Java学习经验
文章目录
-
- 一、MYSQL
-
-
- 1.在MySQL登录时出现Access denied for user 'root'@'localhost' (using password: YES) 拒绝访问,并可修改MySQL密码
- 2.数据库的事务
-
- 1.事务的特性
- 2.并发事务处理问题
- 3.事务的隔离级别
- 3.行锁与表锁
-
- 二、Redis
-
-
- 1.Redis之哨兵模式
- 2.Redis的缓存穿透与雪崩
-
- 1.布隆过滤器
- 2.缓存空对象
-
- 三、MQ 消息中间件
-
-
- MQ之ActiveMQ
-
- 1.安装和下载
- 2. 点对点的消息传递域中,目的地称为队列queue
-
- 1.同步阻塞方式:receive()
- 2.监听方式(MessageListener)
- 3.发布订阅消息传递域,目的地成为主题topic
-
- 四、SpringCloud
-
-
- 1.微服务的基本介绍和组件
- 2.热更新配置
- 3.设置RunDashbord
- 4.服务注册与发现
-
- 1.eureka
- 2.zookeeper
- 3.consul
- 4.eureka、zookeeper、consul区别
- 5.服务调用
-
- 1.Ribbon、LoadBalancer
- 2.Feign、OpenFeign
- 6.服务降级、服务熔断、服务限流
-
- 1.Hystrix
- 7. 服务网关
-
- 1.Gateway
- 8. 服务配置
-
- 1.Sprigcloud Config
- 9. 服务总线
-
- 1.SpringCloud Bus-消息总线
- 2.SpringCloud Stream-消息驱动
- 3.SpringCloud Sleuth-分布式请求链路跟踪
- 10. SpringCloud Alibaba
-
- 1.Nacos服务注册和配置中心
- 2.Sentinel实现熔断和限流
- 3.seata处理分布式事物
- 4.雪花算法:snowflake
-
- 五、Docker
- 六、leetcode刷题资料
一、MYSQL
1.在MySQL登录时出现Access denied for user ‘root’@‘localhost’ (using password: YES) 拒绝访问,并可修改MySQL密码
参考博客:https://blog.csdn.net/qq_36675754/article/details/81381341
分析问题access denied的原因:
- mysql的服务器停止
- 用户的端口号或者IP导致
- mysql的配置文件错误----my.ini等文件
- root用户的密码错误
解决方案:
- 若MySQL已经没有启动,重启MySQL服务器:
net start mysql - 若用户的端口号与IP(
3306/3307)不一致,打开my.ini文件进行编辑。全部将端口编辑替换为: port=X(如:port=3306) - my.ini文件误输入无效内容,不知道到何处。复制替换该文件;有人已经对my.ini文件进行解释以及注释(参考文章:https://blog.csdn.net/lienfeng6/article/details/78140404)
分析问题 using password的原因:
- 密码不输入:using password: NO
- 密码错误:using password: YES
解决方案
- 到安装的MySQL的目录下,找my.ini文件;
- 在**[mysqld]**后添加
skip-grant-tables,使其登录时跳过权限检查; - 重启MySQL服务器;
- 登录mysql,键入
mysql –uroot –p;直接回车(Enter),随便输入密码都可以登录进去 - 执行
set password for 'root'@'localhost'=password('123456');,若报错,输入flush privileges;命令行执行,再执行set password for 'root'@'localhost'=password('123456');就可以成功设置密码了 - 再把my.ini的
skip-grant-tables删除,然后重启MySQL服务器:net stop mysql ;net start mysql;
2.数据库的事务
1.事务的特性
2.并发事务处理问题
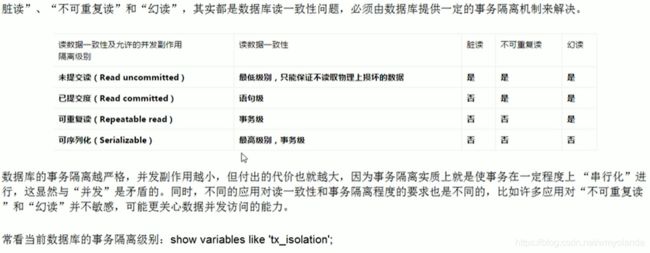
3.事务的隔离级别
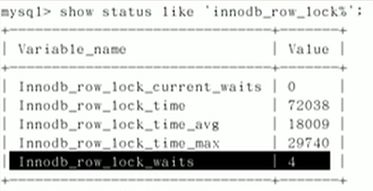
3.行锁与表锁
二、Redis
1.Redis之哨兵模式
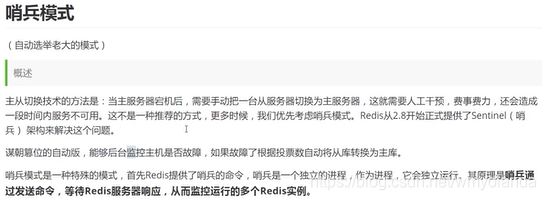


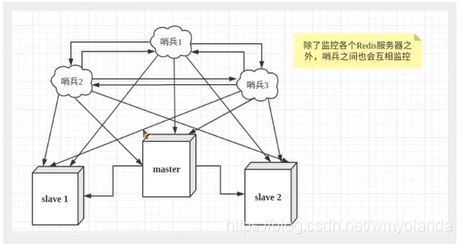

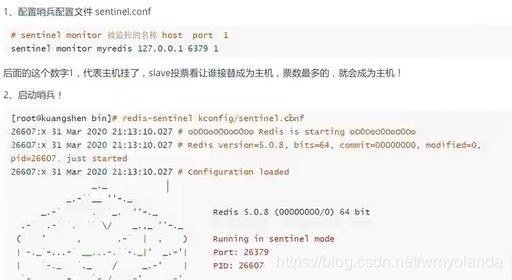

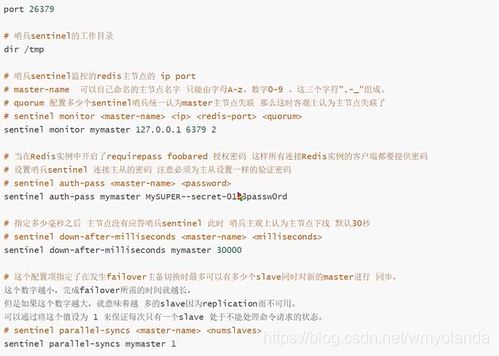
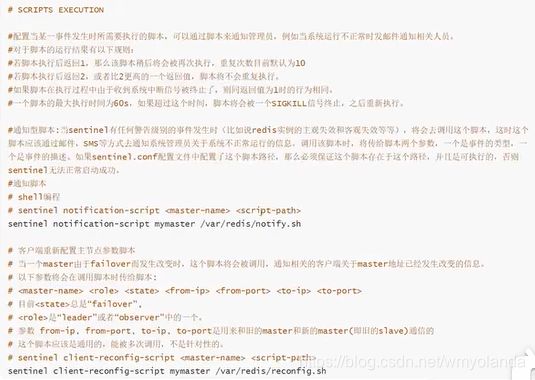
哨兵模式全部配置:如果有哨兵集群,需要配置每个哨兵的端口
Example sentinel.conf

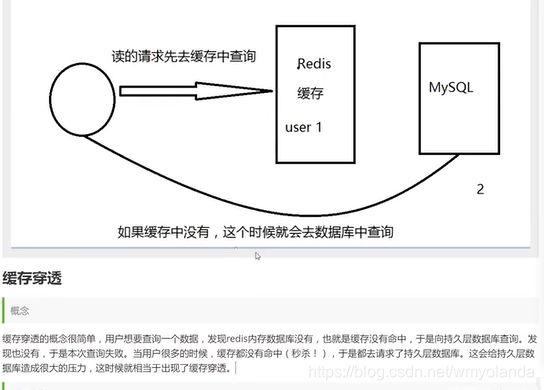
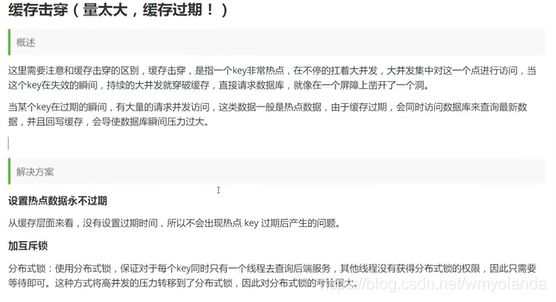
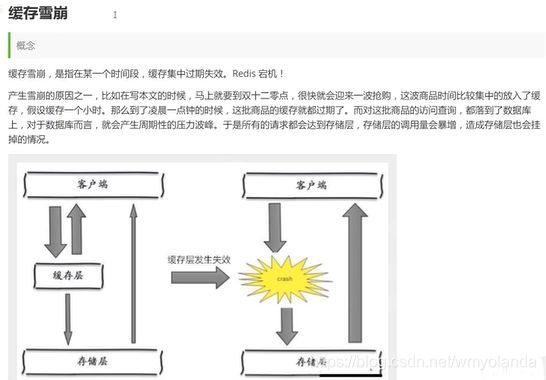
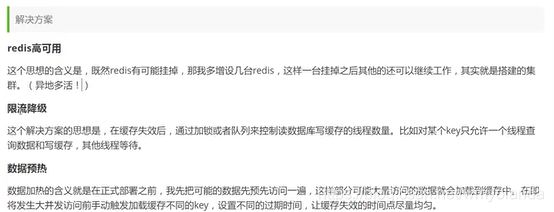
2.Redis的缓存穿透与雪崩
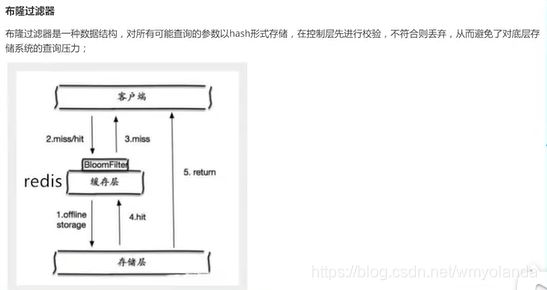
1.布隆过滤器
2.缓存空对象
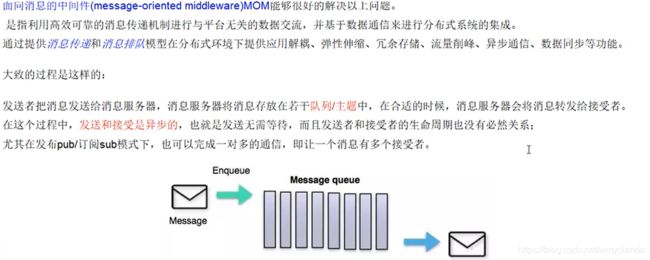
三、MQ 消息中间件
产品种类:
Kafaka、RabbitMQ 、RocketMQ、ActiveMQ
优点:解耦、消峰、异步
包含内容:
1.api发送和接收
2.MQ的高可用性
3.MQ的集群和容错配置
4.MQ的持久化
5.延时发送/定时投递
6.签收机制
7.spring整合


MQ之ActiveMQ
1.安装和下载
1.基于Linux环境的ActiveMQ安装和下载:
http://activemq.apache.org/components/classic/download/
2.官网下载后上传到Linux的/opt目录
3.解压缩:tar -zxvf apache-activemq-5.15.9-bin.tar.gz
4.在根目录下:mkdir /myactiveMQ
5.复制到指定目录:cp -r apache-activemq-5.15.9 /myactiveMQ/
6.普通启动mq:./activemq start/stop
7.activemq的默认进程端口:61616
8.查看后台进程方法:
按activeMQ查询进程:ps -ef|grep activemq|grep -v grep
按端口号查看:netstat -anp|grep 61616
9.带运行日志的启动方式:lsof -i:61616
2. 点对点的消息传递域中,目的地称为队列queue
1.同步阻塞方式:receive()
订阅者或者接收者调用MessageConsumer的receive()方法来接收消息,receive方法能够接收到消息之前(或超时之前)将一直阻塞。

2.监听方式(MessageListener)
System.in.read() 保持服务不灭
JMS:Java Message Service ,java消息服务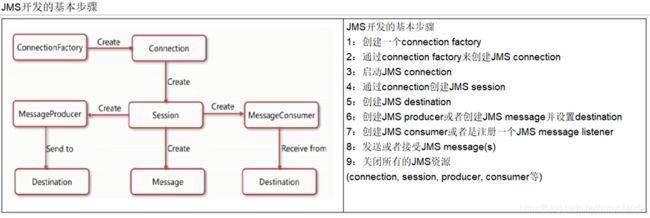
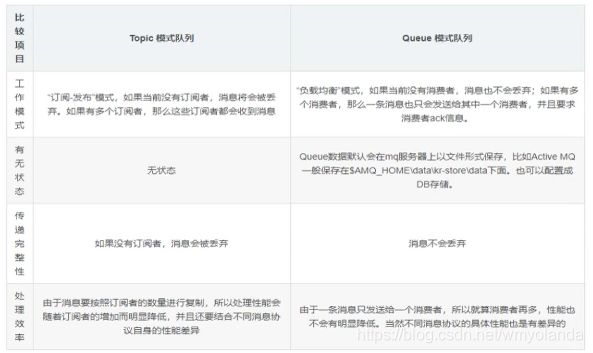
3.发布订阅消息传递域,目的地成为主题topic
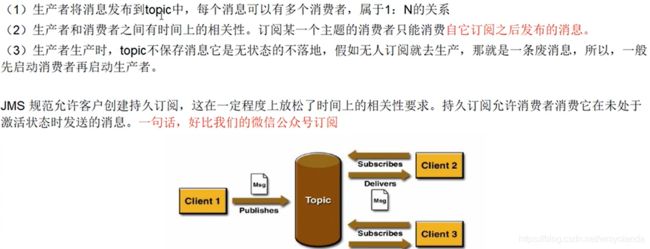
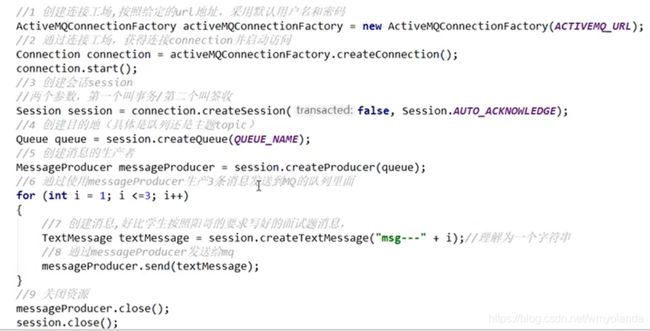
修改消息传递的生产者,将原来的queue改为topic即可:
![]()
四、SpringCloud
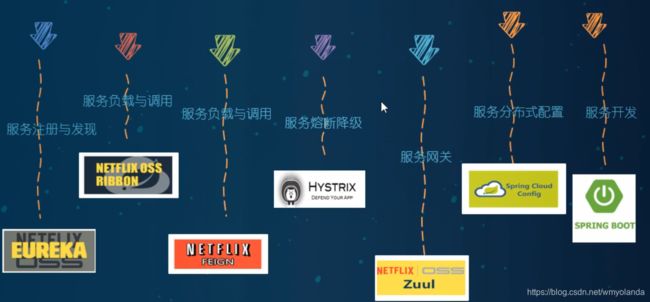
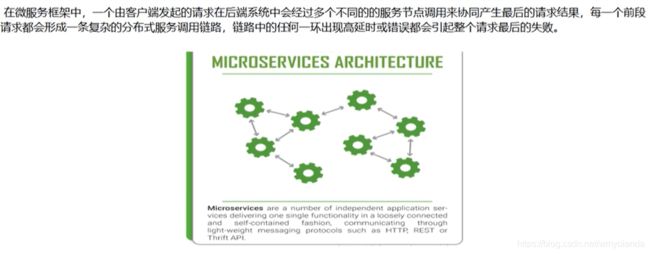
1.微服务的基本介绍和组件
2.热更新配置
建议开发阶段开启,上线部署务必关掉
1.当前子项目的pom.xml里加上依赖
 <!--热部署-->
        <dependency>
            <groupId>org.springframework.boot</groupId>
            <artifactId>spring-boot-devtools</artifactId>
            <scope>runtime</scope>
            <optional>true</optional>
        </dependency>
2.在父项目的pom.xml里加上plugin
 <!--热部署-->
      <plugin>
        <groupId>org.springframework.boot</groupId>
        <artifactId>spring-boot-maven-plugin</artifactId>
        <configuration>
          <fork>true</fork>
          <addResources>true</addResources>
        </configuration>
      </plugin>
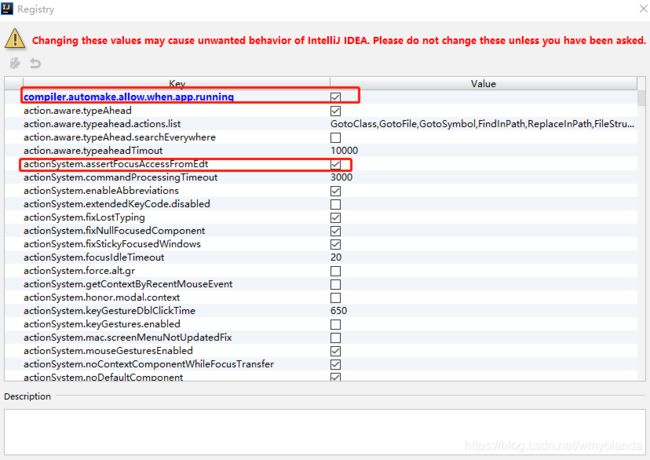
2.配置自动启动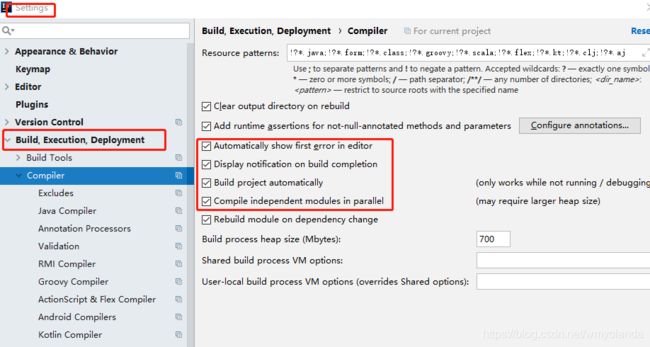
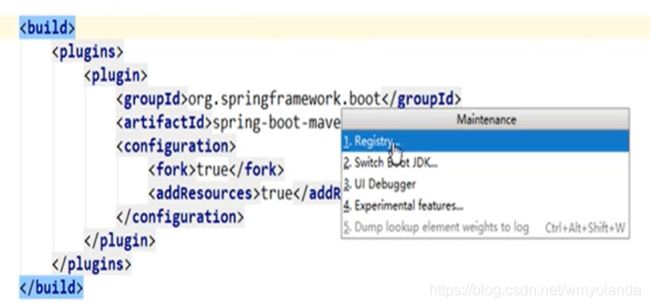
3.将鼠标放在groupId标签上,按快捷键:Ctrl+Alt+Shift+"/",选择Registry,勾上下列选项,完成后重启idea,热更新部署成功。
3.设置RunDashbord
方法一
设置打开Run Dashboard :View–Tool Windows–Run Dashboard
方法二
在工程目录下找.idea文件夹下的workspace.xml,在其中增加如下组件,重启即可
<component name="RunDashboard">
    <option name="configurationTypes">
      <set>
        <option value="SpringBootApplicationConfigurationType" />
      </set>
    </option>
    <option name="ruleStates">
      <list>
        <RuleState>
          <option name="name" value="ConfigurationTypeDashboardGroupingRule" />
        </RuleState>
        <RuleState>
          <option name="name" value="StatusDashboardGroupingRule" />
        </RuleState>
      </list>
    </option>
  </component>
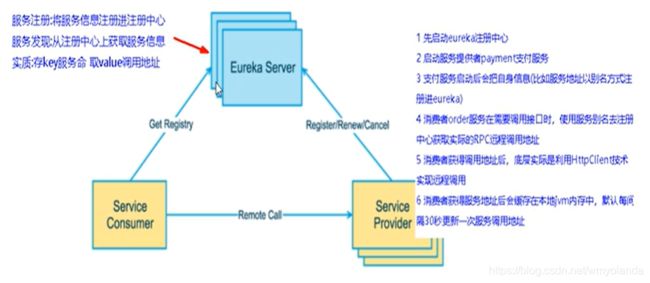
4.服务注册与发现
**集群配置:**在此之前要修改C:\Windows\System32\drivers\etc路径下的hosts文件
######SpringCloud2021#####
127.0.0.1  eureka7001.com
127.0.0.1  eureka7002.com
127.0.0.1  eureka7003.com
![]()
解决Cannot access org.springframework.context.ConfigurableApplicationContext”
参考链接:https://www.cnblogs.com/vwater/p/10369318.html
1.eureka
1.项目依赖:
 <!--eureka client-->
        <dependency>
            <groupId>org.springframework.cloud</groupId>
            <artifactId>spring-cloud-starter-netflix-eureka-client</artifactId>
        </dependency>
2.项目yml配置:
eureka:
  client:
    #表示是否将自己注册进EurekaServer默认为true
    register-with-eureka: true
    #是否从EurekaServer抓取已有的注册消息,默认为true,单节点无所谓,集群必须设置为true才能配合ribbon使用负载均衡
    fetch-registry: true
    service-url:
      #集群版
      defaultZone: http://eureka7001.com:7001/eureka/,http://eureka7002.com:7002/eureka/
      #单机版
#      defaultZone: http://eureka7001.com:7001/eureka/
  instance:
    instance-id: payment8002
    prefer-ip-address: true #访问路径可以显示ip
    #Eureka客户端向服务端发送心跳的实际间隔,单位为秒(默认为30秒)
#    lease-renewal-interval-in-seconds: 1
    #Eureka服务端收到最后一次心跳后等待时间上线,单位为秒(默认为90秒) 超时将剔除服务
#    lease-expiration-duration-in-seconds: 2
2.zookeeper
1.官网下载https://zookeeper.apache.org/releases.html
2.下载安装后,找安装路径下的zoo_sample.cfg文件,复制一份重命名为zoo.cfg

3.在当前路径新建两个空文件夹
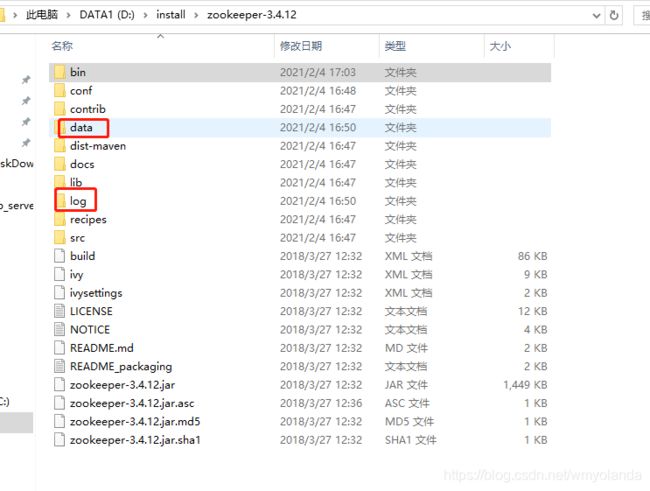
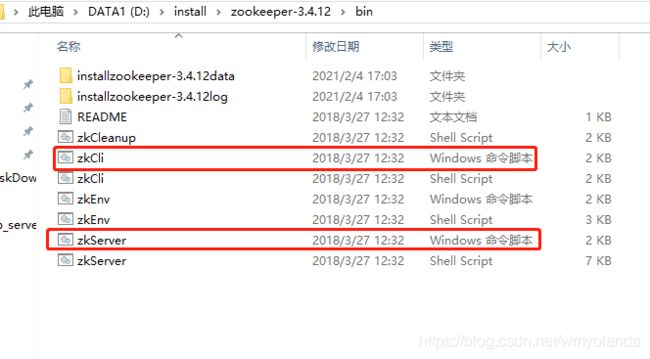
4.点击bin目录下的zkServer,启动zookeeper,点击zkCli可以查看启动是否成功
5.本地项目引入依赖包
 <!--SpringBoot整合Zookeeper客户端-->
        <dependency>
            <groupId>org.springframework.cloud</groupId>
            <artifactId>spring-cloud-starter-zookeeper-discovery</artifactId>
            <exclusions>
                <!--先排除自带的zookeeper3.5.3-->
                <exclusion>
                    <groupId>org.apache.zookeeper</groupId>
                    <artifactId>zookeeper</artifactId>
                </exclusion>
            </exclusions>
        </dependency>
        <!--添加zookeeper3.4.14版本-->
        <dependency>
            <groupId>org.apache.zookeeper</groupId>
            <artifactId>zookeeper</artifactId>
            <version>3.4.14</version>
        </dependency>
6.本地项目配置,默认端口号2181
#服务别名 --- 注册zookeeper到注册中心名称
spring:
  application:
    name: cloud-consumer-order
  cloud:
    zookeeper:
      connect-string: 127.0.0.1:2181
3.consul
1.官网下载https://www.consul.io/downloads,并在系统环境path配置consul.exe的路径
2.开发启动: consul agent -dev
3.本地项目导入依赖包
 <dependency>
            <groupId>org.springframework.cloud</groupId>
            <artifactId>spring-cloud-starter-consul-discovery</artifactId>
 </dependency>
4.本地项目yml配置
spring:
  application:
    name: consul-provider-payment
#consul注册中心地址
  cloud:
    consul:
      host: localhost
      port: 8500
      discovery:
        service-name: ${spring.application.name}
5.启动本地项目:访问localhost:8500
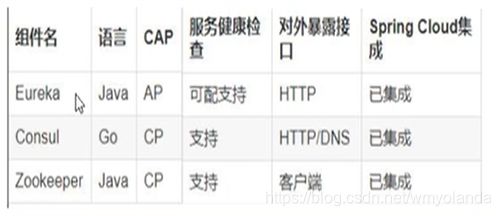
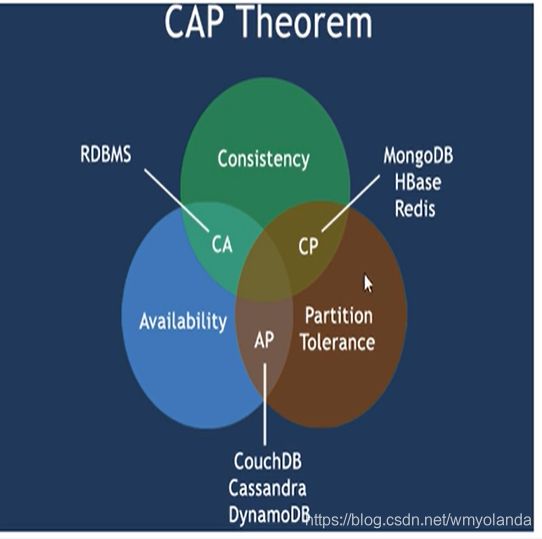
4.eureka、zookeeper、consul区别
5.服务调用
1.Ribbon、LoadBalancer

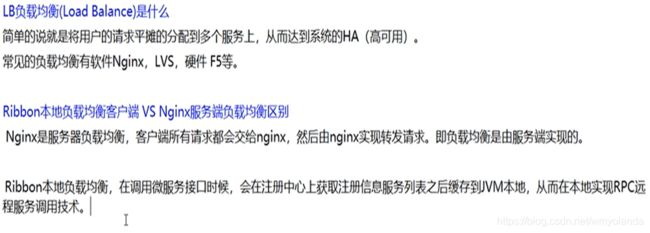
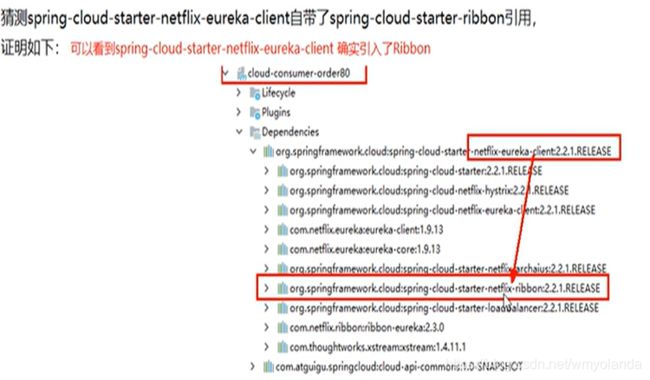
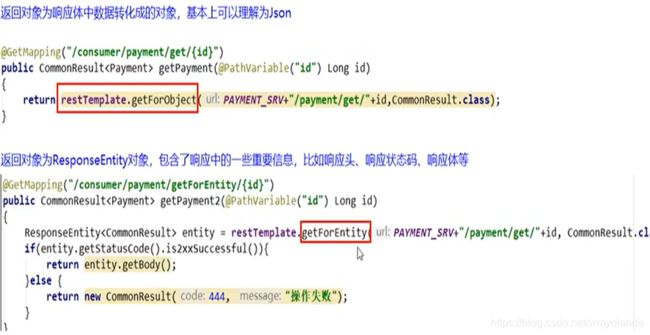
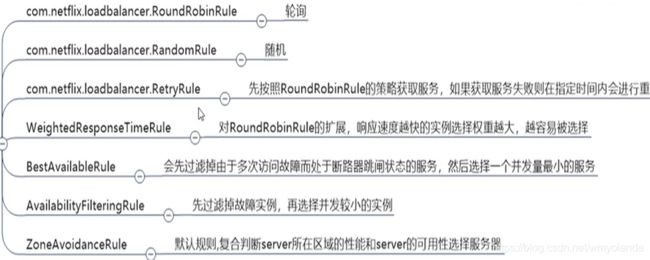
Ribbon自带的负载均衡算法:
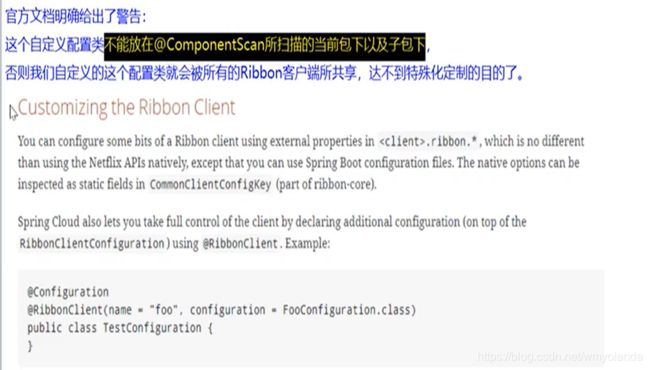
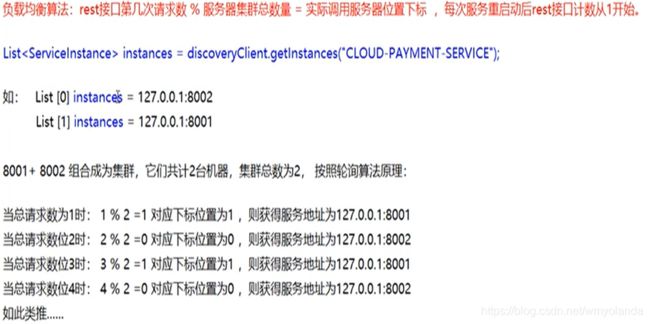
自定义负载均衡:
方法一:新建类采用Bean注入,自定义Ribbon的负载均衡算法(Ribbon自带)

方法二:重写接口实现自定义负载均衡
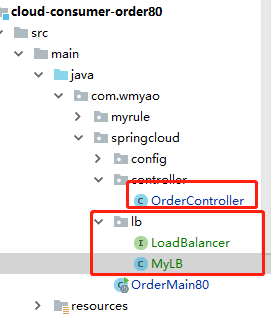
1.新建lb文件夹,新建LoadBalancer接口和实现接口的类MyLB
2.定义LoadBalancer接口:
import org.springframework.cloud.client.ServiceInstance;

import java.util.List;

public interface LoadBalancer {
    ServiceInstance instance(List<ServiceInstance> serviceInstances);
}
3.实现接口的类MyLB:
import org.springframework.cloud.client.ServiceInstance;
import org.springframework.stereotype.Component;

import java.util.List;
import java.util.concurrent.atomic.AtomicInteger;

/**
 * 自定义负载均衡
 */
@Component
public class MyLB implements LoadBalancer {
    private AtomicInteger atomicInteger=new AtomicInteger(0);
    public final int getAndIncrement(){
        int current;
        int next;
        do{
            current=this.atomicInteger.get();
            next=current>=2147483647?0:current+1;
        }while(!this.atomicInteger.compareAndSet(current,next));
        System.out.println("****访问次数next:"+next);
        return next;
    }
    @Override
    public ServiceInstance instance(List<ServiceInstance> serviceInstances) {
        //下标=访问次数%可以访问的服务器个数
        int index=getAndIncrement()%serviceInstances.size();
        return serviceInstances.get(index);
    }
}
4.Controller层的调用
    @GetMapping(value="/consumer/payment/lb")
    public String getPaymentLB(){
        List<ServiceInstance> instances=discoveryClient.getInstances("CLOUD-PAYMENT-SERVICE");
        if (instances==null||instances.size()<=0){
            return null;
        }
        ServiceInstance serviceInstance=loadBalancer.instance(instances);
        URI uri=serviceInstance.getUri();
        return restTemplate.getForObject(uri+"/payment/lb",String.class);
    }
注意:方法一需要开启RibbonClient注解,采用方法二需要关闭

2.Feign、OpenFeign

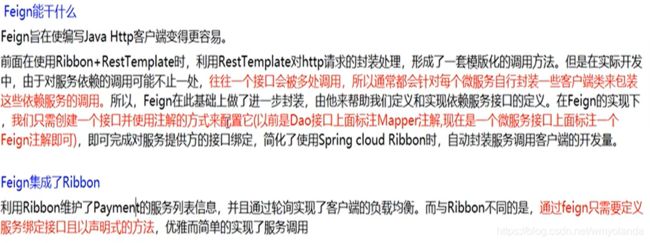

接口+@FeignClient注解实现Feign的服务调用,自带负载均衡
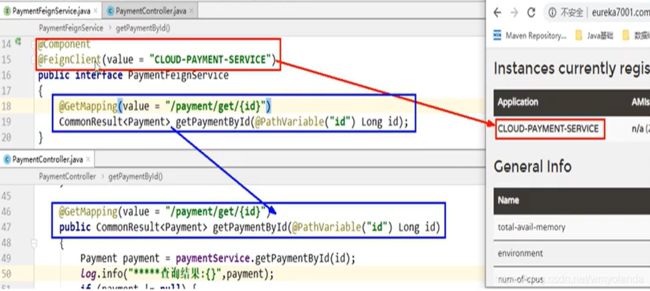
启动类加上注解:@EnableFeignClients
yml配置:
server:
  port: 80

#这里只把feign做客户端用,不注册进eureka
eureka:
  client:
    #表示是否将自己注册进EurekaServer默认为true
    register-with-eureka: false
    service-url:
      #defaultZone: http://localhost:7001/eureka
      defaultZone: http://eureka7001.com:7001/eureka/,http://eureka7002.com:7002/eureka/
feign的超时配置
消费端Controller:
@GetMapping(value = "/consumer/payment/feign/timeout")
    public String paymentFeignTimeout() {
        //openfeign-ribbon 客户端默认等待1S
        return  paymentFeignService.paymentFeignTimeout();
    }
提供者Controller:
  @GetMapping(value = "/payment/feign/timeout")
    public String paymentFeignTimeout() {
        try {
            TimeUnit.SECONDS.sleep(3);
        } catch (Exception e){
            e.printStackTrace();
        } finally {
            return serverPort;
        }
    }
yml配置:
#设置feign客户端超时时间(OpenFeign默认支持ribbon)
ribbon:
  #指的是建立连接所用的时间,适用于网络状况正常的情况下,两端连接所用的实际
  ReadTimeout: 5000
  #指的是建立连接后从服务器读取到可用资源所用的时间
  ConnectTimeout: 5000
feign的增强日志
import feign.Logger;
import org.springframework.context.annotation.Bean;
import org.springframework.context.annotation.Configuration;

@Configuration
public class FeignConfig {
    @Bean
    Logger.Level feignLoggerLevel() {
        return Logger.Level.FULL;
    }
}
yml配置:
logging:
  level:
    #feign日志以什么级别监控那个接口
    com.wmyao.springcloud.service.PaymentFeignService: debug
6.服务降级、服务熔断、服务限流
| 类型 | 概念 |
|---|---|
| 服务降级 | 服务器忙,请稍后再试,不让客户端等待并立刻返回一个友好提示,fallback ,发生情况:程序运行异常;超时;服务熔断触发服务降级;线程池、信号量打满也会导致服务降级 |
| 服务熔断 | 类比保险丝达到最大服务访问后,直接拒绝访问,拉闸限电,然后调用服务降级的方法并返回友好提示break |
| 服务限流 | 秒杀高并发等操作,严禁一窝蜂的过来拥挤,大家排队,一秒钟N个,有序进行flowlimit |
1.Hystrix
@HystrixCommand(fallbackMethod = "paymentInfo_TimeOutHandler",commandProperties = {
            @HystrixProperty(name = "execution.isolation.thread.timeoutInMilliseconds",value = "5000")})
    public  String paymentInfo_TimeOut(Integer id){
//        int age=10/0;
        int time=3;
        try {
            TimeUnit.SECONDS.sleep(time);
        } catch (InterruptedException e) {
            e.printStackTrace();
        }
        return "线程池:"+Thread.currentThread().getName()+"payemntInfo_TimeOut,id="+id+",耗时:"+time+"s";
    }

    public  String paymentInfo_TimeOutHandler(Integer id){
        return "线程池:"+Thread.currentThread().getName()+"payemntInfo_TimeOut,系统繁忙,请稍后再试,id="+id+",采用了服务降级配置@HystrixCommand";

    }
消费者启动类注解:@EnableHystrix
消费者yml文件配置:
#服务降级配置
feign:
  hystrix:
    enabled: true
提供者启动类注解:@EnableCircuitBreaker
一般常见异常:运行时异常、超时异常、宕机
服务降级的全局配置和自定义配置:@DefaultProperties(defaultFallback = "自定义方法名")


服务熔断:在服务降级的基础上,添加熔断的条件
服务降级–进而熔断–恢复调用链路
熔断类型:open - close- half open
![]()
 // 服务熔断
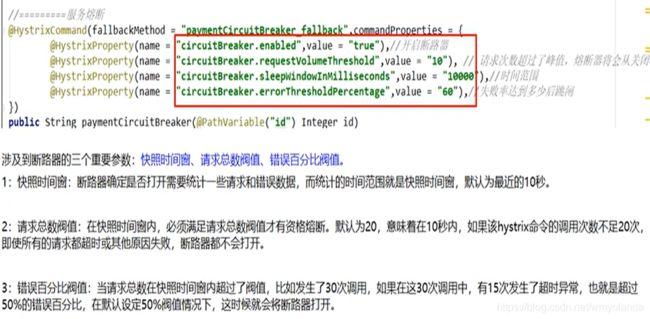
    @HystrixCommand(fallbackMethod = "paymentCircuitBreaker_fallback",commandProperties = {
            @HystrixProperty(name = "circuitBreaker.enabled", value = "true"),              //是否开启断路器
            @HystrixProperty(name = "circuitBreaker.requestVolumeThreshold", value = "10"),    //请求数达到后才计算
            @HystrixProperty(name = "circuitBreaker.sleepWindowInMilliseconds", value = "10000"), //休眠时间窗
            @HystrixProperty(name = "circuitBreaker.errorThresholdPercentage", value = "60"),  //错误率达到多少跳闸
    })
    public String paymentCircuitBreaker(@PathVariable("id") Integer id) {
        if(id < 0){
            throw  new RuntimeException("****id 不能为负数");
        }
        String serialNumber = IdUtil.simpleUUID();
        return  Thread.currentThread().getName() + "\t" + "调用成功,流水号:" + serialNumber;
    }

    public String paymentCircuitBreaker_fallback(@PathVariable("id") Integer id){
        return "id 不能为负数,请稍后再试, o(╥﹏╥)o id: " + id;
    }

实时的调用监控:

启动类注解:@EnableHystrixDashboard
pom依赖:
<dependency>
        <groupId>org.springframework.cloud</groupId>
        <artifactId>spring-cloud-starter-netflix-hystrix-dashboard</artifactId>
 </dependency>
 <!--监控-->
<dependency>
        <groupId>org.springframework.boot</groupId>
 		<artifactId>spring-boot-starter-actuator</artifactId>
 </dependency>
 <dependency>
        <groupId>org.springframework.cloud</groupId>
        <artifactId>spring-cloud-starter-netflix-hystrix</artifactId>
</dependency>
 <dependency>
            <groupId>org.springframework.boot</groupId>
            <artifactId>spring-boot-starter-web</artifactId>
</dependency>
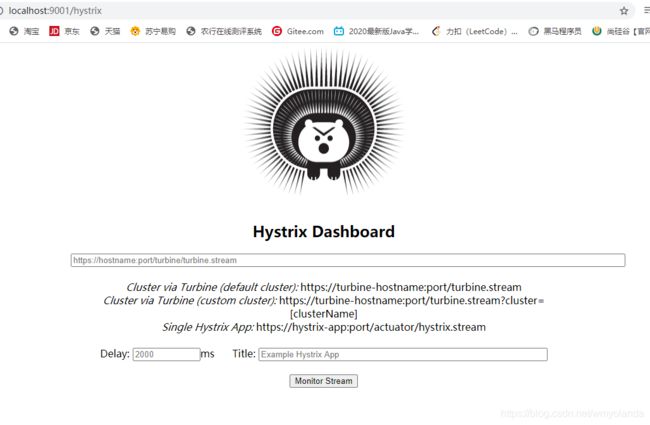
项目启动后访问地址,效果如下,监控配置成功:http://localhost:9001/hystrix
7. 服务网关
1.Gateway
    @Bean
    public RouteLocator customRouteLocator(RouteLocatorBuilder builder) {
        RouteLocatorBuilder.Builder routes = builder.routes();
        routes.route("path_route_wmyao",
                r -> r.path("/guonei")
                        .uri("http://news.baidu.com/guonei")).build();
        return routes.build();
    }
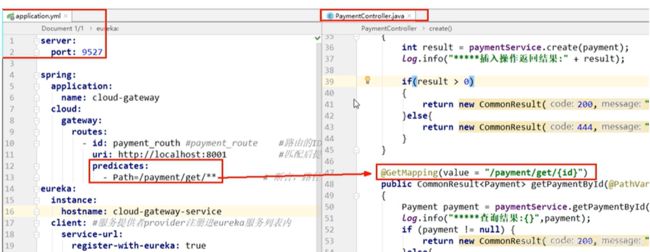
2.yml文件配置:
spring:
  application:
    name: cloud-gateway
  cloud:
    gateway:
      #动态路由配置
      discovery:
        locator:
          enabled: true # 开启从注册中心动态创建路由的功能,利用微服务名称进行路由
      routes:
        - id: payment_route # 路由的id,没有规定规则但要求唯一,建议配合服务名
          #匹配后提供服务的路由地址
          uri: lb://cloud-payment-service #动态路由配置
          predicates:
            - Path=/payment/get/**
        - id: payment_route2
          uri: lb://cloud-payment-service  #动态路由配置
          predicates:
         	- Path=/payment/lb/**
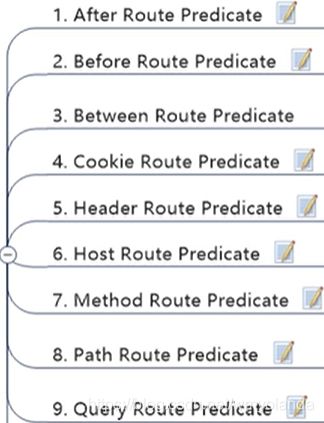
Predicate断言:
 - id: payment_route2
          uri: lb://cloud-payment-service  #动态路由配置
          predicates:
            - Path=/payment/lb/** #断言,路径相匹配的进行路由
            - After=2021-02-08T15:34:16.416+08:00[Asia/Shanghai] #断言,在这个时间之后的网关才可以访问
        	- Cookie=username,wmyao   #带Cookie,并且username的值为wmyao
        	- Header=X-Request-Id,\d+ #请求头要有 X-Request-Id属性并且值为整数的正则表达式
常见发送请求的方式:Jmeter、Postman、curl命令
Predicate断言加上- Cookie=username,wmyao 后,采用curl命令发送携带Cookie的请求:curl http://localhost:9527/payment/lb --cookie "username=wmyao"
效果如下:

Predicate断言加上- Header=X-Request-Id,\d+后,采用curl命令发送携带Cookie的请求:curl http://localhost:9527/payment/lb -H "X-Request-Id:123"

filter过滤:

自定义过滤器:
配置一个filter类,实现GlobalFilter接口和Ordered接口(如下为一个全局过滤器)
import lombok.extern.slf4j.Slf4j;
import org.springframework.cloud.gateway.filter.GatewayFilterChain;
import org.springframework.cloud.gateway.filter.GlobalFilter;
import org.springframework.core.Ordered;
import org.springframework.http.HttpStatus;
import org.springframework.stereotype.Component;
import org.springframework.web.server.ServerWebExchange;
import reactor.core.publisher.Mono;

import java.util.Date;

@Component
@Slf4j
public class MyLogGatewayFilter implements GlobalFilter, Ordered {
    @Override
    public Mono< Void > filter(ServerWebExchange exchange, GatewayFilterChain chain) {
        log.info("****** come in MyLogGateWayFilter: " + new Date());

        String uname = exchange.getRequest().getQueryParams().getFirst("uname");
        if(uname == null) {
            log.info("*****用户名为null,非法用户,o(╥﹏╥)o");
            exchange.getResponse().setStatusCode(HttpStatus.NOT_ACCEPTABLE);
            return exchange.getResponse().setComplete();
        }
        return chain.filter(exchange);
    }

    /**
     * 加载过滤器的顺序,数字越小,优先级越高
     * @return
     */
    @Override
    public int getOrder() {
        return 0;
    }
}
请求验证:http://localhost:9527/payment/lb?uname=1
8. 服务配置
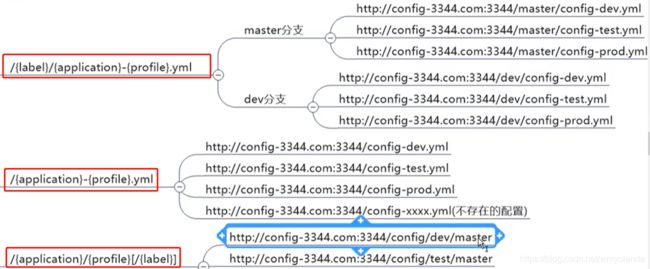
1.Sprigcloud Config
 <!--config server-->
        <dependency>
            <groupId>org.springframework.cloud</groupId>
            <artifactId>spring-cloud-config-server</artifactId>
        </dependency>
yml文件配置:
server:
  port: 3344

spring:
  application:
    name: cloud-config-center
  cloud:
    config:
      server:
        git:
       	  #Github上的git仓库名字
          uri: https://gitee.com/wm-yao/springcloud-config.git
          ##搜索目录.这个目录指的是github上的目录
          search-paths:
            - springcloud-config
          username: 账号
          password: 密码
      ##读取分支
      label: master
eureka:
  client:
    service-url:
      defaultZone: http://eureka7001.com:7001/eureka/
config手动动态刷新:
controller类加上注解:@RefreshScope //动态刷新配置
yml文件配置:
#暴露监控端点
management:
  endpoints:
    web:
      exposure:
        include: "*"
手动发送post请求:curl -X POST "http://localhost:3355/actuator/refresh"
再访问即可:http://localhost:3355/configInfo
9. 服务总线
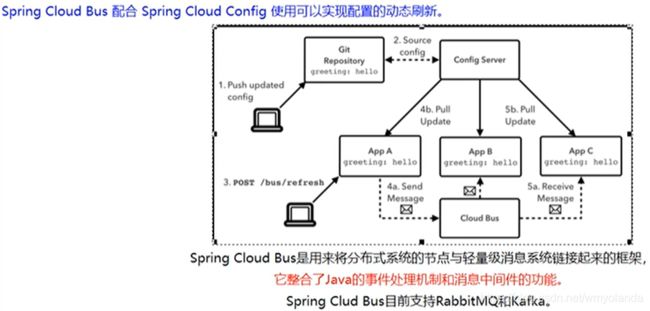
1.SpringCloud Bus-消息总线
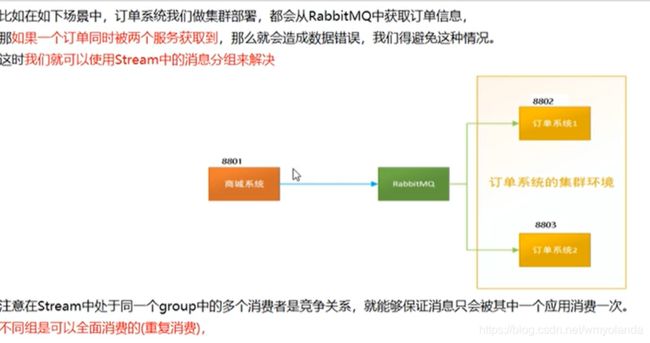
2.SpringCloud Stream-消息驱动


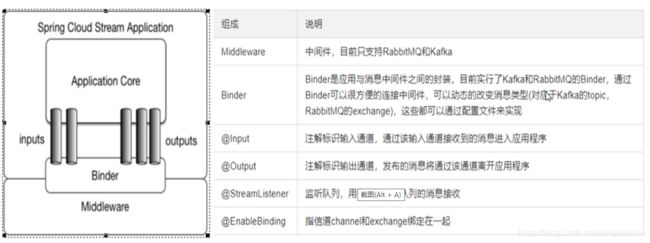
rabbitMQ 的安装目录/sbin下执行cmd:rabbitmq-plugins enable rabbitmq_management
访问地址:localhost:15672
账号/密码: guest/guest
更改git仓库里的配置文件提交,手动发送post请求:curl -X POST "http://localhost:3344/actuator/bus-refresh"
binder: defaultRabbit #设置要绑定的消息服务的具体设置
group: shenzhen
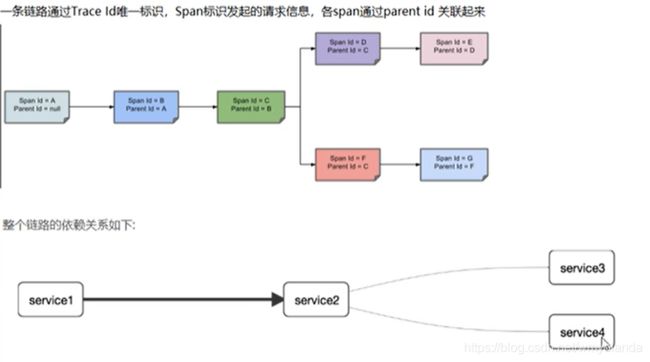
3.SpringCloud Sleuth-分布式请求链路跟踪
10. SpringCloud Alibaba
1.Nacos服务注册和配置中心
服务注册:


默认账号密码:nacos/nacos
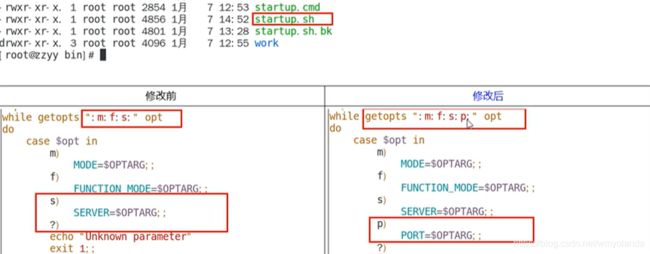
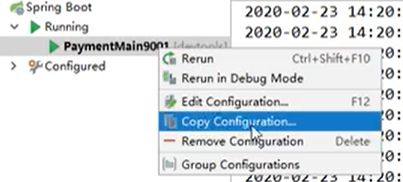
快速建立多个服务方式:复制configuration,配置端口参数如下


配置中心:

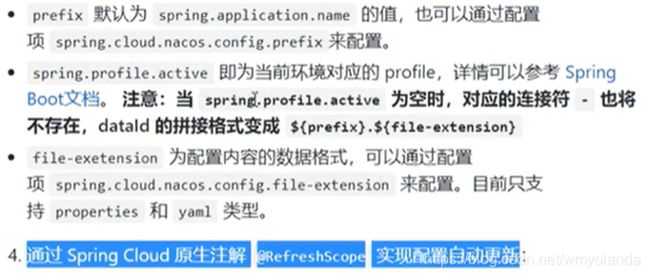

Nacos的集群和持久化配置:


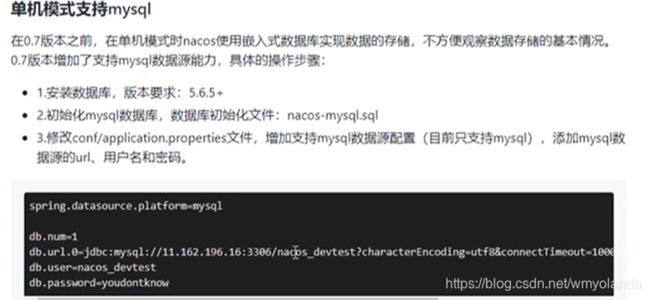
本地新建数据库nacos_config,导入sql文件:D:\install\nacos\conf\nacos-mysql.sql
#########################nacos的持久化:切换mysql数据库配置###############################
spring.datasource.platform=mysql
db.num=1
db.url.0=jdbc:mysql://127.0.0.1:3306/nacos_config?characterEncoding=UTF-8&connectTimeout=1000&socketTimeout=3000&autoReconnect=true
db.user=root
db.password=123456
2.Sentinel实现熔断和限流
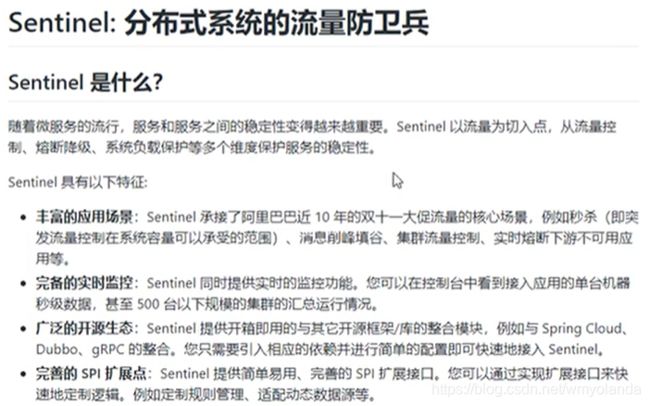
sentinel下载运行后,访问地址:http://localhost:8080/
账号密码:sentinel/sentinel
sentinel流控:
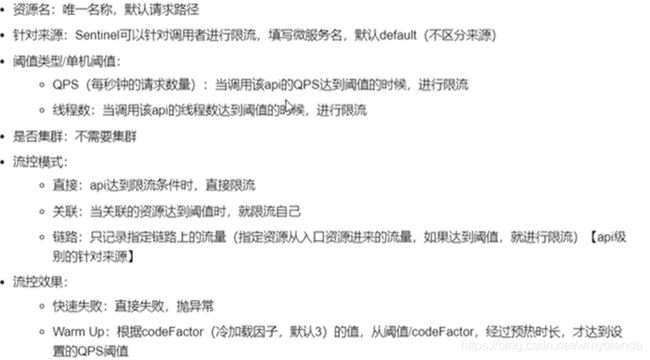
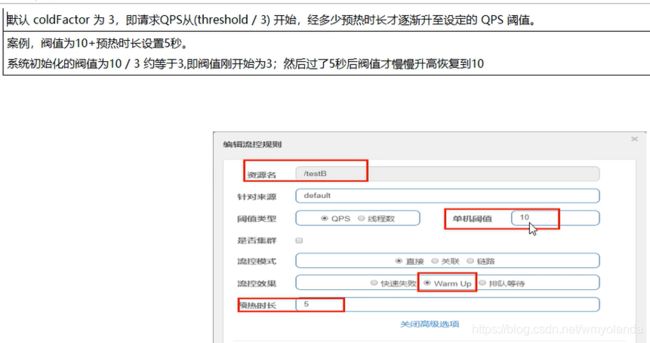
直接、快速失败:(默认流控处理)

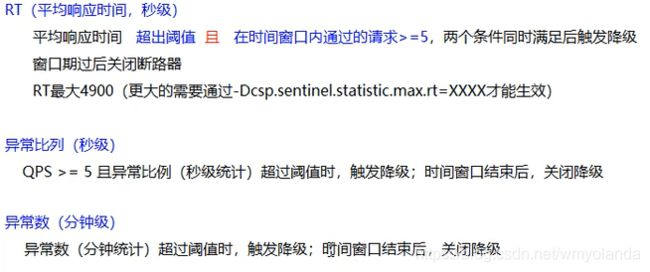


热点参数限流:
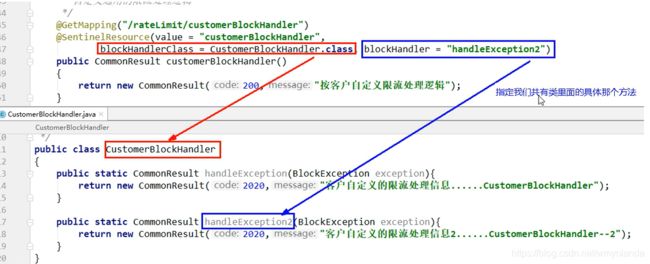
类似于@HystrixCommand的注解:@SentinelResource

兜底方法:
  @GetMapping("/testHotKey")
    @SentinelResource(value = "testHotKey",blockHandler = "deal_testHotKey")
    public String testHotKey(@RequestParam(value = "p1",required = false)String p1,
                             @RequestParam(value = "p2",required = false)String p2) {
        return "----testHotKey";
    }

    public String deal_testHotKey(String p1, String p2, BlockException exception) {
        return "----deal_testHotKey, o(╥﹏╥)o"; // sentinel的默认提示都是: Blocked by Sentinel (flow limiting)
    }
fallback管Java运行时异常,blockHandler管sentinel的配置违规处理:
@SentinelResource(value = "fallback",fallback ="handlerFallback",blockHandler = "blockHandler")
两者都满足条件时,blockHandler要优于fallback
Sentinel的持久化规则:
[
    {
        "resource":"/rateLimit/byUrl",资源名称
        "limitApp":"default",来源应用
        "grade":1,阈值类型,0表示线程数,1表示QPS
        "count":1,单机阈值
        "strategy":0,流控模式:0表示直接,1表示关联,2表示链路
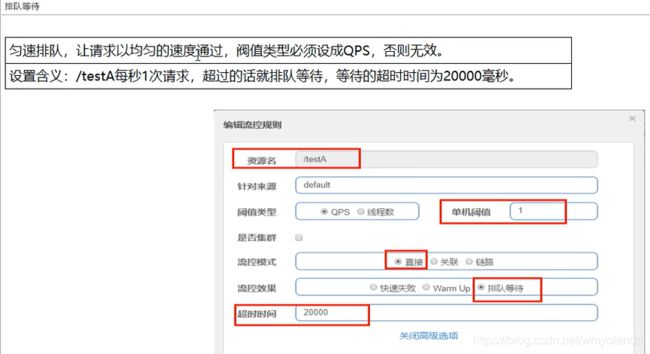
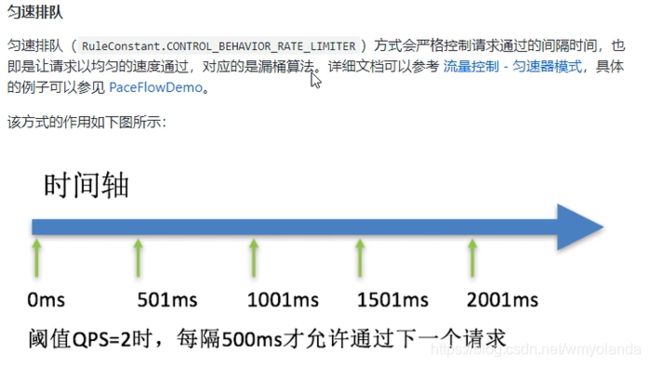
        "controlBehavior":0,流控效果,0表示快速失败,1表示Warm Up,2表示排队等候
        "clusterMode":false 是否集群
    }
]
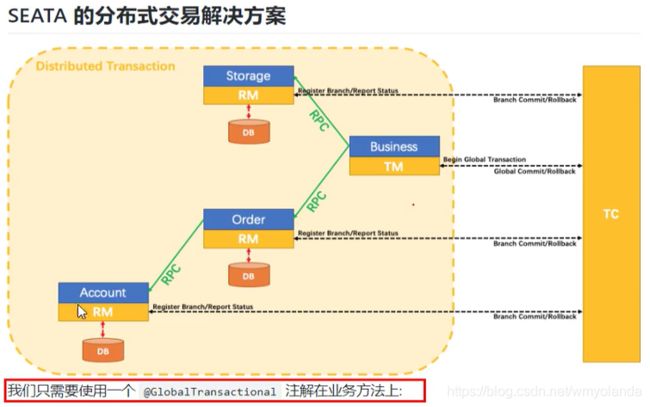
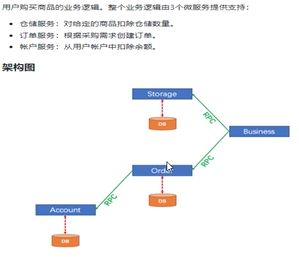
3.seata处理分布式事物
官方文档:http://seata.io/zh-cn/

![]()
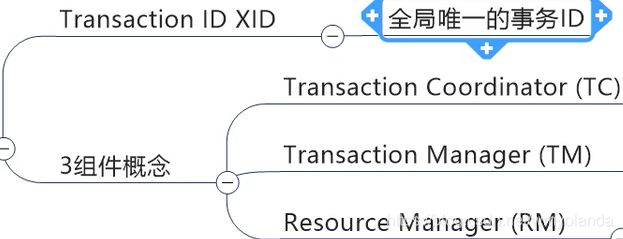
Transaction ID+三组件模型:
seata业务数据库建表语句:
CREATE DATABASE seata;
CREATE TABLE IF NOT EXISTS `global_table`
(
    `xid`                       VARCHAR(128) NOT NULL,
    `transaction_id`            BIGINT,
    `status`                    TINYINT      NOT NULL,
    `application_id`            VARCHAR(32),
    `transaction_service_group` VARCHAR(32),
    `transaction_name`          VARCHAR(128),
    `timeout`                   INT,
    `begin_time`                BIGINT,
    `application_data`          VARCHAR(2000),
    `gmt_create`                DATETIME,
    `gmt_modified`              DATETIME,
    PRIMARY KEY (`xid`),
    KEY `idx_gmt_modified_status` (`gmt_modified`, `status`),
    KEY `idx_transaction_id` (`transaction_id`)
) ENGINE = InnoDB
  DEFAULT CHARSET = utf8;

-- the table to store BranchSession data
CREATE TABLE IF NOT EXISTS `branch_table`
(
    `branch_id`         BIGINT       NOT NULL,
    `xid`               VARCHAR(128) NOT NULL,
    `transaction_id`    BIGINT,
    `resource_group_id` VARCHAR(32),
    `resource_id`       VARCHAR(256),
    `branch_type`       VARCHAR(8),
    `status`            TINYINT,
    `client_id`         VARCHAR(64),
    `application_data`  VARCHAR(2000),
    `gmt_create`        DATETIME(6),
    `gmt_modified`      DATETIME(6),
    PRIMARY KEY (`branch_id`),
    KEY `idx_xid` (`xid`)
) ENGINE = InnoDB
  DEFAULT CHARSET = utf8;

-- the table to store lock data
CREATE TABLE IF NOT EXISTS `lock_table`
(
    `row_key`        VARCHAR(128) NOT NULL,
    `xid`            VARCHAR(96),
    `transaction_id` BIGINT,
    `branch_id`      BIGINT       NOT NULL,
    `resource_id`    VARCHAR(256),
    `table_name`     VARCHAR(32),
    `pk`             VARCHAR(36),
    `gmt_create`     DATETIME,
    `gmt_modified`   DATETIME,
    PRIMARY KEY (`row_key`),
    KEY `idx_branch_id` (`branch_id`)
) ENGINE = InnoDB
  DEFAULT CHARSET = utf8;
Seata案例建表语句(订单、库存、账户):
CREATE DATABASE seata_account;
USE seata_account;
CREATE TABLE t_account(
    id BIGINT(11) NOT NULL AUTO_INCREMENT PRIMARY KEY ,
    user_id BIGINT(11) DEFAULT NULL COMMENT '用户id',
    total DECIMAL(10,0) DEFAULT NULL COMMENT '总额度',
    used DECIMAL(10,0) DEFAULT NULL COMMENT '已用额度',
    residue DECIMAL(10,0) DEFAULT 0 COMMENT '剩余可用额度'
)ENGINE=InnoDB AUTO_INCREMENT=7 CHARSET=utf8;
INSERT INTO t_account(id, user_id, total, used, residue) VALUES(1,1,1000,0,1000);

CREATE DATABASE seata_storage;
USE seata_storage;
CREATE TABLE t_storage(
    id BIGINT(11) NOT NULL AUTO_INCREMENT PRIMARY KEY ,
    product_id BIGINT(11) DEFAULT NULL COMMENT '产品id',
    total INT(11) DEFAULT NULL COMMENT '总库存',
    used INT(11) DEFAULT NULL COMMENT '已用库存',
    residue INT(11) DEFAULT NULL COMMENT '剩余库存'
)ENGINE=InnoDB AUTO_INCREMENT=7 CHARSET=utf8;
INSERT INTO t_storage(id, product_id, total, used, residue) VALUES(1,1,100,0,100);

CREATE DATABASE seata_order;
USE seata_order;
CREATE TABLE t_order(
    id BIGINT(11) NOT NULL AUTO_INCREMENT PRIMARY KEY ,
    user_id BIGINT(11) DEFAULT NULL COMMENT '用户id',
    product_id BIGINT(11) DEFAULT NULL COMMENT '产品id',
    count INT(11) DEFAULT NULL COMMENT '数量',
    money DECIMAL(11,0) DEFAULT NULL COMMENT '金额',
    status INT(1) DEFAULT NULL COMMENT '订单状态:0创建中,1已完结'
)ENGINE=InnoDB AUTO_INCREMENT=7 CHARSET=utf8;
在三个库下分别建立回滚日志表
CREATE TABLE `undo_log` (
  `id` bigint(20) NOT NULL AUTO_INCREMENT,
  `branch_id` bigint(20) NOT NULL,
  `xid` varchar(100) NOT NULL,
  `context` varchar(128) NOT NULL,
  `rollback_info` longblob NOT NULL,
  `log_status` int(11) NOT NULL,
  `log_created` datetime NOT NULL,
  `log_modified` datetime NOT NULL,
  `ext` varchar(100) DEFAULT NULL,
  PRIMARY KEY (`id`),
  UNIQUE KEY `ux_undo_log` (`xid`,`branch_id`)
) ENGINE=InnoDB AUTO_INCREMENT=1 DEFAULT CHARSET=utf8;
配置全局的事务:@GlobalTransactional(name = "fsp-create-order",rollbackFor = Exception.class)
TC、TM、RM三大组件:
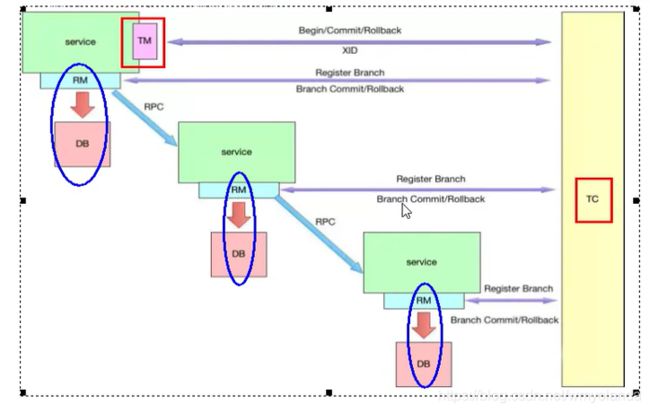

事务的执行流程:

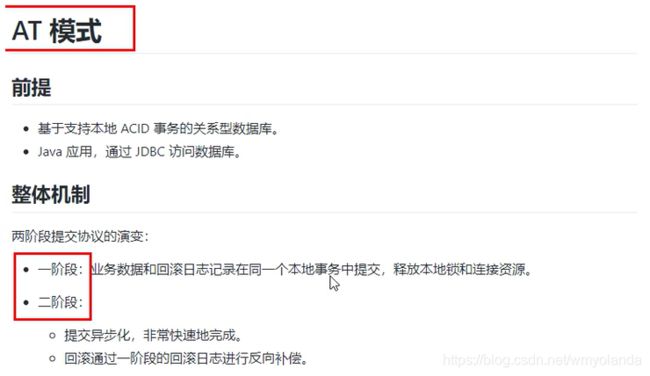

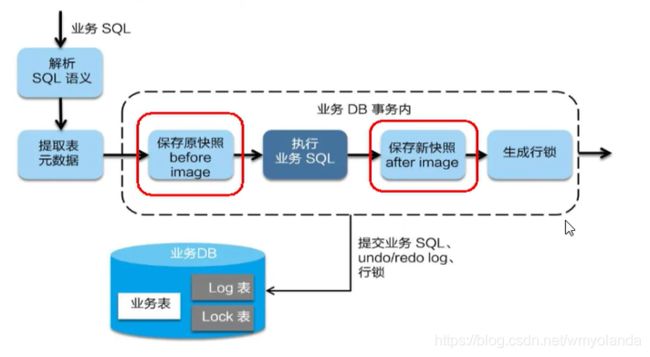


4.雪花算法:snowflake
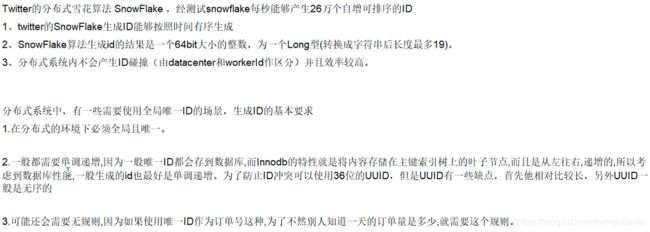
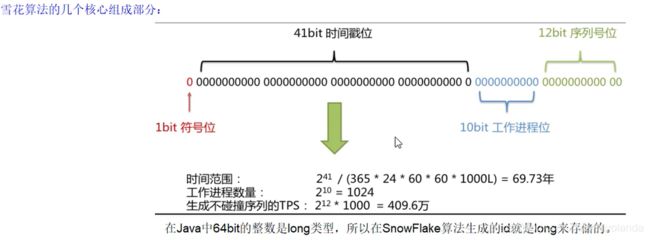


hutool工具:https://github.com/looly/hutool
五、Docker
Docker:解决了运行环境和配置问题软件容器,方便做持续集成并有助于集体发布的容器虚拟化技术。
Docker 的Windows 版本下载安装:https://www.runoob.com/docker/windows-docker-install.html


attach Attach to a running container # 当前 shell 下 attach 连接指定运行镜像
build Build an image from a Dockerfile # 通过 Dockerfile 定制镜像
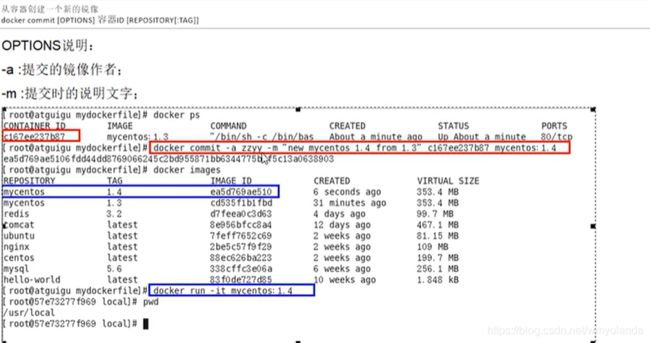
commit Create a new image from a container changes # 提交当前容器为新的镜像
cp Copy files/folders from the containers filesystem to the host path #从容器中拷贝指定文件或者目录到宿主机中
create Create a new container # 创建一个新的容器,同 run,但不启动容器
diff Inspect changes on a container’s filesystem # 查看 docker 容器变化
events Get real time events from the server # 从 docker 服务获取容器实时事件
exec Run a command in an existing container # 在已存在的容器上运行命令
export Stream the contents of a container as a tar archive # 导出容器的内容流作为一个 tar 归档文件[对应 import ]
history Show the history of an image # 展示一个镜像形成历史
images List images # 列出系统当前镜像
import Create a new filesystem image from the contents of a tarball # 从tar包中的内容创建一个新的文件系统映像[对应export]
info Display system-wide information # 显示系统相关信息
inspect Return low-level information on a container # 查看容器详细信息
kill Kill a running container # kill 指定 docker 容器
load Load an image from a tar archive # 从一个 tar 包中加载一个镜像[对应 save]
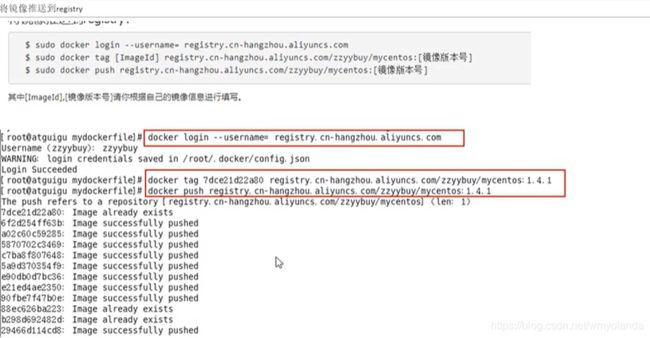
login Register or Login to the docker registry server # 注册或者登陆一个 docker 源服务器
logout Log out from a Docker registry server # 从当前 Docker registry 退出
logs Fetch the logs of a container # 输出当前容器日志信息
port Lookup the public-facing port which is NAT-ed to PRIVATE_PORT # 查看映射端口对应的容器内部源端口
pause Pause all processes within a container # 暂停容器
ps List containers # 列出容器列表
pull Pull an image or a repository from the docker registry server # 从docker镜像源服务器拉取指定镜像或者库镜像
push Push an image or a repository to the docker registry server # 推送指定镜像或者库镜像至docker源服务器
restart Restart a running container # 重启运行的容器
rm Remove one or more containers # 移除一个或者多个容器
rmi Remove one or more images # 移除一个或多个镜像[无容器使用该镜像才可删除,否则需删除相关容器才可继续或 -f 强制删除]
run Run a command in a new container # 创建一个新的容器并运行一个命令
save Save an image to a tar archive # 保存一个镜像为一个 tar 包[对应 load]
search Search for an image on the Docker Hub # 在 docker hub 中搜索镜像
start Start a stopped containers # 启动容器
stop Stop a running containers # 停止容器
tag Tag an image into a repository # 给源中镜像打标签
top Lookup the running processes of a container # 查看容器中运行的进程信息
unpause Unpause a paused container # 取消暂停容器
version Show the docker version information # 查看 docker 版本号
wait Block until a container stops, then print its exit code # 截取容器停止时的退出状态值

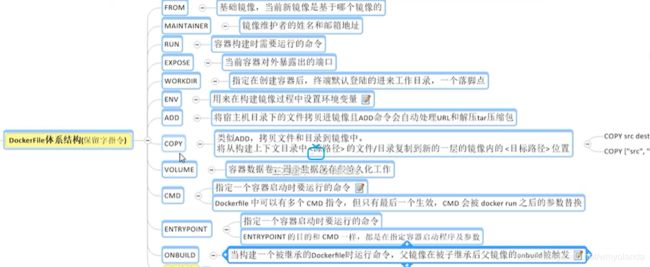
Dockerfile实例:
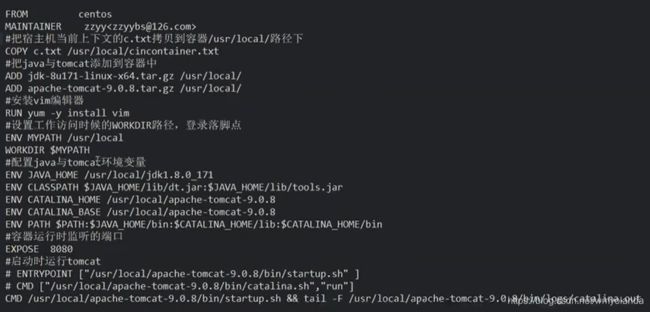
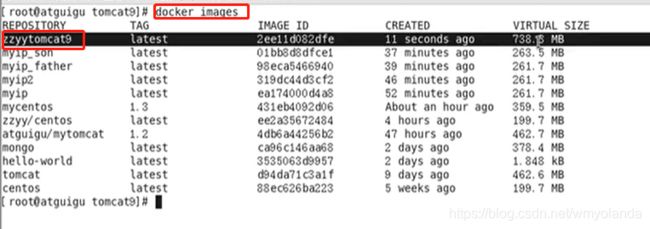
进入当前路径,运行Dockerfile

查看构建好的镜像:
六、leetcode刷题资料
1.http://www.cyc2018.xyz/
2.https://github.com/jwasham/coding-interview-university/blob/master/translations/README-cn.md
3.https://github.com/azl397985856/leetcode
4.https://github.com/MisterBooo/LeetCodeAnimation 动画形式解释算法过程


