Springboot集成Swagger
一、swagger概述
swagger是一套基于OpenAPI规范构建的开源工具,使用RestApi
1、代码变,文档变
2、跨语言,支持多种语言
3、swagger-ui 呈现出来的是一份可交互式的API文档,可以直接在文档页面尝试API的调用
4、可以将文档规范导入相关工具(postman、soapui),这些工具将会为我们自动地创建自动化测试
二、在公共模块common下配置swagger
1、在common模块下pom.xml文件添加依赖
    io.springfox
    springfox-swagger2
    2.9.2


    io.springfox
    springfox-swagger-ui
    2.9.2
2、在common模块下创建SwaggerConfiguration.java
import org.springframework.context.annotation.Bean;
import org.springframework.context.annotation.Configuration;
import springfox.documentation.service.ApiInfo;
import springfox.documentation.spi.DocumentationType;
import springfox.documentation.spring.web.plugins.Docket;
import springfox.documentation.swagger2.annotations.EnableSwagger2;

/**
 * @Author 郝南过
 * @Date 2022/11/7 14:06
 * @Version 1.0
 */
@Configuration
@EnableSwagger2
public class SwaggerConfiguration {
    private static ApiInfo DEFAULT = null;
    @Bean
    public Docket docket(){
        return new Docket(DocumentationType.SWAGGER_2);
    }
}
三、在主模块中引入common的swagger
1.在主模块pom文件中添加代码引入common
    com.hng
    common
    0.0.1-SNAPSHOT
2.在主模块启动类上添加@ComponentScan自动扫描
@ComponentScan(basePackages = {"com.hng"})
3、启动项目运行
启动项目后在浏览器中访问:http://localhost:8080/swagger-ui.html 
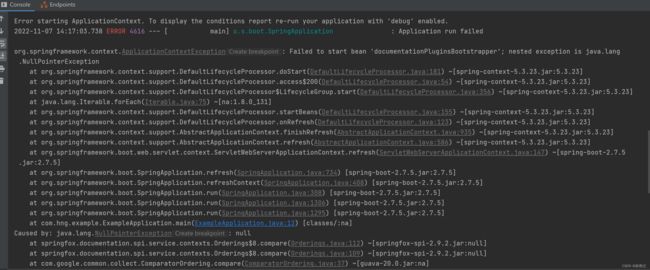
【注:】
如果启动报如下错误,请在application.properties中添加:
spring.mvc.pathmatch.matching-strategy=ANT_PATH_MATCHER
该报错原因是由于SpringBoot版本和Swagger版本不兼容导致的。
四、配置swagger(修改common模块下新建的SwaggerConfiguration)
1、配置首页描述、接口过滤、环境、分组等
package com.hng.swagger;

import org.springframework.context.annotation.Bean;
import org.springframework.context.annotation.Configuration;
import org.springframework.core.env.Environment;
import org.springframework.core.env.Profiles;
import springfox.documentation.builders.RequestHandlerSelectors;
import springfox.documentation.service.ApiInfo;
import springfox.documentation.service.Contact;
import springfox.documentation.spi.DocumentationType;
import springfox.documentation.spring.web.plugins.Docket;
import springfox.documentation.swagger2.annotations.EnableSwagger2;
import java.util.ArrayList;

/**
 * @Author 郝南过
 * @Date 2023/11/3 14:38
 * @Version 1.0
 */
@Configuration
@EnableSwagger2
public class SwaggerConfiguration {
    private static ApiInfo DEFAULT = null;

    @Bean
    public Docket docket_hng(Environment environment) {
        Contact DEFAULT_CONTACT = new Contact("郝南过", "https://blog.csdn.net/shaogaiyue9745602?type=blog", "[email protected]");
        DEFAULT = new ApiInfo(
                "server-接口",
                "Api Documentation",
                "V-1.0",
                "https://blog.csdn.net/shaogaiyue9745602?type=blog",
                DEFAULT_CONTACT,
                "Apache 2.0",
                "http://www.apache.org/licenses/LICENSE-2.0",
                new ArrayList());
        Profiles profiles = Profiles.of("dev");//设置在那个环境下显示swagger
        boolean b = environment.acceptsProfiles(profiles);//获得项目的环境
        return new Docket(DocumentationType.SWAGGER_2)
                .apiInfo(DEFAULT)
                .groupName("郝南过")
                .enable(b) //配置swagger是否开启,如果为false则关闭swagger,默认为true
                .select()
//                .apis(RequestHandlerSelectors.basePackage("com.hng.example.controller.controller"))//按照包名扫描
//                .apis(RequestHandlerSelectors.any())  //全部扫面
//                .apis(RequestHandlerSelectors.none()) //不扫面
//                .paths(PathSelectors.ant("controller"))//过滤指定包下的接口
                .build();
    }

}
上述配置文件中引入了Profiles配置文件,通过不同的配置文件控制swagger只在开发环境显示,如不需要此步骤可直接删除 Profiles profiles = Profiles.of("dev");//设置在那个环境下显示swagger boolean b = environment.acceptsProfiles(profiles);//获得项目的环境 这俩行代码,并修改.enable(b)为.enable(true)即可。
2、开发环境文件配置,在主模块resources下创建application.properties,application-dev.properties(开发环境),application-pro.properties(正式环境)三个文件。
application.properties中通过 spring.profiles.active=dev 确定哪个环境的配置文件生效

application.properties
spring.profiles.active=dev

#解决SpringBoot版本和Swagger版本不兼容导致的报错
spring.mvc.pathmatch.matching-strategy=ANT_PATH_MATCHER
application-dev.properties
#是否开启 swagger-ui
swagger.enabled=true
application-pro.properties
#是否开启 swagger-ui
swagger.enabled=false
3、启动项目,访问 http://localhost:8080/swagger-ui.html

根据需要自行配置描述说明,或者去除。
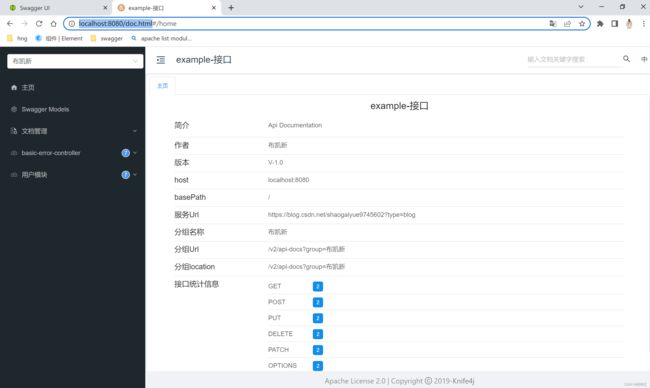
五、Swagger替换UI
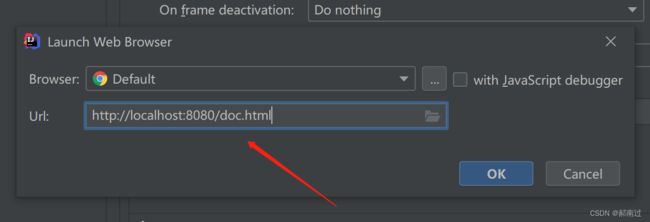
在pom.xml文件中添加新的ui,然后启动访问新地址http://localhost:8080/doc.html即可
    com.github.xiaoymin
    knife4j-spring-ui
    3.0.3
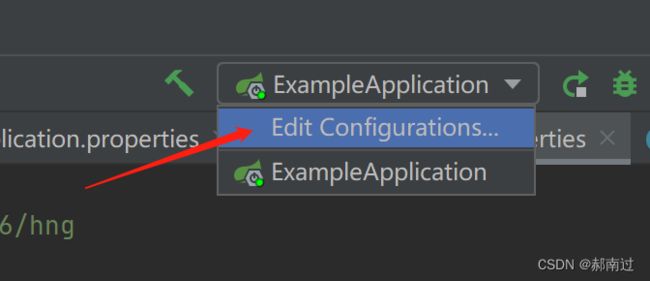
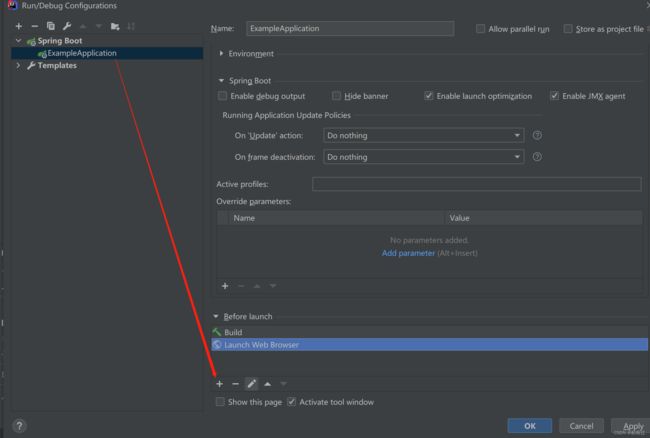
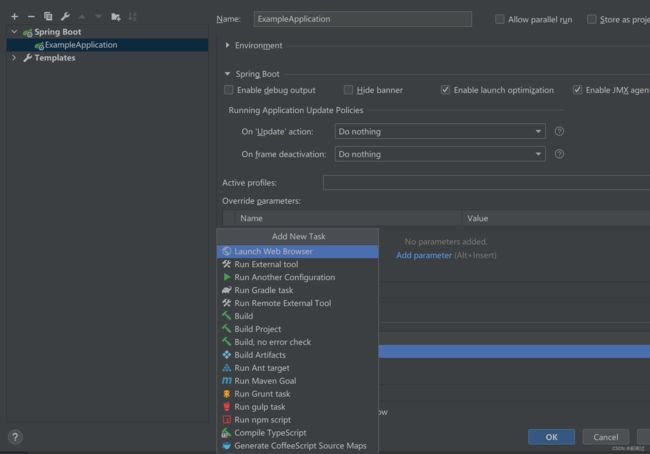
六、配置IDEA启动项目自动打开swagger页面
七.配置接口说明
| 注解 | 说明 |
| @Api | 对请求类的说明 |
| @ApiOperation | 方法的说明 |
| @ApiImplicitParams | 方法参数的说明 |
| @ApiImplicitParam | 用于指定单个参数的说明 |
| @ApiResponses | 方法返回值的说明 |
| @ApiResponse | 用于指定单个参数的说明 |
| @ApiModel | 用在JavaBean类上,说明JavaBean的 整体用途 |
| @ApiModelProperty | 用在JavaBean类的属性上面,说明此属性的的含议 |
| 注解 | 说明 |
| value | url的路径值 |
| tags | 如果设置这个值、value的值会被覆盖 |
| description | 对api资源的描述 |
| basePath | 基本路径 |
| position | 如果配置多个Api 想改变显示的顺序位置 |
| produces | 如, “application/json, application/xml” |
| consumes | 如, “application/json, application/xml” |
| protocols | 协议类型,如: http, https, ws, wss. |
| authorizations | 高级特性认证时配置 |
| hidden | 配置为true ,将在文档中隐藏 |
八.注解使用
UserController.java
package com.hng.example.controller;

import com.hng.example.entity.User;
import com.hng.example.service.UserService;
import io.swagger.annotations.*;
import org.springframework.beans.factory.annotation.Autowired;
import org.springframework.web.bind.annotation.RequestMapping;
import org.springframework.web.bind.annotation.RequestParam;
import org.springframework.web.bind.annotation.ResponseBody;
import org.springframework.web.bind.annotation.RestController;

/**
 * @Author 郝南过
 * @Date 2022/11/6 19:04
 * @Version 1.0
 */
@Api(tags="用户模块")
@RestController
public class UserController {

    @Autowired
    private UserService userService;

    @ApiOperation(value="用户查询",notes="根据id查询")
    @ApiImplicitParams({
            @ApiImplicitParam(paramType="query", name="userId", dataType="String", required=true, value="用户Id")
    })
    @ApiResponses({
            @ApiResponse(code = 200, message = "请求成功"),
            @ApiResponse(code = 400, message = "请求参数没填好"),
            @ApiResponse(code = 404, message = "请求路径没有或页面跳转路径不对")
    })
    @ResponseBody
    @PostMapping("/hello")
    public User getUserById(@RequestParam String userId){
        return userService.selectByPrimaryKey(1);
    }
}