快速入门深度学习——跑通TensorFlow的MNIST图集
学编程都喜欢运行HelloWorld,而深度学习的HelloWorld便是跑通MNIST。MNIST是一个手写数字的图集库,图集非常精小,非常适合作为深度学习练手的图集。跑完下面的demo,会对TensorFlow训练模型和识别图片数字这个流程有个整体的概念。

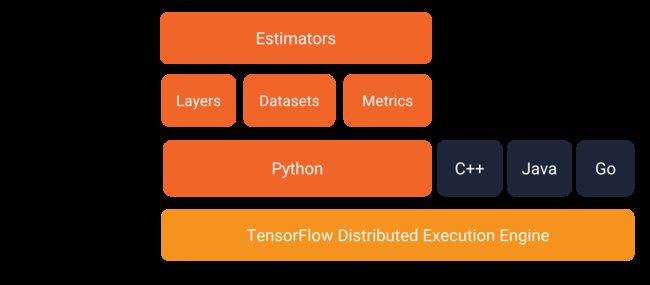
本教程使用TensorFlow的Estimator来实现,Estimator是Tensorflow的高级API,里面预设了模型方便开发者直接调用。下图是Tensorflow的接口设计框架,能清晰看到Estimator的位置,方便搞清楚Tensorflow的接口关系:
正式开始文章的主题
首先导入需要的库,能正常输出tensorflow的版本号表示环境没有问题。
若环境存在问题,请先阅读上一篇文章。
from __future__ import absolute_import, division, print_function
from matplotlib import pyplot as plt
import tensorflow as tf
import numpy as np

print(tf.__version__)
tf.logging.set_verbosity(tf.logging.INFO)
定义卷积神经网络模型
def cnn_model_fn(features, labels, mode):
  input_layer = tf.reshape(features["x"], [-1, 28, 28, 1])

  conv1 = tf.layers.conv2d(
      inputs=input_layer,
      filters=32,
      kernel_size=[5, 5],
      padding="same",
      activation=tf.nn.relu)
  pool1 = tf.layers.max_pooling2d(inputs=conv1, pool_size=[2, 2], strides=2)

  conv2 = tf.layers.conv2d(
      inputs=pool1,
      filters=64,
      kernel_size=[5, 5],
      padding="same",
      activation=tf.nn.relu)
  pool2 = tf.layers.max_pooling2d(inputs=conv2, pool_size=[2, 2], strides=2)

  pool2_flat = tf.reshape(pool2, [-1, 7 * 7 * 64])
  dense = tf.layers.dense(inputs=pool2_flat, units=1024, activation=tf.nn.relu)
  dropout = tf.layers.dropout(
      inputs=dense, rate=0.4, training=mode == tf.estimator.ModeKeys.TRAIN)

  logits = tf.layers.dense(inputs=dropout, units=10)

  predictions = {
      # Generate predictions (for PREDICT and EVAL mode)
      "classes": tf.argmax(input=logits, axis=1),
      # Add `softmax_tensor` to the graph. It is used for PREDICT and by the
      "probabilities": tf.nn.softmax(logits, name="softmax_tensor")
  }

  if mode == tf.estimator.ModeKeys.PREDICT:
    return tf.estimator.EstimatorSpec(mode=mode, predictions=predictions)

  # Calculate Loss (for both TRAIN and EVAL modes)
  loss = tf.losses.sparse_softmax_cross_entropy(labels=labels, logits=logits)

  # Configure the Training Op (for TRAIN mode)
  if mode == tf.estimator.ModeKeys.TRAIN:
    optimizer = tf.train.GradientDescentOptimizer(learning_rate=0.001)
    train_op = optimizer.minimize(
        loss=loss,
        global_step=tf.train.get_global_step())
    return tf.estimator.EstimatorSpec(mode=mode, loss=loss, train_op=train_op)

  # Add evaluation metrics (for EVAL mode)
  eval_metric_ops = {
      "accuracy": tf.metrics.accuracy(
          labels=labels, predictions=predictions["classes"])
  }
  return tf.estimator.EstimatorSpec(
      mode=mode, loss=loss, eval_metric_ops=eval_metric_ops)
准备数据集
# tensorflow提供了获取MNIST图集的接口
((train_data, train_labels),
 (eval_data, eval_labels)) = tf.keras.datasets.mnist.load_data()
# 处理数据
train_data = train_data/np.float32(255)
train_labels = train_labels.astype(np.int32)  # not required
eval_data = eval_data/np.float32(255)
eval_labels = eval_labels.astype(np.int32) # not required
开始训练
先构建Estimator。定义model_dir,这是保存checkpoint的路径。如果不定义model_dir的话,Estimator会保存checkpoint到Python’s的临时路径中。
checkpoints, 是一种保存训练模型参数的格式,结合模型代码可恢复训练的模型
SavedModel, 保存完整的模型文件,不依赖模型代码即可恢复完整的模型
关于如何保存SavedModel,可阅读https://tensorflow.google.cn/guide/saved_model
# 创建一个Estimator,负责训练模型、评估、预测等。
mnist_classifier = tf.estimator.Estimator(
    model_fn=cnn_model_fn, model_dir="./mnist_convnet_model")

train_input_fn = tf.estimator.inputs.numpy_input_fn(
    x={"x": train_data},
    y=train_labels,
    batch_size=100,
    num_epochs=None,
    shuffle=True)

# 开始训练。训练成功后,下次可以注释这一句,直接使用之前训练好的模型
mnist_classifier.train(input_fn=train_input_fn, steps=2000)
评估模型
会看到cosole输出下面内容,accuracy为训练模型的精确度
{‘accuracy’: 0.8619, ‘loss’: 0.5839637, ‘global_step’: 2005}
eval_input_fn = tf.estimator.inputs.numpy_input_fn(
    x={"x": eval_data},
    y=eval_labels,
    num_epochs=1,
    shuffle=False)

eval_results = mnist_classifier.evaluate(input_fn=eval_input_fn)
print(eval_results)
使用评估图集测试刚才训练好的模型。官网的介绍没有这一步,但不跑完这一步,总觉得没有成功感。
predict_input_fn = tf.estimator.inputs.numpy_input_fn(
      x={"x":eval_data},
      num_epochs=1,
      shuffle=False)

mnist_classifier.predict(input_fn=predict_input_fn)

for image,p in zip(eval_data,mnist_classifier.predict(input_fn=predict_input_fn)):
    print(np.argmax(p['probabilities']))
    plt.imshow(image.reshape(28, 28), cmap=plt.cm.binary)
    plt.show()
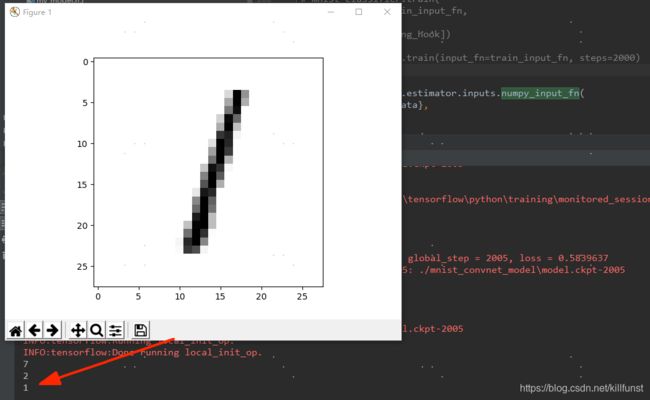
最终的结果如下,图片显示每张手写的数字,cosole显示预测出来最大概率的数字
这个图很清晰地描绘了Estimator的使用流程
1、构建Estimator,包括网络模型
2、准备数据,传进定义好的Input Function中
4、进行训练、评估、预测。训练时保存checkpoint
