全网最强的Spring源码入门教程(包含IOC、AOP、事务、MVC)
一. ioc
1.1 bd的收集
1.1.1 基于xml

-
入口 AbstracApplicationtContext.refresh -> AbstracApplicationtContext.obtainFreshBeanFactory() -> 调用到子类 AbstractRefreshableApplicationContext.loadBeanDefinitions() -> AbstractXmlApplicationContext.loadBeanDefinitions()
对于spring来说,第一步要收集到容器中bd,但是收集的方式很多,那基于xml的收集最终就跑到子类xmlApplicationContext通过xml的方式来收集bd
-
AbstractXmlApplicationContext.loadBeanDefinitions() 使用委托模式,创建了XmlBeanDefinitionReader来完成xml到bd的转换
-
XmlBeanDefinitionReader在解析bd的时候,先把xml通过sax解析出来,然后通过委托模式,创建了DocumentBeanDefinitionReader,完成Document到bd的转换
-
遍历每个element,然后又通过委托模式,创建了BeanDefinitionParseDelegate来完成每个elemement转换成bd
-----------------------------------------------------------------------------
以上是通过bean标签收集bd,往下是通过component-scan来搜集bd
- 分为2种element解析,一种是默认便签解析,比如 那就直接把它解析成bd,然后注册到容器中,另外一种自定义标签解析,比如
- parse解析过程:创建了ClassPathBeanDefinitionScanner扫描类,扫描.class文件,然后判断上面是否有component注解,如果有的话,创建bd,并且把bd注册到容器中
- 这里有一步非常重要的操作,将AutowiredAnnotationBeanPostProcessor,ConfigurationClassPostProcessor,
CommonAnnotationBeanPostProcessor 注册到容器中
1.1.2 基于注解 @ComponentScan& @Component
1.2 实例化
1.2.1 在实例化之前的2个操作
- invokeBeanFactoryPostProcessors(beanFactory):完成对BeanDefinitionRegistryPostProcessor调用、对BeanFactoryPostProcessor调用,增加了运行期干预的手段
- registerBeanPostProcessors(beanFactory):将实现了BeanPostProcessor的db实例化,比如AutoWiredProcessor、CommonPostProcessor、ConfigurationPostProcessor
1.2.2 实例化
- 入口是AbstracApplicationtContext.finishBeanFactoryInitialization
-> DefaultListableBeanFactory.preInstantiateSingletons 遍历beanNames 这个list,然后
-> 调到父类AbstractBeanFactory的getBean
->AbstractBeanFactory的doGetBean
- 从缓存中获取实例,先从一级缓存拿实例,如果拿不到从二级缓存拿,如果还拿不到,从三级缓存拿,如果拿到,将对象从三级升级到二级缓存,并且从三级中删除

- 如果从三级缓存还拿不到,那确实要新建了。将beanName放到一个set中,标识我正在创建它。然后开始真正的创建对象。AbstractAutowireCapableBeanFactory.create开始真正创建对象。
- 通过beanName来获取bd的class,然后反射调用获取class对象
- 通过determineConstructorsFromBeanPostProcessors方法来获取当前class对象上面有@autowire的有参构造函数,如果有的话,那就使用构造函数实例化,同时会触发有参构造函数的getBean,最终返回实例化对象
- 如果存在有参构造函数的话,上面已经返回了,接下来就是无参构造函数实例化,最终返回一个属性为空的实例化对象
--------------这时候大部分会生成一个光秃秃的实例化对象,通过无参函数返回,等待依赖注入------
在依赖注入之前,CommonPostProcessor收集了@PostContruct、@preDestry、@Resource
AutowiredPostProcessor收集了@Autowired、@value
- 如果支持提前暴露的话,会把这个光秃秃的对象先放到三级缓存中
- AbstractAutowireCapableBeanFactory. populateBean,开始di。通过循环调用beanPostProcessor.postProcessProperties最终调用 AutowirePostProcessor触发属性的getBean操作
- ioc和di全部做完之后,会调用AbstractAutowireCapableBeanFactory. initializeBean。分别完成 @PostContruct方法调用、afterPropertiesSet等方法调用
- 最后判断当前类有没有切面,如果有的话,要生存动态代理

2. aop
2.1 动态代理
简单复习一下jdk动态代理的知识
public class ServiceFactory {

	public static Object getService(Object service){
		//这里返回的是代理类对象
		return new TransactionInvocationHandler(service).getProxy();
	}
}
import java.lang.reflect.InvocationHandler;
import java.lang.reflect.Method;
import java.lang.reflect.Proxy;

import org.apache.ibatis.session.SqlSession;

public class TransactionInvocationHandler implements InvocationHandler{

	private Object target;

	public TransactionInvocationHandler(Object target){

		this.target = target;

	}
	public Object invoke(Object proxy, Method method, Object[] args) throws Throwable {

		SqlSession session = null;

		Object obj = null;

		try{
			session = SqlSessionUtil.getSqlSession();

			obj = method.invoke(target, args);

			session.commit();
		}catch(Exception e){
			session.rollback();
			e.printStackTrace();

			//处理的是什么异常,继续往上抛什么异常
			throw e.getCause();

		}finally{
			SqlSessionUtil.myClose(session);
		}

		return obj;
	}

	public Object getProxy(){
		return Proxy.newProxyInstance(target.getClass().getClassLoader(), target.getClass().getInterfaces(),this);

	}
}
- 一个被代理类,一个InvocationHandler实现类,来完成对被代理类的增强操作
- 通过一个工厂来获取代理类,传一个被代理类进去,得到动态代理类。
2.2 aop流程
@Aspect
public class AspectAnnotation {

	@Pointcut("execution(public * com.xiangxue.service.*.*(..))")
	public void pc1() {
	}

    @Around("pc1()")
	public Object around(ProceedingJoinPoint joinPoint) throws Throwable {
		Object[] args = joinPoint.getArgs();
		System.out.println("==============AspectAnnotation around前置通知=========");
		Object result = joinPoint.proceed();
		System.out.println("==============AspectAnnotation around后置通知=========");
		return result;
	}
}

2.2.1 判断这个对象需不需要被代理
- 寻找切面:寻找类上有@Aspect的类,然后遍历方法上不是@PointCut注解的方法(也就是说遍历@before、@after这些),然后创建AspectJAnnotation对象来获取@Before、@After这些注解的属性值,接下来根据AspectJAnnotation对象创建出AspectJExpressionPointcut对象,里面封装了从AspectJAnnotation获取的pointcut表达式。根据遍历的@before、@after这些methd + **AspectJExpressionPointcut ** 就可以生成切面
- 判断当前的bean是否要代理:拿到切面和类,然后做一层匹配,看当前的bean对象要不要被代理。
- 如果要,就进入下面的创建动态代理对象步骤
2.2.2 创建动态代理对象
- 创建一个ProxyFactory代理工厂,把切面、被代理方式(cglib、jdk)、被代理类传进去
- 第一步通过ProxyFactory代理工厂来生成实现了InvocationHandler类的JdkDynamicAopProxy代理类,同时会把ProxyFactory传进去,也就是动态代理会持有 ProxyFactory => 持有了增强
- 第二步通过代理类来获取动态代理对象,具体调用就是**Proxy.newProxyInstance()**方法
2.2.4 动态代理对象被调用
链式调用
会调用到JdkDynamicAopProxy.invoke方法,会把所以增强Advice拿出来,然后进行链式调用
3. 事务
3.1 加入事务切面
- @EnableTransactionManager注解注入了两个bean:
1、AutoProxyRegistrar 2、ProxyTransactionManagementConfiguration
AutoProxyRegistrar : 注册了一个InfrastructureAdvisorAutoProxyCreator的bean, 这个类继承了 AbstractAdvsorAutoProxyCreator,这个类的作用就是开始事务的动态代理。
因为是否要给bean创建代理,就是这里是入口,会走到AbstractAdvsorAutoProxyCreator.postProcessAfterInitialization(这是个beanPostProcessor),然后就是看具体的子类是否要给这个类创建代理对象,比如想要使用@Aspectj,就需要引入AnnotationAwareAspectJAutoProxyCreator,来支持,不然没有AbstractAdvsorAutoProxyCreator的实现类,就走不进去。所以说,有@Transaction,也需要引入AbstractAdvisorAutoProxyCreator的实现类-InfrastructureAdvisorAutoProxyCreator。
ProxyTransactionManagementConfiguration:可以定义了三个bean
- BeanFactoryTransactionAttributeSourceAdvisor: 一个PointAdvisor
- AnnotitionTransactionAttributeSource: 就是PointCut
- TransactionInterceptor: 就是代理逻辑Advice
小结:就是ProxyTransactionManagementConfiguration会向spring容器中添加一个 事物Advisor,然后在匹配的时候,就判断当前bean有没有@Transaction或者某个方法有没有@transaction,如果匹配就需要生成代理对象
3.2 事务处理流程
3.2.1 创建事务流程
- TransactionAttribute对象:拿到@Transaction 上面的注解信息,生成TransactionAttribute对象
- TransactionManager对象:看@Transaction有没有指定TransactionManager,如果没有指定,默认生成TransactionManager类型bean 作为TransactionManager
- TransactionStatus对象:调用AbstractPlatformTransactionManager.getTransaction()方法来生成
- 看当前线程的事物对象有没有数据库连接对象,如果有,就根据传播级别,没有就新建
- 如果已经存在事务对象,看传播级别,是抛异常、新建一个事务、将原来事务挂起再新建一个,假设是新建一个,设置隔离级别、autoCommit=false、数据库连接的timeout
- 把数据库连接对象 放到ThreadLocal中
- TransactionInfo对象:最后把这些组装成 TransacitonInfo返回
3.2.2 执行业务方法
- 如果业务方法执行有异常,则会进行回滚,最后在finally里面把异常抛出
- 也就说如果存在嵌套事务,里面那个抛出异常,它会先回滚,然后抛出异常。同时看有没有事务被挂起,如果有就resume。
4. mvc
4.1 Servlet
4.2 mvc 初始化
<web-app>
  <listener>
    <listener-class>org.springframework.web.context.ContextLoaderListenerlistener-class>
  listener>

  <context-param>
    <param-name>contextConfigLocationparam-name>
    <param-value>/WEB-INF/applicationContext.xmlparam-value>
  context-param>

  <servlet>
    <servlet-name>appservlet-name>
    <servlet-class>org.springframework.web.servlet.DispatcherServletservlet-class>
    <init-param>
      <param-name>contextConfigLocationparam-name>
      <param-value>classpath:springmvc.xmlparam-value>
    init-param>
    <load-on-startup>1load-on-startup>
  servlet>

  <servlet-mapping>
    <servlet-name>appservlet-name>
    <url-pattern>/*url-pattern>
  servlet-mapping>
web-app>
Servelt容器在启动的时候留了一些钩子来触发自定义的东西, mvc的初始化也利用了这些钩子:Listener。ContextLoadListener:
ContextLoadListener:通过实现了ServletContextListener接口,将spring容器融入到web容器中。
web容器:web容器通过ServeltConfig来保持xml配置,通过ServletContext来维护一个web应用
spring容器:接受web容器启动的通知,开始自身配置的解析,然后创建bean实例,并且通过WebApplicaitonContext来存放spring项目主容器的相关bean。ContextLoadListener将Spring容器(webApplicaitonContext)作为ServletContext的attribute,key为Root_Web_Application_Context_Attribte, 保存到ServeltContext中,Spring容器和Web容器可以通过ServletContext来交互。
- 父容器初始化:
ContextLoaderListener.contextInitlized() => initWebApplicationContext()
- Web容器初始化触发监听:web容器初始化调用到ContextLoadListener.contextInitlized
- Spring父容器初始化:看WebApplicationContext有没有创建过,如果创建了就报错,如果没有就创建一个Web ApplicationContext,调用configureAndRefreshWebApplicationContext(ServletContext sc) 从ServletContext拿出配置application.xml,最终调用wac.refresh容器初始化
- 将Spring父容器设置到Web容器中:servletContext.setAttribute(WebApplicationContext.ROOT_WEB_APPLICATION_CONTEXT_ATTRIBUTE
//监听servlet容器的启动
@Override
public void contextInitialized(ServletContextEvent event) {
    initWebApplicationContext(event.getServletContext());//在父类ContextLoader中实现
}
//创建和初始化spring主容器对应的WebApplicationContext对象实例并调用refresh方法完成从contextConfigLocation指定的配置中,加载BeanDefinitions和创建bean实例
public WebApplicationContext initWebApplicationContext(ServletContext servletContext) {
    //判断是否已经有Root  WebApplicationContext,已经有则抛出异常
    if (servletContext.getAttribute(WebApplicationContext.ROOT_WEB_APPLICATION_CONTEXT_ATTRIBUTE) != null) {
        throw new IllegalStateException(
            "Cannot initialize context because there is already a root application context present - " +
            "check whether you have multiple ContextLoader* definitions in your web.xml!");
    }

    servletContext.log("Initializing Spring root WebApplicationContext");
    Log logger = LogFactory.getLog(ContextLoader.class);
    if (logger.isInfoEnabled()) {
        logger.info("Root WebApplicationContext: initialization started");
    }
    long startTime = System.currentTimeMillis();

    try {
        if (this.context == null) {
            //创建上下文对象  XmlWebApplicationContext(静态方法中从ContextLoader.properties文件中读取)  并赋值给全局变量context
            this.context = createWebApplicationContext(servletContext);
        }
        if (this.context instanceof ConfigurableWebApplicationContext) {
            ConfigurableWebApplicationContext cwac = (ConfigurableWebApplicationContext) this.context;
            if (!cwac.isActive()) {
                if (cwac.getParent() == null) {
                    // 设置父容器(如果有)
                    ApplicationContext parent = loadParentContext(servletContext);
                    cwac.setParent(parent);
                }
                //核心方法,完成配置加载,BeanDefinition定义和bean对象创建
                configureAndRefreshWebApplicationContext(cwac, servletContext);
            }
        }
        //ioc容器上下文设置到servlet上下文servletContext
        servletContext.setAttribute(WebApplicationContext.ROOT_WEB_APPLICATION_CONTEXT_ATTRIBUTE, this.context);

        ClassLoader ccl = Thread.currentThread().getContextClassLoader();
        if (ccl == ContextLoader.class.getClassLoader()) {
            currentContext = this.context;
        }
        else if (ccl != null) {
            //将当前类加载器和上下文绑定
            currentContextPerThread.put(ccl, this.context);
        }

        if (logger.isInfoEnabled()) {
            long elapsedTime = System.currentTimeMillis() - startTime;
            logger.info("Root WebApplicationContext initialized in " + elapsedTime + " ms");
        }

        return this.context;
    }
    catch (RuntimeException | Error ex) {
        logger.error("Context initialization failed", ex);
        servletContext.setAttribute(WebApplicationContext.ROOT_WEB_APPLICATION_CONTEXT_ATTRIBUTE, ex);
        throw ex;
    }
}

protected void configureAndRefreshWebApplicationContext(ConfigurableWebApplicationContext wac, ServletContext sc) {
    if (ObjectUtils.identityToString(wac).equals(wac.getId())) {
        String idParam = sc.getInitParameter(CONTEXT_ID_PARAM);
        if (idParam != null) {
            wac.setId(idParam);
        }
        else {
            wac.setId(ConfigurableWebApplicationContext.APPLICATION_CONTEXT_ID_PREFIX +
                      ObjectUtils.getDisplayString(sc.getContextPath()));
        }
    }

    wac.setServletContext(sc);
    //获取web.xml中的配置contextConfigLocation
    String configLocationParam = sc.getInitParameter(CONFIG_LOCATION_PARAM);
    if (configLocationParam != null) {
        wac.setConfigLocation(configLocationParam);
    }

    ConfigurableEnvironment env = wac.getEnvironment();
    if (env instanceof ConfigurableWebEnvironment) {
        ((ConfigurableWebEnvironment) env).initPropertySources(sc, null);
    }
	// 使用ApplicationContextInitializer对ApplicationContext进行初始化
    customizeContext(sc, wac);
    //ApplicationContext的核心方法
    wac.refresh();
}
- 子容器初始化:DispatcherServlet
<servlet>
  <servlet-name>appservlet-name>
  <servlet-class>org.springframework.web.servlet.DispatcherServletservlet-class>
  <init-param>
    <param-name>contextConfigLocationparam-name>
    <param-value>classpath:springmvc.xmlparam-value>
  init-param>
  <load-on-startup>1load-on-startup>
servlet>

<servlet-mapping>
  <servlet-name>appservlet-name>
  <url-pattern>/*url-pattern>
servlet-mapping>
继承关系:
public abstract class HttpServletBean extends HttpServlet implements EnvironmentCapable, EnvironmentAware {
public abstract class FrameworkServlet extends HttpServletBean implements ApplicationContextAware {
public class DispatcherServlet extends FrameworkServlet {
HttpServletBean: 继承了HttpServlet,实现了EnvironmentAware(注入Environment对象)和EnvironmentCapable(访问Environment对象)接口,其中Environment主要从类路径的属性文件,运行参数,@PropertySource注解等获取应用的相关属性值,以提供给spring容器相关组件访问,或者写入属性到Environment来给其他组件访问。HttpServletBean的主要作用就是将于该servlet相关的init-param,封装成bean属性,然后保存到Environment当中,从而可以在spring容器中被其他bean访问。
FrameworkServlet:因为DispatcherServlet通常包含一个独立的WebApplication,所以FrameworkServlet就是完成DispatcherServlet所绑定的WebApplicationContext的创建和管理工作。???从contextConfigLocation获取xml或者WebApplicationInitizlizer配置信息,根据contextClass创建WebApplicaitonContext,获取Application ContextInitizlizer来对WebApplicaitonContext来初始化 这里需要再研究一下
DispatcherServlet:从FrameworkServlet中获取WebApplicaitonContext,然后从WebApplicationContext中获取DispatcherServlet相关功能子组件bean。
DispatcherServlet其实就是一个Servlet,生命周期(init、service、destory),DisPatcherServlet 初始化过程
- HttpServletBean的init():
- 获取web.xml配置DispatcherServlet的初始化参数,存放到一个参数容器ServletConfigPropertyValues
- 根据传进来this创建BeanWrapper,本质上它就是DispatchServlet
- 通过bw.setPropertyValue,将参数设置进去
- 掉到子类FrameworkServlet的initServletBean
//DispatcherServlet第一次加载时调用init方法
@Override
public final void init() throws ServletException {
    ...
    try {
         //加载web.xml文件中的servlet标签中的init-param,其中含有springMVC的配置文件的名字和路径若没有,则默认为(servlet-name)-servlet.xml,默认路径为WEF—INF下,设置到DispatcherServlet中
         PropertyValues pvs = new ServletConfigPropertyValues(getServletConfig(), this.requiredProperties);
         //创建BeanWrapper实例,为DispatcherServlet设置属性
         BeanWrapper bw = PropertyAccessorFactory.forBeanPropertyAccess(this);
         ResourceLoader resourceLoader = new ServletContextResourceLoader(getServletContext());
         bw.registerCustomEditor(Resource.class, new ResourceEditor(resourceLoader, getEnvironment()));
         initBeanWrapper(bw);
         //把init-param中的参数设置到DispatcherServlet里面去
         bw.setPropertyValues(pvs, true);
    }catch (BeansException ex) {
        logger.error("Failed to set bean properties on servlet '" + getServletName() + "'", ex);
        throw ex;
    }

    //调用子类(FrameworkServlet)进行初始化
    // 模版方法,此方法在HttpServletBean本身是空的,但是因为调用方法的对象是DispatcherServlet,所以优先在DispatcherServlet找,找不到再去父类找,最后在FrameworkServlet找到
    initServletBean();

    if (logger.isDebugEnabled()) {
        logger.debug("Servlet '" + getServletName() + "' configured successfully");
    }
}
- FrameworkSevlet的initServletBean()->initWebApplicationContext():
- 创建Spring mvc的容器,比父容器关联
- 把创建出来的mvc容器放到ServletContext
- 模版方法调用子类 DispatcherServlet的onRefersh方法
@Override
protected final void initServletBean() throws ServletException {
    ...
    try {
        //创建springmvc的ioc容器实例,初始化WebApplicationContext并调用子类(DispatcherServlet)的onRefresh(wac)方法
        this.webApplicationContext = initWebApplicationContext();
        initFrameworkServlet();
    }
    ...
}

protected WebApplicationContext initWebApplicationContext() {
    //通过ServletContext获得spring容器,获取root WebApplicationContext,即web.xml中配置的listener(ContextLoaderListener)
    WebApplicationContext rootContext =
        WebApplicationContextUtils.getWebApplicationContext(getServletContext());
    //定义springMVC容器wac
    WebApplicationContext wac = null;


    //判断容器是否由编程式传入(即是否已经存在了容器实例),存在的话直接赋值给wac,给springMVC容器设置父容器
    //最后调用刷新函数configureAndRefreshWebApplicationContext(wac),作用是把springMVC的配置信息加载到容器中去(之前已经将配置信息的路径设置到了bw中)
    if (this.webApplicationContext != null) {
        // context上下文在构造时注入
        wac = this.webApplicationContext;
        if (wac instanceof ConfigurableWebApplicationContext) {
            ConfigurableWebApplicationContext cwac = (ConfigurableWebApplicationContext) wac;
            if (!cwac.isActive()) {
                // context没有被refreshed,设置父context、设置应用context id等服务
                if (cwac.getParent() == null) {
                    //将spring ioc设置为springMVC ioc的父容器
                    cwac.setParent(rootContext);
                }
                configureAndRefreshWebApplicationContext(cwac);
            }
        }
    }
    if (wac == null) {
        // 在ServletContext中寻找是否有springMVC容器,初次运行是没有的,springMVC初始化完毕ServletContext就有了springMVC容器
        wac = findWebApplicationContext();
    }

    //当wac既没有没被编程式注册到容器中的,也没在ServletContext找得到,此时就要新建一个springMVC容器
    if (wac == null) {
        // 创建springMVC容器
        wac = createWebApplicationContext(rootContext);//会加载并触发监听  执行onRefresh,refreshEventReceived设置为true
    }

    if (!this.refreshEventReceived) {//如果监听器未接收到事件
        //到这里mvc的容器已经创建完毕,接着才是真正调用DispatcherServlet的初始化方法onRefresh(wac),模板模式
        synchronized (this.onRefreshMonitor) {
            onRefresh(wac);
        }
    }

    if (this.publishContext) {
        //将springMVC容器存放到ServletContext中去,方便下次取出来
        String attrName = getServletContextAttributeName();
        getServletContext().setAttribute(attrName, wac);
    }
    return wac;
}


protected WebApplicationContext createWebApplicationContext(ApplicationContext parent) {
    Class<?> contextClass = getContextClass();
    if (this.logger.isDebugEnabled()) {
        this.logger.debug("Servlet with name '" + getServletName() +
                          "' will try to create custom WebApplicationContext context of class '" +
                          contextClass.getName() + "'" + ", using parent context [" + parent + "]");
    }
    if (!ConfigurableWebApplicationContext.class.isAssignableFrom(contextClass)) {
        throw new ApplicationContextException(
            "Fatal initialization error in servlet with name '" + getServletName() +
            "': custom WebApplicationContext class [" + contextClass.getName() +
            "] is not of type ConfigurableWebApplicationContext");
    }
    //实例化空白的ioc容器
    ConfigurableWebApplicationContext wac =
        (ConfigurableWebApplicationContext) BeanUtils.instantiateClass(contextClass);
    //给容器设置环境
    wac.setEnvironment(getEnvironment());
    //给容器设置父容器(就是spring容器),两个ioc容器关联在一起了
    wac.setParent(parent);
    //给容器加载springMVC的配置信息,之前已经通过bw将配置文件路径写入到了DispatcherServlet中
    wac.setConfigLocation(getContextConfigLocation());
    //上面提到过这方法,刷新容器,根据springMVC配置文件完成初始化操作,此时springMVC容器创建完成
    configureAndRefreshWebApplicationContext(wac);

    return wac;
}

protected void configureAndRefreshWebApplicationContext(ConfigurableWebApplicationContext wac) {
    if (ObjectUtils.identityToString(wac).equals(wac.getId())) {
        if (this.contextId != null) {
            wac.setId(this.contextId);
        }
        else {
            wac.setId(ConfigurableWebApplicationContext.APPLICATION_CONTEXT_ID_PREFIX +
                      ObjectUtils.getDisplayString(getServletContext().getContextPath()) + '/' + getServletName());
        }
    }

    wac.setServletContext(getServletContext());
    wac.setServletConfig(getServletConfig());
    wac.setNamespace(getNamespace());
    wac.addApplicationListener(new SourceFilteringListener(wac, new ContextRefreshListener()));

    ConfigurableEnvironment env = wac.getEnvironment();
    if (env instanceof ConfigurableWebEnvironment) {
        ((ConfigurableWebEnvironment) env).initPropertySources(getServletContext(), getServletConfig());
    }

    postProcessWebApplicationContext(wac);
    applyInitializers(wac);
    wac.refresh();//registerListeners会注册ContextRefreshListener,finishRefresh中发布事件(publishEvent(new ContextRefreshedEvent(this)))并触发监听逻辑,调用DispatcherServlet的onRefresh
}
- DispatcherServlet的onRresh()->initStrategies():
- 获取ApplicationContext
- 初始化九大组件
@Override
protected void onRefresh(ApplicationContext context) {
    initStrategies(context);
}

//初始化九大核心组件
protected void initStrategies(ApplicationContext context) {
    initMultipartResolver(context);//文件上传解析
    initLocaleResolver(context);//本地解析
    initThemeResolver(context);//主题解析
    initHandlerMappings(context);//url请求映射
    initHandlerAdapters(context);//初始化真正调用controloler方法的类
    initHandlerExceptionResolvers(context);//异常解析
    initRequestToViewNameTranslator(context);
    initViewResolvers(context);//视图解析
    initFlashMapManager(context);
}
4.3 mvc处理请求
HttpServlet.service / doGet /doPost -> FrameworkServlet.service / doGet /doPost ->Framwork
servlet.processRequest -> DispatcherServlet.doService
- HttpServlet接入请求,转发到FrameworkServlet处理:
protected void service(HttpServletRequest req, HttpServletResponse resp)
    throws ServletException, IOException {

    String method = req.getMethod();

    if (method.equals(METHOD_GET)) {
        long lastModified = getLastModified(req);
        if (lastModified == -1) {
            // servlet doesn't support if-modified-since, no reason
            // to go through further expensive logic
            doGet(req, resp);
            ...
            doPost
            ...
            doHead
                }
    }
}
- FrameServlet将请求做了一些处理,最终全部转发到Dispatcher.doServie:
protected final void doGet(HttpServletRequest request, HttpServletResponse response)
                throws ServletException, IOException {
   processRequest(request, response);
}

protected final void processRequest(HttpServletRequest request, HttpServletResponse response)
			throws ServletException, IOException {

    long startTime = System.currentTimeMillis();
    Throwable failureCause = null;
    //previousLocaleContext获取和当前线程相关的LocaleContext,根据已有请求构造一个新的和当前线程相关的LocaleContext
    LocaleContext previousLocaleContext = LocaleContextHolder.getLocaleContext();
    LocaleContext localeContext = buildLocaleContext(request);

    //previousAttributes获取和当前线程绑定的RequestAttributes
    RequestAttributes previousAttributes = RequestContextHolder.getRequestAttributes();
    //为已有请求构造新的ServletRequestAttributes,加入预绑定属性
    ServletRequestAttributes requestAttributes = buildRequestAttributes(request, response, previousAttributes);

    WebAsyncManager asyncManager = WebAsyncUtils.getAsyncManager(request);//异步请求处理
    asyncManager.registerCallableInterceptor(FrameworkServlet.class.getName(), new RequestBindingInterceptor());

    //initContextHolders让新构造的RequestAttributes和ServletRequestAttributes和当前线程绑定,加入到ThreadLocal,完成绑定
    initContextHolders(request, localeContext, requestAttributes);

    try {
        //抽象方法doService由FrameworkServlet子类DispatcherServlet重写
        doService(request, response);
    }catch (ServletException | IOException ex) {
        failureCause = ex;
        throw ex;
    }catch (Throwable ex) {
        failureCause = ex;
        throw new NestedServletException("Request processing failed", ex);
    }finally {
        //解除RequestAttributes,ServletRequestAttributes和当前线程的绑定
        resetContextHolders(request, previousLocaleContext, previousAttributes);
        if (requestAttributes != null) {
            requestAttributes.requestCompleted();
        }
        logResult(request, response, failureCause, asyncManager);
        //注册监听事件ServletRequestHandledEvent,在调用上下文的时候产生Event
        publishRequestHandledEvent(request, response, startTime, failureCause);
    }
}
- DispatcherServlet.doService(重点): doService -> doDispatcher -> processDispatchResult
protected void doService(HttpServletRequest request, HttpServletResponse response) throws Exception {
    logRequest(request);

    // Keep a snapshot of the request attributes in case of an include,
    // to be able to restore the original attributes after the include.
    Map<String, Object> attributesSnapshot = null;
    if (WebUtils.isIncludeRequest(request)) {
        attributesSnapshot = new HashMap<>();//保存request域中的数据,存一份快照
        Enumeration<?> attrNames = request.getAttributeNames();
        while (attrNames.hasMoreElements()) {
            String attrName = (String) attrNames.nextElement();
            if (this.cleanupAfterInclude || attrName.startsWith(DEFAULT_STRATEGIES_PREFIX)) {
                attributesSnapshot.put(attrName, request.getAttribute(attrName));
            }
        }
    }

    //设置web应用上下文
    request.setAttribute(WEB_APPLICATION_CONTEXT_ATTRIBUTE, getWebApplicationContext());
    //国际化本地
    request.setAttribute(LOCALE_RESOLVER_ATTRIBUTE, this.localeResolver);
    //样式
    request.setAttribute(THEME_RESOLVER_ATTRIBUTE, this.themeResolver);
    //设置样式资源
    request.setAttribute(THEME_SOURCE_ATTRIBUTE, getThemeSource());

    //请求刷新时保存属性
    if (this.flashMapManager != null) {
        FlashMap inputFlashMap = this.flashMapManager.retrieveAndUpdate(request, response);
        if (inputFlashMap != null) {
            request.setAttribute(INPUT_FLASH_MAP_ATTRIBUTE, Collections.unmodifiableMap(inputFlashMap));
        }
        //Flash attributes 在对请求的重定向生效之前被临时存储(通常是在session)中,并且在重定向之后被立即移除
        request.setAttribute(OUTPUT_FLASH_MAP_ATTRIBUTE, new FlashMap());
        //FlashMap 被用来管理 flash attributes 而 FlashMapManager 则被用来存储,获取和管理 FlashMap 实体
        request.setAttribute(FLASH_MAP_MANAGER_ATTRIBUTE, this.flashMapManager);
    }

    try {
        doDispatch(request, response);//核心方法
    }finally {
        if (!WebAsyncUtils.getAsyncManager(request).isConcurrentHandlingStarted()) {
            // Restore the original attribute snapshot, in case of an include.
            if (attributesSnapshot != null) {
                restoreAttributesAfterInclude(request, attributesSnapshot);//将快照覆盖回去
            }
        }
    }
}
protected void doDispatch(HttpServletRequest request, HttpServletResponse response) throws Exception {
	HttpServletRequest processedRequest = request;
	HandlerExecutionChain mappedHandler = null;
	boolean multipartRequestParsed = false;

	//异步管理
	WebAsyncManager asyncManager = WebAsyncUtils.getAsyncManager(request);

	try {
		ModelAndView mv = null;
		Exception dispatchException = null;

		try {
			//文件上传
			processedRequest = checkMultipart(request);
			multipartRequestParsed = (processedRequest != request);

			//todo 这个方法很重要,重点看
			// Determine handler for the current request.
			mappedHandler = getHandler(processedRequest);
			if (mappedHandler == null) {
				noHandlerFound(processedRequest, response);
				return;
			}

			//获取跟HandlerMethod匹配的HandlerAdapter对象
			// Determine handler adapter for the current request.
			HandlerAdapter ha = getHandlerAdapter(mappedHandler.getHandler());

			// Process last-modified header, if supported by the handler.
			String method = request.getMethod();
			boolean isGet = "GET".equals(method);
			if (isGet || "HEAD".equals(method)) {
				long lastModified = ha.getLastModified(request, mappedHandler.getHandler());
				if (new ServletWebRequest(request, response).checkNotModified(lastModified) && isGet) {
					return;
				}
			}

			//前置过滤器,如果为false则直接返回
			if (!mappedHandler.applyPreHandle(processedRequest, response)) {
				return;
			}

			//调用到Controller具体方法,核心方法调用,重点看看
			// Actually invoke the handler.
			mv = ha.handle(processedRequest, response, mappedHandler.getHandler());

			if (asyncManager.isConcurrentHandlingStarted()) {
				return;
			}

			applyDefaultViewName(processedRequest, mv);

			//中置过滤器
			mappedHandler.applyPostHandle(processedRequest, response, mv);
		}
		catch (Exception ex) {
			dispatchException = ex;
		}
		catch (Throwable err) {
			// As of 4.3, we're processing Errors thrown from handler methods as well,
			// making them available for @ExceptionHandler methods and other scenarios.
			dispatchException = new NestedServletException("Handler dispatch failed", err);
		}

		//视图渲染
		processDispatchResult(processedRequest, response, mappedHandler, mv, dispatchException);
	}
	catch (Exception ex) {
		triggerAfterCompletion(processedRequest, response, mappedHandler, ex);
	}
	catch (Throwable err) {
		triggerAfterCompletion(processedRequest, response, mappedHandler,
							   new NestedServletException("Handler processing failed", err));
	}
	finally {
		if (asyncManager.isConcurrentHandlingStarted()) {
			// Instead of postHandle and afterCompletion
			if (mappedHandler != null) {
				mappedHandler.applyAfterConcurrentHandlingStarted(processedRequest, response);
			}
		}
		else {
			// Clean up any resources used by a multipart request.
			if (multipartRequestParsed) {
				cleanupMultipart(processedRequest);
			}
		}
	}
}
private void processDispatchResult(HttpServletRequest request, HttpServletResponse response,
		@Nullable HandlerExecutionChain mappedHandler, @Nullable ModelAndView mv,
		@Nullable Exception exception) throws Exception {

	boolean errorView = false;

	//异常处理
	if (exception != null) {
		//ModelAndViewDefiningException类型,会携带对应的ModelAndView
		if (exception instanceof ModelAndViewDefiningException) {
			logger.debug("ModelAndViewDefiningException encountered", exception);
			mv = ((ModelAndViewDefiningException) exception).getModelAndView();
		}else {
			//由对应的处理器handler进行异常处理,返回ModelAndView。其中使用了HandlerExceptionResolver。
			Object handler = (mappedHandler != null ? mappedHandler.getHandler() : null);
			mv = processHandlerException(request, response, handler, exception);
			errorView = (mv != null);
		}
	}
    ....
protected ModelAndView processHandlerException(HttpServletRequest request, HttpServletResponse response,
			@Nullable Object handler, Exception ex) throws Exception {

		// Success and error responses may use different content types
		request.removeAttribute(HandlerMapping.PRODUCIBLE_MEDIA_TYPES_ATTRIBUTE);

		// Check registered HandlerExceptionResolvers...
		ModelAndView exMv = null;
		if (this.handlerExceptionResolvers != null) {
			for (HandlerExceptionResolver resolver : this.handlerExceptionResolvers) {
				exMv = resolver.resolveException(request, response, handler, ex);
				if (exMv != null) {
					break;
				}
			}
		}
        ......
4.4 DispatcherServlet处理请求流程图:
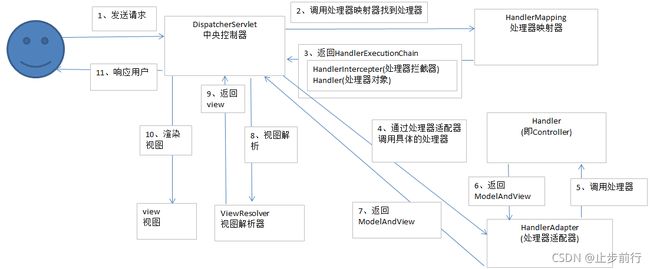
- 请求发送到DispatchServlet
- DispatchServlet将request传给HandlerMapping(可以理解为map
public class WelcomeController implements Controller {

    @Override
    public ModelAndView handleRequest(HttpServletRequest request, HttpServletResponse response)   {
        ModelAndView mav = new ModelAndView("welcome");
        mav.addObject("now", LocalDateTime.now().toString());
        String name = request.getParameter("name");
        mav.addObject("name", name == null ? "你是?" : name);
        return mav;
    }
}

@Configuration
public class ControllerBeanConfig {
    /**
     * 这里定义一个 web controller bean, 注意 :
     * 1. 该 bean 实现了接口 Controller,
     * 2. 该 bean 没有使用注解 @Controller,
     * (如果使用了注解@Controller,就会被RequestMappingHandlerMapping接管,而不是由BeanNameUrlHandlerMapping处理)
     * 3. 映射到匹配 welcome* 的url
     * @return
     */
    @Bean(name = "/welcome*")
    public WelcomeController beanWelcomeController() {
        return new WelcomeController();
    }
}
接下来访问http://localhost:8080/welcome,或者http://localhost:8080/welcome.html之类任何匹配/welcome*的地址,都会跳出 “你是?”
- 在这里我可能拿到的是不同的Handler对象,可能是RequestMappingHandler这种、或者是BeanNameUrlHandler这种,那我是不是要写 if else, spring 设计就通过适配器模式,去包装了Handler,统一对外提供 hande方法
public class AbstractHandlerMethodAdapter {

	// 只处理HandlerMethod 类型的处理器。抽象方法supportsInternal默认返回true
	// 是留出的钩子可以给你自己扩展的
	@Override
	public final boolean supports(Object handler) {
		return (handler instanceof HandlerMethod
			&& supportsInternal((HandlerMethod) handler));
	}

	@Override
	public final ModelAndView handle(HttpServletRequest request,
					HttpServletResponse response, Object handler)
			throws Exception {
		// 抽象方法交给子类handleInternal去实现
		return handleInternal(request, response, (HandlerMethod) handler);
	}
}
- 所以我主逻辑只要通过handler拿到适配器,然后统一调用 Adapter.handle方法就行
- 适配器再通过Handler调用,拿到ModelAndView
- 最终通过视图解析器 解析ModelAndView拿到真正的视图
4.5 HandlerMapping
SpringMVC中HandlerMapping和HandlerAdapter详解(适配器模式)_止步前行的博客-CSDN博客_handlermapping和handleradapter
帮助理解 HandlerMapping与HandlerAdapters
//多种Controller实现
public interface Controller {

}

// 注意这里每个实现,都用了不同的方法名, 如果都用一样的话,就可以放到接口中了
class HttpController implements Controller {
	public void doHttpHandler() {
		System.out.println("http...");
	}
}

class SimpleController implements Controller {
	public void doSimplerHandler() {
		System.out.println("simple...");
	}
}

class AnnotationController implements Controller {
	public void doAnnotationHandler() {
		System.out.println("annotation...");
	}
}
// 定义一个Adapter接口
public interface HandlerAdapter {

	public boolean supports(Object handler);

	public void handle(Object handler);
}

// 多种适配器类
class SimpleHandlerAdapter implements HandlerAdapter {

	public void handle(Object handler) {
		((SimpleController) handler).doSimplerHandler();
	}

	public boolean supports(Object handler) {
		return (handler instanceof SimpleController);
	}
}

class HttpHandlerAdapter implements HandlerAdapter {

	public void handle(Object handler) {
		((HttpController) handler).doHttpHandler();
	}

	public boolean supports(Object handler) {
		return (handler instanceof HttpController);
	}
}

class AnnotationHandlerAdapter implements HandlerAdapter {

	public void handle(Object handler) {
		((AnnotationController) handler).doAnnotationHandler();
	}

	public boolean supports(Object handler) {

		return (handler instanceof AnnotationController);
	}
}
public class DispatchServlet {

	public static List<HandlerAdapter> handlerAdapters = new ArrayList<HandlerAdapter>();

	public DispatchServlet() {
		handlerAdapters.add(new AnnotationHandlerAdapter());
		handlerAdapters.add(new HttpHandlerAdapter());
		handlerAdapters.add(new SimpleHandlerAdapter());
	}

	public void doDispatch() {

		// 此处模拟SpringMVC从request取handler的对象,
		// 适配器可以获取到希望的Controller
		 HttpController controller = new HttpController();
		// AnnotationController controller = new AnnotationController();
		//SimpleController controller = new SimpleController();
		// 得到对应适配器
		HandlerAdapter adapter = getHandler(controller);
		// 通过适配器执行对应的controller对应方法
		adapter.handle(controller);

	}

	public HandlerAdapter getHandler(Controller controller) {
		//遍历:根据得到的controller(handler), 返回对应适配器
		for (HandlerAdapter adapter : this.handlerAdapters) {
			if (adapter.supports(controller)) {
				return adapter;
			}
		}
		return null;
	}

	public static void main(String[] args) {
		new DispatchServlet().doDispatch(); // http...
	}
}