基于OpenCV的图像翻转和镜像
我们将解释如何在Python中实现图像的镜像或翻转。大家只需要了解各种矩阵运算和矩阵操作背后的基本数学即可。
01. 依赖包要求
NumPy —用于矩阵运算并对其进行处理。
OpenCV —用于读取图像并将其转换为2D数组(矩阵)。
Matplotlib —用于将矩阵绘制为图像。

对于这个小型项目,我使用了著名的Lena图像,该图像主要用于测试计算机视觉模型。确保下载此映像并将其保存在当前工作目录中。
import cv2
import numpy as np
from matplotlib import pyplot as plt
02. 让我们开始吧
首先,我们使用imread()模块中的方法读取图像文件cv2。为此,我们只需要导入包并使用它即可。因此,通过这样做,我们获得了矩阵形式的图像。默认情况下,imread()该方法读取的图像BGR(Blue,Green,Red)格式。要读取的图像转换为常规格式,即,RGB(Red,Green,Blue),我们使用cvtColor()来自同一模块的方法cv2。
def read_this(image_file, gray_scale=False):
    image_src = cv2.imread(image_file)
    if gray_scale:
        image_rgb = cv2.cvtColor(image_src, cv2.COLOR_BGR2GRAY)
    else:
        image_rgb = cv2.cvtColor(image_src, cv2.COLOR_BGR2RGB)
    return image_rgb
上面的函数从传递的图像文件返回图像矩阵。如果我们要获取图像矩阵或格式,它由常规if和else条件组成。
镜像图像
要基本镜像图像,我们需要从左到右逐行反转矩阵。让我们考虑一个matrix A。
>>> A = [
       [4, 1, 1],
       [2, 8, 0],
       [3, 8, 1]
]
如果我们要镜像此矩阵(逐行),则它将是-
>>> import numpy as np
>>> mirror_ = np.fliplr(A)
>>> mirror_
[[1, 1, 4],
 [0, 8, 2],
 [1, 8, 3]]
我们也可以在不使用NumPy模块的情况下执行此操作。如果是这样,我们可以使用循环并反转每一行。如果在图像矩阵上执行相同的操作将花费一些时间,因为它们是非常大的矩阵,并且我们不希望我们的代码执行得非常慢。
def mirror_this(image_file, gray_scale=False, with_plot=False):
    image_rgb = read_this(image_file=image_file, gray_scale=gray_scale)
    image_mirror = np.fliplr(image_rgb)
    if with_plot:
        fig = plt.figure(figsize=(10, 20))
        ax1 = fig.add_subplot(2, 2, 1)
        ax1.axis("off")
        ax1.title.set_text('Original')
        ax2 = fig.add_subplot(2, 2, 2)
        ax2.axis("off")
        ax2.title.set_text("Mirrored")
        if not gray_scale:
            ax1.imshow(image_rgb)
            ax2.imshow(image_mirror)
        else:
            ax1.imshow(image_rgb, cmap='gray')
            ax2.imshow(image_mirror, cmap='gray')
        return True
    return image_mirror
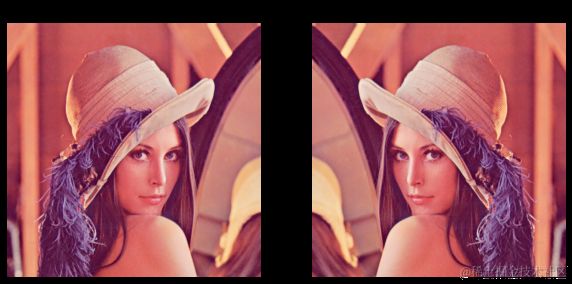
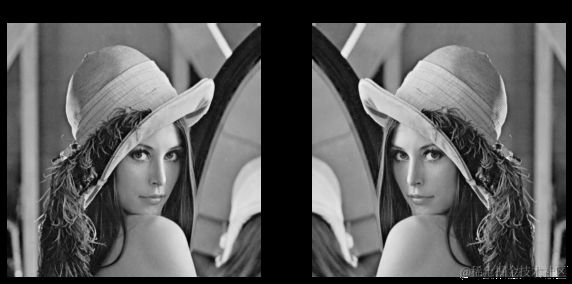
上面的函数返回一个图像矩阵,该矩阵从左向右逐行反转或翻转。
让我们绘制相同的内容-
mirror_this(image_file="lena_original.png", with_plot=True)
mirror_this(image_file="lena_original.png", gray_scale=True, with_plot=True)
翻转图像
要基本翻转图像,我们需要将矩阵从上到下逐列反转。让我们考虑一个matrix B。
>>> B = [
       [4, 1, 1],
       [2, 8, 0],
       [3, 8, 1]
]
如果我们要翻转此矩阵(按列),则它将是-
>>> import numpy as np
>>> flip_= np.flipud(B)
>>> flip_
[[3, 8, 1],
 [2, 8, 0],
 [4, 1, 1]]
我们NumPy用于翻转矩阵以保持代码的牢固性。
def flip_this(image_file, gray_scale=False, with_plot=False):
    image_rgb = read_this(image_file=image_file, gray_scale=gray_scale)
    image_flip = np.flipud(image_rgb)
    if with_plot:
        fig = plt.figure(figsize=(10, 20))
        ax1 = fig.add_subplot(2, 2, 1)
        ax1.axis("off")
        ax1.title.set_text('Original')
        ax2 = fig.add_subplot(2, 2, 2)
        ax2.axis("off")
        ax2.title.set_text("Flipped")
        if not gray_scale:
            ax1.imshow(image_rgb)
            ax2.imshow(image_flip)
        else:
            ax1.imshow(image_rgb, cmap='gray')
            ax2.imshow(image_flip, cmap='gray')
        return True
    return image_flip
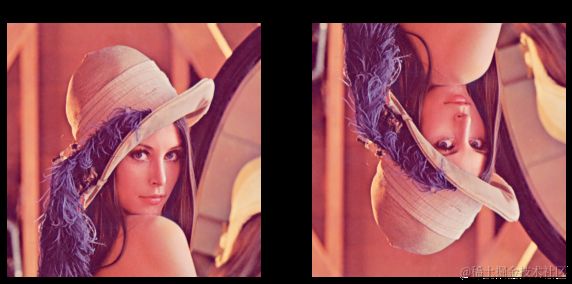
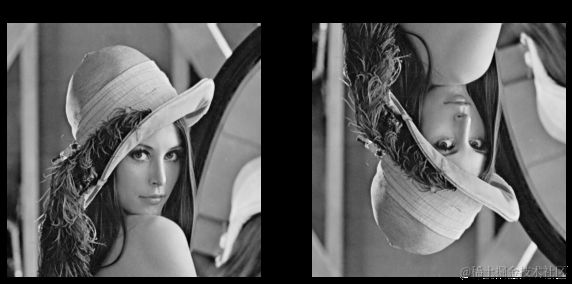
上面的函数返回一个图像矩阵,该矩阵从上向下向下按列反转或翻转。
让我们绘制相同的内容-
flip_this(image_file='lena_original.png', with_plot=True)
flip_this(image_file='lena_original.png', gray_scale=True, with_plot=True)
完整的代码
class ImageOpsFromScratch(object):
    def __init__(self, image_file):
        self.image_file = image_file
    def read_this(self, gray_scale=False):
        image_src = cv2.imread(self.image_file)
        if gray_scale:
            image_rgb = cv2.cvtColor(image_src, cv2.COLOR_BGR2GRAY)
        else:
            image_rgb = cv2.cvtColor(image_src, cv2.COLOR_BGR2RGB)
        return image_rgb
    def mirror_this(self, with_plot=True, gray_scale=False):
        image_rgb = self.read_this(gray_scale=gray_scale)
        image_mirror = np.fliplr(image_rgb)
        if with_plot:
            self.plot_it(orig_matrix=image_rgb, trans_matrix=image_mirror, head_text='Mirrored', gray_scale=gray_scale)
            return None
        return image_mirror
    def flip_this(self, with_plot=True, gray_scale=False):
        image_rgb = self.read_this(gray_scale=gray_scale)
        image_flip = np.flipud(image_rgb)
        if with_plot:
            self.plot_it(orig_matrix=image_rgb, trans_matrix=image_flip, head_text='Flipped', gray_scale=gray_scale)
            return None
        return image_flip
    def plot_it(self, orig_matrix, trans_matrix, head_text, gray_scale=False):
        fig = plt.figure(figsize=(10, 20))
        ax1 = fig.add_subplot(2, 2, 1)
        ax1.axis("off")
        ax1.title.set_text('Original')
        ax2 = fig.add_subplot(2, 2, 2)
        ax2.axis("off")
        ax2.title.set_text(head_text)
        if not gray_scale:
            ax1.imshow(orig_matrix)
            ax2.imshow(trans_matrix)
        else:
            ax1.imshow(orig_matrix, cmap='gray')
            ax2.imshow(trans_matrix, cmap='gray')
        return True

RUBY 复制 全屏
基本图像操作包
imo = ImageOpsFromScratch(image_file='lena_original.png')
### Mirroring ###
imo.mirror_this()
imo.mirror_this(gray_scale=True)
### Flipping ###
imo.flip_this()
imo.flip_this(gray_scale=True)
将显示以上图像结果。现在,所有内容都已排序,我们可以创建其他图像操作,例如equalize(),solarize()等等。