Qt使用MongoDB的c++接口:连接、创建、写入、读取
Qt使用MongoDB的c++接口
使用c++接口,连接数据库,创建表格,查找表格中的数据,写入一个图片文件,并从数据库中拿取图片数据再保存为图片。
本环境为windows10,如何编译MongoDB,如何在Qt上使用MongoDB,可以查看我的这一篇博客:Windows10编译MongoDB的c++版,并以Qt调用。
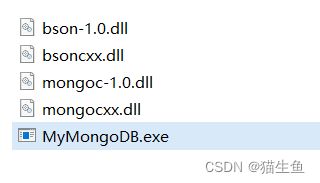
需要注意的是,在运行时需要将MongoDB依赖的一些dll库,与exe程序放在同一个目录下,否则会运行失败。
例如:

好了,直接上代码。
MyMongoDB.pro
QT += quick

CONFIG += c++11
CONFIG += c++17

CONFIG(debug,debug|release):{
    DESTDIR  = $$OUT_PWD/bin/debug
}
CONFIG(release,debug|release):{
    DESTDIR  = $$OUT_PWD/bin/release
}

# You can make your code fail to compile if it uses deprecated APIs.
# In order to do so, uncomment the following line.
#DEFINES += QT_DISABLE_DEPRECATED_BEFORE=0x060000    # disables all the APIs deprecated before Qt 6.0.0

SOURCES += \
        TestMain.cpp \
        main.cpp

RESOURCES += qml.qrc

# Additional import path used to resolve QML modules in Qt Creator's code model
QML_IMPORT_PATH =

# Additional import path used to resolve QML modules just for Qt Quick Designer
QML_DESIGNER_IMPORT_PATH =

# Default rules for deployment.
qnx: target.path = /tmp/$${TARGET}/bin
else: unix:!android: target.path = /opt/$${TARGET}/bin
!isEmpty(target.path): INSTALLS += target


# opencv库
win32:CONFIG(release, debug|release): LIBS += -LD:/Users/opencv4.4.0_gpu/install/x64/vc16/lib/ -lopencv_img_hash440 -lopencv_world440
else:win32:CONFIG(debug, debug|release): LIBS += -LD:/Users/opencv4.4.0_gpu/install/x64/vc16/lib/ -lopencv_img_hash440d -lopencv_world440d
else:unix:!macx: LIBS += -LD:/Users/opencv4.4.0/opencv/build/x64/vc15/lib/ -lopencv_world440
INCLUDEPATH += D:/Users/opencv4.4.0_gpu/install/include/opencv2
INCLUDEPATH += D:/Users/opencv4.4.0_gpu/install/include

# MongoDB库
LIBS += -L$$OUT_PWD/lib/mongoDB -lmongocxx -lbsoncxx
INCLUDEPATH += $$OUT_PWD/include/
INCLUDEPATH += $$OUT_PWD/include/mongoDB/mongocxx/v_noabi
INCLUDEPATH += $$OUT_PWD/include/mongoDB/bsoncxx/v_noabi

#boost路径
INCLUDEPATH += $$OUT_PWD/include/boost_1_81_0

HEADERS += \
    TestMain.h
TestMain.h
#ifndef TESTMAIN_H
#define TESTMAIN_H
#include 主要接口代码部分
TestMain.cpp
#include "TestMain.h"

using bsoncxx::builder::basic::kvp;
using bsoncxx::builder::basic::make_document;

TestMain::TestMain()
{

    mongocxx::instance inst{};

    mongocxx::client conn{mongocxx::uri{"mongodb://localhost/27017"}};
    if (!conn.operator bool()) {
        qDebug() << "连接失败!";
    }
    qDebug() << "连接成功!";


    qDebug() << "**********查数据库名**********";
    try {
        std::vector<std::string> dbNames = conn.list_database_names();
        for(std::string name : dbNames) {
            qDebug() << "数据库名:" << QString::fromStdString(name);
        }
    } catch(mongocxx::exception e) {
        qDebug() << e.what();
        return ;
    }


    qDebug() << "**********查数据库表名**********";
    try {
        std::vector<std::string> ctNames = conn["DemoDB"].list_collection_names();
        for(std::string name : ctNames) {
            qDebug() << "数据库[DemoDB]表名:" << QString::fromStdString(name);
        }
    } catch(mongocxx::exception e) {
        qDebug() << e.what();
        return ;
    }

    mongocxx::client_session session = conn.start_session();
    qDebug() << "**********查找数据,条件为:uid==1**********";
    try {
        auto cursor = conn["DemoDB"]["my_collection"].find(session, make_document(kvp("uid", 1)));
        for(auto &&info : cursor) {
            qDebug().noquote() << QString::fromStdString(bsoncxx::to_json(info));
        }
    } catch(mongocxx::exception e) {
        qDebug() << e.what();
        return ;
    }

    qDebug() << "**********查找全部数据**********";
    try {
        auto cursor = conn["DemoDB"]["my_collection"].find({});
        for (bsoncxx::document::view info : cursor) {
            qDebug().noquote() << QString::fromStdString(bsoncxx::to_json(info));
        }
    } catch(mongocxx::exception e) {
        qDebug() << e.what();
        return ;
    }

    qDebug() << "**********创建一个表**********";
    try {
        conn["DemoDB"].create_collection("my_image");
    } catch(mongocxx::exception e) {
        qDebug() << e.what();
    }

    qDebug() << "**********插入图片**********";
#if 1
    try {
        QString path = "E:/work/Image/Dog/1.jpg";
        QFile imgFile(path);
        imgFile.open(QIODevice::ReadOnly);
        QString timeName = QDateTime::currentDateTime().toString("yyyyMMddhhmmsss")+".jpg";
        conn["DemoDB"]["my_image"].insert_one(session, make_document(
                                                       kvp("name",timeName.toStdString()),
                                                       kvp("label","ok"),
                                                       kvp("size",imgFile.size()),
                                                       kvp("content",imgFile.readAll().toStdString())));
        imgFile.close();
    } catch(mongocxx::exception e) {
        qDebug() << e.what();
        return ;
    }
#endif

    qDebug() << "**********显示图片**********";
    try {
        QString path = "./1.jpg";
        QFile imgFile(path);
        mongocxx::cursor cursor = conn["DemoDB"]["my_image"].find(session, make_document(kvp("label", "ok")));
        for(bsoncxx::document::view info : cursor) {
            bsoncxx::document::element element = info["name"];
            qDebug() << QString::fromStdString(element.get_string().value.to_string());
            QByteArray imgData = QByteArray::fromStdString(info["content"].get_string().value.to_string());
            QFile imgFile(path);
            imgFile.open(QIODevice::WriteOnly | QIODevice::Truncate);
            imgFile.write(imgData);
            imgFile.close();
        }
    }  catch (mongocxx::exception e) {
        qDebug() << e.what();
        return ;
    }

}

TestMain::~TestMain()
{
}
main.cpp:
#include 2023/09/11 更新:
以_id为条件进行查询、删除数据。
_id是数据库表中,每条数据的唯一标识,在插入数据时由MongoDB自动生成。
_id在数据库表中的格式为ObjectId,以shell命令操作为:
db.my_collection.find({"_id" : ObjectId("64fe80be57f59d7f24051931")})
db.my_collection.deleteOne({"_id" : ObjectId("64fe80be57f59d7f24051931")})
而在c++进行查询和删除时,不能直接使用"64fe80be57f59d7f24051931",而是需要转成MongoDB能识别的ObjectId。
bsoncxx::oid myid("64fe80be57f59d7f24051931");
auto delRes = conn["DemoDB"]["my_collection"].delete_one(make_document(kvp("_id", myid)));
2023/10/24 更新:
ISODate数据类型的增加、查询。
MongoDB有自己的时间类型,Date和ISODate,在数据处理方面一般ISODate用的更多一些。
在shell中增加、查询一个有ISODate的数据:
db.new_table.insert({name:"test", date:ISODate()})
db.new_table.find({ date: {"$gt":ISODate("2023-10-20T01:16:33.303Z")} })
在c++中增加、查询一个有ISODate的数据:
auto collection = conn["DemoDB"]["new_table"];
auto result = collection.insert_one(make_document(
                                        kvp("name", "OK"),
                                        kvp("date", bsoncxx::types::b_date(std::chrono::system_clock::now()))
                                        ));

std::tm tm = {};
std::stringstream ss("2023-10-24 10:03:20");
ss >> std::get_time(&tm, "%Y-%m-%d %H:%M:%S");
bsoncxx::types::b_date iso_date(std::chrono::system_clock::from_time_t(std::mktime(&tm)));
mongocxx::client_session session = (*m_client).start_session();
auto cursor = collection.find(session,
                              make_document(kvp("date",
                                                make_document(kvp("$gt", iso_date)))));
其中,MongoDB的ISODate显示为:“date” : ISODate(“2023-10-24T01:24:20.628Z”)
T:表示时间的分隔符,表示这是一个ISO 8601日期时间格式;
Z:表示时区,表示这个日期时间是在UTC(协调世界时)时区;
需要注意的是,在 MongoDB 中存储的日期和时间数据都是以 UTC 时区为基准的,而中国标准时间是CST,因此在处理日期和时间数据时需要注意时区的转换。
转换公式:CST=UTC+8。
也就是说,MongoDB的时间,其实比我们看到的中国标准时间,要慢了8小时。
MongoDB范围查询
(>) 大于 - $gt
(<) 小于 - $lt
(>=) 大于等于 - $gte
(<= ) 小于等于 - $lte