使用FastAPI for Python构建应用实战教程
FastAPI是一个快速和轻量级的网络框架,用于使用Python 3.6及以上版本构建现代应用编程接口。在本教程中,我们将介绍用FastAPI构建应用程序的基础知识,你将了解到为什么它被提名为2021年最佳开源框架之一。
FastAPI的优势
下面是FastAPI框架给项目带来的一些优势。
- 速度:顾名思义,FastAPI是一个非常快的框架。它的速度可与Go和Node.js相媲美,后者被普遍认为是构建API的最快选择之一。
- 易于学习和编码:FastAPI已经想好了你制作一个生产就绪的API所需要的几乎一切。作为一个使用FastAPI的开发者,你不需要从头开始编码所有的东西。只需几行代码,你就可以拥有一个准备好部署的RESTful API。
- 全面的文档:FastAPI使用OpenAPI文档标准,因此可以动态地生成文档。该文档提供关于FastAPI的端点、响应、参数和返回代码的详细信息。
- 具有较少错误的API:FastAPI支持自定义数据验证,这使开发人员能够以更少的错误构建API。FastAPI的开发者吹嘘说,该框架导致了更少的人为错误–多达40%的错误。
- 类型提示:类型模块是在Python 3.5中引入的。这使你能够声明一个变量的
type。当一个变量的类型被声明时,IDE能够提供更好的支持,并更准确地预测错误。
如何开始使用FastAPI
要遵循本教程并开始使用FastAPI,你需要先做几件事。
确保你有一个程序员的文本编辑器/IDE,如Visual Studio Code。其他选择包括Sublime Text和Espresso。
让你的 Python 应用程序和它们的实例在虚拟环境中运行是一种常见的做法。虚拟环境允许不同的软件包集和配置同时运行,并避免因软件包版本不兼容而产生冲突。
要创建一个虚拟环境,打开你的终端并运行这个命令。
$ python3 -m venv env你还需要激活这个虚拟环境。做到这一点的命令将取决于你所使用的操作系统和外壳。下面是一些CLI激活的例子,适用于一些环境:
# On Unix or MacOS (bash shell):

/path/to/venv/bin/activate

# On Unix or MacOS (csh shell):

/path/to/venv/bin/activate.csh

# On Unix or MacOS (fish shell):

/path/to/venv/bin/activate.fish

# On Windows (command prompt):

\path\to\venv\Scripts\activate.bat

# On Windows (PowerShell):

\path\to\venv\Scripts\Activate.ps1
(一些认识Python的IDE也可以被配置为激活当前的虚拟环境)。
现在,安装FastAPI:
$ pip3 install fastapiFastAPI是一个构建API的框架,但为了测试你的API,你需要一个本地的Web服务器。 Uvicorn是一个用于Python的快如闪电的异步服务器网关接口(ASGI)网络服务器,非常适合于开发。要安装Uvicorn,运行这个命令:
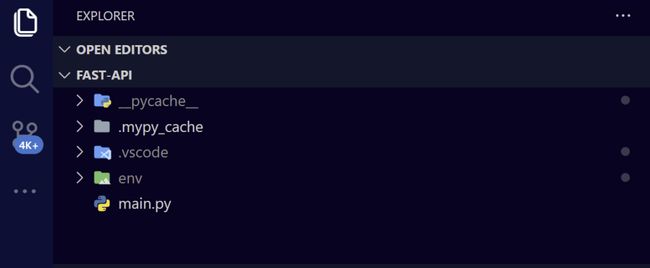
$ pip3 install "uvicorn[standard]"安装成功后,在你项目的工作目录下创建一个名为main.py的文件。这个文件将是你的应用程序的入口点。
在IDE中查看一个基本的FastAPI项目
一个快速的FastAPI例子
你将通过快速设置一个示例端点来测试你的FastAPI安装。在你的main.py文件中,粘贴以下代码,然后保存该文件:
# main.py

from fastapi import FastAPI

app = FastAPI()

@app.get("/")

async def root():

return {"greeting":"Hello world"}
上面的片段创建了一个基本的FastAPI端点。下面是对每一行所做工作的总结:
from fastapi import FastAPI: 你的API的功能是由FastAPI Python类提供的。app = FastAPI(): 这将创建一个FastAPI实例。@app.get("/"): 这是一个python装饰器,向FastAPI指定它下面的函数负责处理请求。@app.get("/"): 这是一个指定路由的装饰器。这将在网站的路由上创建一个GET方法。然后,结果由封装的函数返回。- 其他可能用于通信的操作包括
@app.post(),@app.put(),@app.delete(),@app.options(),@app.head(),@app.patch(), and@app.trace().
在文件目录中,在你的终端运行以下命令来启动API服务器:
$ uvicorn main:app --reload在这个命令中,main是你的模块的名字。app 对象是你的应用程序的实例,并被导入ASGI服务器。 --reload 标志告诉服务器在你做任何改变时自动重新加载。
你应该在你的终端看到类似这样的东西:
$ uvicorn main:app --reload

INFO: Will watch for changes in these directories: ['D:\\WEB DEV\\Eunit\\Tests\\fast-api']

INFO: Uvicorn running on http://127.0.0.1:8000 (Press CTRL+C to quit)

INFO: Started reloader process [26888] using WatchFiles

INFO: Started server process [14956]

INFO: Waiting for application startup.

INFO: Application startup complete.
在你的浏览器中,导航到 http://localhost:8000 ,确认你的API正在工作。你应该看到 “Hello”。”World “作为一个JSON对象出现在页面上。这说明用FastAPI创建一个API是多么容易。你所要做的就是定义一个路由并返回你的Python字典,如上面片段的第6行所示。
网页浏览器中的FastAPI Hello World应用程序
使用类型提示
如果你使用Python,你已经习惯于用基本的数据类型来注释变量,如 int, str, float, 和 bool。然而,从 Python 3.9 版本开始,高级数据结构被引入。这使得你可以使用数据结构,如 dictionaries, tuples, 和 lists。通过FastAPI的类型提示,你可以使用pydantic模型来构造你的数据模式,然后,使用pydantic模型进行类型提示,并从所提供的数据验证中获益。
在下面的例子中,我们用一个简单的餐价计算器 calculate_meal_fee 来演示Python中类型提示的使用:
def calculate_meal_fee(beef_price: int, meal_price: int) -> int:

total_price: int = beef_price + meal_price

return total_price

print("Calculated meal fee", calculate_meal_fee(75, 19))
注意,类型提示不会改变你的代码运行方式。
FastAPI交互式API文档
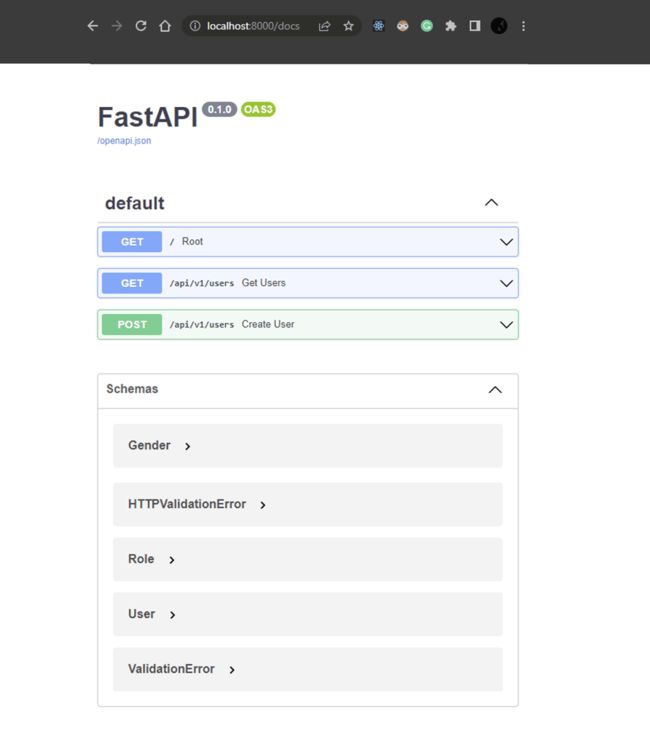
FastAPI使用Swagger UI来提供自动交互式API文档。要访问它,请导航到 http://localhost:8000/docs,你会看到一个屏幕,上面有你所有的端点、方法和模式。
Swagger UI的FastAPI的文档
这个自动的、基于浏览器的API文档是由FastAPI提供的,你不需要做任何其他事情就可以利用它。
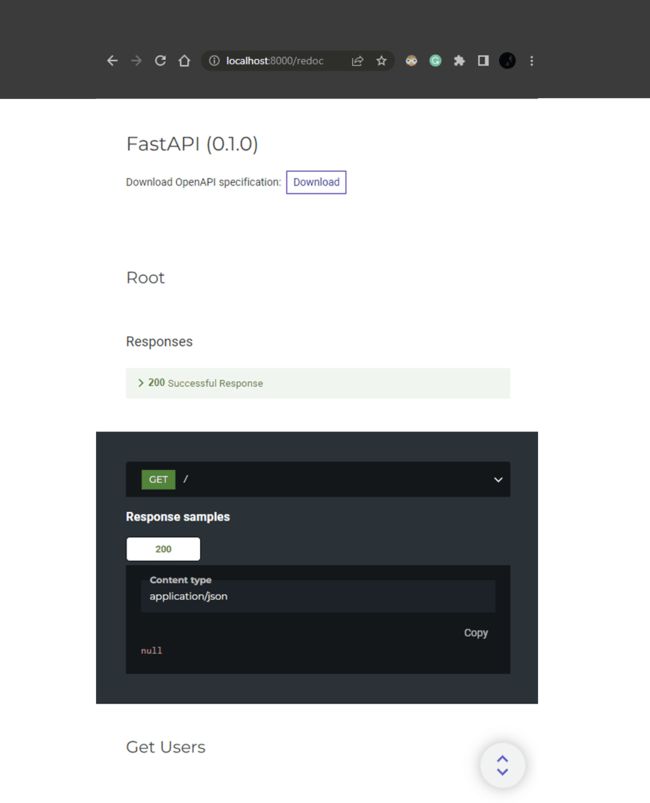
另一个基于浏览器的API文档,也是由FastAPI提供的,是Redoc。要访问Redoc,请导航到 http://localhost:8000/redoc,在那里你会看到你的端点、方法和它们各自的响应的列表。
Redoc的FastAPI的文档
在FastAPI中设置路由
@app 装饰器允许你指定路由的方法,如 @app.get or @app.post,并支持 GET, POST, PUT, and DELETE,以及不太常见的选项:HEAD, PATCH, 和 TRACE。
使用FastAPI构建应用程序
在本教程中,我们将指导你用FastAPI构建一个CRUD应用程序。该应用程序将能够:
- 创建一个用户
- 读取一个用户的数据库记录
- 更新一个现有的用户
- 删除一个特定的用户
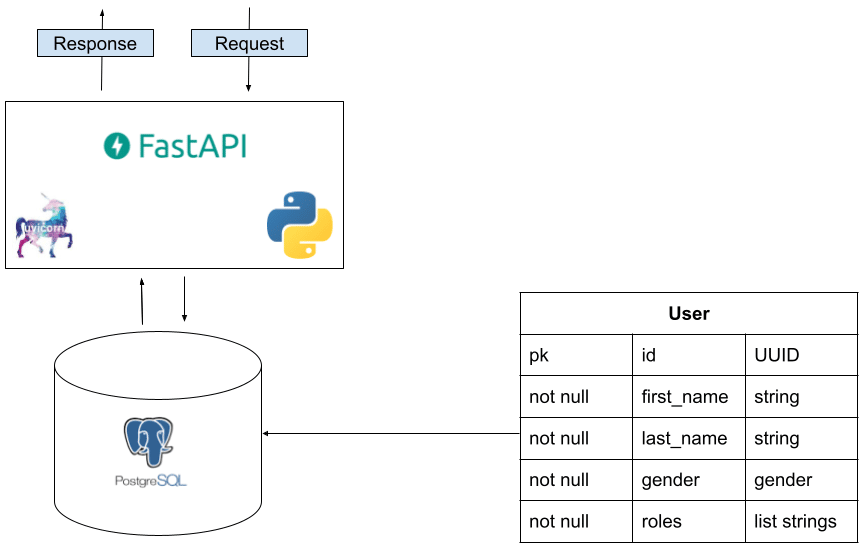
为了执行这些CRUD操作,你将创建暴露API端点的方法。其结果将是一个可以存储用户列表的内存数据库。
用于CRUD示例的数据库表结构
你将使用pydantic库,使用Python类型注释进行数据验证和设置管理。为了本教程的目的,你将把你的数据的形状声明为带有属性的类。
本教程将使用内存中的数据库。这是为了让你快速开始使用FastAPI来构建你的API。然而,对于生产来说,你可以利用你选择的任何数据库,如PostgreSQL、MySQL、SQLite,甚至是Oracle。
构建应用程序
你将从创建你的用户模型开始。该用户模型将有以下属性:
id: 一个通用唯一标识符(UUID)first_name: 用户的名字last_name: 用户的姓氏gender: 用户的性别roles: 这是一个包含admin和user角色的列表
首先在你的工作目录中创建一个名为models.py的新文件,然后将以下代码粘贴到models.py中,创建你的模型:
# models.py

from typing import List, Optional

from uuid import UUID, uuid4

from pydantic import BaseModel

from enum import Enum

from pydantic import BaseModel

class Gender(str, Enum):

male = "male"

female = "female"

class Role(str, Enum):

admin = "admin"

user = "user"

class User(BaseModel):

id: Optional[UUID] = uuid4()

first_name: str

last_name: str

gender: Gender

roles: List[Role]
在上面的代码中:
- 你的
User类扩展了BaseModel,然后从pydantic导入。 - 你定义了用户的属性,如上所述。
下一步是创建你的数据库。用以下代码替换你的main.py文件的内容:
# main.py

from typing import List

from uuid import uuid4

from fastapi import FastAPI

from models import Gender, Role, User

app = FastAPI()

db: List[User] = [

User(

id=uuid4(),

first_name="John",

last_name="Doe",

gender=Gender.male,

roles=[Role.user],

),

User(

id=uuid4(),

first_name="Jane",

last_name="Doe",

gender=Gender.female,

roles=[Role.user],

),

User(

id=uuid4(),

first_name="James",

last_name="Gabriel",

gender=Gender.male,

roles=[Role.user],

),

User(

id=uuid4(),

first_name="Eunit",

last_name="Eunit",

gender=Gender.male,

roles=[Role.admin, Role.user],

),

]在main.py中:
- 你用
List的类型初始化了db,并传入了User模型 - 你创建了一个有四个用户的内存数据库,每个用户都有必要的属性,如
first_name,last_name,gender, 和roles。用户Eunit被分配了admin和user的角色,而其他三个用户只被分配了user的角色。
读取数据库记录
你已经成功地建立了你的内存数据库,并为其填充了用户,所以下一步是建立一个端点,以返回所有用户的列表。这就是FastAPI的作用。
在你的main.py文件中,在你的 Hello World 端点下面粘贴以下代码:
# main.py

@app.get("/api/v1/users")

async def get_users():

return db
这段代码定义了端点 /api/v1/users,并创建了一个异步函数get_users,它返回数据库db的所有内容。
保存你的文件,你可以测试你的用户端点。在你的终端运行以下命令来启动API服务器:
$ uvicorn main:app --reload在你的浏览器中,导航到 http://localhost:8000/api/v1/users。这应该会返回你所有用户的列表,如下图所示:
通过FastAPI数据库读取请求获取的用户数据
在这个阶段,你的main.py文件将看起来像这样:
# main.py

from typing import List

from uuid import uuid4

from fastapi import FastAPI

from models import Gender, Role, User

app = FastAPI()

db: List[User] = [

User(

id=uuid4(),

first_name="John",

last_name="Doe",

gender=Gender.male,

roles=[Role.user],

),

User(

id=uuid4(),

first_name="Jane",

last_name="Doe",

gender=Gender.female,

roles=[Role.user],

),

User(

id=uuid4(),

first_name="James",

last_name="Gabriel",

gender=Gender.male,

roles=[Role.user],

),

User(

id=uuid4(),

first_name="Eunit",

last_name="Eunit",

gender=Gender.male,

roles=[Role.admin, Role.user],

),

]

@app.get("/")

async def root():

return {"Hello": "World",}

@app.get("/api/v1/users")

async def get_users():

return db
创建数据库记录
下一步是创建一个端点,在你的数据库中创建一个新的用户。将下面的片段粘贴到你的main.py文件中:
# main.py

@app.post("/api/v1/users")

async def create_user(user: User):

db.append(user)

return {"id": user.id}
在这个片段中,你定义了提交新用户的端点,并使用 @app.post 装饰器来创建一个 POST 方法。
你还创建了函数 create_user,它接受 user 模型的 User,并将新创建的用户追加(添加)到数据库 db 中。最后,端点返回一个新创建的用户的 id 的JSON对象。
你将不得不使用FastAPI提供的自动API文档来测试你的端点,如上所示。这是因为你不能使用网络浏览器进行发布请求。导航到 http://localhost:8000/docs,使用SwaggerUI提供的文档进行测试。
FastAPI POST请求的参数
删除数据库记录
由于你正在建立一个CRUD应用程序,你的应用程序将需要具有删除指定资源的能力。在本教程中,你将创建一个端点来删除一个用户。
将以下代码粘贴到你的main.py文件中:
# main.py

from uuid import UUID

from fastapi HTTPException

@app.delete("/api/v1/users/{id}")

async def delete_user(id: UUID):

for user in db:

if user.id == id:

db.remove(user)

return

raise HTTPException(

status_code=404, detail=f"Delete user failed, id {id} not found."

)
下面是对这段代码的逐行分解:
@app.delete("/api/v1/users/{id}"): 你使用@app.delete()装饰器创建了删除端点。路径仍然是/api/v1/users/{id},但随后它检索了id,这是一个对应于用户id的路径变量。async def delete_user(id: UUID):: 创建delete_user函数,从URL中获取id。for user in db:: 这告诉应用程序循环浏览数据库中的用户,并检查所传递的id是否与数据库中的用户相符。db.remove(user): 如果id与用户匹配,该用户将被删除;否则,将产生一个HTTPException,状态码为404。
FastAPI DELETE请求的参数
更新数据库记录
你将创建一个端点来更新一个用户的详细信息。可以更新的细节包括以下参数: first_name, last_name, 和 roles。
在你的models.py文件中,在你的 User 模型下粘贴以下代码,也就是在 User(BaseModel): 类:
# models.py

class UpdateUser(BaseModel):

first_name: Optional[str]

last_name: Optional[str]

roles: Optional[List[Role]]在这个片段中,UpdateUser 类扩展了 BaseModel。然后,你将可更新的用户参数,如 first_name, last_name, 和 roles,设置为可选。
现在你将创建一个端点来更新一个特定用户的详细信息。在你的main.py文件中,在 @app.delete 装饰器之后粘贴以下代码:
# main.py

@app.put("/api/v1/users/{id}")

async def update_user(user_update: UpdateUser, id: UUID):

for user in db:

if user.id == id:

if user_update.first_name is not None:

user.first_name = user_update.first_name

if user_update.last_name is not None:

user.last_name = user_update.last_name

if user_update.roles is not None:

user.roles = user_update.roles

return user.id

raise HTTPException(status_code=404, detail=f"Could not find user with id: {id}")
在上面的代码中,你已经做了以下工作:
- 创建
@app.put("/api/v1/users/{id}"),即更新端点。它有一个变量参数id,与用户的id相对应。 - 创建了一个名为
update_user的方法,它接收了UpdateUser类和id。 - 使用一个
for循环来检查与所传id相关的用户是否在数据库中。 - 检查用户的任何参数是否
is not None(非空)。如果任何参数,如first_name,last_name, 或roles,,不是null,那么它就被更新。 - 如果操作成功,将返回用户ID。
- 如果没有找到用户,就会产生一个
HTTPException异常,状态代码为404,信息为Could not find user with id: {id}的用户。
要测试这个端点,确保你的Uvicorn服务器正在运行。如果它没有运行,请输入这个命令:
uvicorn main:app --reload下面是测试的屏幕截图。
FastAPI UPDATE请求的参数
小结
在本教程中,你已经了解了Python的FastAPI框架,并亲眼目睹了如何快速启动和运行一个由FastAPI驱动的应用程序。你学会了如何使用该框架建立 CRUD API 端点 – 创建、读取、更新和删除数据库记录。


