Istio 实战:WasmPlugin(Proxy-Wasm 插件)开发(实现限流和修改请求和响应的 header)
更多 istio 文章:Istio 专栏目录
WasmPlugin 的典型应用
- 限流:当前 envoy 提供的限流能力虽然比较强大,但主要提供了一些 api,在使用上对用户不够友好,且全局限流对每个请求都调用一次限流服务,性能损耗较大。因此,可以通过开发限流过滤器,提高易用性和时延
- 应用层协议解析:主要是能实现对 http 协议中 request 和 response 的 header 和 trailer 进行自定义开发
环境准备
proxy-wasm sdk 有支持多语言开发(点击前往),本实例以 go 语言为例(github 地址)
kubernetes
kubernetes 安装省略
示例使用的 kubernetes 版本为 1.23.4
istio
istio 安装省略
示例使用的 istio 版本为 1.16.3
docker
docker 安装省略
打包镜像使用
go
go 安装省略
tinygo
此 SDK 由 TinyGo 提供支持,不支持官方的 Go 编译器。因此需要安装 tinygo(tinygo 安装指南)
以 windows 安装为例,官网提供了四种安装方式

如下所示,下载压缩包后解压到指定位置

将 bin 路径添加到环境变量 Path 中

此时运行 tinygo version 应该输出版本信息
![]()
镜像仓库
推荐使用阿里云镜像仓库,主要是免费!(点击前往)
示例一:修改请求和响应的 header
示例代码 github 地址(点击前往)
如果对您有帮助,请点个免费的 star,谢谢!
创建 go 项目
创建好文件夹后执行 go mod init go-wasm 生成依赖管理工具
添加 main.go
// 读取 wasmplugin crd 中的 pluginConfig 内容
var customData string

func (p *pluginContext) OnPluginStart(pluginConfigurationSize int) types.OnPluginStartStatus {
	proxywasm.LogDebug("loading plugin config")
	data, err := proxywasm.GetPluginConfiguration()
	if data == nil {
		return types.OnPluginStartStatusOK
	}

	if err != nil {
		proxywasm.LogCriticalf("error reading plugin configuration: %v", err)
		return types.OnPluginStartStatusFailed
	}

	// 插件启动的时候读取配置
	customData = string(data)

	return types.OnPluginStartStatusOK
}

// Additional headers supposed to be injected to response headers.
var additionalResponseHeaders = map[string]string{
	"who-am-i":      "go-wasm-extension",
	"injected-by":   "istio-api!",
	"devloper-name": "mm",
	"which-header":  "response",
	// 定义自定义的header,每个返回中都添加以上header
}

// 修改 respense headers
func (ctx *httpHeaders) OnHttpResponseHeaders(numHeaders int, endOfStream bool) types.Action {
	//添加 headr
	for key, value := range additionalResponseHeaders {
		proxywasm.AddHttpResponseHeader(key, value)
	}

	//为了便于演示观察,将配置信息也加到返回头里
	proxywasm.AddHttpResponseHeader("customData", customData)
	return types.ActionContinue
}

// Additional headers supposed to be injected to request headers.
var additionalRequestHeaders = map[string]string{
	"devloper-name": "mm",
	"which-header":  "request",
}

// 修改 request headers
func (ctx *httpHeaders) OnHttpRequestHeaders(int, bool) types.Action {
	//添加 headr
	for key, value := range additionalRequestHeaders {
		proxywasm.ReplaceHttpRequestHeader(key, value)
	}
	return types.ActionContinue
}
添加 dockerfile
FROM scratch

COPY main.wasm ./plugin.wasm
go 代码生成 wasm 文件
tinygo build -o main.wasm -scheduler=none -target=wasi main.go
生成镜像,推送阿里仓库
# 注意最后面的点号 .
docker build -t registry.cn-hangzhou.aliyuncs.com/ydkmm/wasm:4 .

docker push registry.cn-hangzhou.aliyuncs.com/ydkmm/wasm:4
部署 demo 程序
参考 httpbin 程序(点击前往)
部署 wasmplugin
执行 kubectl apply -f go-wasm.yaml 创建资源
注意和之前的 httpbin 程序在同一命名空间
apiVersion: extensions.istio.io/v1alpha1
kind: WasmPlugin
metadata:
  name: my-wasm
  namespace: mm-wasm
spec:
  selector:
    matchLabels:
      app: httpbin
  ## 编译好的镜像
  url: oci://registry.cn-hangzhou.aliyuncs.com/ydkmm/wasm:3
  #插件的配置信息,在代码中可以获取到json string
  pluginConfig:
    testConfig: abcddeeeee
    listconfig:
     - abc
     - def
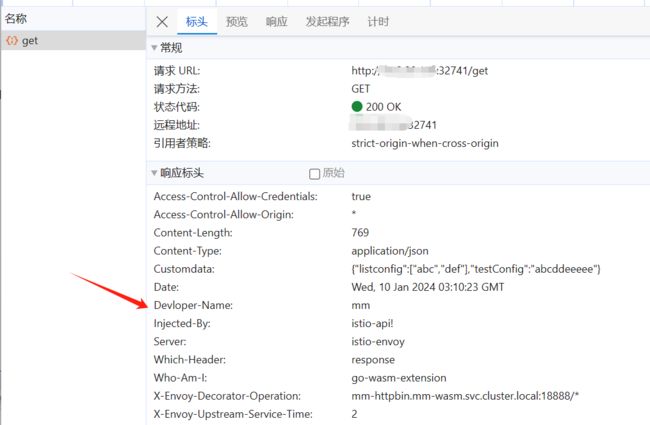
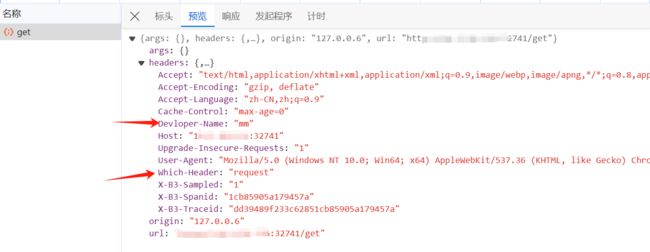
查看效果
浏览器访问 httpbin 服务

f12 查看具体的 header


示例二:限流
示例代码 github 地址(点击前往)
如果对您有帮助,请点个免费的 star,谢谢!
核心代码
主要是通过当前请求的时间戳和记录的令牌桶填充时间 lastRefillNanoSec 对比,超过 1s 则重新填充令牌桶并刷新 lastRefillNanoSec,否则令牌数量减一
// 令牌桶限流
current := time.Now().UnixNano()
// We use nanoseconds() rather than time.Second() because the proxy-wasm has the known limitation.
// TODO(incfly): change to time.Second() once https://github.com/proxy-wasm/proxy-wasm-cpp-host/issues/199
// is resolved and released.
if current > ctx.pluginContext.lastRefillNanoSec+1e9 {
	ctx.pluginContext.remainToken = 5
	ctx.pluginContext.lastRefillNanoSec = current
}
proxywasm.LogCriticalf("Current time %v, last refill time %v, the remain token %v",
	current, ctx.pluginContext.lastRefillNanoSec, ctx.pluginContext.remainToken)
if ctx.pluginContext.remainToken == 0 {
	if err := proxywasm.SendHttpResponse(403, [][2]string{
		{"powered-by", "proxy-wasm-go-sdk!!"},
	}, []byte("rate limited, wait and retry."), -1); err != nil {
		proxywasm.LogErrorf("failed to send local response: %v", err)
		proxywasm.ResumeHttpRequest()
	}
	return types.ActionPause
}
ctx.pluginContext.remainToken -= 1

