SpringBoot内嵌Tomcat启动流程
前言
Spring MVC 让开发者不用了解 Servlet 细节,专注于 Controller 编写 API 接口。Spring Boot 更是采用约定大于配置的设计思想,通过内嵌 Tomcat 的方式让开发者可以快速构建并部署一个 Web 应用。怎么做到的呢?
Tomcat启动方式
早期的开发,一般是基于 Spring 和 Spring MVC 构建我们的应用,然后把项目打成 War 包。在服务器上安装 Tomcat,把我们的 War 包放到对应的 webapp 目录下,启动 Tomcat 服务就可以访问了。
其实要部署我们的服务,没必要这么繁琐,通过代码启动 Tomcat 早就不是新鲜事了。
我这里写一个示例,只引入 Spring MVC 和 Tomcat 依赖:
<dependencies>
  <dependency>
    <groupId>org.springframeworkgroupId>
    <artifactId>spring-webmvcartifactId>
    <version>5.3.31version>
  dependency>
  <dependency>
    <groupId>org.apache.tomcat.embedgroupId>
    <artifactId>tomcat-embed-coreartifactId>
    <version>9.0.83version>
  dependency>
dependencies>
编写我们的 Controller
@RestController
public class HelloContrller {

    @RequestMapping("hello")
    public String hello() {
        return "hello world!";
    }
}
再编写我们的启动类,手动把 Tomcat 给启动起来并注册 DispatcherServlet。
@Configuration
@ComponentScan
public class Application {
    public static void main(String[] args) throws Exception {
        AnnotationConfigWebApplicationContext context = new AnnotationConfigWebApplicationContext();
        context.register(Application.class);
        context.refresh();

        Tomcat tomcat = new Tomcat();
        Connector connector = new Connector();
        connector.setPort(8080);
        tomcat.getService().addConnector(connector);

        final String contextPath = "";
        StandardContext standardContext = new StandardContext();
        standardContext.setPath(contextPath);
        standardContext.addLifecycleListener(new Tomcat.FixContextListener());
        tomcat.getHost().addChild(standardContext);

        standardContext.addServletContainerInitializer(new ServletContainerInitializer() {
            @Override
            public void onStartup(Set<Class<?>> c, ServletContext ctx) throws ServletException {
                System.err.println("Servlet容器初始化...");
                DispatcherServlet servlet = new DispatcherServlet(context);
                tomcat.addServlet(contextPath, "DispatcherServlet", servlet);
                standardContext.addServletMappingDecoded("/*", "DispatcherServlet");
            }
        }, Collections.EMPTY_SET);
        tomcat.start();
    }
}
运行 Application 类,即可访问服务
curl localhost:8080/hello
hello world!
Spring Boot 底层其实也是这么干的,一起来分析下吧。
设计实现
回到程序启动的入口,为什么执行下面一行代码,Web 服务就起来了。
SpringApplication.run(Application.class, args);
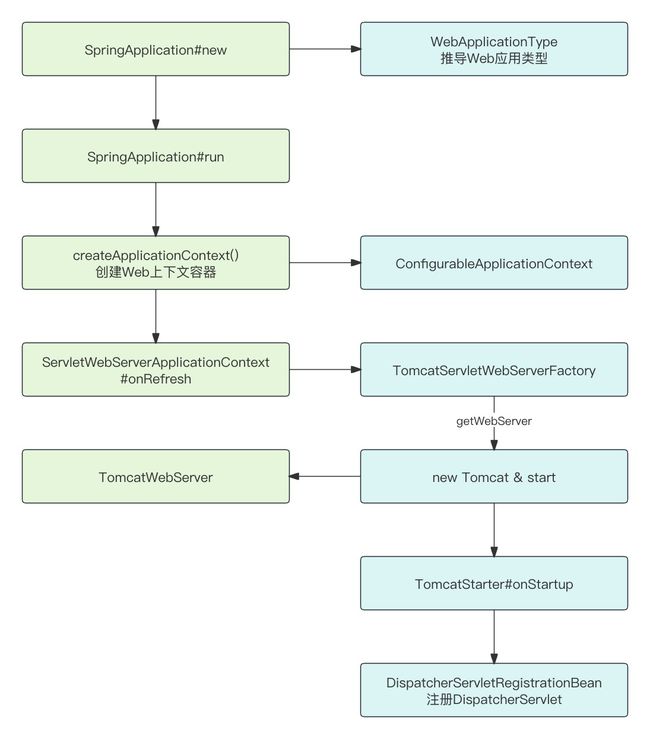
Spring Boot 首先会实例化一个 SpringApplication 对象,在构造函数里,首先要推导出 Web 应用类型,才好启对应的服务。
public enum WebApplicationType {
	NONE,
    SERVLET,
    REACTIVE;
}
- NONE:无需启动 Web 服务
- SERVLET:基于 Servlet 容器的 Web 应用
- REACTIVE:响应时 Web 应用
推导的方法是WebApplicationType#deduceFromClasspath,原理是检查 ClassPath 路径下是否存在对应的类。比如:存在org.springframework.web.reactive.DispatcherHandler类那就是 SERVLET 类型(不绝对)
private static final String[] SERVLET_INDICATOR_CLASSES = { "javax.servlet.Servlet",
        "org.springframework.web.context.ConfigurableWebApplicationContext" };
private static final String WEBMVC_INDICATOR_CLASS = "org.springframework.web.servlet.DispatcherServlet";
private static final String WEBFLUX_INDICATOR_CLASS = "org.springframework.web.reactive.DispatcherHandler";
private static final String JERSEY_INDICATOR_CLASS = "org.glassfish.jersey.servlet.ServletContainer";

static WebApplicationType deduceFromClasspath() {
    if (ClassUtils.isPresent(WEBFLUX_INDICATOR_CLASS, null) && !ClassUtils.isPresent(WEBMVC_INDICATOR_CLASS, null)
            && !ClassUtils.isPresent(JERSEY_INDICATOR_CLASS, null)) {
        return WebApplicationType.REACTIVE;
    }
    for (String className : SERVLET_INDICATOR_CLASSES) {
        if (!ClassUtils.isPresent(className, null)) {
            return WebApplicationType.NONE;
        }
    }
    return WebApplicationType.SERVLET;
}
Spring Boot 本质还是一个 Spring 应用,所以它肯定是要依赖上下文容器对象的。所以在run()里它会调用createApplicationContext()根据 Web 应用类型创建对应的 ConfigurableApplicationContext。不同的 Web 应用类型对应不同的实现类,创建职责交给了DefaultApplicationContextFactory#create,它会去解析META-INF/spring.factories文件里配置的工厂类,然后判断哪个工厂类支持创建。
private <T> T getFromSpringFactories(WebApplicationType webApplicationType,
        BiFunction<ApplicationContextFactory, WebApplicationType, T> action, Supplier<T> defaultResult) {
    for (ApplicationContextFactory candidate : SpringFactoriesLoader.loadFactories(ApplicationContextFactory.class,
            getClass().getClassLoader())) {
        // 实例化 AnnotationConfigServletWebServerApplicationContext
        T result = action.apply(candidate, webApplicationType);
        if (result != null) {
            return result;
        }
    }
    return (defaultResult != null) ? defaultResult.get() : null;
}
默认配置的工厂类:
org.springframework.boot.ApplicationContextFactory=\
org.springframework.boot.web.reactive.context.AnnotationConfigReactiveWebServerApplicationContext.Factory,\
org.springframework.boot.web.servlet.context.AnnotationConfigServletWebServerApplicationContext.Factory
默认是 Servlet 环境,所以会使用 AnnotationConfigServletWebServerApplicationContext.Factory 工厂类,创建的上下文对象是 AnnotationConfigServletWebServerApplicationContext。
实例化上下文对象后,紧接着就是调用其refresh()刷新上下文,这是个模板方法,流程在分析 Spring 源码时已经说过了,这里就略过了。
我们这里要重点关注的是子类重写后的扩展方法ServletWebServerApplicationContext#onRefresh,它会在父类准备好整个环境后创建 Web 服务。
@Override
protected void onRefresh() {
    super.onRefresh();
    try {
        createWebServer();
    }
    catch (Throwable ex) {
        throw new ApplicationContextException("Unable to start web server", ex);
    }
}
createWebServer()首先要获取 ServletWebServerFactory 工厂对象,默认的 Servlet 容器是 Tomcat,所以工厂类是 TomcatServletWebServerFactory。在实例化工厂类时要求传入一组 ServletContextInitializer,Spring 在初始化 Servlet 容器时会调用它的onStartup()用于注册 Servlet。
private void createWebServer() {
    WebServer webServer = this.webServer;
    ServletContext servletContext = getServletContext();
    if (webServer == null && servletContext == null) {// 默认走这里
        StartupStep createWebServer = this.getApplicationStartup().start("spring.boot.webserver.create");
        ServletWebServerFactory factory = getWebServerFactory();
        createWebServer.tag("factory", factory.getClass().toString());
        // 通过工厂获取WebServer,会直接启动
        this.webServer = factory.getWebServer(getSelfInitializer());
        createWebServer.end();
        getBeanFactory().registerSingleton("webServerGracefulShutdown",
                new WebServerGracefulShutdownLifecycle(this.webServer));
        getBeanFactory().registerSingleton("webServerStartStop",
                new WebServerStartStopLifecycle(this, this.webServer));
    }
    ......
}
private org.springframework.boot.web.servlet.ServletContextInitializer getSelfInitializer() {
    return this::selfInitialize;
}

// Spring初始化Servlet容器时触发
private void selfInitialize(ServletContext servletContext) throws ServletException {
    prepareWebApplicationContext(servletContext);
    registerApplicationScope(servletContext);
    WebApplicationContextUtils.registerEnvironmentBeans(getBeanFactory(), servletContext);
    for (ServletContextInitializer beans : getServletContextInitializerBeans()) {
        beans.onStartup(servletContext);
    }
}
TomcatServletWebServerFactory#getWebServer会实例化 Tomcat 并启动。
@Override
public WebServer getWebServer(ServletContextInitializer... initializers) {
    if (this.disableMBeanRegistry) {
        Registry.disableRegistry();
    }
    Tomcat tomcat = new Tomcat();
    // 基础目录
    File baseDir = (this.baseDirectory != null) ? this.baseDirectory : createTempDir("tomcat");
    tomcat.setBaseDir(baseDir.getAbsolutePath());
    for (LifecycleListener listener : this.serverLifecycleListeners) {
        tomcat.getServer().addLifecycleListener(listener);
    }
    // 连接器
    Connector connector = new Connector(this.protocol);
    connector.setThrowOnFailure(true);
    tomcat.getService().addConnector(connector);
    customizeConnector(connector);
    tomcat.setConnector(connector);
    tomcat.getHost().setAutoDeploy(false);
    // 配置Engine
    configureEngine(tomcat.getEngine());
    for (Connector additionalConnector : this.additionalTomcatConnectors) {
        tomcat.getService().addConnector(additionalConnector);
    }
    /**
     * 配置上下文,这里会把ServletContextInitializer封装成TomcatStarter
     * 并设置到Host.Context
     */
    prepareContext(tomcat.getHost(), initializers);
    return getTomcatWebServer(tomcat);
}
配置 Tomcat 是个复杂的过程,这里不赘述,与我们最相关的就是 Port、ContextPath、Servlet 的配置,我们重点关注 Servlet 的配置。
我们知道,Spring MVC 的核心是 DispatcherServlet,它是何时被注册到 Tomcat 的呢???这就不得不提到另一个组件 ServletContainerInitializer。
ServletContainerInitializer 是 Servlet 3.0 提供的用来初始化 Servlet 容器的接口,通过实现这个接口可以让第三方组件有机会来对容器做一些初始化的工作,比如动态的注册 Servlet、Filter 等等。
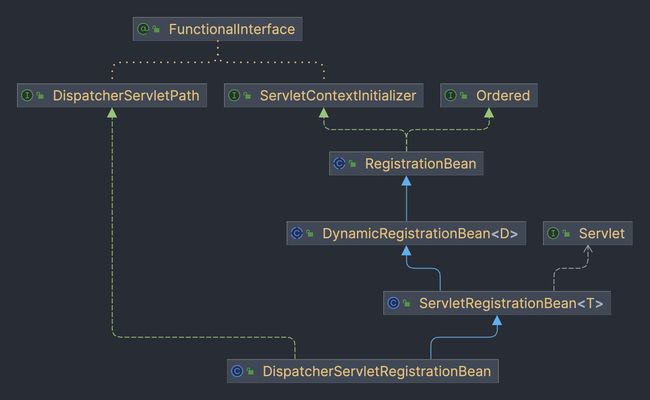
显然,Spring Boot 需要注册 DispatcherServlet。所以 Spring Boot 首先会把容器内的所有 ServletContextInitializer Bean 统一封装成 TomcatStarter,而 TomcatStarter 恰恰就是 ServletContainerInitializer 的实现类。所以 Tomcat 启动时会触发其onStartup()
@Override
public void onStartup(Set<Class<?>> classes, ServletContext servletContext) throws ServletException {
    try {
        for (ServletContextInitializer initializer : this.initializers) {
            initializer.onStartup(servletContext);
        }
    }
    catch (Exception ex) {
    }
}
代码很简单,就是挨个调用ServletContextInitializer#onStartup,其中有个最关键的实现类就是 DispatcherServletRegistrationBean,顾名思义,它就是用来注册 DispatcherServlet。

注册的方法是ServletRegistrationBean#addRegistration,这里就会注册我们最关心的 DispatcherServlet
@Override
protected ServletRegistration.Dynamic addRegistration(String description, ServletContext servletContext) {
    String name = getServletName();
    return servletContext.addServlet(name, this.servlet);
}
尾巴
Spring Boot 本身也是个 Spring 应用,它也要依赖于上下文容器对象,如果我们构建的是 Web 应用,它就会创建适用于 Web 环境的上下文容器,例如 ServletWebServerApplicationContext,然后通过父类的模板方法来 refresh,只不过它重写了 onRefresh 方法,等待父类准备好环境后会创建 WebServer,启动我们的 Web 服务,默认启动的是 Tomcat,然后通过实现 ServletContainerInitializer 的方式来注册 DispatcherServlet。这就是 Spring Boot 内嵌 Tomcat 的秘密。
