Cocos 涂鸦染色算法
涂鸦染色算法
本人新手入坑Cocos两周半,做项目比较吃力,所以计划退而结网,做自己擅长一些的游戏算法部分,希望能坚持下去。
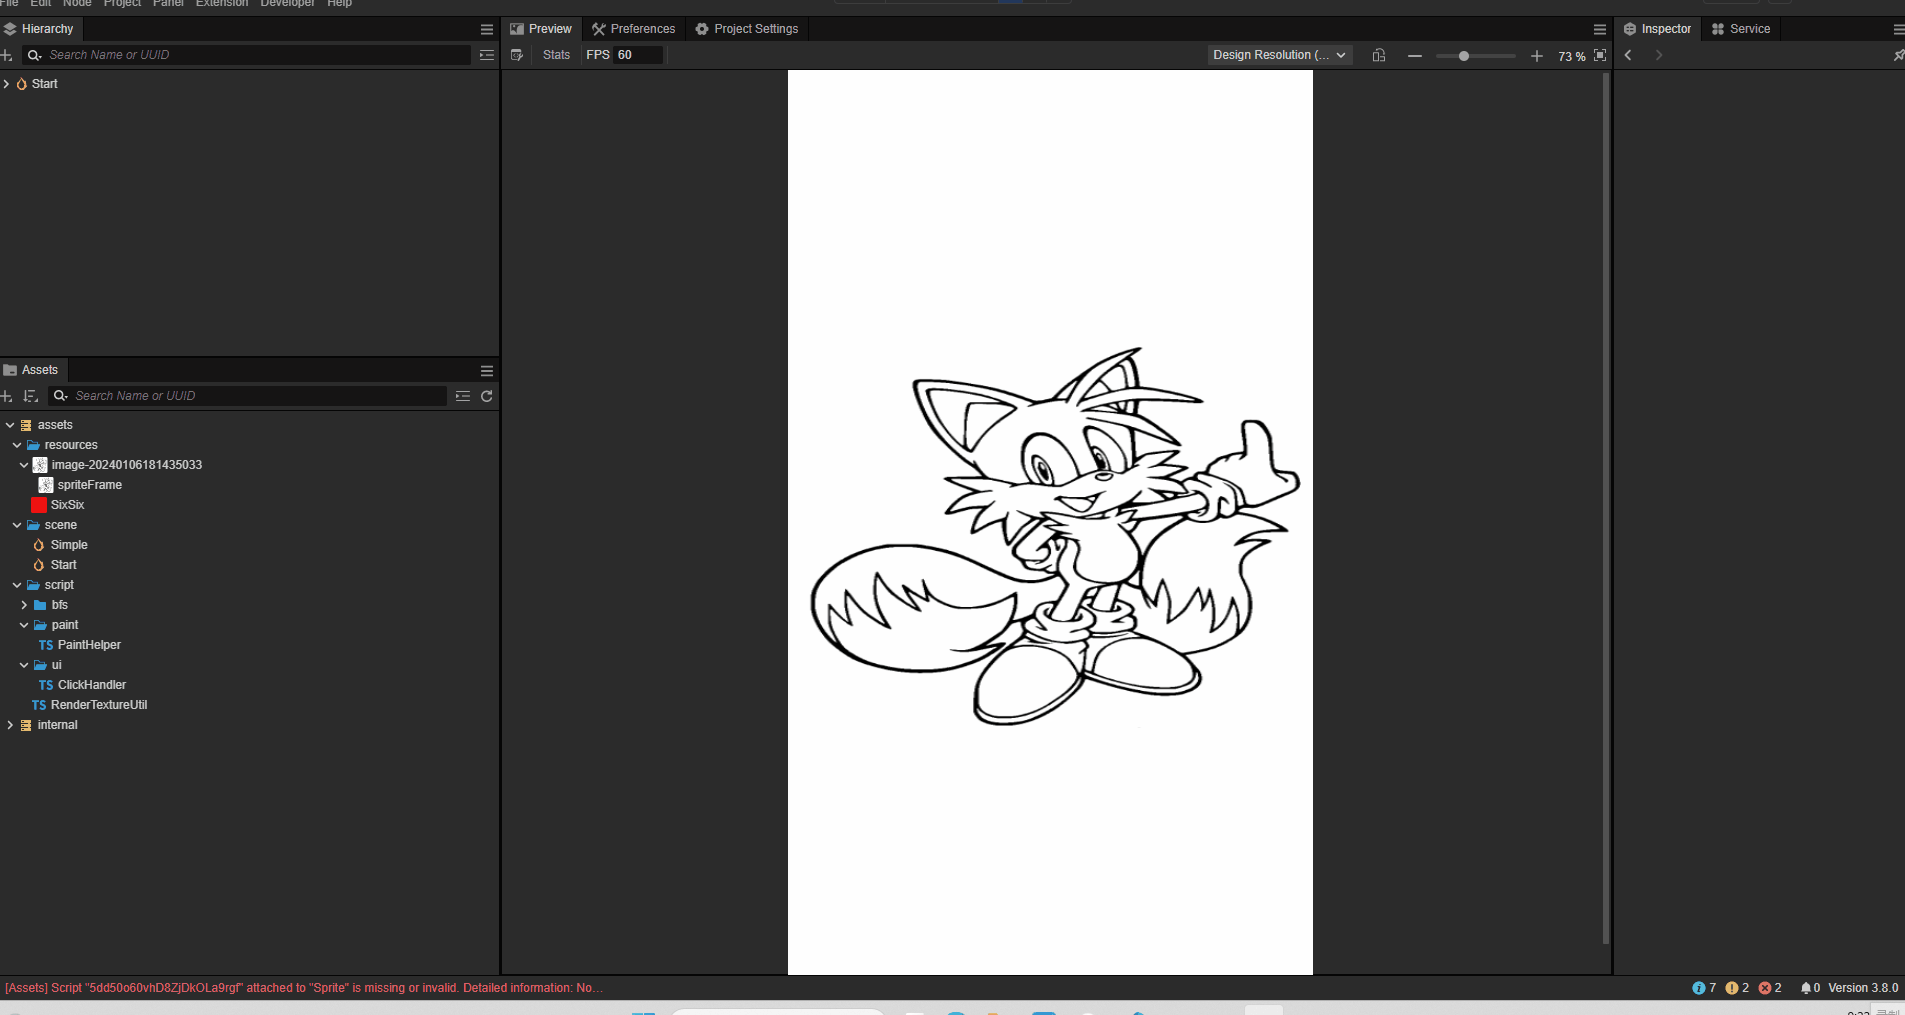
最终效果:
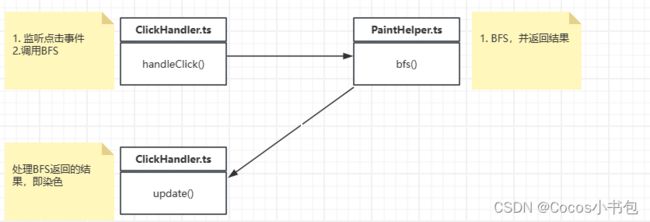
程序主要流程:
一、接入说明
在PaintHelper中暴露了4个接口,分别是
- bfs(Vec2, Node)
- toSpriteFrame():SpriteFrame
- addToQueue(result:Array
) - handleOneDeep():boolean
下面说明下各个接口的作用
1.1 toSpriteFrame():SpriteFrame
将PatinerHelper中的texture转换成SpriteFrame,拿到SpriteFrame后可以复制给Sprite来显示改变后的图像
// ClickHandler.ts
protected onLoad(): void {
    this.paintHelper = new PaintHelper(this.texture)
    this.node.getComponent(Sprite).spriteFrame = this.paintHelper.toSpriteFrame()
}
1.2 bfs(uiPosition: Vec2, uiNode:Node): Array|null
- uiPosition: 通过event.getUILocation()获得
- uiNode:图像所在的节点,需要获取节点的宽高,以及锚点
- return: 可以涂色的点的集合,算法原理中详细讲解
// ClickHandler.ts
handleClick(event:EventTouch){
    // 1. 获取UI坐标
    const uiPosition = event.getUILocation()
    // 2. DFS
    const results = this.paintHelper.bfs(uiPosition, this.node)
    ...
}
1.3 addToQueue(result:Array)
将bfs()获取到的结果添加到队列中,handleOneDeep()才可以处理参数中的result。这里是考虑到result可能用作其他用途
1.4 handleOneDeep():boolean
- 处理结果中某一深度的点
// ClickHandler.ts
protected update(dt: number): void {
    const needUpdate = this.paintHelper.handleOneDeep()
    if(needUpdate){
        this.node.getComponent(Sprite).spriteFrame = this.paintHelper.toSpriteFrame()
    }
}
如果已经了解BFS,或者对算法不感兴趣,可以忽略下面内容
二、算法大致原理
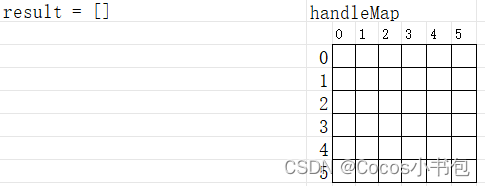
2.1 初始数据
使用一个6*6的红色色块作为例子,我们将这个色块的rgb读入buffer(项目中读的rgba),每个方块表示图像中一个像素
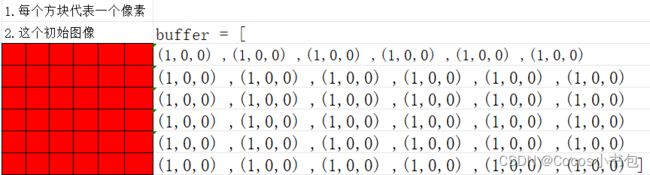
这一步在PaintHelper的构造函数中实现,对于引擎相关的东西我还比较陌生,RenderTextureUtil类中的方法我就不细讲了
// PaintHelper.ts
constructor(texture:  Texture2D){
    this.texture = texture
    this.buffer =  RenderTextureUtil.textureToBuffer(this.texture)
}
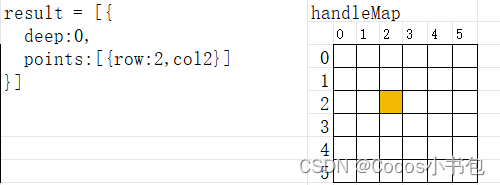
2.2 玩家点击第三行第三列的方块
这里需要注意的是 玩家点击位置是场景中节点中的位置,算法中应当使用图片中的像素位置,需要进行坐标转换。由于坐标转换相对复杂,影响讲解,第三部分单独讲解坐标转换
// ClickHandler.ts
handleClick(event:EventTouch){
    // 1. 获取UI坐标
    const uiPosition = event.getUILocation()
    // 2. DFS
    const results = this.paintHelper.bfs(uiPosition, this.node)
}
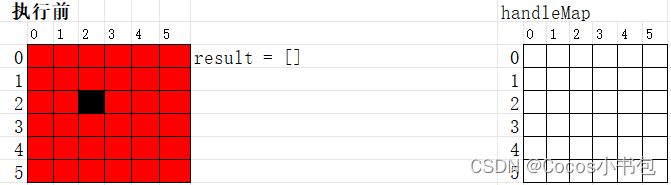
2.3 BFS前的准备
static bfs(startPoint: Index, width: number, height: number, buffer: Uint8Array, excludeColors?: Array<Color>): Array<BFSResult> {
   const result: Array<BFSResult> = []
   // 1. 检查起点颜色是否在排除的颜色中
   const startColor = RenderTextureUtil.getColor(startPoint.row, startPoint.col, width, buffer)
   if (excludeColors) {
       for (let color of excludeColors) {
           if (color.a === startColor.a && color.r === startColor.r && color.g === startColor.g) {
               return result
           }
       }
   }
   // 2. 起点颜色是正确的,则把起点放进结果中
   const subResult = new BFSResult(0)
   subResult.points.push(startPoint)
   result.push(subResult)

   //3. 将已经处理的点放到缓存中
   const handledMap = new Map<number, Map<number, boolean>>()
   BFS.setHandled(startPoint, handledMap)

   // 4. 开始遍历
   BFS.bfsMain(1, width, height, startColor, buffer, result, handledMap)

   return result

}
- 检查起点颜色是否合理
- 将起点封装到结果中
执行前的状态: handleMap白色放个表示元素不存在
执行后的状态: handleMap中黄色表示handleMap.get(2).get(2) 值为 true,意味着这个点已经处理过了
2.4 BFS deep=1
BFS的代码主要在BFS.bfsMain()中,代码就不贴了,这里比较详细的讲解下:
**获取上一深度的结果: ** 因为此时deep=1,所以result[deep-1]就是result[0],即2.3中的{deep:0,points:[{row:2,col:2}]}
const preResult = result[deep - 1]
获取上下左右四个点:
const topIndex = point.getTopIndex()
const bottomIndex = point.getBottomIndex(height)
const leftIndex = point.getLeftIndex()
const rightIndex = point.getRightIndex(width)
处理指定的点:
private static handleOnePoint(index: Index, width: number, startColor: Color, buffer: Uint8Array, handledMap: Map<number, Map<number, boolean>>, currentDeepResult: BFSResult) {
    ...
    // 设置为已经处理过了,防止重复处理
    BFS.setHandled(index, handledMap)

    // 获取上方像素点的颜色
    const topColor = RenderTextureUtil.getColor(index.row, index.col, width, buffer)
    // 如果上方像素点的颜色与起点颜色相同,则添加到结果中
    if (BFS.isSameColor(topColor, startColor, 100)) {
        currentDeepResult.points.push(index)
    }
}
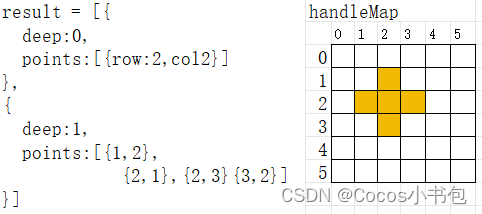
deep=1 执行后的状态:

2.5 BFS deep=2
相比deep=1时,deep,result,handleMap发生了变化,影响比较大的时deep
**获取上一深度的结果: ** 因为此时deep=2,所以result[deep-1]就是result[1],即2.4中的{deep:1,points:[1,2},{2,1},{2,3}{3,2} ]}
const preResult = result[deep - 1]
然后对每个points后去四个方向上的点
// preResult = [1,2},{2,1},{2,3}{3,2} ]
for (let point of preResult.points) {
    // 获取四个方向
    const topIndex = point.getTopIndex()
    const bottomIndex = point.getBottomIndex(height)
    const leftIndex = point.getLeftIndex()
    const rightIndex = point.getRightIndex(width)
    // 判断是可以感染,并设置标记(handleMap)
    BFS.handleOnePoint(topIndex, width, startColor, buffer, handledMap, currentDeepResult)
    BFS.handleOnePoint(bottomIndex, width, startColor, buffer, handledMap, currentDeepResult)
    BFS.handleOnePoint(leftIndex, width, startColor, buffer, handledMap, currentDeepResult)
    BFS.handleOnePoint(rightIndex, width, startColor, buffer, handledMap, currentDeepResult)
}
deep=2 执行后的状态:
其中绿色时deep=2传染的点
2.6 BFS deep=3、4、5…
算法接下来的走向就不讲解了,自行打断点测试吧,或者单独了解下BFS
三、坐标转换
3.1 UI坐标
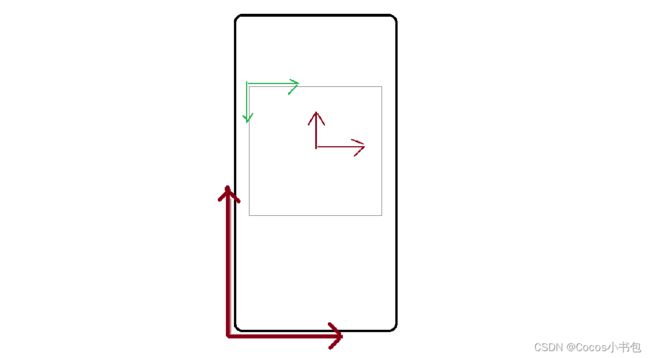
UI坐标是Cocos引擎中定义的,我了解不是太深刻,当前的理解是原点在界面的左下角,上方向是y轴正方向,右方向是x轴的正方向
外链图片转存失败,源站可能有防盗链机制,建议将图片保存下来直接上传
3.2 本地坐标
const localPositionV3 = uiNode.getComponent(UITransform).convertToNodeSpaceAR(v3(uiPosition.x, uiPosition.y, 0))
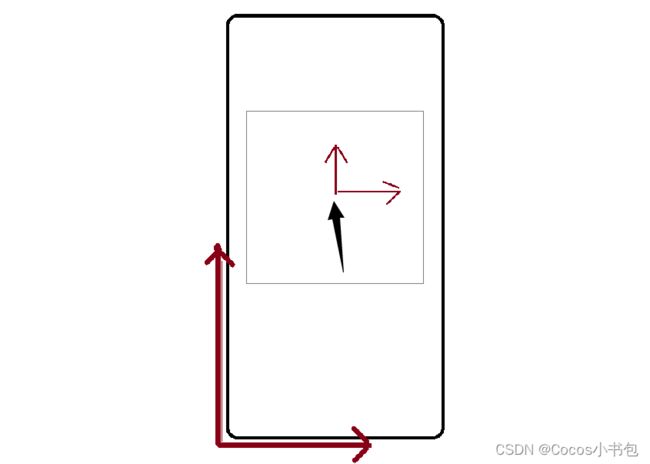
本地坐标的原点受到anchor影响,不过代码中做了处理
private getLeftTopPosition(node:Node):Vec2{
    ...
    const leftX = node.position.x - contentSize.width * transform.anchorX
    const topY = node.position.y + contentSize.height * transform.anchorY
    ...
}
3.3 本地下标
观察下图中绿色坐标系,起点在节点的左上角,两个轴的正方向与二位数组下标递增方向一致,防止编码过程中下标混乱
3.4 图像下标
考虑下面问题,Sprite所在的节点的宽高是200*200,图像宽高20*20,我们点击的本地下标是(100,100),那(100,100)对应图像中的哪个点?
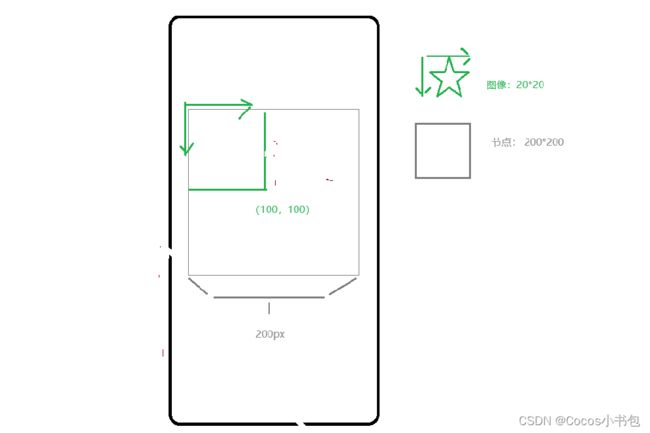
private localIndexToImageIndex(uiIndex:Index,uiNode:Node):Index{
    const uiSize = uiNode.getComponent(UITransform).contentSize
    const textureSize = new math.Size()
    textureSize.height = this.texture.height
    textureSize.width = this.texture.width
    // UI宽高 / 图片宽高 = SCALE
    const scale = new math.Size(uiSize.width / textureSize.width, uiSize.height / textureSize.height)
    // UI宽高 / 图片宽高 = SCALE ===> UI下标 / 图片下标 = SCALE
    // 图片下标 = UI下标 / SCALE
    const imageIndex = new Index(uiIndex.row / scale.height, uiIndex.col / scale.width)
    return imageIndex
}
这个方法就是将本地下标转换成图像的下标,可以自行测试下
文档不当之处,不理解的地方可以私信反馈,会及时处理的