POI,EasyExcel学习笔记
文章目录
- 1. POI操作Excel
- 2. EasyExcel操作Excel
1. POI操作Excel
Excel简介
一个excel文件就是一个工作簿workbook,一个工作簿中可以创建多张工作表sheet,而一个工作表中包含多个单元格Cell,这些单元格都是由列(Column)和行(Row)组成,列用大写英文字母表示,从A开始到Z共26列,然后再从AA到AZ又26列,再从BA到BZ再26列以此类推。行则使用数字表示,例如:A3表示第三行第一列,E5表示第五行第五列。
工作簿分类
工作簿有多种类型,在Excel 2007中,新建Excel默认保存的的Excel文件格式后缀是.xlsx;而.xls则为Excel97-2003的工作簿。
.xls和.xlsx的区别(答案来源于互联网)
- 版本不同:略。
- xlsx文件比xls文件更小:如果表格文件很多,使用xlsx格式会节省大量的磁盘空间,而且在传输时速度更快,更节省流量。两者大小如此悬殊的原因,是因为它们采用了不同的文档核心结构。xls采用的是特有的二进制复合文档类型结构,xlsx采用的是XML格式结构。XML文件格式被设计出来的目的就是传输和存储数据,因此对数据有良好的压缩率。
- xls具有更好的兼容性: 相比xlsx,xls格式可以兼容老版本软件,例如Excel 2003和之前的版本,以及一些业务、数据系统。这些老软件和老系统,不能很好地兼容xlsx格式。
- 最大行列得数量不同:xls最大只有65536行、256列。xlsx可以有1048576行、16384列。比如,如果写数据到xls,超过65536行,会报如下错误:
java.lang.IllegalArgumentException: Invalid row number (65536) outside allowable range (0..65535)
POI工具包
JAVA中操作Excel的有两种比较主流的工具包:JXL和POI,jxl只能操作Excel95,97,2000,也即以.xls为后缀的excel。而poi可以操作Excel 95及以后的版本,即可操作后缀为.xls和.xlsx两种格式的excel。
JXL的官网:http://www.andykhan.com/jexcelapi
POI的官网:http://poi.apache.org
准备maven坐标
<dependencies>

    <dependency>
        <groupId>org.apache.poigroupId>
        <artifactId>poiartifactId>
        <version>3.9version>
    dependency>

    <dependency>
        <groupId>org.apache.poigroupId>
        <artifactId>poi-ooxmlartifactId>
        <version>3.9version>
    dependency>
    <dependency>
        <groupId>joda-timegroupId>
        <artifactId>joda-timeartifactId>
        <version>2.10.1version>
    dependency>

    <dependency>
        <groupId>junitgroupId>
        <artifactId>junitartifactId>
        <version>4.12version>
    dependency>
dependencies>
Hello World
在POI包中有如下几个主要对象和excel的几个对象对应:
| POI对象 | excel对象 |
|---|---|
| HSSFWorkbook | Excel 工作簿 workbook |
| HSSFSheet | Excel 工作表 sheet |
| HSSFRow | Excel 行 |
| HSSFCell | Excel 单元格 |
利用以上几个对象,我们简单创建一个Excel工作表,往里面的C1单元格写入和读出“Hello World”;如下:
@Test
public void test1() throws IOException {
      //1. 创建工作簿
       HSSFWorkbook wb = new HSSFWorkbook();
      //2. 创建工作表
       HSSFSheet sheet = wb.createSheet("hello");//给工作表取一个名叫hello,如果不给默认叫Sheet1
      //3. 创建行,第1行
       HSSFRow row = sheet.createRow(0); //参数里写的是第几行-1,为什么减1,因为参数填的是索引
      //4. 创建单元格
       HSSFCell cell = row.createCell(2); //参数里写的是第几列-1
      //5. 往第1行第3列,也就是C1这位置的单元格写入一个值,叫小陈
       cell.setCellValue("小陈");
      //6. 定义一个,写到硬盘地址的某个位置上
       String fileName = "D:\\xiaochen.xls"; //后缀为xls,意味着为03版本
      //7. 输出到硬盘,所以要用到IO流,既然是输出去,那就是FileOutputStream,输出到fileName指定的路径上
       FileOutputStream fileOutputStream = new FileOutputStream(fileName);
      //8. 借助输出流把内容写到指定的路径上
       wb.write(fileOutputStream);
      //IO流基本操作,关闭流
       fileOutputStream.close();
}
String time = new DateTime().toString("yyyy-MM-dd HH:mm:ss");
cell.setCellValue(time);
那么,如何读取?如下:
@Test
public void test2() throws IOException {
	   String fileName = "D:\\xiaochen.xls";
	   FileInputStream fileInputStream = new FileInputStream(fileName);
	   //1. 读取工作簿
	   HSSFWorkbook wb = new HSSFWorkbook(fileInputStream);
	   //2. 读取工作表
	   HSSFSheet sheet = wb.getSheetAt(0);//读取第一个工作表
	   //3. 读取行,第1行
	   HSSFRow row1 = sheet.getRow(0);
	   //4. 通过行读取单元格
	   HSSFCell cell1 = row1.getCell(2);
	   //5. 输出到控制台
	   System.out.println("第1行第3列的值是:"+cell1.getStringCellValue());//注意读取类型
	   //6. IO流基本操作,关闭流
	   fileInputStream.close();
}
效果如下:
第1行第3列的值是:小陈
大致流程:
- 创建工作簿Workbook
- 借助Workbook创建Sheet
- 借助Sheet创建行Row
- 借助Row创建单元格Cell
但要注意,如果读取的或者写入的是以.xlsx文件格式的execl的话,那么我们就采用XSSF来完成,也就是说,把如上代码的HSSF换成XSSF即可。因为一般来说,HSSFWorkbook是操作Excel2003以前(包括2003)的版本,扩展名为.xls;而XSSFWorkbook是操作EXCEL2007以后的版本,扩展名.xlsx。有如下:

数据批量导入
注意POI操作EXCEL有三种类型,如下:
 如果是大文件写HSSF,缺点就是最多只能处理65536行,否则会抛出异常,上面说过。
优点:过程中写入缓存,不操作磁盘,最后一次性写入磁盘,速度快。
如果是大文件写XSSF,缺点是写数据时速度非常慢,非常耗内存,也会发生内存溢出(OOM),如100万条。优点:可以写较大的数据量,如20万条。
面对大文件的XSSF写操作,因为耗时比较长,所以我们还可以采用SXSSF,这个的优点是可以写非常大的数据量,如100万条甚至更多条,写数据速度快,占用更少的内存。但要注意一下,1: 过程中会产生临时文件,需要清理临时文件。 2: 默认由100条记录被保存在内存中,如果超过这数量,则最前面的数据被写入临时文件。3: 如果想自定义内存中数据的数量,可以使用new SXSSFWorkbook(数量)。
读取不同类型的数据
如果excel中的内容如下,该如何读取?
@Test
public void test3() throws IOException {
   FileInputStream fileInputStream = new FileInputStream("D:\\xiaochen.xls");
   Workbook workbook = new HSSFWorkbook(fileInputStream);
   Sheet sheet = workbook.getSheetAt(0);
   Row row = sheet.getRow(0);
   if(row != null){
       int cellCount = row.getPhysicalNumberOfCells(); //获取一行中有数据的列的个数
       for(int cellNum=0;cellNum<cellCount;cellNum++){
           Cell cell = row.getCell(cellNum);
           if(cell!=null){
               int cellType = cell.getCellType();
               String cellValue = cell.getStringCellValue();
               System.out.print(cellValue + "|");
           }
       }
       System.out.println();
   }
   //获取表中的内容
   int rowCount = sheet.getPhysicalNumberOfRows();
   for(int rowNum=1;rowNum<rowCount;rowNum++){
       Row rowData = sheet.getRow(rowNum);
       if(rowData!=null){
           int cellCount = row.getPhysicalNumberOfCells();
           for(int cellNum=0;cellNum<cellCount;cellNum++){
               Cell cell = rowData.getCell(cellNum);
               //匹配列的数据类型
               if(cell!=null){
                   int cellType = cell.getCellType();
                   String cellValue = "";
                   switch (cellType){
                       case HSSFCell.CELL_TYPE_STRING: //字符串 代表数1
                           cellValue = cell.getStringCellValue();
                           break;
                       case HSSFCell.CELL_TYPE_BOOLEAN://布尔值 代表数4
                           cellValue = String.valueOf(cell.getBooleanCellValue());
                           break;
                       case HSSFCell.CELL_TYPE_BLANK: //空的 代表数3
                           break;
                       case HSSFCell.CELL_TYPE_NUMERIC: //数字(分为日期和普通数字) 代表数0
                           if(HSSFDateUtil.isCellDateFormatted(cell)){ //日期
                               Date date = cell.getDateCellValue();
                               cellValue = new DateTime(date).toString("yyyy-MM-dd");
                           }else{ //普通的数字
                               cell.setCellType(1);
                               cellValue = cell.getStringCellValue() ;
                           }
                           break;
                       case HSSFCell.CELL_TYPE_ERROR: //数据类型错误 代表数5
                           break;
                   }
                   System.out.print(cellValue+"|");
               }
           }
       }
   }
   fileInputStream.close();
}
效果如下:
 注意,我execl表中的2021-06-25本质上是2021/6/25,如下:

扩展
合并单元格:
@Test
public void test() throws IOException {
    HSSFWorkbook wb = new HSSFWorkbook();
    HSSFSheet sheet = wb.createSheet();
    HSSFRow row = sheet.createRow(0);
    CellRangeAddress region1=new CellRangeAddress(0, 0, 0, 5);
    CellRangeAddress region2=new CellRangeAddress(3, 5, 6, 6);
    sheet.addMergedRegion(region1); //MergedRegion译为合并
    sheet.addMergedRegion(region2);
    String fileName = "D:\\xiaochen.xls";
    FileOutputStream fileOutputStream = new FileOutputStream(fileName);
    wb.write(fileOutputStream);
    fileOutputStream.close();
}
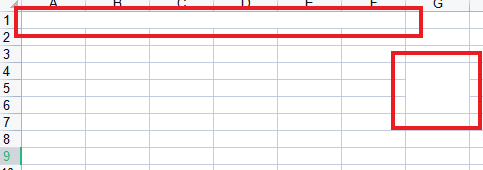
效果如下:

现在我说下CellRangeAddress(0, 0, 0, 5)里的四个参数是什么意思:
- 第一个参数为firstRow:表示区域中的第一个单元格的行号(行号是从0开始的,0就代表第1行,类似索引,包括后面的列号,也就是第3点和第4点)。
- 第二个参数为lastRow:表示区域中最后一个单元格的行号。
- 第三个参数为firstCol:表示区域中第一个单元格的列号。
- 第四个参数为lastCol:表示区域中最后一个单元格的列号。
知道以上四个参数的意义之后,单元格合并的位置,合并的长度,高度也就明白了。
2. EasyExcel操作Excel
hello world
maven坐标:
<dependency>
    <groupId>com.alibabagroupId>
    <artifactId>easyexcelartifactId>
    <version>2.2.0-beta2version>
dependency>
Student类:
package com.cht.pojo;

import java.util.Date;

public class Student {
	//注意要跟excel中的标题顺序一致,可以这么说,EasyExcel是根据实体类来生成一张表的
    private String name;
    private String gender;
    private Date birthday;
	private Integer id;

    public Integer getId() {
        return id;
    }

    public void setId(Integer id) {
        this.id = id;
    }

    public String getName() {
        return name;
    }

    public void setName(String name) {
        this.name = name;
    }

    public String getGender() {
        return gender;
    }

    public void setGender(String gender) {
        this.gender = gender;
    }

    public Date getBirthday() {
        return birthday;
    }

    public void setBirthday(Date birthday) {
        this.birthday = birthday;
    }

    @Override
    public String toString() {
        return "Student{" +
                "id='" + id + '\'' +
                ", name='" + name + '\'' +
                ", gender='" + gender + '\'' +
                ", birthday=" + birthday +
                '}';
    }
}
测试类:
package com.cht.easyexcel;

import com.alibaba.excel.EasyExcel;
import com.alibaba.excel.read.builder.ExcelReaderBuilder;
import com.alibaba.excel.read.builder.ExcelReaderSheetBuilder;
import com.cht.listener.StudentListener;
import com.cht.pojo.Student;
import org.junit.Test;

public class ExcelTest {
    @Test
    public void test01(){
        //获得一个工作簿对象
        //第三个参数表示监听器,表示每读一行内容,都会调用一次该对象的invoke,在invoke可以操作使用读取到的数据
        ExcelReaderBuilder readWorkBook = EasyExcel.read("D:\\student.xls", Student.class, new StudentListener());
        //获得一个工作表对象
        ExcelReaderSheetBuilder sheet = readWorkBook.sheet();
        //读取工作表中的内容
        sheet.doRead();
    }
}
监听器类:
package com.cht.listener;

import com.alibaba.excel.context.AnalysisContext;
import com.alibaba.excel.event.AnalysisEventListener;
import com.cht.pojo.Student;

public class StudentListener extends AnalysisEventListener<Student> {

    //每读一行,都会调用一次invoke
    @Override
    public void invoke(Student student, AnalysisContext analysisContext) {
        System.out.println("student = "+student);
    }

    //读取完整个文档之后调用的方法
    @Override
    public void doAfterAllAnalysed(AnalysisContext analysisContext) {

    }
}
结果如下:
student = Student{id='null', name='小小浩', gender='男', birthday=Sat Feb 22 00:00:00 CST 2020}
student = Student{id='null', name='陈飞', gender='男', birthday=Mon Jan 01 00:00:00 CST 2001}
student = Student{id='null', name='方块', gender='女', birthday=Sat Jun 01 00:00:00 CST 2002}
也可以往里写,如下:
@Test
public void test02(){
    ExcelWriterBuilder writeWorkBook = EasyExcel.write("D:\\student.xls", Student.class);
    ExcelWriterSheetBuilder sheet = writeWorkBook.sheet();
    List<Student> students = new ArrayList<Student>();
    Student stu = new Student();
    stu.setName("小刚");
    stu.setGender("男");
    stu.setBirthday(new Date());
    students.add(stu);
    sheet.doWrite(students);
}
只不过效果变成了如下:
 标题是不是都是属性名呀,我们可以在属性上加上某个注解,如下:
@ExcelProperty("姓名")
private String name;
@ExcelProperty("性别")
private String gender;
@ExcelProperty("生日")
private Date birthday;
@ExcelProperty("ID")
private Integer id;
再来测试,如下:
 我们还可以调整列的顺序,就是在@ExcelProperty注解里加上index选项,比如如下:
@ExcelProperty(value = "姓名",index = 2)
也可以调整列的宽度,以birthday这个列为例,如下:
@ExcelProperty("生日")
@ColumnWidth(60)
private Date birthday;
再看效果,如下:
 与之对应的就是行高了,它可以是@HeadRowHeight或者@ContentRowHeight,只不过注意的是它只能作用于类上,不能作用于某个属性上。
下一个注解, @ExcelIgnore,表示忽略该字段。@DateTimeFormat,如下:
@ExcelProperty("生日")
@DateTimeFormat("yyyy-MM-dd")
private Date birthday;
看效果,如下:
 是不是时间点没了呀。还有@NumberFormat,如下:
@ExcelProperty("ID")
@NumberFormat("##.00")
private Integer id;
在测试类中我们为它设置一个id值,也就是stu.setId(1);,效果如下:
 下一个注解,@ExcelIgnoreUnannotated,什么意思?1. 标注在类上,如果不标注该注解,默认类中所有成员变量都会参与读写,无论是否在成员变量上加了@ExcelProperty注解。2. 如果标注了,那么类中的成员变量如果没有标注@ExcelProperty注解将不会参与读写。
扩展
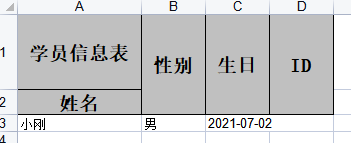
像@ExcelProperty,我们可以这样写,以姓名为例,如下:
@ExcelProperty(value = {"学员信息表","姓名"})
private String name;
如下效果:
 如果我把性别和生日也这样搞,那么列与列之间会不会合并在一起呢?如下:

基于Springmvc的文件上传和下载
maven坐标:
<dependency>
   <groupId>org.springframework</groupId>
   <artifactId>spring-webmvc</artifactId>
   <version>4.3.6.RELEASE</version>
</dependency>
<dependency>
   <groupId>javax.servlet</groupId>
   <artifactId>javax.servlet-api</artifactId>
   <version>4.0.1</version>
   <scope>provided</scope>
</dependency>
<dependency>
   <groupId>commons-fileupload</groupId>
   <artifactId>commons-fileupload</artifactId>
   <version>1.4</version>
</dependency>
<dependency>
   <groupId>com.alibaba</groupId>
   <artifactId>easyexcel</artifactId>
   <version>2.2.0-beta2</version>
</dependency>
<dependency>
   <groupId>org.projectlombok</groupId>
   <artifactId>lombok</artifactId>
   <version>1.18.12</version>
   <scope>provided</scope>
</dependency>
web.xml:
<web-app xmlns="http://xmlns.jcp.org/xml/ns/javaee"
         xmlns:xsi="http://www.w3.org/2001/XMLSchema-instance"
         xsi:schemaLocation="http://xmlns.jcp.org/xml/ns/javaee http://xmlns.jcp.org/xml/ns/javaee/web-app_4_0.xsd"
         version="4.0">

  <servlet>
    <servlet-name>dispatcherservlet-name>
    <servlet-class>org.springframework.web.servlet.DispatcherServletservlet-class>
    <init-param>
      <param-name>contextConfigLocationparam-name>
      <param-value>/WEB-INF/applicationContext.xmlparam-value>
    init-param>
  servlet>
  <servlet-mapping>
    <servlet-name>dispatcherservlet-name>
    <url-pattern>/url-pattern>
  servlet-mapping>
  <filter>
    <filter-name>CharacterEncodingFilterfilter-name>
    <filter-class>org.springframework.web.filter.CharacterEncodingFilterfilter-class>
    <init-param>
      <param-name>encodingparam-name>
      <param-value>utf-8param-value>
    init-param>
  filter>
  <filter-mapping>
    <filter-name>CharacterEncodingFilterfilter-name>
    <url-pattern>/*url-pattern>
  filter-mapping>
web-app>
applicationContext.xml:
<beans xmlns="http://www.springframework.org/schema/beans"
       xmlns:xsi="http://www.w3.org/2001/XMLSchema-instance"
       xmlns:context="http://www.springframework.org/schema/context"
       xmlns:mvc="http://www.springframework.org/schema/mvc"
       xsi:schemaLocation="http://www.springframework.org/schema/beans
        https://www.springframework.org/schema/beans/spring-beans.xsd
        http://www.springframework.org/schema/context
        https://www.springframework.org/schema/context/spring-context.xsd
        http://www.springframework.org/schema/mvc
        http://www.springframework.org/schema/mvc/spring-mvc.xsd">

    <context:component-scan base-package="com.cht"/>

   <bean class="org.springframework.web.multipart.commons.CommonsMultipartResolver" id="multipartResolver"/>

   <mvc:annotation-driven/>

beans>
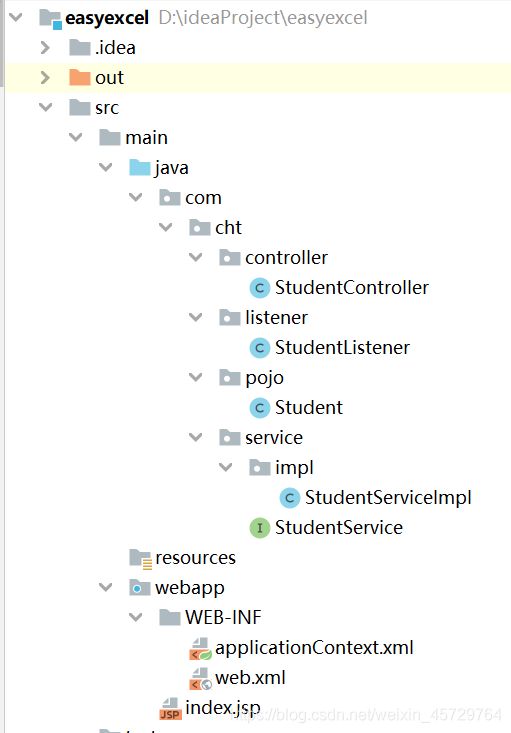
StudentController:
package com.cht.controller;

import com.alibaba.excel.EasyExcel;
import com.alibaba.excel.read.builder.ExcelReaderBuilder;
import com.alibaba.excel.write.builder.ExcelWriterBuilder;
import com.alibaba.excel.write.builder.ExcelWriterSheetBuilder;
import com.cht.listener.StudentListener;
import com.cht.pojo.Student;
import org.springframework.beans.factory.annotation.Autowired;
import org.springframework.stereotype.Controller;
import org.springframework.web.bind.annotation.RequestMapping;
import org.springframework.web.bind.annotation.RequestParam;
import org.springframework.web.bind.annotation.ResponseBody;
import org.springframework.web.multipart.MultipartFile;

import javax.servlet.ServletOutputStream;
import javax.servlet.http.HttpServletResponse;
import java.io.IOException;
import java.net.URLEncoder;
import java.util.ArrayList;
import java.util.Date;
import java.util.List;

@Controller
@RequestMapping("student")
public class StudentController {

	@Autowired
	StudentListener studentListener;

	@RequestMapping("read")
	@ResponseBody
	public String readExcel(@RequestParam(value="file") MultipartFile uploadExcel){
		try {
			ExcelReaderBuilder read = EasyExcel.read(uploadExcel.getInputStream(), Student.class, studentListener);
			read.sheet().doRead();
			return "success";
		} catch (IOException e) {
			e.printStackTrace();
			return "fail";
		}
	}
	@RequestMapping("write")
	@ResponseBody
	public void writeExcel(HttpServletResponse response) throws IOException {
		response.setContentType("application/vnd.ms-excel");
		response.setCharacterEncoding("utf-8");
		String fileName = URLEncoder.encode("测试", "UTF-8");
		response.setHeader("Content-Disposition","attachment;filename*=UTF-8"+fileName+"xls");
		ServletOutputStream outputStream = response.getOutputStream();
		ExcelWriterBuilder writeWorkBook = EasyExcel.write(outputStream, Student.class);
		ExcelWriterSheetBuilder sheet = writeWorkBook.sheet();
		List<Student> students = new ArrayList<Student>();
		Student stu = new Student();
		stu.setName("小小真");
		stu.setGender("男");
		stu.setBirthday(new Date());
		students.add(stu);
		sheet.doWrite(students);
	}
}
StudentListener:
package com.cht.listener;

import com.alibaba.excel.context.AnalysisContext;
import com.alibaba.excel.event.AnalysisEventListener;
import com.cht.pojo.Student;
import com.cht.service.StudentService;
import org.springframework.beans.factory.annotation.Autowired;
import org.springframework.context.annotation.Scope;
import org.springframework.stereotype.Component;

import java.util.ArrayList;

@Component
@Scope("prototype") //官方要求
public class StudentListener extends AnalysisEventListener<Student> {

    @Autowired
    StudentService studentService;

    ArrayList<Student> students = new ArrayList<Student>();
    //每读一行,都会调用一次invoke
    @Override
    public void invoke(Student student, AnalysisContext analysisContext) {
        students.add(student);
        //这里就要调dao往数据库里存了,只不过我这没有。
        //一般是每隔5条才存储到数据库里的,视情况而定。
        if(students.size()%4==0){
            studentService.readExcel(students);
            students.clear();
        }
    }

    //读取完整个文档之后调用的方法
    @Override
    public void doAfterAllAnalysed(AnalysisContext analysisContext) {

    }
}
Student:
package com.cht.pojo;

import com.alibaba.excel.annotation.format.DateTimeFormat;
import lombok.Data;
import lombok.ToString;

import java.util.Date;
@Data
@ToString
public class Student {
    //注意要跟excel中的标题顺序一致
    private String name;
    private String gender;
    @DateTimeFormat("yyyy-MM-dd")
    private Date birthday;
    private Integer id;
}
StudentService:
package com.cht.service;

import com.cht.pojo.Student;

import java.util.List;

public interface StudentService {
    void readExcel(List<Student> students);
}
StudentServiceImpl:
package com.cht.service.impl;

import com.cht.pojo.Student;
import com.cht.service.StudentService;
import org.springframework.stereotype.Service;

import java.util.List;
@Service
public class StudentServiceImpl implements StudentService {

    @Override
    public void readExcel(List<Student> students) {
        for(Student student:students){
            System.out.println("student = "+student);
        }
    }
}
index.jsp:
<%@ page contentType="text/html; charset=UTF-8" language="java" %>

<html lang="en">
<head>
    <meta charset="UTF-8">
    <title>首页title>
head>
<body>
<form method="POST" action="/student/read" enctype="multipart/form-data">
    选择文件: <input type="file" name="file">
    <input type="submit" value="Upload">
form>

<a href="/student/write">下载文件a>
body>
html>
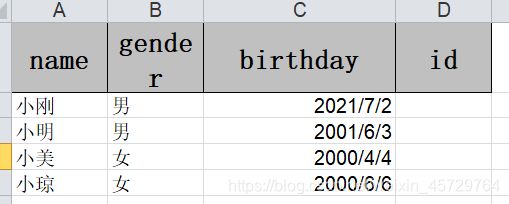
测试效果:
-
student = Student(name=小刚, gender=男, birthday=Fri Jul 02 00:00:00 CST 2021, id=null)
student = Student(name=小明, gender=男, birthday=Sun Jun 03 00:00:00 CST 2001, id=null)
student = Student(name=小美, gender=女, birthday=Tue Apr 04 00:00:00 CST 2000, id=null)
student = Student(name=小琼, gender=女, birthday=Tue Jun 06 00:00:00 CST 2000, id=null)
填充
填充一组数据:
准备模板: Excel表格中用{}来包裹要填充的变量,如果单元格文本中本来就有{,}左右大括号,需要在括号前面使用斜杠转义\{,\}。
代码中被填充数据的实体对象的成员变量名或被填充map集合的key需要和Excel中被{}包裹的变量名称一致。
准备模板,模板名叫fill_data_template.xls,如下内容:
再搞一个实体类,如下:
package com.cht.pojo;

import lombok.Data;

@Data
public class FillData {
    private String name;
    private int age;
}
测试:
@Test
public void test03(){
    String template = "D:\\fill_data_template.xls";
    //根据模板产生写对象
    ExcelWriterBuilder excelWriterBuilder = EasyExcel.write("D:\\Excel填充单组数据.xls", FillData.class).withTemplate(template);
    ExcelWriterSheetBuilder sheet = excelWriterBuilder.sheet();
    //不一定是对象,也可以是map
    FillData fillData = new FillData();
    fillData.setName("林林");
    fillData.setAge(18);
    //填充数据
    sheet.doFill(fillData);//doFill底层帮我们关闭流了
}
这样就会在D盘下生成“Excel填充单组数据.xls文件”,它的样式啥的,比如字体大小,单元格的背景颜色,都跟模板文件一模一样,唯独不一样的就是常量上的替换,如下:

填充多组数据:
但是,如果填充的不是一组数据,而是多组数据,那么用以上的方法就不好使了,如下:@Test
public void test03(){
String template = "D:\\fill_data_template.xls";
//根据模板产生写对象
ExcelWriterBuilder excelWriterBuilder = EasyExcel.write("D:\\Excel填充单组数据.xls", FillData.class).withTemplate(template);
ExcelWriterSheetBuilder sheet = excelWriterBuilder.sheet();
List<FillData> fillDatas = initFillData();
//填充数据
sheet.doFill(fillDatas);
}
//生成多组数据
public static List<FillData> initFillData(){
ArrayList<FillData> fillDatas = new ArrayList<FillData>();
for (int i=0;i<10;i++){
FillData fillData = new FillData();
fillData.setName("小潇"+i);
fillData.setAge(10 + i);
fillDatas.add(fillData);
}
return fillDatas;
}
以上再测试就会报错,解决的问题很简单,就是打开fill_data_template.xls模板文件,在变量前加上一点就是,也就是{变量}变成{.变量},如下:
![]()
再测试,就成功了,再次打开"Excel填充单组数据.xls”,当然,这次的文件名就不叫填充单组数据了,而是填充多组数据,这不管,打开,如下内容:

混合填充
有如下模板,即有单组也有多组,如下:
 解决方式跟如上代码有所不同,代码解决如下:
@Test
public void test04(){
    String template = "D:\\fill_data_template.xls";
    //根据模板产生写对象
    ExcelWriter workBook = EasyExcel.write("D:\\Excel填充组合数据.xls", FillData.class).withTemplate(template).build();
    WriteSheet sheet = EasyExcel.writerSheet().build();
    //准备多组数据
    List<FillData> fillDatas = initFillData();
    //准备单组数据
    HashMap<String,String> dataAndTotal = new HashMap<String, String>();
    dataAndTotal.put("date","2013-02-06");
    dataAndTotal.put("total","100");
    //填充数据
    workBook.fill(fillDatas,sheet);
    workBook.fill(dataAndTotal,sheet);
    //关闭流
    workBook.finish();
}
不报错,但显示出来的有点问题,如下:
即有多组数据填充,又有单一数据填充,为了避免两者数据出现冲突覆盖的情况,在多组填充时需要通过FillConfig对象设置换行,如下:
@Test
public void test04(){
    String template = "D:\\fill_data_template.xls";
    //根据模板产生写对象
    ExcelWriter workBook = EasyExcel.write("D:\\Excel填充组合数据.xls", FillData.class).withTemplate(template).build();
    WriteSheet sheet = EasyExcel.writerSheet().build();
    //组合填充时,因为多组填充的数据量不确定,需要在多组填充完之后另起一行
    FillConfig build = FillConfig.builder().forceNewRow(true).build();
    //准备多组数据
    List<FillData> fillDatas = initFillData();
    //准备单组数据
    HashMap<String,String> dataAndTotal = new HashMap<String, String>();
    dataAndTotal.put("date","2013-02-06");
    dataAndTotal.put("total","100");
    //填充数据
    //填充并换行
    workBook.fill(fillDatas,build,sheet);
    workBook.fill(dataAndTotal,sheet);
    //关闭流
    workBook.finish();
}
看第8行和第17行。效果如下:

最后,提供一下学习网址:https://github.com/alibaba/easyexcel和https://www.yuque.com/easyexcel/doc/write


