TensorRT(C++)基础代码解析
TensorRT(C++)基础代码解析
文章目录
- TensorRT(C++)基础代码解析
- 前言
- 一、TensorRT工作流程
- 二、C++ API
-
- 2.1 构建阶段
-
- 2.1.1 创建builder
- 2.1.2 创建网络定义
- 2.1.3 定义网络结构
- 2.1.4 定义网络输入输出
- 2.1.5 配置参数
- 2.1.6 生成Engine
- 2.1.7 保存为模型文件
- 2.1.8 释放资源
- 2.2 运行期
-
- 2.2.1 创建一个runtime对象
- 2.2.2 反序列化生成engine
- 2.2.3 创建一个执行上下文ExecutionContext
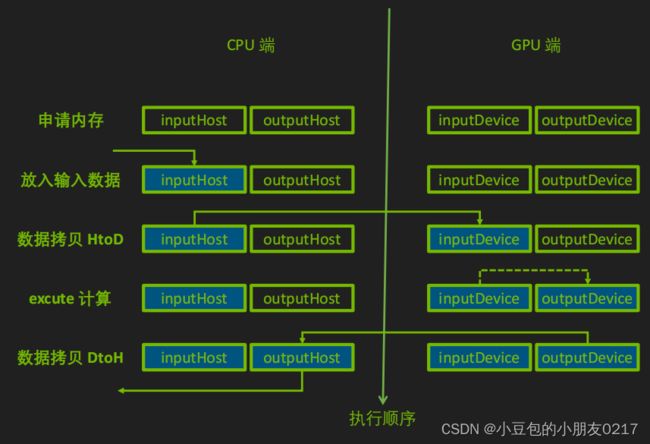
- 2.2.4 为推理填充输入
- 2.2.4 调用enqueueV2来执行推理
- 2.2.5 释放资源
- 总结
前言
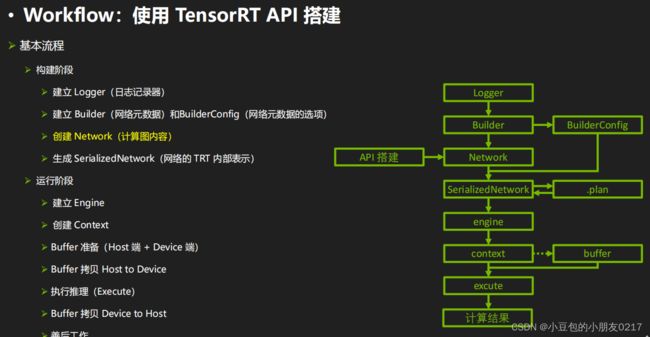
一、TensorRT工作流程
二、C++ API
2.1 构建阶段
TensorRT build engine的过程
- 创建builder
- 创建网络定义:builder —> network
- 配置参数:builder —> config
- 生成engine:builder —> engine (network, config)
- 序列化保存:engine —> serialize
- 释放资源:delete
2.1.1 创建builder
nvinfer1 是 NVIDIA TensorRT 的 C++ 接口命名空间。构建阶段的最高级别接口是 Builder。Builder负责优化一个模型,并产生Engine。通过如下接口创建一个Builder。
nvinfer1::IBuilder *builder = nvinfer1::createInferBuilder(logger);
2.1.2 创建网络定义
NetworkDefinition接口被用来定义模型。接口createNetworkV2接受配置参数,参数用按位标记的方式传入。比如上面激活explicitBatch,是通过1U << static_cast 将模型转移到TensorRT的最常见的方式是以ONNX格式从框架中导出(将在后续课程进行介绍),并使用TensorRT的ONNX解析器来填充网络定义。同时,也可以使用TensorRT的Layer和Tensor等接口一步一步地进行定义。通过接口来定义网络的代码示例如下: 添加输入层 添加全连接层 添加激活层 定义哪些张量是网络的输入和输出。没有被标记为输出的张量被认为是瞬时值,可以被构建者优化掉。输入和输出张量必须被命名,以便在运行时,TensorRT知道如何将输入和输出缓冲区绑定到模型上。 添加相关Builder 的配置。createBuilderConfig接口被用来指定TensorRT应该如何优化模型 完整代码 TensorRT运行时的最高层级接口是Runtime 通过读取模型文件并反序列化,我们可以利用runtime生成Engine。 从Engine创建的ExecutionContext接口是调用推理的主要接口。ExecutionContext包含与特定调用相关的所有状态,因此可以有多个与单个引擎相关的上下文,且并行运行它们。 首先创建CUDA Stream用于推理的执行。 同时在CPU和GPU上分配输入输出内存,并将输入数据从CPU拷贝到GPU上。 完整代码 TensorRT(C++)基础代码解析auto explicitBatch = 1U << static_cast<uint32_t
(nvinfer1::NetworkDefinitionCreationFlag::kEXPLICIT_BATCH);
// 调用createNetworkV2创建网络定义,参数是显性batch
nvinfer1::INetworkDefinition *network = builder->createNetworkV2(explicitBatch);
2.1.3 定义网络结构
const int input_size = 3;
nvinfer1::ITensor *input = network->addInput("data", nvinfer1::DataType::kFLOAT,nvinfer1::Dims4{1, input_size, 1, 1})
nvinfer1::IFullyConnectedLayer* fc1 = network->addFullyConnected(*input, output_size, fc1w, fc1b);
nvinfer1::IActivationLayer* relu1 = network->addActivation(*fc1->getOutput(0), nvinfer1::ActivationType::kRELU);
2.1.4 定义网络输入输出
// 设置输出名字
sigmoid->getOutput(0)->setName("output");
// 标记输出,没有标记会被当成顺时针优化掉
network->markOutput(*sigmoid->getOutput(0));
2.1.5 配置参数
 nvinfer1::IBuilderConfig *config = builder->createBuilderConfig();
 // 设置最大工作空间大小,单位是字节
config->setMaxWorkspaceSize(1 << 28); // 256MiB
2.1.6 生成Engine
nvinfer1::ICudaEngine *engine = builder->buildEngineWithConfig(*network, *config);
2.1.7 保存为模型文件
nvinfer1::IHostMemory *serialized_engine = engine->serialize();
    // 存入文件
std::ofstream outfile("model/mlp.engine", std::ios::binary);
assert(outfile.is_open() && "Failed to open file for writing");
outfile.write((char *)serialized_engine->data(), serialized_engine->size());
2.1.8 释放资源
outfile.close();
delete serialized_engine;
delete engine;
delete config;
delete network;
/*
TensorRT build engine的过程
7. 创建builder
8. 创建网络定义:builder ---> network
9. 配置参数:builder ---> config
10. 生成engine:builder ---> engine (network, config)
11. 序列化保存:engine ---> serialize
12. 释放资源:delete
*/
#include 2.2 运行期
2.2.1 创建一个runtime对象
nvinfer1::IRuntime *runtime = nvinfer1::createInferRuntime(logger);
2.2.2 反序列化生成engine
nvinfer1::ICudaEngine *engine = runtime->deserializeCudaEngine(engine_data.data(), engine_data.size(), nullptr);
2.2.3 创建一个执行上下文ExecutionContext
nvinfer1::IExecutionContext *context = engine->createExecutionContext();
2.2.4 为推理填充输入
cudaStream_t stream = nullptr;
cudaStreamCreate(&stream);
// 输入数据
float* h_in_data = new float[3]{1.4, 3.2, 1.1};
int in_data_size = sizeof(float) * 3;
float* d_in_data = nullptr;
// 输出数据
float* h_out_data = new float[2]{0.0, 0.0};
int out_data_size = sizeof(float) * 2;
float* d_out_data = nullptr;
// 申请GPU上的内存
cudaMalloc(&d_in_data, in_data_size);
cudaMalloc(&d_out_data, out_data_size);
// 拷贝数据
cudaMemcpyAsync(d_in_data, h_in_data, in_data_size, cudaMemcpyHostToDevice, stream);
// enqueueV2中是把输入输出的内存地址放到bindings这个数组中,需要写代码时确定这些输入输出的顺序(这样容易出错,而且不好定位bug,所以新的接口取消了这样的方式,不过目前很多官方 sample 也在用v2)
float* bindings[] = {d_in_data, d_out_data};
2.2.4 调用enqueueV2来执行推理
bool success = context -> enqueueV2((void **) bindings, stream, nullptr);
// 数据从device --> host
cudaMemcpyAsync(host_output_data, device_output_data, output_data_size, cudaMemcpyDeviceToHost, stream);
// 等待流执行完毕
cudaStreamSynchronize(stream);
// 输出结果
std::cout << "输出结果: " << host_output_data[0] << " " << host_output_data[1] << std::endl;
2.2.5 释放资源
cudaStreamDestroy(stream);
cudaFree(device_input_data_address);
cudaFree(device_output_data_address);
delete[] host_input_data;
delete[] host_output_data;

delete context;
delete engine;
delete runtime;
/*
使用.cu是希望使用CUDA的编译器NVCC,会自动连接cuda库
TensorRT runtime 推理过程
1. 创建一个runtime对象
2. 反序列化生成engine:runtime ---> engine
3. 创建一个执行上下文ExecutionContext:engine ---> context
4. 填充数据
5. 执行推理:context ---> enqueueV2
6. 释放资源:delete
*/
#include
总结


