【源码分析】一个flink job的sql到底是如何执行的(一):flink sql底层是如何调用connector实现物理执行计划的
文章目录
- 一. 一条flink sql
- 二. 源码流程图示
-
- 1. flink connector的实现逻辑
- 2. flink sql的转换逻辑
- 三、flink sql 调用connector源码分析
-
- 1. tEnv.executeSql(stmt)
-
- 1.1. 概述
- 1.2. convertValidatedSqlNode
-
- 1.2.1. create语句
- 1.2.2. insert语句
- 1.2.3. query语句
-
- a. 找到connector的DynamicTableSource
- b. convertSourceToRel ing
- 2. statementSet.execute()
-
- 2.1. translateToExecNodeGraph
-
- 实现类1:StreamPhysicalTableSourceScan
- 实现类2:StreamPhysicalLookupJoin
- 实现类3:StreamPhysicalSink
- 2.2. translateToPlan
我们以一条sql为例分析下flink sql与connector是如何配合执行的,本文我们先分析
- sql->sqlnode->validate->operation:是如何找到对应的connector实例的
- relnode->execGraph:是如何组装node为Graph,在哪找到connector实例的
之后的文章将会继续分析:
- translateToPlanInternal是如何串联connector其他方法的
- runtime时是如何调用connector执行方法的
另外:对于connector的spi机制、connector并行度的设置后续也都可以分析。
一. 一条flink sql
CREATE TABLE tjy_test1_ss
(
`id` int,
`name` string,
age string,
`proc_time` AS `proctime`()
) WITH (
'password' = '11111111',
'timestamp-format.standard' = 'SQL',
'connector' = 'binlog-x',
'port' = '3306',
'cat' = 'insert',
'host' = 'localhost',
-- 'connection-charset' = 'utf-8',
'url' = 'jdbc:mysql://localhost:3306/360test',
'table' = 'test003',
'username' = 'root',
'timestamp'='1702881040000'
);

CREATE TABLE tjy_fortest1
(
`id` int,
`name` string,
`face` string,
PRIMARY KEY (id) NOT ENFORCED
) WITH (
'password' = '123456',
'connector' = 'mysql-x',
'sink.buffer-flush.interval' = '10000',
'sink.buffer-flush.max-rows' = '1024',
'sink.all-replace' = 'true',
'table-name' = 'tjy_fortest1',
'sink.parallelism' = '1',
'url' = 'jdbc:mysql://xxx:3306/middle_test?useunicode=true&characterEncoding=utf8&useSSL=false&useCursorFetch=true',
'username' = 'middle_test'
);
CREATE TABLE zzzzz_star01
(
`qq` int,
`ww` string
) WITH (
'connector' = 'print'
);

insert into zzzzz_star01 select t1.`id` as `qq` ,t2.`name` as `ww` from tjy_test1_ss t1 left join tjy_fortest1 FOR SYSTEM_TIME AS OF `t1`.`proc_time` t2 on t1.name=t2.name;
二. 源码流程图示
1. flink connector的实现逻辑
flink connector 在代码层面从一个阶段到其他阶段的翻译过程。

| 阶段 | 解释 |
|---|---|
| 元数据管理 |
执行CREATE TABLE时,会在目标catalog种更新元数据,比如上图黄色的create table语句。语句中with下的参数不会被校验和解释。DDL语句将会被解释成CatalogTable实例。 |
| 生成逻辑计划 | 接下来,当规划和优化一个job下的sql时,CatalogTable实例将会根据sql的语法具体解析为:当读select 语句时,会解析成DynamicTableSource;当读到insert into 语句时,解析成DynamicTableSink。 DynamicTableSource\SinkFactory将会提供具体的解析方法将CatalogTable解析为DynamicTableSource\Sink。具体的,比如说with下的port,Factory会从CatalogTable中校验port是否是连接器支持的参数,然后获取值,并创建参数实例,以便往下个阶段传输。 默认情况下,通过java的SPI机制发现工厂实例,工厂实例要定义一个能被校验的工厂标识符,例如上图:‘connector’ = ‘custom’。 DynamicTableSource\Sink 在运行时将会实际的读写数据。 |
| 运行时 | 当逻辑计划生成时,planner将会获取连接器的实现。运行时核心接口是,InputFormat和SourceFunction,按另一个抽象级别分组为ScanRuntimeProvider、 LookupRuntimeProvider和的子类SinkRuntimeProvider |
小结:
- 对于一个create table语句会被更新到catalogTable实例中,语句中with下的参数不会被校验和解析。
- create table不会生成DynamicTable,而是select语句会生成DynamicTableSource,代表从物理表中拉取数据,insert into语句生成DynamicTableSink,代表写入数据到物理表。
- 在Planning期间,通过with下的connector参数获取对应的工厂,然后通过工厂校验、解析(with下的)参数值(比如’port’=‘5022’)最后封装成参数实例,并传递给runtime的实例;
- Runtime期间,根据参数实例定义的数据消费规则,开始真正的从物理表中处理(拉取\写入)数据。
2. flink sql的转换逻辑
其次梳理下flink sql的整体源码流程

- 解析:通过calicite解析器生成AST即sqlnode
- 校验:校验sqlnode
- 生成逻辑计划:生成relroot封装成不同的operation(封装的算子细节)
- 优化逻辑计划:解析operation内部的relnode进行优化
- 生成物理执行计划
- 构建streamGraph异步执行
三、flink sql 调用connector源码分析
1. tEnv.executeSql(stmt)
1.1. 概述
先回顾下tEnv.executeSql(stmt)执行时都发生了什么

在paser阶段:sql会从sqlNode再到operation的转变
create table 语句:
create table 语句会被维护到catalogTable实例中,以便insert 或 select 语句。注意语句中with下的参数不会被校验和解析。insert into语句:
找into后的表会生成DynamicTableSink实例,代表写入数据到物理表。select语句:
select语句代表query,找from后的表生成DynamicTableSource实例,代表从物理表中拉取数据。
ServiceLoader通过catalog元数据利用spi机制发现具体的实现类,然后加载具体的DynamicTable。
生成的DynamicTablexxx实例提供getScanRuntimeProvider、getLookupRuntimeProvider、getSinkRuntimeProvider等方法:用于后续translate阶段构建物理执行计划。
代码调用链概述
tEnv.executeSql(stmt);
   ->List<Operation> operations = getParser().parse(statement);
   -> ParserImpl.parse:
   创建paser,并执行parse:javacc将sql转换为代码:SqlNodeList。这里略
      ->SqlToOperationConverter.convert(planner, catalogManager,
       parsed.get(0)):转换为operation:逻辑执行计划
parse的大致流程是:sql到sqlnode再到operation。
1.2. convertValidatedSqlNode
这里我们忽略校验的过程,关注SqlToOperationConverter.convertValidatedSqlNode逻辑:即用于将sqlnode转换为operation。
如下代码主要是匹配不同的sqlnode进行operation的转换,这里我们集中关注,create、select、insert语句的converter逻辑。
private static Optional<Operation> convertValidatedSqlNode(
        FlinkPlannerImpl flinkPlanner, CatalogManager catalogManager, SqlNode validated) {
    SqlToOperationConverter converter =
            new SqlToOperationConverter(flinkPlanner, catalogManager);

	...
	 else if (validated instanceof SqlCreateTable) {
    ...
    return Optional.of(
            converter.createTableConverter.convertCreateTable((SqlCreateTable) validated));
    ...
    } else if (validated instanceof RichSqlInsert) {
    return Optional.of(converter.convertSqlInsert((RichSqlInsert) validated));
    ...
    } else if (validated.getKind().belongsTo(SqlKind.QUERY)) {
    return Optional.of(converter.convertSqlQuery(validated));

}
1.2.1. create语句
代码分析
SqlToOperationConverter.convertValidatedSqlNode
return Optional.of(
        converter.createTableConverter.convertCreateTable((SqlCreateTable) validated));

->

Operation convertCreateTable(SqlCreateTable sqlCreateTable) {
    sqlCreateTable.getTableConstraints().forEach(validateTableConstraint);
    CatalogTable catalogTable = createCatalogTable(sqlCreateTable);

    UnresolvedIdentifier unresolvedIdentifier =
            UnresolvedIdentifier.of(sqlCreateTable.fullTableName());
    ObjectIdentifier identifier = catalogManager.qualifyIdentifier(unresolvedIdentifier);
  //封装一些属性:
  //identifier:
  //catalogTable实例
    return new CreateTableOperation(
            identifier,  //`default_catalog`.`default_database`.`tjy_test1_ss`
            catalogTable,  // option
                           // partitionkey
                           // table schema:字段、主键、watermark
            sqlCreateTable.isIfNotExists(),
            sqlCreateTable.isTemporary());
}
create的sqlnode转换为operation:主要用于封装一些属性,如下:
- identifier:这里是:
default_catalog.default_database.tjy_test1_ss- catalogTable实例:option、 partitionkey、 table schema:字段、主键、watermark

1.2.2. insert语句
insert的sqlnode到Operation转换同样是封装了一些参数
 else if (validated instanceof RichSqlInsert) {
    return Optional.of(converter.convertSqlInsert((RichSqlInsert) validated));

private Operation convertSqlInsert(RichSqlInsert insert) {
    // Get sink table name.
	...
    // Get sink table hints.
	...
    PlannerQueryOperation query =
            (PlannerQueryOperation)
                    convertValidatedSqlNodeOrFail(
                            flinkPlanner, catalogManager, insert.getSource());

    return new SinkModifyOperation(
            contextResolvedTable,   //表名
            query,                  //query:PlannerQueryOperation
            insert.getStaticPartitionKVs(),
            insert.isOverwrite(),
            dynamicOptions);
}
ing
此例子insert into 后的表源码并未找sinksource的实现,只是将insert 后的select语句进行了实现,debug后发现在translate附近进行的实例初始化。
1.2.3. query语句
query的语句包含了join,operation操作时生成了join左右两个表的DynamicTableSource实例。
} else if (validated.getKind().belongsTo(SqlKind.QUERY)) {
    return Optional.of(converter.convertSqlQuery(validated));

...

private PlannerQueryOperation toQueryOperation(FlinkPlannerImpl planner, SqlNode validated) {
    // transform to a relational tree
    RelRoot relational = planner.rel(validated);
    return new PlannerQueryOperation(relational.project());
}
toQueryOperation时会将query语句转换为关系表达式,而RelRoot relational = planner.rel(validated); 的调用链是:rel->sqlToRelConverter.convertQuery->convertQueryRecursive 。
接着调用链往下看
...
switch (kind) {
case SELECT:
  return RelRoot.of(convertSelect((SqlSelect) query, top), kind);
...
->convertSelect->convertSelectImpl实现了select语句中各个sqlNode的转换,如下代码:
protected void convertSelectImpl(final Blackboard bb, SqlSelect select) {
	// 转换from
    convertFrom(bb, select.getFrom());
    //转换where
    convertWhere(bb, select.getWhere());

    final List<SqlNode> orderExprList = new ArrayList<>();
    final List<RelFieldCollation> collationList = new ArrayList<>();
    gatherOrderExprs(bb, select, select.getOrderList(), orderExprList, collationList);
    final RelCollation collation = cluster.traitSet().canonize(RelCollations.of(collationList));
    //转换聚合
    if (validator.isAggregate(select)) {
        convertAgg(bb, select, orderExprList);
    } else {
        convertSelectList(bb, select, orderExprList);
    }
    //转换:distinct
    if (select.isDistinct()) {
        distinctify(bb, true);
    }
    //转换:order
    convertOrder(select, bb, collation, orderExprList, select.getOffset(), select.getFetch());
    //转换hint
    if (select.hasHints()) {
        ...
    } else {
        bb.setRoot(bb.root, true);
    }
}
SqlSelect进入convertFrom逻辑进行匹配、迭代,直到遇见IDENTIFIER类型,会创建左右表的数据源实例,如下代码调用过程:
protected void convertFrom(Blackboard bb, SqlNode from, List<String> fieldNames) {
...
	switch (from.getKind()) {
		case JOIN:
		    convertJoin(bb, (SqlJoin) from);
		    return;
	}


private void convertJoin(Blackboard bb, SqlJoin join) {
    final SqlValidatorScope scope = validator.getJoinScope(join);
    final Blackboard fromBlackboard = createBlackboard(scope, null, false);
    SqlNode left = join.getLeft();
    SqlNode right = join.getRight();
    ...
}


# SqlToRelConverter
private void convertIdentifier(。。。){
	...
	tableRel = toRel(table, hints);
	...
}

===>
#CatalogSourceTable.
toRel(){
...
	// create table source
	final DynamicTableSource tableSource =
	        createDynamicTableSource(context, catalogTable.getResolvedTable());

	// prepare table source and convert to RelNode
	return DynamicSourceUtils.convertSourceToRel(
	        !schemaTable.isStreamingMode(),
	        context.getTableConfig(),
	        relBuilder,
	        schemaTable.getContextResolvedTable(),
	        schemaTable.getStatistic(),
	        hints,
	        tableSource);
}
其中,代码
final DynamicTableSource tableSource =
	        createDynamicTableSource(context, catalogTable.getResolvedTable());
通过spi机制(ing)发现具体连接器的实现:DynamicTableSource,创建DynamicTableSource实例,这里是binlog的,jdbc的就不列举了。
# BinlogDynamicTableFactory.
@Override
public DynamicTableSource createDynamicTableSource(Context context) {
    final FactoryUtil.TableFactoryHelper helper =
            FactoryUtil.createTableFactoryHelper(this, context);

....
}
此时观察createDynamicTableSource的context参数就知道context是在paser阶段传递的。
a. 找到connector的DynamicTableSource
找到数据源实现之后

接着调用DynamicSourceUtils.convertSourceToRel 将 DynamicTableSource 转换成 RelNode。
当获取到DynamicTableSource时就有能力获取具体数据源的getScanRuntimeProvider、getLookupRuntimeProvider等方法。
b. convertSourceToRel ing
继续看DynamicSourceUtils.convertSourceToRel的方法
public static RelNode convertSourceToRel(
        boolean isBatchMode,
        ReadableConfig config,
        FlinkRelBuilder relBuilder,
        ContextResolvedTable contextResolvedTable,
        FlinkStatistic statistic,
        List<RelHint> hints,
        DynamicTableSource tableSource) {
    final String tableDebugName = contextResolvedTable.getIdentifier().asSummaryString();
    final ResolvedCatalogTable resolvedCatalogTable = contextResolvedTable.getResolvedTable();

    // 1. prepare table source
    prepareDynamicSource(
            tableDebugName, resolvedCatalogTable, tableSource, isBatchMode, config);

    // 2. push table scan
    pushTableScan(isBatchMode, relBuilder, contextResolvedTable, statistic, hints, tableSource);

    // 3. push project for non-physical columns
    final ResolvedSchema schema = contextResolvedTable.getResolvedSchema();
    if (!schema.getColumns().stream().allMatch(Column::isPhysical)) {
        pushMetadataProjection(relBuilder, schema);
        pushGeneratedProjection(relBuilder, schema);
    }

    // 4. push watermark assigner
    if (!isBatchMode && !schema.getWatermarkSpecs().isEmpty()) {
        pushWatermarkAssigner(relBuilder, schema);
    }

    return relBuilder.build();
}
创建DynamicSource之前的准备:prepareDynamicSource
// 1. prepare table source
prepareDynamicSource(
        tableDebugName, resolvedCatalogTable, tableSource, isBatchMode, config);

//准备给定的DynamicTableSource 。它检查源是否与给定模式兼容并应用初始参数。
public static void prepareDynamicSource(
        String tableDebugName,
        ResolvedCatalogTable table,
        DynamicTableSource source,
        boolean isBatchMode,
        ReadableConfig config) {
    //获取数据源的schema
    final ResolvedSchema schema = table.getResolvedSchema();

    validateAndApplyMetadata(tableDebugName, schema, source);

    if (source instanceof ScanTableSource) {
        validateScanSource(
                tableDebugName, schema, (ScanTableSource) source, isBatchMode, config);
    }

    // lookup table source is validated in LookupJoin node
}


private static void validateScanSource(
        String tableDebugName,
        ResolvedSchema schema,
        ScanTableSource scanSource,
        boolean isBatchMode,
        ReadableConfig config) {

    // getScanRuntimeProvider:用于离线任务时,provider的校验
    final ScanRuntimeProvider provider =
            scanSource.getScanRuntimeProvider(ScanRuntimeProviderContext.INSTANCE);
    final ChangelogMode changelogMode = scanSource.getChangelogMode();
    //校验水印
    validateWatermarks(tableDebugName, schema);

    if (isBatchMode) {
        validateScanSourceForBatch(tableDebugName, changelogMode, provider);
    } else {
        validateScanSourceForStreaming(
                tableDebugName, schema, scanSource, changelogMode, config);
    }
}
2. statementSet.execute()
执行statementSet.execute(); 时有如下三个阶段
- 优化逻辑计划:解析operation内部的relnode进行优化
- 生成物理执行计划
- 构建streamGraph异步执行
如下代码:主要描述了flink优化逻辑计划、翻译成物理计划、转换为trans DAG的总体逻辑。
// PlannerBase.

override def translate(
    modifyOperations: util.List[ModifyOperation]): util.List[Transformation[_]] = {
  beforeTranslation()
  if (modifyOperations.isEmpty) {
    return List.empty[Transformation[_]]
  }

  val relNodes = modifyOperations.map(translateToRel)
  //1.优化
  val optimizedRelNodes = optimize(relNodes)
  //2. 生成物理计划
  val execGraph = translateToExecNodeGraph(optimizedRelNodes, isCompiled = false)
  //3. 翻译为transformations DAG。
  val transformations = translateToPlan(execGraph)
  afterTranslation()
  transformations
}
再来回顾下二.2的部分流程图
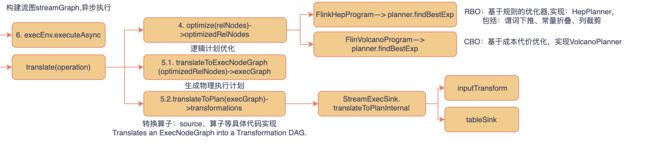
接下来我们重点关注translateToExecNodeGraph转换为物理执行计划的逻辑
2.1. translateToExecNodeGraph
translateToExecNodeGraph用于生成物理执行计划,如下代码:
private[flink] def translateToExecNodeGraph(
    optimizedRelNodes: Seq[RelNode],
    isCompiled: Boolean): ExecNodeGraph = {
...
  // convert FlinkPhysicalRel DAG to ExecNodeGraph
  val generator = new ExecNodeGraphGenerator()
  //产生execGraph:物理执行计划
  val execGraph =
generator.generate(optimizedRelNodes.map(_.asInstanceOf[FlinkPhysicalRel]), isCompiled)

  // process the graph  :处理graph
  val context = new ProcessorContext(this)
  val processors = getExecNodeGraphProcessors
  processors.foldLeft(execGraph)((graph, processor) => processor.process(graph, context))
}


//产生execGraph:物理执行计划
private ExecNode<?> generate(FlinkPhysicalRel rel, boolean isCompiled) {
。。。
    //获取所有的input数据源
    for (RelNode input : rel.getInputs()) {
        inputNodes.add(generate((FlinkPhysicalRel) input, isCompiled));
    }
    // 找到各个逻辑执行计划节点的物理实现类
    execNode = rel.translateToExecNode(isCompiled);
    // connects the input nodes:链接所有的逻辑执行计划节点,形成DAG?
    List<ExecEdge> inputEdges = new ArrayList<>(inputNodes.size());
    for (ExecNode<?> inputNode : inputNodes) {  inputEdges.add(ExecEdge.builder().source(inputNode).target(execNode).build());
    }
。。。
    return execNode;
}
上述代码,获取逻辑执行计划的所有节点,找到各个逻辑执行计划节点的物理实现类,然后串联成物理执行计划。
接下来我们看各个节点物理执行计划节点实现类:
如下是物理执行计划转化的基类
FlinkPhysicalRel.
def translateToExecNode(isCompiled: Boolean): ExecNode[_] = {
  val execNode = translateToExecNode()
  execNode.setCompiled(isCompiled)
  execNode
}
接着看source、sink、lookup的实现类
实现类1:StreamPhysicalTableSourceScan
org.apache.flink.table.planner.plan.nodes.physical.stream
//实现类:StreamPhysicalTableSourceScan
//Stream physical RelNode to read data from an external source defined by a org.apache.flink.table.connector.source.ScanTableSource.
override def translateToExecNode(): ExecNode[_] = {
val tableSourceSpec = new DynamicTableSourceSpec(
tableSourceTable.contextResolvedTable,
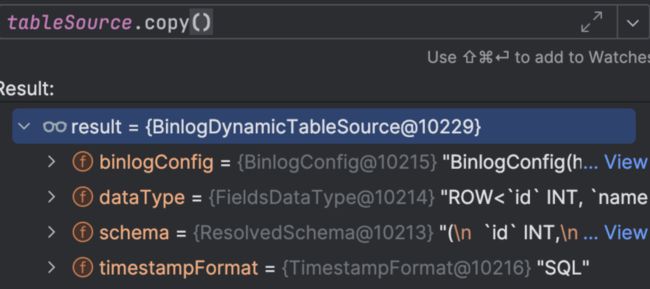
util.Arrays.asList(tableSourceTable.abilitySpecs: _*))
// 这里的tableSource:是在parser阶段已经实现的
tableSourceSpec.setTableSource(tableSource)
new StreamExecTableSourceScan(
unwrapTableConfig(this),
tableSourceSpec,
FlinkTypeFactory.toLogicalRowType(getRowType),
getRelDetailedDescription)
}
tableSource:是在parser阶段已经实现的实例,这里以BinlogDynamicTableSource为例
实现类2:StreamPhysicalLookupJoin
override def translateToExecNode(): ExecNode[_] = {
  val (projectionOnTemporalTable, filterOnTemporalTable) = calcOnTemporalTable match {
    case Some(program) =>
      val (projection, filter) = FlinkRexUtil.expandRexProgram(program)
      (JavaScalaConversionUtil.toJava(projection), filter.orNull)
    case _ =>
      (null, null)
  }

  new StreamExecLookupJoin(
    tableConfig,
    JoinTypeUtil.getFlinkJoinType(joinType),
    remainingCondition.orNull,
    new TemporalTableSourceSpec(temporalTable),
    allLookupKeys.map(item => (Int.box(item._1), item._2)).asJava,
    projectionOnTemporalTable,
    filterOnTemporalTable,
    lookupKeyContainsPrimaryKey(),
    upsertMaterialize,
    asyncOptions.orNull,
    retryOptions.orNull,
    inputChangelogMode,
    InputProperty.DEFAULT,
    FlinkTypeFactory.toLogicalRowType(getRowType),
    getRelDetailedDescription)
}
 /** Stream physical RelNode for [[Calc]]. */

class StreamPhysicalCalc(

}
实现类3:StreamPhysicalSink
/**
 * Stream physical RelNode to to write data into an external sink defined by a [[DynamicTableSink]].
 */
 class StreamPhysicalSink(){
...

override def translateToExecNode(): ExecNode[_] = {
  val inputChangelogMode =
    ChangelogPlanUtils.getChangelogMode(getInput.asInstanceOf[StreamPhysicalRel]).get

  val tableSinkSpec =
    new DynamicTableSinkSpec(contextResolvedTable, util.Arrays.asList(abilitySpecs: _*))
  tableSinkSpec.setTableSink(tableSink)
  // no need to call getUpsertKeysInKeyGroupRange here because there's no exchange before sink,
  // and only add exchange in exec sink node.  val inputUpsertKeys = FlinkRelMetadataQuery
    .reuseOrCreate(cluster.getMetadataQuery)
    .getUpsertKeys(inputRel)

  new StreamExecSink(
    unwrapTableConfig(this),
    tableSinkSpec,
    inputChangelogMode,
    InputProperty.DEFAULT,
    FlinkTypeFactory.toLogicalRowType(getRowType),
    upsertMaterialize,
    UpsertKeyUtil.getSmallestKey(inputUpsertKeys),
    getRelDetailedDescription)
}
tableSinkSpec为具体sink实现类,为PrintTableSinkFactory。
2.2. translateToPlan
org.apache.flink.table.planner.delegation.PlannerBase
。。。
//Translates an ExecNodeGraph into a Transformation DAG.
val transformations = translateToPlan(execGraph)
PlannerBase有两个实现类:BatchPlanner、StreamPlanner,我们这里是StreamPlanner,如下
//StreamPlanner
override protected def translateToPlan(execGraph: ExecNodeGraph): util.List[Transformation[_]] = {
  beforeTranslation()
  val planner = createDummyPlanner()
  //遍历每一个node转换为transformations
  val transformations = execGraph.getRootNodes.map {
    case node: StreamExecNode[_] => node.translateToPlan(planner)
    case _ =>
      throw new TableException(
        "Cannot generate DataStream due to an invalid logical plan. " +
          "This is a bug and should not happen. Please file an issue.")
  }
  //
  afterTranslation()
  transformations ++ planner.extraTransformations
}
node.translateToPlan: 翻译node为 Transformation。其中node: 一个物理执行节点(FlinkPhysicalRel)
先跳到基类,然后找具体实现
//org.apache.flink.table.planner.plan.nodes.exec.ExecNodeBase
public final Transformation<T> translateToPlan(Planner planner) {
    if (transformation == null) {
        transformation =
                translateToPlanInternal(
                        (PlannerBase) planner,
                        ExecNodeConfig.of(
                                ((PlannerBase) planner).getTableConfig(),
                                persistedConfig,
                                isCompiled));
        if (this instanceof SingleTransformationTranslator) {
            if (inputsContainSingleton()) {
                transformation.setParallelism(1);
                transformation.setMaxParallelism(1);
            }
        }
    }
    return transformation;
}

//接口
protected abstract Transformation<T> translateToPlanInternal(
        PlannerBase planner, ExecNodeConfig config);
这里较为复杂,篇幅问题,暂时不详细分析(ing)。
目前可以确定的是在translateToPlanInternal中source、sink、lookup等操作,都会找到对应连接器的实现。
参考:
https://nightlies.apache.org/flink/flink-docs-release-1.18/docs/dev/table/sourcessinks/
flink 1.16.1的相关源码