生信步骤|EffectorP批量预测病原物效应子
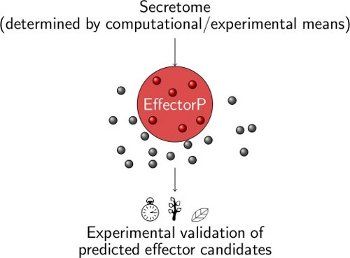
EffectorP软件利用机器学习原理,通过事先收集已知的效应子制备训练集,从而实现病原真菌和卵菌的效应子预测[1]。
EffectorP发展史[2]:
1.0版本最初在16年发表于NEW PHYTOLOGIST,实现了机器学习初步预测效应子。
2.0版本在18年发表于MPP,采用了更大的训练集和模型集成的方法,准确度更高。
3.0版本在22年发表于MPMI,是目前最新的版本。其实现了效应子的空间定位预测,同时新增了对卵菌效应子的预测。
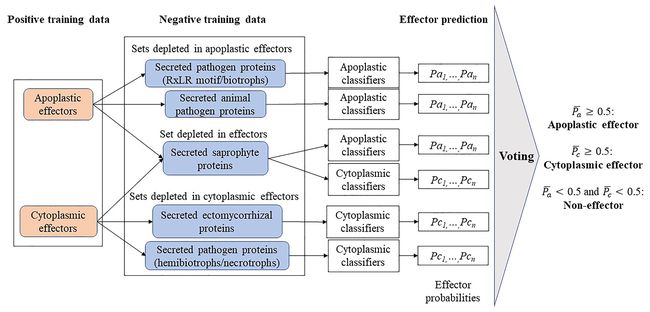
EffectorP3.0正训练集采用64个质外体效应子(50个真菌效应子,14个卵菌效应子)和112个胞质效应子(77真菌,35卵菌)构成。负训练集采用五种不太可能成为effectors的蛋白作为指标。正负训练集中的同源重复蛋白皆被去除。EffectorP3.0通过构建已有效应子数据库,训练机器学习模型,实现效应子预测。同时推断效应子的定位信息。 EffectorP也有在线网站:https://effectorp.csiro.au/ 对代码不感冒的小伙伴可以参考此网页。
0.下载并安装EffectorP
我们首先进入EffectorP官网下载最新版本软件:
$ git clone https://github.com/JanaSperschneider/EffectorP-3.0.git
EffectorP的运行需要Python3环境和WEKA软件3.8.4版本。需要我们提前在服务器上配置好。新建python3环境可以用conda实现。
#新建python3环境
$ conda create -y -n effector python=3
$ conda activate effector

#配置WEKA3.8.4,简单解压即可。
$ cd EffectorP-3.0-main && unzip weka-3-8-4.zip
通过软件自带的蛋白序列测试数据Effectors.fasta,测试是否运行顺利:
$ python EffectorP.py -i Effectors.fasta
#若成功运行则会在屏幕输出预测结果
我们可以参考官网给出的结果示例:
python EffectorP.py -i Effectors.fasta
-----------------

EffectorP 3.0 is running for 9 proteins given in FASTA file Effectors.fasta

Ensemble classification
25 percent done...
50 percent done...
75 percent done...
All done.

# Identifier                                    Cytoplasmic effector    Apoplastic effector     Non-effector            Prediction
AvrM Melampsora lini                            Y (1.0)                 -                       -                       Cytoplasmic effector
Avr1-CO39 Magnaporthe oryzae                    Y (0.945)               Y (0.667)               -                       Cytoplasmic/apoplastic effector
ToxA Parastagonospora nodorum                   Y (0.551)               Y (0.767)               -                       Apoplastic/cytoplasmic effector
AVR3a Phytophthora infestans                    Y (0.985)               -                       -                       Cytoplasmic effector
Pit2 Ustilago maydis                            Y (0.779)               -                       -                       Cytoplasmic effector
Zt6 Zymoseptoria tritici                        -                       Y (0.944)               -                       Apoplastic effector
INF1 Phytophthora infestans                     -                       Y (0.837)               -                       Apoplastic effector
Zinc transporter 3 Arabidopsis thaliana         -                       -                       Y (0.737)               Non-effector
GPI-anchored protein 13 Candida albicans        -                       -                       Y (0.708)               Non-effector

-----------------
9 proteins were provided as input in the following file: Effectors.fasta
-----------------
Number of predicted effectors: 7
Number of predicted cytoplasmic effectors: 4
Number of predicted apoplastic effectors: 3
-----------------
77.8 percent are predicted effectors.
44.4 percent are predicted cytoplasmic effectors.
33.3 percent are predicted apoplastic effectors.
-----------------
可见,EffectorP非常直观地给出了各个蛋白的预测类型(是/否为效应子)以及这些蛋白可能存在的细胞位置!
下面我们将采用发表于NCBI的稻瘟菌RNA-seq作为示例数据,执行批量预测效应子的操作。稻瘟菌RNA-seq的sra编号分别为SRR081552,SRR081553,SRR081554,SRR081555,SRR081556。
1.批量下载及解压sra示例数据
首先将示例数据的sra序号存放到新的文本文件sra.txt中,执行下载和批量解压操作。
$ vim sra.txt
-----
SRR081552
SRR081553
SRR081554
SRR081555
SRR081556
-----
#批量下载sra.txt中的数据
$ prefetch --option-file sra.txt
下载后的SRR文件需要进一步解压才能得到fastq文件:
#构建批量解压脚本
$ vim step1_fastdump.sh
----------
#!/bin/sh
for i in `tail -n+1 sra.txt|cut -f1`;do
fastq-dump ${i} --split-3 --gzip -O ./
done
---------

#执行批量解压处理
$ sh step1_fastdump.sh
2.批量进行RNAseq数据的回比
将得到的双端测序数据/单端测序数据回比到参考基因组上,通过stringtie提取转录本cds序列。示例数据为双端测序数据,故采用双端测序数据的回比流程,此处串联成了批量执行脚本。
针对双端测序的批量执行脚本。
#构建批量处理脚本
$ vim step2_hisat2_pair.sh
----------
#!/bin/bash
for i in `tail -n+1 sra.txt|cut -f1`;do
  {
        hisat2 -p 8 --dta --no-mixed --no-discordant  -x 70-15.BAC.fa -1 ${i}_1.fastq.cleandata.gz -2 ${i}_2.fastq.cleandata.gz --no-unal -S ${i}.sam 2>${i}.summary.txt
        samtools view -bS ${i}.sam -o ${i}.bam
        samtools sort ${i}.bam ${i}.sorted.bam #注意产生的是SRR081556.sorted.bam.bam
        stringtie ${i}.sorted.bam.bam -p 20 -o ${i}.gtf
        gffread -w ${i}.fa -g 70-15.BAC.fa ${i}.gtf
  }
done
---------

#批量处理
$ sh step2_hisat2_pair.sh
针对单端测序的批量执行脚本。
#构建批量处理脚本
$ vim step2_hisat2_single.sh
----------
#!/bin/bash
for i in `tail -n+1 sra.txt|cut -f1`;do
  {
        hisat2 -p 8 --dta --no-mixed --no-discordant  -x 70-15.BAC.fa -U ${i}.fastq.cleandata.gz --no-unal -S ${i}.sam 2>${i}.summary.txt
        samtools view -bS ${i}.sam -o ${i}.bam
        samtools sort ${i}.bam -o ${i}.sorted.bam #注意产生的是SRR081556.sorted.bam.bam
        stringtie ${i}.sorted.bam -p 20 -o ${i}.gtf
        gffread -w ${i}.fa -g 70-15.BAC.fa ${i}.gtf
  }
done
----------

#执行批量处理
$ sh step2_hisat2_single.sh
3.蛋白质翻译和过滤
对回比上的cds序列进行翻译,并筛选100个AA以上的氨基酸作为候选目标。
#构建批量处理脚本
$ vim step3_translate.sh
----------
#!/bin/bash
for i in `tail -n+1 sra.txt|cut -f1`;do
  {
        seqkit translate ${i}.fa --trim > ${i}.pro.fa
        seqkit seq -m 100 -g ${i}.pro.fa > ${i}.pro.filter.fa
  }
done
----------

#批量处理
$ sh step3_translate.sh
4.效应子预测
最后一步,对所有候选的目标蛋白进行效应子预测。
#构建批量处理脚本
$ vim step4_effectorP.sh
----------
#!/bin/bash
for i in `tail -n+1 sra.txt|cut -f1`;do
  {
        python /mnt/zhou/hangyuan/biosoft/EffectorP-3.0-main/EffectorP.py -i ${i}.pro.filter.fa > ${i}.predict_effector.txt
  }
done
----------

#批量处理
$ sh step4_effectorP.sh
执行后完上述所有代码后,得到的预测结果文件会分别保存在以.predict_effector.txt为结尾的文本文件中。打开即可查看各个RNAseq数据的预测结果。
参考信息:
- EffectorP Github:https://github.com/JanaSperschneider/EffectorP-3.0
- Sperschneider J, Dodds P. EffectorP 3.0: prediction of apoplastic and cytoplasmic effectors in fungi and oomycetes. Mol Plant Microbe Interact. 2021.doi: 10.1094/MPMI-08-21-0201-R

