Docker简介、基本概念和安装
Docker简介、基本概念和安装
1.docker简介
1.1 什么是docker
Docker 最初是 dotCloud 公司创始人 Solomon Hykes (opens new window)在法国期间发起的一个公司内部项目,它是基于 dotCloud 公司多年云服务技术的一次革新,并于 2013 年 3 月以 Apache 2.0 授权协议开源 (opens new window),主要项目代码在 GitHub (opens new window)上进行维护。Docker 项目后来还加入了 Linux 基金会,并成立推动 开放容器联盟(OCI) (opens new window)。
Docker 自开源后受到广泛的关注和讨论,至今其 GitHub 项目 (opens new window)已经超过 5 万 7 千个星标和一万多个 fork。甚至由于 Docker 项目的火爆,在 2013 年底,dotCloud 公司决定改名为 Docker (opens new window)。Docker 最初是在 Ubuntu 12.04 上开发实现的;Red Hat 则从 RHEL 6.5 开始对 Docker 进行支持;Google 也在其 PaaS 产品中广泛应用 Docker。
Docker 使用 Google 公司推出的 Go 语言 (opens new window)进行开发实现,基于 Linux 内核的 cgroup (opens new window),namespace (opens new window),以及 OverlayFS (opens new window)类的 Union FS (opens new window)等技术,对进程进行封装隔离,属于 操作系统层面的虚拟化技术 (opens new window)。由于隔离的进程独立于宿主和其它的隔离的进程,因此也称其为容器。最初实现是基于 LXC (opens new window),从 0.7 版本以后开始去除 LXC,转而使用自行开发的 libcontainer (opens new window),从 1.11 版本开始,则进一步演进为使用 runC (opens new window)和 containerd (opens new window)。

图1-1 docker架构
runc是一个 Linux 命令行工具,用于根据 OCI容器运行时规范 (opens new window)创建和运行容器。
containerd是一个守护程序,它管理容器生命周期,提供了在一个节点上执行容器和管理镜像的最小功能集。
Docker 在容器的基础上,进行了进一步的封装,从文件系统、网络互联到进程隔离等等,极大的简化了容器的创建和维护。使得 Docker 技术比虚拟机技术更为轻便、快捷。
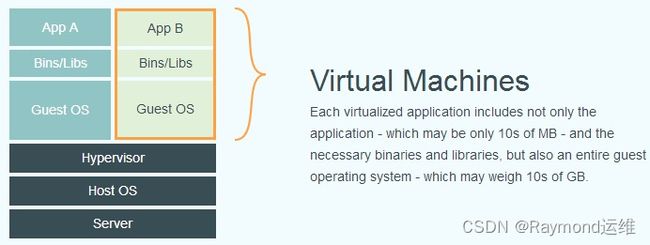
图1-2 传统虚拟机技术

图1-3 容器技术
上面的图片比较了 Docker 和传统虚拟化方式的不同之处。传统虚拟机技术是虚拟出一套硬件后,在其上运行一个完整操作系统,在该系统上再运行所需应用进程;而容器内的应用进程直接运行于宿主的内核,容器内没有自己的内核,而且也没有进行硬件虚拟。因此容器要比传统虚拟机更为轻便。
1.2 为什么要使用 Docker?
作为一种新兴的虚拟化方式,Docker 跟传统的虚拟化方式相比具有众多的优势。
更高效的利用系统资源
由于容器不需要进行硬件虚拟以及运行完整操作系统等额外开销,Docker 对系统资源的利用率更高。无论是应用执行速度、内存损耗或者文件存储速度,都要比传统虚拟机技术更高效。因此,相比虚拟机技术,一个相同配置的主机,往往可以运行更多数量的应用。
更快速的启动时间
传统的虚拟机技术启动应用服务往往需要数分钟,而 Docker 容器应用,由于直接运行于宿主内核,无需启动完整的操作系统,因此可以做到秒级、甚至毫秒级的启动时间。大大的节约了开发、测试、部署的时间。
一致的运行环境
开发过程中一个常见的问题是环境一致性问题。由于开发环境、测试环境、生产环境不一致,导致有些 bug 并未在开发过程中被发现。而 Docker 的镜像提供了除内核外完整的运行时环境,确保了应用运行环境一致性,从而不会再出现 「这段代码在我机器上没问题啊」 这类问题。
持续交付和部署
对开发和运维(DevOps (opens new window))人员来说,最希望的就是一次创建或配置,可以在任意地方正常运行。
使用 Docker 可以通过定制应用镜像来实现持续集成、持续交付、部署。开发人员可以通过 Dockerfile 来进行镜像构建,并结合 持续集成(Continuous Integration) (opens new window)系统进行集成测试,而运维人员则可以直接在生产环境中快速部署该镜像,甚至结合 持续部署(Continuous Delivery/Deployment) (opens new window)系统进行自动部署。
而且使用 Dockerfile 使镜像构建透明化,不仅仅开发团队可以理解应用运行环境,也方便运维团队理解应用运行所需条件,帮助更好的生产环境中部署该镜像。
更轻松的迁移
由于 Docker 确保了执行环境的一致性,使得应用的迁移更加容易。Docker 可以在很多平台上运行,无论是物理机、虚拟机、公有云、私有云,甚至是笔记本,其运行结果是一致的。因此用户可以很轻易的将在一个平台上运行的应用,迁移到另一个平台上,而不用担心运行环境的变化导致应用无法正常运行的情况。
更轻松的维护和扩展
Docker 使用的分层存储以及镜像的技术,使得应用重复部分的复用更为容易,也使得应用的维护更新更加简单,基于基础镜像进一步扩展镜像也变得非常简单。此外,Docker 团队同各个开源项目团队一起维护了一大批高质量的 官方镜像 (opens new window),既可以直接在生产环境使用,又可以作为基础进一步定制,大大的降低了应用服务的镜像制作成本。
对比传统虚拟机总结
| 特性 | 容器 | 虚拟机 |
|---|---|---|
| 启动 | 秒级 | 分钟级 |
| 硬盘使用 | 一般为 MB |
一般为 GB |
| 性能 | 接近原生 | 弱于 |
| 系统支持量 | 单机支持上千个容器 | 一般几十个 |
2.docker的基本概念
2.1 Docker 镜像
我们都知道,操作系统分为 内核 和 用户空间。对于 Linux 而言,内核启动后,会挂载 root 文件系统为其提供用户空间支持。而 Docker 镜像(Image),就相当于是一个 root 文件系统。比如官方镜像 ubuntu:18.04 就包含了完整的一套 Ubuntu 18.04 最小系统的 root 文件系统。
Docker 镜像 是一个特殊的文件系统,除了提供容器运行时所需的程序、库、资源、配置等文件外,还包含了一些为运行时准备的一些配置参数(如匿名卷、环境变量、用户等)。镜像 不包含 任何动态数据,其内容在构建之后也不会被改变。
分层存储
因为镜像包含操作系统完整的 root 文件系统,其体积往往是庞大的,因此在 Docker 设计时,就充分利用 Union FS (opens new window)的技术,将其设计为分层存储的架构。所以严格来说,镜像并非是像一个 ISO 那样的打包文件,镜像只是一个虚拟的概念,其实际体现并非由一个文件组成,而是由一组文件系统组成,或者说,由多层文件系统联合组成。
镜像构建时,会一层层构建,前一层是后一层的基础。每一层构建完就不会再发生改变,后一层上的任何改变只发生在自己这一层。比如,删除前一层文件的操作,实际不是真的删除前一层的文件,而是仅在当前层标记为该文件已删除。在最终容器运行的时候,虽然不会看到这个文件,但是实际上该文件会一直跟随镜像。因此,在构建镜像的时候,需要额外小心,每一层尽量只包含该层需要添加的东西,任何额外的东西应该在该层构建结束前清理掉。
分层存储的特征还使得镜像的复用、定制变的更为容易。甚至可以用之前构建好的镜像作为基础层,然后进一步添加新的层,以定制自己所需的内容,构建新的镜像。
2.2 Docker 容器
镜像(Image)和容器(Container)的关系,就像是面向对象程序设计中的 类 和 实例 一样,镜像是静态的定义,容器是镜像运行时的实体。容器可以被创建、启动、停止、删除、暂停等。
容器的实质是进程,但与直接在宿主执行的进程不同,容器进程运行于属于自己的独立的 命名空间 (opens new window)。因此容器可以拥有自己的 root 文件系统、自己的网络配置、自己的进程空间,甚至自己的用户 ID 空间。容器内的进程是运行在一个隔离的环境里,使用起来,就好像是在一个独立于宿主的系统下操作一样。这种特性使得容器封装的应用比直接在宿主运行更加安全。也因为这种隔离的特性,很多人初学 Docker 时常常会混淆容器和虚拟机。
前面讲过镜像使用的是分层存储,容器也是如此。每一个容器运行时,是以镜像为基础层,在其上创建一个当前容器的存储层,我们可以称这个为容器运行时读写而准备的存储层为 容器存储层。
容器存储层的生存周期和容器一样,容器消亡时,容器存储层也随之消亡。因此,任何保存于容器存储层的信息都会随容器删除而丢失。
按照 Docker 最佳实践的要求,容器不应该向其存储层内写入任何数据,容器存储层要保持无状态化。所有的文件写入操作,都应该使用 数据卷(Volume)、或者 绑定宿主目录,在这些位置的读写会跳过容器存储层,直接对宿主(或网络存储)发生读写,其性能和稳定性更高。
数据卷的生存周期独立于容器,容器消亡,数据卷不会消亡。因此,使用数据卷后,容器删除或者重新运行之后,数据却不会丢失。
2.3 Docker Registry
镜像构建完成后,可以很容易的在当前宿主机上运行,但是,如果需要在其它服务器上使用这个镜像,我们就需要一个集中的存储、分发镜像的服务,Docker Registry 就是这样的服务。
一个 Docker Registry 中可以包含多个 仓库(Repository);每个仓库可以包含多个 标签(Tag);每个标签对应一个镜像。
通常,一个仓库会包含同一个软件不同版本的镜像,而标签就常用于对应该软件的各个版本。我们可以通过 <仓库名>:<标签> 的格式来指定具体是这个软件哪个版本的镜像。如果不给出标签,将以 latest 作为默认标签。
以 Ubuntu 镜像 (opens new window)为例,ubuntu 是仓库的名字,其内包含有不同的版本标签,如,16.04, 18.04。我们可以通过 ubuntu:16.04,或者 ubuntu:18.04 来具体指定所需哪个版本的镜像。如果忽略了标签,比如 ubuntu,那将视为 ubuntu:latest。
仓库名经常以 两段式路径 形式出现,比如 jwilder/nginx-proxy,前者往往意味着 Docker Registry 多用户环境下的用户名,后者则往往是对应的软件名。但这并非绝对,取决于所使用的具体 Docker Registry 的软件或服务。
Docker Registry 公开服务
Docker Registry 公开服务是开放给用户使用、允许用户管理镜像的 Registry 服务。一般这类公开服务允许用户免费上传、下载公开的镜像,并可能提供收费服务供用户管理私有镜像。
最常使用的 Registry 公开服务是官方的 Docker Hub (opens new window),这也是默认的 Registry,并拥有大量的高质量的 官方镜像 (opens new window)。除此以外,还有 Red Hat 的 Quay.io (opens new window);Google 的 Google Container Registry (opens new window),Kubernetes (opens new window)的镜像使用的就是这个服务;代码托管平台 GitHub (opens new window)推出的 ghcr.io (opens new window)。
由于某些原因,在国内访问这些服务可能会比较慢。国内的一些云服务商提供了针对 Docker Hub 的镜像服务(Registry Mirror),这些镜像服务被称为 加速器。常见的有 阿里云加速器 (opens new window)、DaoCloud 加速器 (opens new window)等。使用加速器会直接从国内的地址下载 Docker Hub 的镜像,比直接从 Docker Hub 下载速度会提高很多。在 安装 Docker 一节中有详细的配置方法。
国内也有一些云服务商提供类似于 Docker Hub 的公开服务。比如 网易云镜像服务 (opens new window)、DaoCloud 镜像市场 (opens new window)、阿里云镜像库 (opens new window)等。
私有 Docker Registry
除了使用公开服务外,用户还可以在本地搭建私有 Docker Registry。Docker 官方提供了 Docker Registry (opens new window)镜像,可以直接使用做为私有 Registry 服务。在 私有仓库 一节中,会有进一步的搭建私有 Registry 服务的讲解。
开源的 Docker Registry 镜像只提供了 Docker Registry API (opens new window)的服务端实现,足以支持 docker 命令,不影响使用。但不包含图形界面,以及镜像维护、用户管理、访问控制等高级功能。
除了官方的 Docker Registry 外,还有第三方软件实现了 Docker Registry API,甚至提供了用户界面以及一些高级功能。比如,Harbor (opens new window)和 Sonatype Nexus。
3.docker的安装
3.1 Docker 安装准备
官方网址: https://www.docker.com/
帮助文档链接: https://docs.docker.com/
docker 镜像: https://hub.docker.com/
OS系统版本选择:
Docker 目前已经支持多种操作系统的安装运行,比如Ubuntu、CentOS、Redhat、Debian、Fedora,甚至是还支持了Mac和Windows,在linux系统上需要内核版本在3.10或以上
Docker版本选择:
docker版本号之前一直是0.X版本或1.X版本,但是从2017年3月1号开始改为每个季度发布一次稳定版,其版本号规则也统一变更为YY.MM,例如17.09表示是2017年9月份发布的
Docker之前没有区分版本,但是2017年推出(将docker更名为)新的项目Moby,github地址: https://github.com/moby/moby,Moby项目属于Docker项目的全新上游,Docker将是一个隶属于的Moby的子产品,而且之后的版本之后开始区分为 CE(Docker Community Edition,社区版本)和 EE(Docker Enterprise Edition,企业收费版),CE社区版本和EE企业版本都是每个季度发布一个新版本,但是EE版本提供后期安全维护1年,而CE版本是4个月。
3.2 主机初始化
3.2.1 设置ip地址
Rocky 9和CentOS Stream 9:
# Rocky 9和CentOS Stream 9默认支持修改网卡名。
[root@rocky9 ~]# grep 'plugins' /etc/NetworkManager/NetworkManager.conf
#plugins=keyfile,ifcfg-rh
# 因为网卡命名方式默认是keyfile,默认不支持修改网卡名,既然官方已经默认是keyfile那这里就不去更改网卡名了。

[root@rocky9 ~]# ETHNAME=`ip addr | awk -F"[ :]" '/^2/{print $3}'`

[root@rocky9 ~]# nmcli con delete ${ETHNAME} && nmcli connection add type ethernet con-name ${ETHNAME} ifname ${ETHNAME} ipv4.method manual ipv4.address "172.31.0.9/21" ipv4.gateway "172.31.0.2" ipv4.dns "223.5.5.5,180.76.76.76" autoconnect yes && nmcli con reload && nmcli con up ${ETHNAME}
# 172.31.0.9/21中172.31.0.9是ip地址,21是子网位数;172.31.0.2是网关地址;223.5.5.5, 180.76.76.76都是DNS,根据自己的需求修改。

[root@rocky9 ~]# ip addr
1: lo: <LOOPBACK,UP,LOWER_UP> mtu 65536 qdisc noqueue state UNKNOWN group default qlen 1000
    link/loopback 00:00:00:00:00:00 brd 00:00:00:00:00:00
    inet 127.0.0.1/8 scope host lo
       valid_lft forever preferred_lft forever
    inet6 ::1/128 scope host
       valid_lft forever preferred_lft forever
2: ens160: <BROADCAST,MULTICAST,UP,LOWER_UP> mtu 1500 qdisc mq state UP group default qlen 1000
    link/ether 00:0c:29:37:62:95 brd ff:ff:ff:ff:ff:ff
    altname enp3s0
    inet 172.31.0.9/21 brd 172.31.7.255 scope global noprefixroute ens160
       valid_lft forever preferred_lft forever
    inet6 fe80::51ca:fd5d:3552:677d/64 scope link noprefixroute
       valid_lft forever preferred_lft forever
# 可以看到ip地址已修改。
Rocky 8、CentOS Stream 8和CentOS 7:
# Rocky 8、CentOS Stream 8和CentOS 7支持修改网卡名。
[root@rocky8 ~]# grep 'plugins' /etc/NetworkManager/NetworkManager.conf
#plugins=ifcfg-rh
# 因为网卡命名方式默认是ifcfg-rh,支持修改网卡名。

# 修改网卡名称配置文件
[root@rocky8 ~]# sed -ri.bak '/^GRUB_CMDLINE_LINUX=/s@"$@ net.ifnames=0 biosdevname=0"@' /etc/default/grub
[root@rocky8 ~]# grub2-mkconfig -o /boot/grub2/grub.cfg
Generating grub configuration file ...
done

# 修改网卡文件名
[root@rocky8 ~]# ETHNAME=`ip addr | awk -F"[ :]" '/^2/{print $3}'`
[root@rocky8 ~]# mv /etc/sysconfig/network-scripts/ifcfg-${ETHNAME} /etc/sysconfig/network-scripts/ifcfg-eth0

[root@rocky8 ~]# shutdown -r now


[root@rocky8 ~]# nmcli dev
DEVICE  TYPE      STATE      CONNECTION
eth0    ethernet  connected  Wired connection 1
lo      loopback  unmanaged  --
# 可以看到CONNECTION的名字是Wired connection 1,要改名才可以下面设置。

[root@rocky8 ~]# ETHNAME=`ip addr | awk -F"[ :]" '/^2/{print $3}'`

[root@rocky8 ~]# nmcli connection modify "Wired connection 1" con-name ${ETHNAME}
[root@rocky8 ~]# nmcli dev
DEVICE  TYPE      STATE      CONNECTION
eth0    ethernet  connected  eth0
lo      loopback  unmanaged  --

# 修改ip地址
[root@rocky8 ~]# nmcli con delete ${ETHNAME} && nmcli connection add type ethernet con-name ${ETHNAME} ifname ${ETHNAME} ipv4.method manual ipv4.address "172.31.0.8/21" ipv4.gateway "172.31.0.2" ipv4.dns "223.5.5.5,180.76.76.76" autoconnect yes && nmcli con reload && nmcli dev up eth0
# 172.31.0.8/21中172.31.0.8是ip地址,21是子网位数;172.31.0.2是网关地址;223.5.5.5, 180.76.76.76都是DNS,根据自己的需求修改。

[root@rocky8 ~]# ip addr
1: lo: <LOOPBACK,UP,LOWER_UP> mtu 65536 qdisc noqueue state UNKNOWN group default qlen 1000
    link/loopback 00:00:00:00:00:00 brd 00:00:00:00:00:00
    inet 127.0.0.1/8 scope host lo
       valid_lft forever preferred_lft forever
    inet6 ::1/128 scope host
       valid_lft forever preferred_lft forever
2: eth0: <BROADCAST,MULTICAST,UP,LOWER_UP> mtu 1500 qdisc mq state UP group default qlen 1000
    link/ether 00:0c:29:6f:65:d3 brd ff:ff:ff:ff:ff:ff
    altname enp3s0
    altname ens160
    inet 172.31.0.8/21 brd 172.31.7.255 scope global noprefixroute eth0
       valid_lft forever preferred_lft forever
    inet6 fe80::e9c9:aa93:4a58:2cc2/64 scope link noprefixroute
       valid_lft forever preferred_lft forever
# 重启系统后可以看到网卡名已经修改成eth0,ip地址也已修改。
Ubuntu:
# Ubuntu先启用root用户,并设置密码
raymond@ubuntu2204:~$ cat set_root_login.sh
#!/bin/bash

read -p "请输入密码: " PASSWORD
echo ${PASSWORD} |sudo -S sed -ri 's@#(PermitRootLogin )prohibit-password@\1yes@' /etc/ssh/sshd_config
sudo systemctl restart sshd
sudo -S passwd root <<-EOF
${PASSWORD}
${PASSWORD}
EOF

raymond@ubuntu2204:~$ bash set_root_login.sh
请输入密码: 123456
[sudo] password for raymond: New password: Retype new password: passwd: password updated successfully

raymond@ubuntu2204:~$ rm -rf set_root_login.sh

# 使用root登陆,修改网卡名
root@ubuntu2204:~# sed -ri.bak '/^GRUB_CMDLINE_LINUX=/s@"[email protected]=0 biosdevname=0"@' /etc/default/grub
root@ubuntu2204:~# grub-mkconfig -o /boot/grub/grub.cfg
Sourcing file `/etc/default/grub'
Sourcing file `/etc/default/grub.d/init-select.cfg'
Generating grub configuration file ...
Found linux image: /boot/vmlinuz-5.15.0-88-generic
Found initrd image: /boot/initrd.img-5.15.0-88-generic
Warning: os-prober will not be executed to detect other bootable partitions.
Systems on them will not be added to the GRUB boot configuration.
Check GRUB_DISABLE_OS_PROBER documentation entry.
done

# Ubuntu 20.04设置ip地址
root@ubuntu2004:~# cat > /etc/netplan/00-installer-config.yaml <<-EOF
network:
  version: 2
  renderer: networkd
  ethernets:
    eth0:
      dhcp4: no
      dhcp6: no
      addresses: [172.31.0.20/21]
      gateway4: 172.31.0.2
      nameservers:
        addresses: [223.5.5.5, 180.76.76.76]
EOF
# 说明:Ubuntu20.04网卡配置文件是00-installer-config.yaml;172.31.0.20/21中172.31.0.20是ip地址,21是子网位数;172.31.0.2是网关地址;223.5.5.5, 180.76.76.76都是DNS,根据自己的需求修改。

# Ubuntu 18.04设置ip地址
root@ubuntu1804:~# cat > /etc/netplan/01-netcfg.yaml <<-EOF
network:
  version: 2
  renderer: networkd
  ethernets:
    eth0:
      dhcp4: no
      dhcp6: no
      addresses: [172.31.0.18/21]
      gateway4: 172.31.0.2
      nameservers:
        addresses: [223.5.5.5, 180.76.76.76]
EOF
# 说明:Ubuntu18.04网卡配置文件是01-netcfg.yaml;172.31.0.18/21中172.31.0.18是ip地址,21是子网位数;172.31.0.2是网关地址;223.5.5.5, 180.76.76.76都是DNS,根据自己的需求修改。

root@ubuntu2004:~# shutdown -r now

root@ubuntu2004:~# ip addr
1: lo: <LOOPBACK,UP,LOWER_UP> mtu 65536 qdisc noqueue state UNKNOWN group default qlen 1000
    link/loopback 00:00:00:00:00:00 brd 00:00:00:00:00:00
    inet 127.0.0.1/8 scope host lo
       valid_lft forever preferred_lft forever
    inet6 ::1/128 scope host
       valid_lft forever preferred_lft forever
2: eth0: <BROADCAST,MULTICAST,UP,LOWER_UP> mtu 1500 qdisc fq_codel state UP group default qlen 1000
    link/ether 00:0c:29:e5:98:6f brd ff:ff:ff:ff:ff:ff
    inet 172.31.0.20/21 brd 172.31.7.255 scope global eth0
       valid_lft forever preferred_lft forever
    inet6 fe80::20c:29ff:fee5:986f/64 scope link
       valid_lft forever preferred_lft forever
# 重启系统后可以看到网卡名已经修改成eth0,ip地址也已修改。

# Ubuntu 22.04设置ip地址
root@ubuntu2204:~# cat > /etc/netplan/00-installer-config.yaml <<-EOF
network:
  version: 2
  renderer: networkd
  ethernets:
    eth0:
      dhcp4: no
      dhcp6: no
      addresses: [172.31.0.22/21]
      routes:
        - to: default
          via: 172.31.0.2
      nameservers:
        addresses: [223.5.5.5, 180.76.76.76]
EOF
# 说明:Ubuntu22.04网卡配置文件是00-installer-config.yaml;172.31.0.22/21中172.31.0.22是ip地址,21是子网位数;172.31.0.2是网关地址,Ubuntu 22.04设置网关地址的方法发生了改变,参考上面的方法;223.5.5.5, 180.76.76.76都是DNS,根据自己的需求修改。

root@ubuntu2204:~# shutdown -r now

# 重启后使用新设置的ip登陆
root@ubuntu2204:~# ip addr
1: lo: <LOOPBACK,UP,LOWER_UP> mtu 65536 qdisc noqueue state UNKNOWN group default qlen 1000
    link/loopback 00:00:00:00:00:00 brd 00:00:00:00:00:00
    inet 127.0.0.1/8 scope host lo
       valid_lft forever preferred_lft forever
    inet6 ::1/128 scope host
       valid_lft forever preferred_lft forever
2: eth0: <BROADCAST,MULTICAST,UP,LOWER_UP> mtu 1500 qdisc fq_codel state UP group default qlen 1000
    link/ether 00:0c:29:a7:be:f2 brd ff:ff:ff:ff:ff:ff
    altname enp2s1
    altname ens33
    inet 172.31.0.22/21 brd 172.31.7.255 scope global eth0
       valid_lft forever preferred_lft forever
    inet6 fe80::20c:29ff:fea7:bef2/64 scope link
       valid_lft forever preferred_lft forever
# 重启系统后可以看到网卡名已经修改成eth0,ip地址也已修改。
3.2.2 配置镜像源
Rocky 8和9:
MIRROR=mirrors.sjtug.sjtu.edu.cn
sed -i.bak -e 's|^mirrorlist=|#mirrorlist=|g' -e 's|^#baseurl=http://dl.rockylinux.org/$contentdir|baseurl=https://'${MIRROR}'/rocky|g' /etc/yum.repos.d/[Rr]ocky*.repo

dnf clean all && dnf makecache
CentOS Stream 9:
cat update_mirror.pl
#!/usr/bin/perl
use strict;
use warnings;
use autodie;
# 要修改镜像源,请去修改url变量!
my $url = 'mirrors.aliyun.com';
my $mirrors = "https://$url/centos-stream";
if (@ARGV < 1) {
die "Usage: $0 ...\n" ;
}
while (my $filename = shift @ARGV) {
my $backup_filename = $filename . '.bak';
rename $filename, $backup_filename;
open my $input, "<", $backup_filename;
open my $output, ">", $filename;
while (<$input>) {
s/^metalink/# metalink/;
if (m/^name/) {
my (undef, $repo, $arch) = split /-/;
$repo =~ s/^\s+|\s+$//g;
($arch = defined $arch ? lc($arch) : '') =~ s/^\s+|\s+$//g;
if ($repo =~ /^Extras/) {
$_ .= "baseurl=${mirrors}/SIGs/\$releasever-stream/extras" . ($arch eq 'source' ? "/${arch}/" : "/\$basearch/") . "extras-common\n";
} else {
$_ .= "baseurl=${mirrors}/\$releasever-stream/$repo" . ($arch eq 'source' ? "/" : "/\$basearch/") . ($arch ne '' ? "${arch}/tree/" : "os") . "\n";
}
}
print $output $_;
}
}
rpm -q perl &> /dev/null || { echo -e "\\033[01;31m "安装perl工具,请稍等..."\033[0m";yum -y install perl ; }
perl ./update_mirror.pl /etc/yum.repos.d/centos*.repo
dnf clean all && dnf makecache
CentOS Stream 8:
MIRROR=mirrors.aliyun.com
sed -i.bak -e 's|^mirrorlist=|#mirrorlist=|g' -e 's|^#baseurl=http://mirror.centos.org/$contentdir|baseurl=https://'${MIRROR}'/centos|g' /etc/yum.repos.d/CentOS-*.repo

dnf clean all && dnf makecache
CentOS 7:
MIRROR=mirrors.aliyun.com
sed -i.bak -e 's|^mirrorlist=|#mirrorlist=|g' -e 's|^#baseurl=http://mirror.centos.org|baseurl=https://'${MIRROR}'|g' /etc/yum.repos.d/CentOS-*.repo

yum clean all && yum makecache
Ubuntu 22.04和20.04:
MIRROR=mirrors.aliyun.com
OLD_MIRROR=`sed -rn "s@^deb http(.*)://(.*)/ubuntu/? $(lsb_release -cs) main.*@\2@p" /etc/apt/sources.list`

sed -i.bak 's/'${OLD_MIRROR}'/'${MIRROR}'/g' /etc/apt/sources.list

apt update
Ubuntu 18.04:
MIRROR=mirrors.aliyun.com
OLD_MIRROR=`sed -rn "s@^deb http(.*)://(.*)/ubuntu/? $(lsb_release -cs) main.*@\2@p" /etc/apt/sources.list`

sed -i.bak 's/'${OLD_MIRROR}'/'${MIRROR}'/g' /etc/apt/sources.list

SECURITY_MIRROR=`sed -rn "s@^deb http(.*)://(.*)/ubuntu $(lsb_release -cs)-security main.*@\2@p" /etc/apt/sources.list`

sed -i.bak 's/'${SECURITY_MIRROR}'/'${MIRROR}'/g' /etc/apt/sources.list

apt update
3.2.3 关闭防火墙
# Rocky和CentOS
systemctl disable --now firewalld

# CentOS 7
systemctl disable --now NetworkManager

# Ubuntu
systemctl disable --now ufw
3.2.4 禁用SELinux
#CentOS
setenforce 0
sed -i 's#SELINUX=enforcing#SELINUX=disabled#g' /etc/selinux/config

#Ubuntu
Ubuntu没有安装SELinux,不用设置
3.2.5 设置时区
ln -sf /usr/share/zoneinfo/Asia/Shanghai /etc/localtime
echo 'Asia/Shanghai' >/etc/timezone

#Ubuntu还要设置下面内容
cat >> /etc/default/locale <<-EOF
LC_TIME=en_DK.UTF-8
EOF
3.3 基于镜像仓库安装docker
3.3.1 在 Ubuntu 上安装 Docker
官方文档: https://docs.docker.com/engine/install/ubuntu/
Ubuntu 18.04、20.04、22.04 安装 docker
# step 1: 安装必要的一些系统工具
root@ubuntu2204:~# apt update
root@ubuntu2204:~# apt -y install apt-transport-https ca-certificates curl software-properties-common

# step 2: 安装GPG证书
root@ubuntu2204:~# curl -fsSL https://mirrors.aliyun.com/docker-ce/linux/ubuntu/gpg | sudo apt-key add -

# Step 3: 写入软件源信息
root@ubuntu2204:~# add-apt-repository "deb [arch=amd64] https://mirrors.aliyun.com/docker-ce/linux/ubuntu/  $(lsb_release -cs) stable"
Repository: 'deb [arch=amd64] https://mirrors.aliyun.com/docker-ce/linux/ubuntu/ jammy stable'
Description:
Archive for codename: jammy components: stable
More info: https://mirrors.aliyun.com/docker-ce/linux/ubuntu/
Adding repository.
Press [ENTER] to continue or Ctrl-c to cancel. # 在Ubuntu 22.04上会出现这这个提示,按回车继续或“Ctrl-c”取消。

# 在下面命令中加上“-y”选项就没有上面的提示了
root@ubuntu2204:~# add-apt-repository -y "deb [arch=amd64] https://mirrors.aliyun.com/docker-ce/linux/ubuntu/  $(lsb_release -cs) stable"
Repository: 'deb [arch=amd64] https://mirrors.aliyun.com/docker-ce/linux/ubuntu/ jammy stable'
Description:
Archive for codename: jammy components: stable
More info: https://mirrors.aliyun.com/docker-ce/linux/ubuntu/
Adding repository.
Adding deb entry to /etc/apt/sources.list.d/archive_uri-https_mirrors_aliyun_com_docker-ce_linux_ubuntu_-jammy.list
Adding disabled deb-src entry to /etc/apt/sources.list.d/archive_uri-https_mirrors_aliyun_com_docker-ce_linux_ubuntu_-jammy.list
Hit:1 https://mirrors.aliyun.com/ubuntu jammy InRelease
Hit:2 https://mirrors.aliyun.com/ubuntu jammy-updates InRelease
Hit:3 https://mirrors.aliyun.com/ubuntu jammy-backports InRelease
Hit:4 https://mirrors.aliyun.com/ubuntu jammy-security InRelease
Get:5 https://mirrors.aliyun.com/docker-ce/linux/ubuntu jammy InRelease [48.8 kB]
Get:6 https://mirrors.aliyun.com/docker-ce/linux/ubuntu jammy/stable amd64 Packages [23.0 kB]
Fetched 71.8 kB in 3s (22.9 kB/s)
Reading package lists... Done
W: https://mirrors.aliyun.com/docker-ce/linux/ubuntu/dists/jammy/InRelease: Key is stored in legacy trusted.gpg keyring (/etc/apt/trusted.gpg), see the DEPRECATION section in apt-key(8) for details.

# Step 4: 更新Docker-CE镜像源
root@ubuntu2204:~# apt update

# 安装指定版本的Docker-CE:
# Step 5: 查找Docker-CE的版本:
root@ubuntu2204:~# apt-cache madison docker-ce
 docker-ce | 5:24.0.7-1~ubuntu.22.04~jammy | https://mirrors.aliyun.com/docker-ce/linux/ubuntu jammy/stable amd64 Packages
 docker-ce | 5:24.0.6-1~ubuntu.22.04~jammy | https://mirrors.aliyun.com/docker-ce/linux/ubuntu jammy/stable amd64 Packages
 docker-ce | 5:24.0.5-1~ubuntu.22.04~jammy | https://mirrors.aliyun.com/docker-ce/linux/ubuntu jammy/stable amd64 Packages
 docker-ce | 5:24.0.4-1~ubuntu.22.04~jammy | https://mirrors.aliyun.com/docker-ce/linux/ubuntu jammy/stable amd64 Packages
 docker-ce | 5:24.0.3-1~ubuntu.22.04~jammy | https://mirrors.aliyun.com/docker-ce/linux/ubuntu jammy/stable amd64 Packages
 docker-ce | 5:24.0.2-1~ubuntu.22.04~jammy | https://mirrors.aliyun.com/docker-ce/linux/ubuntu jammy/stable amd64 Packages
 docker-ce | 5:24.0.1-1~ubuntu.22.04~jammy | https://mirrors.aliyun.com/docker-ce/linux/ubuntu jammy/stable amd64 Packages
 docker-ce | 5:24.0.0-1~ubuntu.22.04~jammy | https://mirrors.aliyun.com/docker-ce/linux/ubuntu jammy/stable amd64 Packages
 docker-ce | 5:23.0.6-1~ubuntu.22.04~jammy | https://mirrors.aliyun.com/docker-ce/linux/ubuntu jammy/stable amd64 Packages
 docker-ce | 5:23.0.5-1~ubuntu.22.04~jammy | https://mirrors.aliyun.com/docker-ce/linux/ubuntu jammy/stable amd64 Packages
 docker-ce | 5:23.0.4-1~ubuntu.22.04~jammy | https://mirrors.aliyun.com/docker-ce/linux/ubuntu jammy/stable amd64 Packages
 docker-ce | 5:23.0.3-1~ubuntu.22.04~jammy | https://mirrors.aliyun.com/docker-ce/linux/ubuntu jammy/stable amd64 Packages
 docker-ce | 5:23.0.2-1~ubuntu.22.04~jammy | https://mirrors.aliyun.com/docker-ce/linux/ubuntu jammy/stable amd64 Packages
 docker-ce | 5:23.0.1-1~ubuntu.22.04~jammy | https://mirrors.aliyun.com/docker-ce/linux/ubuntu jammy/stable amd64 Packages
 docker-ce | 5:23.0.0-1~ubuntu.22.04~jammy | https://mirrors.aliyun.com/docker-ce/linux/ubuntu jammy/stable amd64 Packages
 docker-ce | 5:20.10.24~3-0~ubuntu-jammy | https://mirrors.aliyun.com/docker-ce/linux/ubuntu jammy/stable amd64 Packages
 docker-ce | 5:20.10.23~3-0~ubuntu-jammy | https://mirrors.aliyun.com/docker-ce/linux/ubuntu jammy/stable amd64 Packages
 docker-ce | 5:20.10.22~3-0~ubuntu-jammy | https://mirrors.aliyun.com/docker-ce/linux/ubuntu jammy/stable amd64 Packages
 docker-ce | 5:20.10.21~3-0~ubuntu-jammy | https://mirrors.aliyun.com/docker-ce/linux/ubuntu jammy/stable amd64 Packages
 docker-ce | 5:20.10.20~3-0~ubuntu-jammy | https://mirrors.aliyun.com/docker-ce/linux/ubuntu jammy/stable amd64 Packages
 docker-ce | 5:20.10.19~3-0~ubuntu-jammy | https://mirrors.aliyun.com/docker-ce/linux/ubuntu jammy/stable amd64 Packages
 docker-ce | 5:20.10.18~3-0~ubuntu-jammy | https://mirrors.aliyun.com/docker-ce/linux/ubuntu jammy/stable amd64 Packages
 docker-ce | 5:20.10.17~3-0~ubuntu-jammy | https://mirrors.aliyun.com/docker-ce/linux/ubuntu jammy/stable amd64 Packages
 docker-ce | 5:20.10.16~3-0~ubuntu-jammy | https://mirrors.aliyun.com/docker-ce/linux/ubuntu jammy/stable amd64 Packages
 docker-ce | 5:20.10.15~3-0~ubuntu-jammy | https://mirrors.aliyun.com/docker-ce/linux/ubuntu jammy/stable amd64 Packages
 docker-ce | 5:20.10.14~3-0~ubuntu-jammy | https://mirrors.aliyun.com/docker-ce/linux/ubuntu jammy/stable amd64 Packages
 docker-ce | 5:20.10.13~3-0~ubuntu-jammy | https://mirrors.aliyun.com/docker-ce/linux/ubuntu jammy/stable amd64 Packages

# Step 6: 安装指定版本的Docker-CE: (VERSION例如上面的5:24.0.7-1~ubuntu.22.04~jammy)
root@ubuntu2204:~# apt -y install docker-ce=5:24.0.7-1~ubuntu.22.04~jammy docker-ce-cli=5:24.0.7-1~ubuntu.22.04~jammy

# Step7: 把Docker服务设为开机启动,并立即启动服务
root@ubuntu2204:~# systemctl enable --now docker

# 查看docker版本
root@ubuntu2204:~# docker version
Client: Docker Engine - Community
 Version:           24.0.7
 API version:       1.43
 Go version:        go1.20.10
 Git commit:        afdd53b
 Built:             Thu Oct 26 09:07:41 2023
 OS/Arch:           linux/amd64
 Context:           default

Server: Docker Engine - Community
 Engine:
  Version:          24.0.7
  API version:      1.43 (minimum version 1.12)
  Go version:       go1.20.10
  Git commit:       311b9ff
  Built:            Thu Oct 26 09:07:41 2023
  OS/Arch:          linux/amd64
  Experimental:     false
 containerd:
  Version:          1.6.26
  GitCommit:        3dd1e886e55dd695541fdcd67420c2888645a495
 runc:
  Version:          1.1.10
  GitCommit:        v1.1.10-0-g18a0cb0
 docker-init:
  Version:          0.19.0
  GitCommit:        de40ad0

# 查看docker信息
root@ubuntu2204:~# docker info
Client: Docker Engine - Community
 Version:    24.0.7
 Context:    default
 Debug Mode: false
 Plugins:
  buildx: Docker Buildx (Docker Inc.)
    Version:  v0.11.2
    Path:     /usr/libexec/docker/cli-plugins/docker-buildx
  compose: Docker Compose (Docker Inc.)
    Version:  v2.21.0
    Path:     /usr/libexec/docker/cli-plugins/docker-compose

Server:
 Containers: 0
  Running: 0
  Paused: 0
  Stopped: 0
 Images: 0
 Server Version: 24.0.7
 Storage Driver: overlay2
  Backing Filesystem: extfs
  Supports d_type: true
  Using metacopy: false
  Native Overlay Diff: true
  userxattr: false
 Logging Driver: json-file
 Cgroup Driver: systemd
 Cgroup Version: 2
 Plugins:
  Volume: local
  Network: bridge host ipvlan macvlan null overlay
  Log: awslogs fluentd gcplogs gelf journald json-file local logentries splunk syslog
 Swarm: inactive
 Runtimes: runc io.containerd.runc.v2
 Default Runtime: runc
 Init Binary: docker-init
 containerd version: 3dd1e886e55dd695541fdcd67420c2888645a495
 runc version: v1.1.10-0-g18a0cb0
 init version: de40ad0
 Security Options:
  apparmor
  seccomp
   Profile: builtin
  cgroupns
 Kernel Version: 5.15.0-88-generic
 Operating System: Ubuntu 22.04.3 LTS
 OSType: linux
 Architecture: x86_64
 CPUs: 2
 Total Memory: 1.883GiB
 Name: ubuntu2204
 ID: fc2d51bd-9fb6-425b-8d4c-aa595e8d2697
 Docker Root Dir: /var/lib/docker
 Debug Mode: false
 Experimental: false
 Insecure Registries:
  127.0.0.0/8
 Live Restore Enabled: false

# 查看docker相关文件
root@ubuntu2204:~# dpkg -L docker-ce
/.
/etc
/etc/default
/etc/default/docker
/etc/docker
/etc/init.d
/etc/init.d/docker
/lib
/lib/systemd
/lib/systemd/system
/lib/systemd/system/docker.service
/lib/systemd/system/docker.socket
/usr
/usr/bin
/usr/bin/docker-proxy
/usr/bin/dockerd
/usr/libexec
/usr/libexec/docker
/usr/libexec/docker/docker-init
/usr/share
/usr/share/doc
/usr/share/doc/docker-ce
/usr/share/doc/docker-ce/README.md
/usr/share/doc/docker-ce/changelog.Debian.gz
解决"WARNING: No swap limit support"报警提示
root@ubuntu2004:~# docker info
...
WARNING: No swap limit support
# Ubuntu 20.04和18.04安装完docker,查看docker信息的时候,最后一行会出现"WARNING: No swap limit support"报警提示

root@ubuntu2004:~# vim /etc/default/grub
...
GRUB_CMDLINE_LINUX="net.ifnames=0 biosdevname=0 swapaccount=1" # 在此行最后面加上“swapaccount=1”参数

#也可以sed直接替换
root@ubuntu2004:~# sed -ri '/^GRUB_CMDLINE_LINUX=/s@"$@ swapaccount=1"@' /etc/default/grub

root@ubuntu2004:~# update-grub
root@ubuntu2004:~# reboot

root@ubuntu2004:~# docker info
Client: Docker Engine - Community
 Version:    24.0.7
 Context:    default
 Debug Mode: false
 Plugins:
  buildx: Docker Buildx (Docker Inc.)
    Version:  v0.11.2
    Path:     /usr/libexec/docker/cli-plugins/docker-buildx
  compose: Docker Compose (Docker Inc.)
    Version:  v2.21.0
    Path:     /usr/libexec/docker/cli-plugins/docker-compose

Server:
 Containers: 0
  Running: 0
  Paused: 0
  Stopped: 0
 Images: 0
 Server Version: 24.0.7
 Storage Driver: overlay2
  Backing Filesystem: extfs
  Supports d_type: true
  Using metacopy: false
  Native Overlay Diff: true
  userxattr: false
 Logging Driver: json-file
 Cgroup Driver: cgroupfs
 Cgroup Version: 1
 Plugins:
  Volume: local
  Network: bridge host ipvlan macvlan null overlay
  Log: awslogs fluentd gcplogs gelf journald json-file local logentries splunk syslog
 Swarm: inactive
 Runtimes: io.containerd.runc.v2 runc
 Default Runtime: runc
 Init Binary: docker-init
 containerd version: 3dd1e886e55dd695541fdcd67420c2888645a495
 runc version: v1.1.10-0-g18a0cb0
 init version: de40ad0
 Security Options:
  apparmor
  seccomp
   Profile: builtin
 Kernel Version: 5.4.0-166-generic
 Operating System: Ubuntu 20.04.6 LTS
 OSType: linux
 Architecture: x86_64
 CPUs: 2
 Total Memory: 1.894GiB
 Name: ubuntu2004
 ID: faa38ca4-7036-4279-a7c3-55be37ea1eca
 Docker Root Dir: /var/lib/docker
 Debug Mode: false
 Experimental: false
 Insecure Registries:
  127.0.0.0/8
 Live Restore Enabled: false
 # 重启后再次查看就没有"WARNING: No swap limit support"报警提示
3.3.2 在 Rocky和CentOS 上安装 Docker
官方文档: https://docs.docker.com/install/linux/docker-ce/centos/
# step 1: 安装必要的一些系统工具
[root@rocky9 ~]# yum -y install yum-utils

# Step 2: 添加软件源信息
[root@rocky9 ~]# yum-config-manager --add-repo https://mirrors.aliyun.com/docker-ce/linux/centos/docker-ce.repo

# Step 3: 更新Docker-CE镜像源
[root@rocky9 ~]# yum clean all
22 files removed
[root@rocky9 ~]# yum makecache

# 安装指定版本的Docker-CE:
# Step 4: 查找Docker-CE的版本:
[root@rocky9 ~]# yum list docker-ce.x86_64 --showduplicates
Last metadata expiration check: 0:00:12 ago on Mon 08 Jan 2024 04:16:58 PM CST.
Available Packages
docker-ce.x86_64                                    3:20.10.15-3.el9                                    docker-ce-stable
docker-ce.x86_64                                    3:20.10.16-3.el9                                    docker-ce-stable
docker-ce.x86_64                                    3:20.10.17-3.el9                                    docker-ce-stable
docker-ce.x86_64                                    3:20.10.18-3.el9                                    docker-ce-stable
docker-ce.x86_64                                    3:20.10.19-3.el9                                    docker-ce-stable
docker-ce.x86_64                                    3:20.10.20-3.el9                                    docker-ce-stable
docker-ce.x86_64                                    3:20.10.21-3.el9                                    docker-ce-stable
docker-ce.x86_64                                    3:20.10.22-3.el9                                    docker-ce-stable
docker-ce.x86_64                                    3:20.10.23-3.el9                                    docker-ce-stable
docker-ce.x86_64                                    3:20.10.24-3.el9                                    docker-ce-stable
docker-ce.x86_64                                    3:23.0.0-1.el9                                      docker-ce-stable
docker-ce.x86_64                                    3:23.0.1-1.el9                                      docker-ce-stable
docker-ce.x86_64                                    3:23.0.2-1.el9                                      docker-ce-stable
docker-ce.x86_64                                    3:23.0.4-1.el9                                      docker-ce-stable
docker-ce.x86_64                                    3:23.0.5-1.el9                                      docker-ce-stable
docker-ce.x86_64                                    3:23.0.6-1.el9                                      docker-ce-stable
docker-ce.x86_64                                    3:24.0.0-1.el9                                      docker-ce-stable
docker-ce.x86_64                                    3:24.0.1-1.el9                                      docker-ce-stable
docker-ce.x86_64                                    3:24.0.2-1.el9                                      docker-ce-stable
docker-ce.x86_64                                    3:24.0.3-1.el9                                      docker-ce-stable
docker-ce.x86_64                                    3:24.0.4-1.el9                                      docker-ce-stable
docker-ce.x86_64                                    3:24.0.5-1.el9                                      docker-ce-stable
docker-ce.x86_64                                    3:24.0.6-1.el9                                      docker-ce-stable
docker-ce.x86_64                                    3:24.0.7-1.el9                                      docker-ce-stable

# Step5: 安装指定版本的Docker-CE: (VERSION例如上面的24.0.7)
[root@rocky9 ~]# yum -y install docker-ce-24.0.7 docker-ce-cli-24.0.7

# Step6: 把Docker服务设为开机启动,并立即启动服务
[root@rocky9 ~]# systemctl enable --now docker

# 查看docker版本
[root@rocky9 ~]# docker version
Client: Docker Engine - Community
 Version:           24.0.7
 API version:       1.43
 Go version:        go1.20.10
 Git commit:        afdd53b
 Built:             Thu Oct 26 09:09:13 2023
 OS/Arch:           linux/amd64
 Context:           default

Server: Docker Engine - Community
 Engine:
  Version:          24.0.7
  API version:      1.43 (minimum version 1.12)
  Go version:       go1.20.10
  Git commit:       311b9ff
  Built:            Thu Oct 26 09:07:45 2023
  OS/Arch:          linux/amd64
  Experimental:     false
 containerd:
  Version:          1.6.26
  GitCommit:        3dd1e886e55dd695541fdcd67420c2888645a495
 runc:
  Version:          1.1.10
  GitCommit:        v1.1.10-0-g18a0cb0
 docker-init:
  Version:          0.19.0
  GitCommit:        de40ad0

# 查看docker信息
[root@rocky9 ~]# docker info
Client: Docker Engine - Community
 Version:    24.0.7
 Context:    default
 Debug Mode: false
 Plugins:
  buildx: Docker Buildx (Docker Inc.)
    Version:  v0.11.2
    Path:     /usr/libexec/docker/cli-plugins/docker-buildx
  compose: Docker Compose (Docker Inc.)
    Version:  v2.21.0
    Path:     /usr/libexec/docker/cli-plugins/docker-compose

Server:
 Containers: 0
  Running: 0
  Paused: 0
  Stopped: 0
 Images: 0
 Server Version: 24.0.7
 Storage Driver: overlay2
  Backing Filesystem: xfs
  Supports d_type: true
  Using metacopy: false
  Native Overlay Diff: true
  userxattr: false
 Logging Driver: json-file
 Cgroup Driver: systemd
 Cgroup Version: 2
 Plugins:
  Volume: local
  Network: bridge host ipvlan macvlan null overlay
  Log: awslogs fluentd gcplogs gelf journald json-file local logentries splunk syslog
 Swarm: inactive
 Runtimes: io.containerd.runc.v2 runc
 Default Runtime: runc
 Init Binary: docker-init
 containerd version: 3dd1e886e55dd695541fdcd67420c2888645a495
 runc version: v1.1.10-0-g18a0cb0
 init version: de40ad0
 Security Options:
  seccomp
   Profile: builtin
  cgroupns
 Kernel Version: 5.14.0-362.8.1.el9_3.x86_64
 Operating System: Rocky Linux 9.3 (Blue Onyx)
 OSType: linux
 Architecture: x86_64
 CPUs: 2
 Total Memory: 1.692GiB
 Name: rocky9
 ID: caedc431-b566-4ec4-8f8e-4df65e6a657f
 Docker Root Dir: /var/lib/docker
 Debug Mode: false
 Experimental: false
 Insecure Registries:
  127.0.0.0/8
 Live Restore Enabled: false

# 查看docker相关文件
[root@rocky9 ~]# rpm -ql docker-ce
/etc/docker
/usr/bin/docker-proxy
/usr/bin/dockerd
/usr/lib/.build-id
/usr/lib/.build-id/3e
/usr/lib/.build-id/3e/25ff43da6eb38f0f2eab2aec6f97c9dd164d33
/usr/lib/.build-id/71
/usr/lib/.build-id/71/14030d8d1e2108a93658f6e3f2d1553bbae16d
/usr/lib/systemd/system/docker.service
/usr/lib/systemd/system/docker.socket
/usr/libexec/docker/docker-init
3.4 基于二进制包安装docker
本方法适用于无法上网或无法通过包安装方式安装的主机上安装docker
安装文档: https://docs.docker.com/install/linux/docker-ce/binaries/
二进制安装下载路径
https://download.docker.com/linux/
https://mirrors.aliyun.com/docker-ce/linux/static/stable/x86_64/
[root@rocky9-2 ~]# yum -y install wget

[root@rocky9-2 ~]# wget https://mirrors.aliyun.com/docker-ce/linux/static/stable/x86_64/docker-24.0.7.tgz

[root@rocky9-2 ~]# tar xf docker-24.0.7.tgz

[root@rocky9-2 ~]# mv docker/* /usr/bin/

[root@rocky9-2 ~]# cat > /lib/systemd/system/docker.service <<-EOF
[Unit]
Description=Docker Application Container Engine
Documentation=https://docs.docker.com
After=network-online.target firewalld.service
Wants=network-online.target

[Service]
Type=notify
# the default is not to use systemd for cgroups because the delegate issues still
# exists and systemd currently does not support the cgroup feature set required
# for containers run by docker
ExecStart=/usr/bin/dockerd -H unix://var/run/docker.sock
ExecReload=/bin/kill -s HUP \$MAINPID
# Having non-zero Limit*s causes performance problems due to accounting overhead
# in the kernel. We recommend using cgroups to do container-local accounting.
LimitNOFILE=infinity
LimitNPROC=infinity
LimitCORE=infinity
# Uncomment TasksMax if your systemd version supports it.
# Only systemd 226 and above support this version.
#TasksMax=infinity
TimeoutStartSec=0
# set delegate yes so that systemd does not reset the cgroups of docker containers
Delegate=yes
# kill only the docker process, not all processes in the cgroup
KillMode=process
# restart the docker process if it exits prematurely
Restart=on-failure
StartLimitBurst=3
StartLimitInterval=60s

[Install]
WantedBy=multi-user.target
EOF

[root@rocky9-2 ~]# systemctl daemon-reload && systemctl enable --now docker

# 查看docker版本
[root@rocky9-2 ~]# docker version
Client:
 Version:           24.0.7
 API version:       1.43
 Go version:        go1.20.10
 Git commit:        afdd53b
 Built:             Thu Oct 26 09:04:00 2023
 OS/Arch:           linux/amd64
 Context:           default

Server: Docker Engine - Community
 Engine:
  Version:          24.0.7
  API version:      1.43 (minimum version 1.12)
  Go version:       go1.20.10
  Git commit:       311b9ff
  Built:            Thu Oct 26 09:05:28 2023
  OS/Arch:          linux/amd64
  Experimental:     false
 containerd:
  Version:          v1.7.6
  GitCommit:        091922f03c2762540fd057fba91260237ff86acb
 runc:
  Version:          1.1.9
  GitCommit:        v1.1.9-0-gccaecfc
 docker-init:
  Version:          0.19.0
  GitCommit:        de40ad0

# 查看docker信息
[root@rocky9-2 ~]# docker info
Client:
 Version:    24.0.7
 Context:    default
 Debug Mode: false

Server:
 Containers: 0
  Running: 0
  Paused: 0
  Stopped: 0
 Images: 0
 Server Version: 24.0.7
 Storage Driver: overlay2
  Backing Filesystem: xfs
  Supports d_type: true
  Using metacopy: false
  Native Overlay Diff: true
  userxattr: false
 Logging Driver: json-file
 Cgroup Driver: systemd
 Cgroup Version: 2
 Plugins:
  Volume: local
  Network: bridge host ipvlan macvlan null overlay
  Log: awslogs fluentd gcplogs gelf journald json-file local logentries splunk syslog
 Swarm: inactive
 Runtimes: io.containerd.runc.v2 runc
 Default Runtime: runc
 Init Binary: docker-init
 containerd version: 091922f03c2762540fd057fba91260237ff86acb
 runc version: v1.1.9-0-gccaecfc
 init version: de40ad0
 Security Options:
  seccomp
   Profile: builtin
  cgroupns
 Kernel Version: 5.14.0-362.8.1.el9_3.x86_64
 Operating System: Rocky Linux 9.3 (Blue Onyx)
 OSType: linux
 Architecture: x86_64
 CPUs: 2
 Total Memory: 1.692GiB
 Name: rocky9-2
 ID: c13f9ec7-b3fc-4258-a3cc-950f70f37f71
 Docker Root Dir: /var/lib/docker
 Debug Mode: false
 Experimental: false
 Insecure Registries:
  127.0.0.0/8
 Live Restore Enabled: false
 Product License: Community Engine

[root@rocky9-2 ~]# pstree -p |grep docker
           |-dockerd(11293)-+-containerd(11300)-+-{containerd}(11301)
           |                |-{dockerd}(11294)
           |                |-{dockerd}(11295)
           |                |-{dockerd}(11296)
           |                |-{dockerd}(11297)
           |                |-{dockerd}(11298)
           |                |-{dockerd}(11309)
           |                |-{dockerd}(11310)
           |                |-{dockerd}(11311)
           |                `-{dockerd}(11312)
3.5 docker 镜像加速配置
docker 镜像官方的下载站点是: https://hub.docker.com/
从国内下载官方的镜像站点有时候会很慢,因此可以更改docker配置文件添加一个加速器,可以通过加速器达到加速下载镜像的目的
国内有许多公司都提供了docker 加速镜像,比如: 阿里云,腾讯云,网易云,以下以阿里云为例
3.5.1 阿里云获取镜像加速地址及其它镜像加速
浏览器打开https://cr.console.aliyun.com/,注册或登录阿里云账号,点击左侧的镜像加速器,将会得到一个专属的加速地址,而且下面有使用配置说明:

图1-4 阿里云获取镜像加速地址
Docker Hub 镜像加速器列表
| 镜像加速器 | 镜像加速器地址 | 专属加速器? | 其它加速? |
|---|---|---|---|
| Docker 中国官方镜像 | https://registry.docker-cn.com | Docker Hub | |
| DaoCloud 镜像站 | https://docker.m.daocloud.io | Docker Hub | |
| Azure 中国镜像 | https://dockerhub.azk8s.cn | Docker Hub、GCR、Quay | |
| 科大镜像站 | https://docker.mirrors.ustc.edu.cn | Docker Hub、GCR、Quay | |
| 阿里云 | https:// |
需登录,系统分配 | Docker Hub |
| 七牛云 | https://reg-mirror.qiniu.com | Docker Hub、GCR、Quay | |
| 网易云 | https://hub-mirror.c.163.com | Docker Hub | |
| 腾讯云 | https://mirror.ccs.tencentyun.com | Docker Hub |
3.5.2 docker 镜像加速配置
- 安装/升级Docker客户端
推荐安装1.10.0以上版本的Docker客户端,参考文档docker-ce
- 配置镜像加速器
针对Docker客户端版本大于 1.10.0 的用户
您可以通过修改daemon配置文件/etc/docker/daemon.json来使用加速器
[root@rocky9 ~]# mkdir -p /etc/docker
[root@rocky9 ~]# tee /etc/docker/daemon.json <<-'EOF'
{
    "registry-mirrors": [
        "https://l6strdex.mirror.aliyuncs.com",
        "https://docker.mirrors.ustc.edu.cn",
        "https://docker.m.daocloud.io",
        "https://registry.docker-cn.com",
        "https://dockerhub.azk8s.cn",
        "https://reg-mirror.qiniu.com",
        "https://hub-mirror.c.163.com",
        "https://mirror.ccs.tencentyun.com"
    ]
}
EOF

[root@rocky9 ~]# systemctl daemon-reload  && systemctl restart docker

[root@rocky9 ~]# docker info |tail -n 11
 Registry Mirrors:
  https://l6strdex.mirror.aliyuncs.com/
  https://docker.mirrors.ustc.edu.cn/
  https://docker.m.daocloud.io/
  https://registry.docker-cn.com/
  https://dockerhub.azk8s.cn/
  https://reg-mirror.qiniu.com/
  https://hub-mirror.c.163.com/
  https://mirror.ccs.tencentyun.com/
 Live Restore Enabled: false
3.6 一键安装 docker 脚本
Shell脚本源码地址:
Gitee:https://gitee.com/raymond9/shell
Github:https://github.com/raymond999999/shell
可以去上面的Gitee或Github代码仓库拉取脚本。
3.6.1 基于镜像仓库一键安装docker脚本
[root@rocky9 ~]# cat install_docker_v2.sh
#!/bin/bash
#
#********************************************************************************************************
#Author:        Raymond
#QQ:            88563128
#Date:          2024-01-09
#FileName:      install_docker_v2.sh
#URL:           raymond.blog.csdn.net
#Description:   install_docker for CentOS 7 & CentOS Stream 8/9 & Ubuntu 18.04/20.04/22.04 & Rocky 8/9
#Copyright (C): 2024 All rights reserved
#********************************************************************************************************
COLOR="echo -e \\033[01;31m"
END='\033[0m'
DOCKER_VERSION=24.0.7
DOCKER_MAIN_VERSION=`echo ${DOCKER_VERSION} | awk -F'.' '{print $1}'`
URL='mirrors.aliyun.com'

os(){
    OS_ID=`sed -rn '/^NAME=/s@.*="([[:alpha:]]+).*"$@\1@p' /etc/os-release`
    OS_RELEASE_VERSION=`sed -rn '/^VERSION_ID=/s@.*="?([0-9]+)\.?.*"?@\1@p' /etc/os-release`
}

ubuntu_install_docker(){
    dpkg -s docker-ce &>/dev/null && ${COLOR}"Docker已安装,退出"${END} && exit
    ${COLOR}"开始安装Docker依赖包,请稍等..."${END}
    apt update &> /dev/null
    apt -y install apt-transport-https ca-certificates curl software-properties-common &> /dev/null
    curl -fsSL https://${URL}/docker-ce/linux/ubuntu/gpg | sudo apt-key add - &> /dev/null
    add-apt-repository -y "deb [arch=amd64] https://${URL}/docker-ce/linux/ubuntu  $(lsb_release -cs) stable" &> /dev/null
    apt update &> /dev/null

    ${COLOR}"Docker有以下版本"${END}
    apt-cache madison docker-ce
    ${COLOR}"10秒后即将安装:Docker-"${DOCKER_VERSION}"版本......"${END}
    ${COLOR}"如果想安装其它Docker版本,请按Ctrl+c键退出,修改版本再执行"${END}
    sleep 10

    ${COLOR}"开始安装Docker,请稍等..."${END}
    if [ ${DOCKER_MAIN_VERSION} == "18" -o ${DOCKER_MAIN_VERSION} == "19" -o ${DOCKER_MAIN_VERSION} == "20" ];then
        apt -y install docker-ce=5:${DOCKER_VERSION}~3-0~ubuntu-$(lsb_release -cs) docker-ce-cli=5:${DOCKER_VERSION}~3-0~ubuntu-$(lsb_release -cs) &> /dev/null || { ${COLOR}"apt源失败,请检查apt配置"${END};exit; }
    else
        apt -y install docker-ce=5:${DOCKER_VERSION}-1~ubuntu.$(lsb_release -rs)~$(lsb_release -cs) docker-ce-cli=5:${DOCKER_VERSION}-1~ubuntu.$(lsb_release -rs)~$(lsb_release -cs) &> /dev/null || { ${COLOR}"apt源失败,请检查apt配置"${END};exit; }
    fi
}

centos_install_docker(){
    rpm -q docker-ce &> /dev/null && ${COLOR}"Docker已安装,退出"${END} && exit

    ${COLOR}"开始安装Docker依赖包,请稍等..."${END}
    yum -y install yum-utils &> /dev/null
    yum-config-manager --add-repo https://${URL}/docker-ce/linux/centos/docker-ce.repo &> /dev/null
    yum clean all &> /dev/null
	yum makecache &> /dev/null

    ${COLOR}"Docker有以下版本"${END}
    yum list docker-ce.x86_64 --showduplicates
    ${COLOR}"10秒后即将安装:Docker-"${DOCKER_VERSION}"版本......"${END}
    ${COLOR}"如果想安装其它Docker版本,请按Ctrl+c键退出,修改版本再执行"${END}
    sleep 10

    ${COLOR}"开始安装Docker,请稍等..."${END}
    yum -y install docker-ce-${DOCKER_VERSION} docker-ce-cli-${DOCKER_VERSION} &> /dev/null || { ${COLOR}"yum源失败,请检查yum配置"${END};exit; }
}

mirror_accelerator(){
    mkdir -p /etc/docker
    tee /etc/docker/daemon.json <<-'EOF'
{
    "registry-mirrors": [
        "https://l6strdex.mirror.aliyuncs.com",
        "https://docker.mirrors.ustc.edu.cn",
        "https://docker.m.daocloud.io",
        "https://registry.docker-cn.com",
        "https://dockerhub.azk8s.cn",
        "https://reg-mirror.qiniu.com",
        "https://hub-mirror.c.163.com",
        "https://mirror.ccs.tencentyun.com"
    ]
}
EOF
    systemctl daemon-reload
    systemctl enable --now docker &> /dev/null
    systemctl is-active docker &> /dev/null && ${COLOR}"Docker 服务启动成功"${END} || { ${COLOR}"Docker 启动失败"${END};exit; }
    docker version &&  ${COLOR}"Docker 安装成功"${END} || ${COLOR}"Docker 安装失败"${END}
}

set_alias(){
    echo 'alias rmi="docker images -qa|xargs docker rmi -f"' >> ~/.bashrc
    echo 'alias rmc="docker ps -qa|xargs docker rm -f"' >> ~/.bashrc
}

set_swap_limit(){
    if [ ${OS_RELEASE_VERSION} == "18" -o ${OS_RELEASE_VERSION} == "20" ];then
        ${COLOR}'设置Docker的"WARNING: No swap limit support"警告'${END}
        sed -ri '/^GRUB_CMDLINE_LINUX=/s@"$@ swapaccount=1"@' /etc/default/grub
        update-grub &> /dev/null
        ${COLOR}"10秒后,机器会自动重启!"${END}
        sleep 10
        reboot
    fi
}

main(){
    os
    if [ ${OS_ID} == "CentOS" -o ${OS_ID} == "Rocky" ] &> /dev/null;then
        centos_install_docker
    else
        ubuntu_install_docker
    fi
    mirror_accelerator
    set_alias
    set_swap_limit
}

main
3.6.2 基于二进制包一键安装docker脚本
[root@rocky9 ~]# cat install_docker_binary_v2.sh
#!/bin/bash
#
#*************************************************************************************************************
#Author:        Raymond
#QQ:            88563128
#Date:          2024-01-09
#FileName:      install_docker_binary_v2.sh
#URL:           raymond.blog.csdn.net
#Description:   install_docker_binary CentOS 7 & CentOS Stream 8/9 & Ubuntu 18.04/20.04/22.04 & Rocky 8/9
#Copyright (C): 2021 All rights reserved
#*************************************************************************************************************
SRC_DIR=/usr/local/src
COLOR="echo -e \\033[01;31m"
END='\033[0m'
URL='https://mirrors.aliyun.com/docker-ce/linux/static/stable/x86_64/'
DOCKER_FILE=docker-24.0.7.tgz

os(){
    OS_ID=`sed -rn '/^NAME=/s@.*="([[:alpha:]]+).*"$@\1@p' /etc/os-release`
    OS_RELEASE_VERSION=`sed -rn '/^VERSION_ID=/s@.*="?([0-9]+)\.?.*"?@\1@p' /etc/os-release`
}

check_file (){
    cd ${SRC_DIR}
    if [ ${OS_ID} == "CentOS" -o ${OS_ID} == "Rocky" ] &> /dev/null;then
        rpm -q wget &> /dev/null || { ${COLOR}"安装wget工具,请稍等..."${END};yum -y install wget &> /dev/null; }
    fi
    if [ ! -e ${DOCKER_FILE} ];then
        ${COLOR}"缺少${DOCKER_FILE}文件,如果是离线包,请把文件放到${SRC_DIR}目录下"${END}
        ${COLOR}'开始下载Docker二进制安装包'${END}
        wget ${URL}${DOCKER_FILE} || { ${COLOR}"Docker二进制安装包下载失败"${END}; exit; }
    else
        ${COLOR}"相关文件已准备好"${END}
    fi
}

install(){
    [ -f /usr/bin/docker ] && { ${COLOR}"Docker已存在,安装失败"${END};exit; }
    ${COLOR}"开始安装Docker,请稍等..."${END}
    tar xf ${DOCKER_FILE}
    mv docker/* /usr/bin/
    cat > /lib/systemd/system/docker.service <<-EOF
[Unit]
Description=Docker Application Container Engine
Documentation=https://docs.docker.com
After=network-online.target firewalld.service
Wants=network-online.target

[Service]
Type=notify
# the default is not to use systemd for cgroups because the delegate issues still
# exists and systemd currently does not support the cgroup feature set required
# for containers run by docker
ExecStart=/usr/bin/dockerd -H unix://var/run/docker.sock
ExecReload=/bin/kill -s HUP \$MAINPID
# Having non-zero Limit*s causes performance problems due to accounting overhead
# in the kernel. We recommend using cgroups to do container-local accounting.
LimitNOFILE=infinity
LimitNPROC=infinity
LimitCORE=infinity
# Uncomment TasksMax if your systemd version supports it.
# Only systemd 226 and above support this version.
#TasksMax=infinity
TimeoutStartSec=0
# set delegate yes so that systemd does not reset the cgroups of docker containers
Delegate=yes
# kill only the docker process, not all processes in the cgroup
KillMode=process
# restart the docker process if it exits prematurely
Restart=on-failure
StartLimitBurst=3
StartLimitInterval=60s

[Install]
WantedBy=multi-user.target
EOF
    mkdir -p /etc/docker
    tee /etc/docker/daemon.json <<-'EOF'
{
    "registry-mirrors": [
        "https://l6strdex.mirror.aliyuncs.com",
        "https://docker.mirrors.ustc.edu.cn",
        "https://docker.m.daocloud.io",
        "https://registry.docker-cn.com",
        "https://dockerhub.azk8s.cn",
        "https://reg-mirror.qiniu.com",
        "https://hub-mirror.c.163.com",
        "https://mirror.ccs.tencentyun.com"
    ]
}
EOF
    echo 'alias rmi="docker images -qa|xargs docker rmi -f"' >> ~/.bashrc
    echo 'alias rmc="docker ps -qa|xargs docker rm -f"' >> ~/.bashrc
    systemctl daemon-reload
    systemctl enable --now docker &> /dev/null
    systemctl is-active docker &> /dev/null && ${COLOR}"Docker 服务启动成功"${END} || { ${COLOR}"Docker 启动失败"${END};exit; }
    docker version && ${COLOR}"Docker 安装成功"${END} || ${COLOR}"Docker 安装失败"${END}
}

set_swap_limit(){
    if [ ${OS_RELEASE_VERSION} == "18" -o ${OS_RELEASE_VERSION} == "20" ];then
        ${COLOR}'设置Docker的"WARNING: No swap limit support"警告'${END}
        sed -ri '/^GRUB_CMDLINE_LINUX=/s@"$@ swapaccount=1"@' /etc/default/grub
        update-grub &> /dev/null
        ${COLOR}"10秒后,机器会自动重启!"${END}
        sleep 10
        reboot
    fi
}

main(){
    os
    check_file
    install
    set_swap_limit
}

main