SpringBoot,vue,elemet-ui前后端分离小练习
1后端
①创建项目
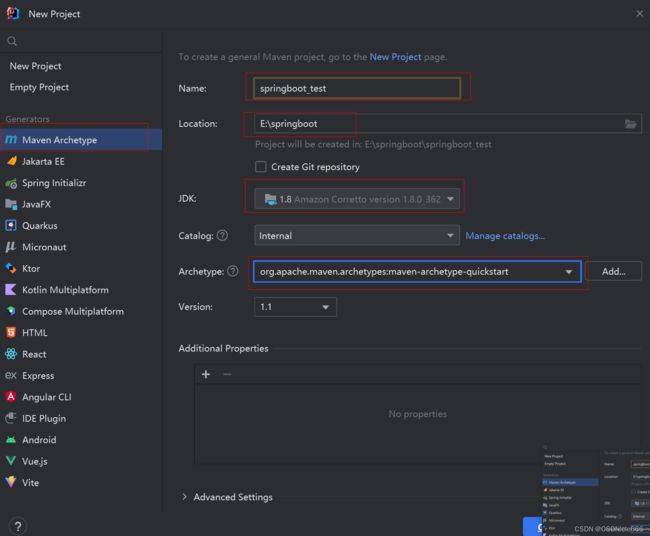
用Maven手动创建一个springboot项目,快速开始,
快速创建完成东西比较少
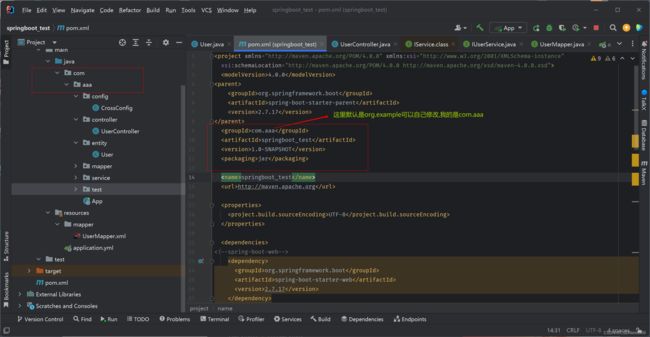
②pom.xml导入依赖
    org.springframework.boot
    spring-boot-starter-parent
    2.7.17


      org.springframework.boot
      spring-boot-starter-web
      2.7.17


      mysql
      mysql-connector-java
      5.1.47


      com.baomidou
      mybatis-plus-boot-starter
      3.5.3


      com.baomidou
      mybatis-plus-generator
      3.5.3


      org.apache.velocity
      velocity-engine-core
      2.3


      org.freemarker
      freemarker


      org.projectlombok
      lombok
      1.18.6


      junit
      junit
      4.13.2
      test
③mybatis-plus快速生成代码
创建文件com.aaa/test.MyTest.java
//这是mybatis-plus自动生成单体架构(单表操作)的的代码
package com.aaa.test;
import com.baomidou.mybatisplus.annotation.FieldFill;
import com.baomidou.mybatisplus.generator.FastAutoGenerator;
import com.baomidou.mybatisplus.generator.config.OutputFile;
import com.baomidou.mybatisplus.generator.fill.Column;
import java.util.Arrays;
import java.util.Collections;
import java.util.List;
public class MyTest {
    public static void main(String[] args) {
        //数据库,账号密码改成自己的,
        FastAutoGenerator.create("jdbc:mysql://localhost:3306/hehe", "root", "1111")
                // 全局配置
                .globalConfig((scanner, builder) -> builder
                        .author("第五问天")
                        .outputDir("E:\\springboot\\springboot_test\\src\\main\\java")
                )
                // 包配置,parent("com.aaa")我该的自己的包名,之前依赖哪里提到过,
                .packageConfig(
                        (scanner, builder) ->
                                builder
                                        .parent("com.aaa")
                                        .pathInfo(Collections.singletonMap(OutputFile.xml, "E:\\springboot\\springboot_test\\src\\main\\resources\\mapper")))
                // 策略配置,上一行代码的路径改成自己的mapper如果没有回自动生成的,执行后根据提示在控制台输入自己的数据库表名字,
                .strategyConfig((scanner, builder) -> builder.addInclude(getTables(scanner.apply("请输入表名,数据库有多个表,请用英文逗号分隔?用所有表请输入 all")))
                        .controllerBuilder().enableRestStyle().enableHyphenStyle()
                        .entityBuilder().enableLombok().addTableFills(
                                new Column("create_time", FieldFill.INSERT)
                        ).build())
                /*
                    模板引擎配置,默认 Velocity 可选模板引擎 Beetl 或 Freemarker
                   .templateEngine(new BeetlTemplateEngine())
                   .templateEngine(new FreemarkerTemplateEngine())
                 */
                .execute();
// 处理 all 情况
    }
    protected static List getTables(String tables) {
        return "all".equals(tables) ? Collections.emptyList() : Arrays.asList(tables.split(","));
    }
}
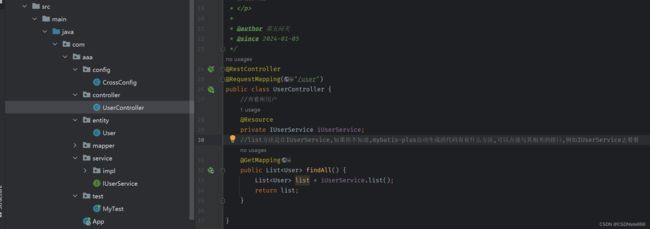
这是生成之后的代码
④新建yml文件
新建rescourses/application.yml文件,
# 数据库配置
spring:
  datasource:
    driver-class-name: com.mysql.jdbc.Driver
    url: jdbc:mysql://localhost:3306/hehe?useSSL=false&serverTimezone=UTC&useUnicode=true&characterEncoding=utf-8 # 数据库连接URL
    username: root # 数据库用户名
    password: 1111 # 数据库密码

# Jackson配置
# 用于序列化和反序列化Java对象和JSON
# 这里设置了日期格式和时区
# write-date-keys-as-timestamps表示是否将日期类型字段写成时间戳形式
# 如果为false,则按照指定的日期格式输出
  jackson:
    date-format: yyyy-MM-dd HH:mm:ss # 日期格式
    time-zone: GMT+8 # 时区
    serialization:
      write-date-keys-as-timestamps: false # 是否将日期类型字段写成时间戳形式

# MyBatis Plus配置
mybatis-plus:
  configuration:
    map-underscore-to-camel-case: true # 将下划线转换为驼峰命名法
    log-impl: org.apache.ibatis.logging.stdout.StdOutImpl # 打印SQL语句到控制台

  mapper-locations: classpath:/mapper/*.xml # Mapper文件所在路径

  global-config:
    db-config:
      logic-not-delete-value: 0 # 逻辑删除,删除之前的值是0
      logic-delete-value: 1 # 逻辑删除,删除之后的值是1
⑤写controller层代码
写controller层相应的代码,
⑥写启动类
⑦启动拿数据
然后启动成功之后,访问一下,能拿到数据
前后端分离的项目,会有跨域问题
如果不解决,前端启动的时候,会报错
这里先解决,有两种方案,
1.在对应的controller层加注解:@CrossOrigin
2.用配置文件:建议使用这种
建包com/aaa/config/CrossConfig.java
代码:
@Configuration
public class CrossConfig {
    @Bean
    public CorsFilter corsFilter(){
        final UrlBasedCorsConfigurationSource source = new UrlBasedCorsConfigurationSource();
        final CorsConfiguration corsConfiguration = new CorsConfiguration();
        corsConfiguration.addAllowedHeader("*");//允许所有的请求头
        corsConfiguration.addAllowedOrigin("*");//允许所有的路径
        corsConfiguration.addAllowedMethod("*");//允许所有的方法
        source.registerCorsConfiguration("/**",corsConfiguration);//所有路由都能运行
        return new CorsFilter(source);
    }
}
后端准备完毕
2前端
前端准备
①安装axios
命令: npm install axios
②使用axios
在main.js里
前端和后端的端口号不要冲突,后端8080,前端8081,前端的8080端口号重复了会自动变成8082,后端8080会报错,所以如果端口号一样都是8080,先启动后端再启动前端,避免错误
可以修改端口号,避免端口号重复
③引入UI
main.js里引入UI,这里引入的是element-ui(饿了么ui)
import Vue from 'vue'
import App from './App.vue'
import router from './router'
//使用element-ui开始
import ElementUI from 'element-ui';
import 'element-ui/lib/theme-chalk/index.css';
Vue.use(ElementUI);
//使用element-ui结束
Vue.config.productionTip = false
    //引入axios并定义成全局变量
import axios from 'axios'
const instance = axios.create({
    //所有请求路径上加入${baseUrl}
    baseURL: 'http://localhost:8080/'
});
//定义成全局变量
Vue.prototype.$axios = instance;

new Vue({
    router,
    render: h => h(App)
}).$mount('#app')
⑤4个组件
前端有4个组件
1先写组件再写路由
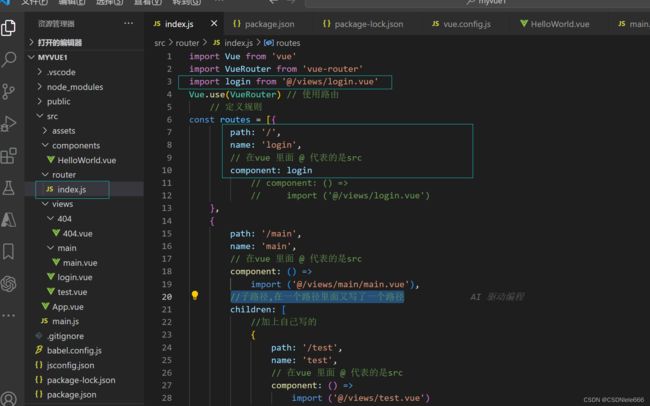
index.js里写路由,
import Vue from 'vue'
import VueRouter from 'vue-router'
import login from '@/views/login.vue'
Vue.use(VueRouter) // 使用路由
    // 定义规则
const routes = [{
        path: '/',
        name: 'login',
        // 在vue 里面 @ 代表的是src
        component: login
            // component: () =>
            //     import ('@/views/login.vue')
    },
    {
        path: '/main',
        name: 'main',
        // 在vue 里面 @ 代表的是src
        component: () =>
            import ('@/views/main/main.vue'),
//子路径,在一个路径里面又写了一个路径,在main.vue里可以跳到test.vue
        children: [
            //加上自己写的
            {
                path: '/test',
                name: 'test',
                // 在vue 里面 @ 代表的是src
                component: () =>
                    import ('@/views/test.vue')
            },
        ]
    },
    //放在最后,所有不存在的路径都会跳到这里,只是练习
    {
        path: '*',
        name: '404',
        // 在vue 里面 @ 代表的是src
        component: () =>
            import ('@/views/404/404.vue')
    },

]
const router = new VueRouter({
    mode: 'history',
    base: process.env.BASE_URL,
    routes
})

export default router
①login.vue
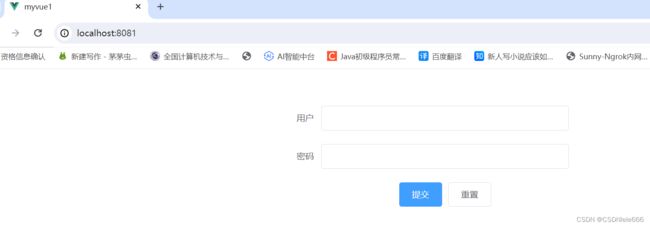
login.vue,没有去真正的请求,只有个页面,做了一点修改,设置成了立即加载不然会跳到.vue
// 路由 更改
this.$router.push({path:"/main"})
如图:
提交
重置
②main.vue
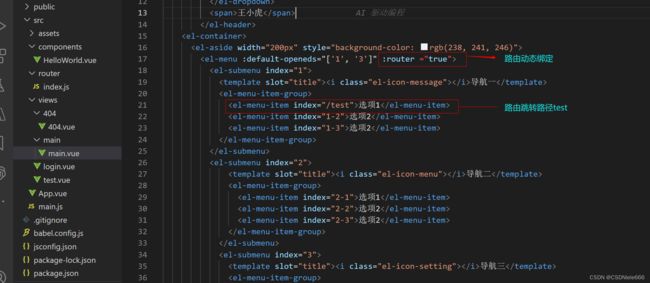
是用了element-ui 里的容器布局,略微修改,不影响
如图:
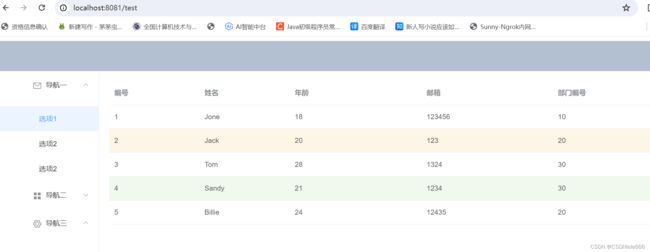
在main.vue里点击侧边栏选项一,跳转到test.vue(属于本框架之间的跳转,没有向下面的404.vue一样,跳出了这个框架,//404类似页面之间的跳转)
查看
新增
删除
王小虎
导航一
选项1
选项2
选项2
导航二
选项1
选项2
选项2
导航三
选项1
选项2
选项2
③test.vue
created(){在页面加载的时候渲染,即把数据传过去
this.$axios.get("user").then(res=>{//向后端发送一个axios请求,路径是user,后端响应结果到res里,然后把数res里的数据给element-ui里的模版的数据表格tableDate中
console.log(res.data);
this.tableData=res.data;
});
}
④404.vue
只要是访问的路径路由没有,最后就会跳到这里,上面也提到了,它是直接跳到了另一个页面,和main.vue跳test.vue不一样
该网页不存在,请稍后再试
前端完毕
前后端分离结束
