libfacedetection库 yufacedetectnet-open-v1.prototxt详解
libfacedetection库是深圳大学的于仕琪老师发布的开源人脸检测库,该库使用的是SSD网络框架,SSD框架详情参见博客:https://blog.csdn.net/qq_30815237/article/details/90292639
下面对其网库框架的prototxt文件进行详解:
| name: "YuFaceDetectNet" | |
| input: "data"#输入 | |
| input_shape { #输入数据的尺寸:1张图片,3个通道(BGR),width,height=320,240 | |
| dim: 1 | |
| dim: 3 | |
| dim: 240 | |
| dim: 320 | |
| } | |
| #CONV1########################################################### | |
| layer { | |
| name: "conv1_1" #,name任取,表示这一层的名字 | |
| type: "Convolution"#卷积层 | |
| bottom: "data"#bottom为此层输入 | |
| top: "conv1_1" #top为此层输出 在数据层中,至少有一个命名为data的top。如果有第二个top,一般命名为label。这种(data, label)的配对是分类模型所必需的. |
|
| param { | |
| lr_mult: 1.0 #学习率的系数,最终的学习率是这个数乘以solver.prototxt配置文件中的base_lr。如有两个lr_mult,则第一个表示权值w的学习率,第二个表示偏置项的学习率。一般偏置项的学习率是权值学习率的两倍。 | |
| decay_mult: 1.0 #权值衰减,为了避免模型的over-fitting,需要对cost function加入规范项 | |
| } | |
| convolution_param { #卷积核的参数定义 | |
| num_output: 16 #卷积核的个数 | |
| pad: 1 #扩充边缘,默认为0,不扩充。 扩充的时候是左右、上下对称的 | |
| stride: 2 #卷积核的步长,默认为1, 也可以用stride_h, stride_w来设置。 | |
| kernel_size: 3 #卷积核的大小,如果kernel_size长宽不一样,则需要通过kernel_h,kernel_w分别设定 | |
| weight_filler { #权值初始化。默认为“constant”,值权威0,很多时候我们用“xavier”算法来进行初始化,也可以设置为“gaussian” |
|
| type: "xavier" | |
| } | |
| bias_term: false #是否开启偏置项,默认为true | |
| } | |
| } | |
| layer {#激活函数 | |
| name: "relu1_1" | |
| type: "ReLU"激活函数,对输入数据进行激活操作(一种函数变换),从bottom得到一个blob数据输入,运算后,从top输出一个blob数据, 在运算过程中,只对输入数据逐个元素进行函数变化,不改变数据维度大小 | |
| bottom: "conv1_1" 输入:n*c*h*w 输出:n*c*h*w | |
| top: "conv1_1" Relu层支持in-place计算,因此Relu层的输入输出可以相同,这意味着该层的输入输出可以共享同一块内存,减少内存消耗,其它层不支持 |
|
| } | |
| ##################第一组卷积层的第2个小层,1.2层 layer { |
|
| name: "conv1_2" | |
| type: "Convolution" | |
| bottom: "conv1_1"#第1小层卷积层输出作为输入 | |
| top: "conv1_2" | |
| param { | |
| lr_mult: 1.0 #learning rate | |
| decay_mult: 1.0 | |
| } | |
| convolution_param { | |
| num_output: 16 | |
| pad: 0 | |
| kernel_size: 1 | |
| weight_filler { type: "xavier" } | |
| bias_term: false | |
| } | |
| } | |
| #卷积层1.2的激活层 layer { |
|
| name: "relu1_2" | |
| type: "ReLU" | |
| bottom: "conv1_2" | |
| top: "conv1_2" | |
| } |
####################CONV2
| #池化层,对第一组卷积层池化 layer { |
|
| name: "pool1" | |
| type: "Pooling" | |
| bottom: "conv1_2" #1.2层经过激活函数的输出作为输入 | |
| top: "pool1" | |
| pooling_param { | |
| pool: MAX | |
| kernel_size: 2 | |
| stride: 2} | |
| } | |
| #2.1卷积层 layer { |
|
| name: "conv2_1" | |
| type: "Convolution" | |
| bottom: "pool1" | |
| top: "conv2_1" | |
| param { | |
| lr_mult: 1.0 | |
| decay_mult: 1.0 | |
| } | |
| convolution_param { | |
| num_output: 16 | |
| pad: 1 | |
| kernel_size: 3 | |
| weight_filler { | |
| type: "xavier"} | |
| bias_term: false | |
| } | |
| } | |
| #2.1激活层 layer { |
|
| name: "relu2_1" | |
| type: "ReLU" | |
| bottom: "conv2_1" | |
| top: "conv2_1" | |
| } | |
| #2.2卷积层 layer { |
|
| name: "conv2_2" | |
| type: "Convolution" | |
| bottom: "conv2_1" | |
| top: "conv2_2" | |
| param { | |
| lr_mult: 1.0 | |
| decay_mult: 1.0 | |
| } | |
| convolution_param { | |
| num_output: 16 | |
| pad: 0 | |
| kernel_size: 1 | |
| weight_filler { | |
| type: "xavier"} | |
| bias_term: false | |
| } | |
| } | |
| #2.2激活层 layer { |
|
| name: "relu2_2" | |
| type: "ReLU" | |
| bottom: "conv2_2" | |
| top: "conv2_2" | |
| } |
#CONV3###########先池化,卷积激活3.1,3.2.3.3,该大层一共有三个3个卷积层,最终num_output: 32
layer {
name: "pool2"
type: "Pooling"
}
layer {
name: "conv3_1"
type: "Convolution"
}
layer {
name: "relu3_1"
type: "ReLU"
}
layer {
name: "conv3_2"
type: "Convolution"
}
layer {
name: "relu3_2"
type: "ReLU"
}
layer {
name: "conv3_3"
type: "Convolution"
}
layer {
name: "relu3_3"
type: "ReLU"
}
#CONV4同上,num_output: 64
#CONV5同上, num_output: 128
#CONV6同上,num_output: 128
layer {
name: "pool5"
type: "Pooling"
bottom: "conv5_3"
top: "pool5"
pooling_param {
pool: MAX
kernel_size: 2
stride: 2
}
}
layer {
name: "conv6_1"
type: "Convolution"
bottom: "pool5"
top: "conv6_1"
param {
lr_mult: 1.0
decay_mult: 1.0
}
convolution_param {
num_output: 128
pad: 1
kernel_size: 3
weight_filler {
type: "xavier"
}
bias_term: false
dilation: 1
}
}
layer {
name: "relu6_1"
type: "ReLU"
bottom: "conv6_1"
top: "conv6_1"
}
layer {
name: "conv6_2"
type: "Convolution"
bottom: "conv6_1"
top: "conv6_2"
param {
lr_mult: 1.0
decay_mult: 1.0
}
convolution_param {
num_output: 128
pad: 0
kernel_size: 1
weight_filler {
type: "xavier"
}
bias_term: false
dilation: 1
}
}
layer {
name: "relu6_2"
type: "ReLU"
bottom: "conv6_2"
top: "conv6_2"
}
layer {
name: "conv6_3"
type: "Convolution"
bottom: "conv6_2"
top: "conv6_3"
param {
lr_mult: 1.0
decay_mult: 1.0
}
convolution_param {
num_output: 128
pad: 1
kernel_size: 3
weight_filler {
type: "xavier"
}
bias_term: false
dilation: 1
}
}
layer {
name: "relu6_3"
type: "ReLU"
bottom: "conv6_3"
top: "conv6_3"
}
from:Caffe各层参数解析https://www.jianshu.com/p/d7bcd3338c6c
from:https://blog.csdn.net/github_37973614/article/details/81810327
layer {
name: "conv3_3_norm"
type: "Normalize"
bottom: "conv3_3"
top: "conv3_3_norm"
norm_param {
across_spatial: false
scale_filler {
type: "constant"
value: 10.0
}
channel_shared: false
}
}
PriorBox层用于部署特征图中每个位置(像素点)处的默认框(即计算每个默认框相对于网络输入层输入图像的归一化左上角和右下角坐标以及设置的坐标variance值)
#PRIORBOX4与PRIORBOX3基本一样,区别在于特征图上每个点对应的默认矿不再是3个,而是2个。
layer {
name: "conv4_3_norm_mbox_loc"
type: "Convolution"
bottom: "conv4_3_norm"
top: "conv4_3_norm_mbox_loc"
convolution_param {
num_output: 8 # 2个边框*4个参数x,y,w,h
pad: 1
kernel_size: 3
stride: 1
}
"Permute"
"Flatten"
layer {
name: "conv4_3_norm_mbox_conf"
type: "Convolution"
bottom: "conv4_3_norm"
top: "conv4_3_norm_mbox_conf"
convolution_param {
num_output: 4 # 2类*2个边框
pad: 1
kernel_size: 3
stride: 1
}
"Permute"
"Flatten"
layer {
name: "conv4_3_norm_mbox_priorbox"
type: "PriorBox"
bottom: "conv4_3_norm"
bottom: "data"
top: "conv4_3_norm_mbox_priorbox"
prior_box_param {
min_size: 32.0
min_size: 48.0
}
#PRIORBOX5与PRIORBOX4相同,边框数为2.
layer {
name: "conv5_3_norm_mbox_priorbox"
type: "PriorBox"
bottom: "conv5_3_norm"
bottom: "data"
top: "conv5_3_norm_mbox_priorbox"
prior_box_param {
min_size: 64.0
min_size: 96.0
}
}
#PRIORBOX6,边框数为3.
layer {
name: "conv6_3_norm_mbox_priorbox"
type: "PriorBox"
bottom: "conv6_3_norm"
bottom: "data"
top: "conv6_3_norm_mbox_priorbox"
prior_box_param {
min_size: 128.0
min_size: 192.0
min_size: 256.0
}
}
########################################################

layer {
name: "mbox_loc"
type: "Concat"
bottom: "conv3_3_norm_mbox_loc_flat"
bottom: "conv4_3_norm_mbox_loc_flat"
bottom: "conv5_3_norm_mbox_loc_flat"
bottom: "conv6_3_norm_mbox_loc_flat"
top: "mbox_loc"
concat_param {
axis: 1 }
}
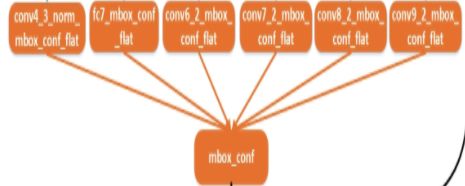
layer {
name: "mbox_conf"
type: "Concat"
bottom: "conv3_3_norm_mbox_conf_flat"
bottom: "conv4_3_norm_mbox_conf_flat"
bottom: "conv5_3_norm_mbox_conf_flat"
bottom: "conv6_3_norm_mbox_conf_flat"
top: "mbox_conf"
concat_param {
axis: 1}
}

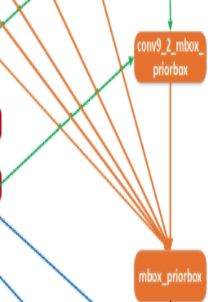
layer {
name: "mbox_priorbox"
type: "Concat"
bottom: "conv3_3_norm_mbox_priorbox"
bottom: "conv4_3_norm_mbox_priorbox"
bottom: "conv5_3_norm_mbox_priorbox"
bottom: "conv6_3_norm_mbox_priorbox"
top: "mbox_priorbox"
concat_param {
axis: 2 }
}
#####################################################

layer {
name: "mbox_conf_reshape"
type: "Reshape"
bottom: "mbox_conf"
top: "mbox_conf_reshape"
reshape_param {
shape {
dim: 0
dim: -1
dim: 2 }
}
}
layer {
name: "mbox_conf_softmax"
type: "Softmax"
bottom: "mbox_conf_reshape"
top: "mbox_conf_softmax"
softmax_param {
axis: 2}
}
layer {#
name: "mbox_conf_flatten"
type: "Flatten"
bottom: "mbox_conf_softmax"
top: "mbox_conf_flatten"
flatten_param {
axis: 1 }
}
###################################################
layer {
name: "detection_out"
type: "DetectionOutput"
bottom: "mbox_loc"
bottom: "mbox_conf_flatten"
bottom: "mbox_priorbox"
top: "detection_out"
include {
phase: TEST
}
transform_param {
mean_value: 103.94
mean_value: 116.78
mean_value: 123.68
}
detection_output_param {
num_classes: 2 #两个类别,人脸非人脸
share_location: true
background_label_id: 0
nms_param { #极大值抑制
nms_threshold: 0.15
top_k: 100
}
code_type: CENTER_SIZE
keep_top_k: 50
confidence_threshold: 0.01
visualize: false
visualize_threshold: 0.3
}
}
完整prototxt文件:https://github.com/ShiqiYu/libfacedetection/blob/master/models/caffe/yufacedetectnet-open-v1.prototxt


