【antd】如何借助antd Form实现自定义表单校验(模拟antd校验效果)
开始前先看下这篇:https://editor.csdn.net/md/?articleId=134720990
当我们做自定义组件时,偶尔会有迫不得已需要自己修改antd默认校验文案的位置的时候,可以看这篇文章。
假设,我们有一个通用渲染组件,可以渲染多种表单项,但每次仅渲染一个,取名为RenderOne
如下所示,我们的Form.Item正是在RenderOne中,他还有一个父级组件CompRender使用Form标签,指定了form=form, 定义是const form= useForm(),并return了RenderOne
// CompRender.js
{renderFromList.map((item) => {
            return (
              <RenderOne
                key={item.key || item.formId}
                tag={item.tag}
                config={item}
                form={trulyForm}
                formValueMap={trulyFormValueMap}
              />
            );
          })}
// RenderOne.js
const CommonRender = commonComponent[tag]; // 这边的这个commonComponent就是引入了一个暴露所有类型组件的js对象,根据tag标签进行指定当前需要渲染的组件,以下的...dynamicProps,otherProps等等属性都是将上层组件传递进来的进行解构传递

return (
      <>
        <Form.Item
          {...dynamicProps}
          label={labelProps}
          extra={isDisabled(config) ? null : extra}
          colon={false}
          rules={isDisabled(config) ? null : setRules(config, trulyForm)}
          initialValue={formItemInitialValue}
          style={style}
          validateFirst={config?.options?.validateFirst || false}
          className={classNames(className)}
        >
          {!children ? (
            <CommonRender
              config={{ ...config, titleSubfix }} // ...config接收来自父级组件的各个Props
              formValueMap={trulyFormValueMap}
              containerId={containerId}
              form={form}
              getPopupContainer={(trigger) => trigger.parentNode}
              {...otherProps}
              {...initexpandedKeyProps}
              direction={direction}
            />
          ) : (
            children
          )}
        </Form.Item>
      </>
在以上基础上,再次假设我们有一个地址组件(就是我们上面提到的,被暴露出来的组件之一,取名为area.js),需要选择省市区并填写详细地址。并且我们是在一个Form.Item中渲染的address Cascader组件,并且在address下面再定义一个Form.Item并写入详细地址输入框组件addrDetail LimitInput,像这样:
// area.js
<Cascader
                  fieldNames={{
                    id: 'code',
                    label: 'name',
                    value: 'name',
                  }}
                  showSearch={initialShowSearch}
                  changeOnSelect={changeOnSelect}
                  options={area}
                  value={initialValue}
                  valueType={valTyp}
                  onChange={handleChanged}
                  {...optionsProps}
                  {...otherprops}
                />

                <div style={{ marginTop: mgTp }}>
                  <LimitInput
                    area
                    formItemOpts={{
                      formItemName: getFormId(),
                      rules: [
                        {
                          required:
                            config?.rules[0]?.required,
                          message: optionsProps.placeholder2,
                        },
                      ],
                    }}
                    value={detailAddr}
                    rows={3}
                    // disabled
                    placeholder={optionsProps.placeholder2}
                    style={{ wordBreak: 'break-all' }}
                    maxLength={maxLength}
                    detailIsNeed={detailIsNeed}
                  />
                </div>
// LimitInput.js
<Form.Item name={formItemOpts.formItemName} noStyle rules={formItemOpts.rules}>
        <Input.TextArea ref={cRef} {...rest} style={{ paddingBottom: 24, ...rest?.style }} />
      </Form.Item>
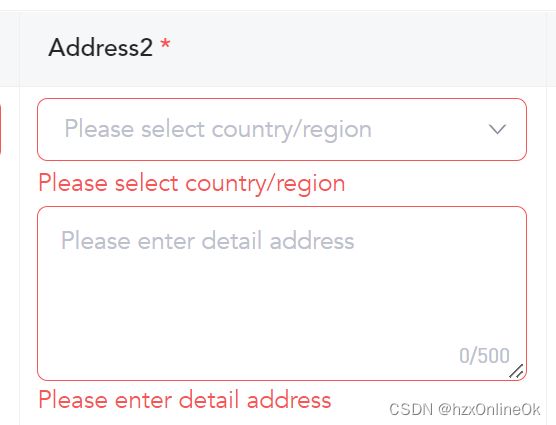
像上面这么写,默认情况下地址和详细地址的表单检验文案会放置在最底下(地址在最上方,详细地址在下方,校验文案在详细地址的底下),这个位置的原因是因为他们是父子级的formItem嵌套,现在UI要求必须让地址的表单校验文案放在地址的下面,详细地址上面。这时候就需要自己校验规则并添加自定义样式进行处理了。效果图参考如下:

以上在Form.Item标签属性中rules={isDisabled(config) ? null : setRules(config, trulyForm)},我们注意到有一个用来自定义校验规则的setRules方法:
/** 校验规则处理 */
const setRules = (config, form) => {
  const { tag, rules, cmpType, pickerType, formId } = config;

  // 给基础组件换msg
  const newRules = rules?.map((item) => {
    const attr = { ...item };
    let message = baseMessageObj[tag] || '默认校验提示语';
    return {
      ...attr,
      message,
    };
  });

  if (tag === 'Area' && config.areaFormat === 1) {
    const isRequired = rules?.[0]?.required;
    const _newRules = newRules.map((ruleItme) => {
      // 此时当前的ruleItme的数据为{ required: true, message: '请选择地区/国家' }
      ruleItme.message = ''; // 这个是重点,目的是覆盖掉antd自带的表单校验信息,如果不覆盖掉,我们就无法将自定义的校验文案设置到默认的校验文案的位置,因为会出现重复提示,被覆盖的message置空后,就不会再显示出校验文案,也不会占用一行展示空字符串校验。
      return ruleItme;
    });
    return [
      ..._newRules, // 这个配置必须继承,数据为{ required: true, message: '' }
      {
        validator: (rule, rulesValue, callback) => {
          if (isRequired) {
            if (!rulesValue?.[0]) {
              callback(
                <div className={classNames('commonAreaRuleTextPosition')}> // commonAreaRuleTextPosition这个就是我们自定义的校验文案样式
                  请选择国家/地区
                </div>,
              );
            }
          }
          callback();
        },
      },
    ];
  }

  return newRules;
};
补充一个,如何设置antd表单不触发校验时的样式,设置这个的目的是为了设置类似嵌套表单项,其中有一个是选填的,如果是自定义的组件就会被一起触发,我们需要自主控制其选填的边框、hover、focus、focused、focus-within样式。
效果如下:
(1)默认效果

(2)鼠标hover覆盖富文本框但没有点击选中

(3)鼠标点击选中富文本框
// render function
const renderTextArea = formItemOpts ? (
      <Form.Item name={formItemOpts.formItemName} noStyle rules={formItemOpts.rules}>
        <Input.TextArea ref={cRef} {...rest} style={{ paddingBottom: 24, ...rest?.style }} />
      </Form.Item>
    ) : (
      <Input.TextArea ref={cRef} {...rest} style={{ paddingBottom: 24, ...rest?.style }} />
    );
return <div className={!rest.detailIsNeed && !rest.readOnly ? `${styles.detailAddr}` : ``}>{renderTextArea}</div>

// style.less
.detailAddr {
      :global {
        .ant-input {
          border-color: #e8eaef !important;
        }
        .ant-input:hover,
        .ant-input:focus,
        .ant-input-focused {
          border-color: #82b4ff !important;
          outline: none !important;
          box-shadow: 0 0 6px rgba(0, 0, 0, 0.1) !important;
        }
        .ant-input:focus,
        .ant-input-focused {
          box-shadow: 0 0 4px #82b4ff !important;
        }
        .ant-input-affix-wrapper:focus-within {
          border-color: #82b4ff !important;
          box-shadow: 0 0 4px #82b4ff !important;
        }
      }
    }