SpringBoot Redis入门(四)——Redis单机、哨兵、集群模式
- 单机模式:单台缓存服务器,开发、测试环境下使用;
- 哨兵模式:主-从模式,提高缓存服务器的高可用和安全性。所有缓存的数据在每个节点上都一致。每个节点添加监听器,不断监听节点可用状态,一旦主节点不能再提供服务。各监听器会立即在“从节点“中投票选择一台将之作为”主节点“器。从而使业务系统服务不会被中断。当然主节点具体出了什么问题,还得运维人员排查并及时修复并上线;
- 集群模式:分布式+主从模式,具有高可用、安全性高、数据量大、并发量大等优势。一般需要6台服务器,3台主+3台从。一般在缓存数据量大或者并发访问量非常高以至于单台服务器已经无法承受这样的数据量或访问量时才考虑集群模式。集群模式中几台主服务器中的数据是不一致的,只有主和从中的数据是相同的。
在SpringBoot中使用哨兵模式和集群模式,也是不费吹灰之力。对于我们使用来说和前面单机模式没有任何区别。唯一需要做的就是告诉SbringBoot框架:这个项目我要使用哨兵模式,这个项目我要使用集群模式。如何告诉框架呢,当然是通过application.yml文件中的配置来说明:
pom.xml
<project xmlns="http://maven.apache.org/POM/4.0.0"
         xmlns:xsi="http://www.w3.org/2001/XMLSchema-instance"
         xsi:schemaLocation="http://maven.apache.org/POM/4.0.0 http://maven.apache.org/xsd/maven-4.0.0.xsd">
    <parent>
        <artifactId>lab-03-redisartifactId>
        <groupId>com.luogroupId>
        <version>1.0-SNAPSHOTversion>
    parent>
    <modelVersion>4.0.0modelVersion>

    <artifactId>lab-03-redis-06-redis-clusterartifactId>

    <properties>
        <maven.compiler.source>8maven.compiler.source>
        <maven.compiler.target>8maven.compiler.target>
    properties>

    <dependencies>

        <dependency>
            <groupId>org.springframework.bootgroupId>
            <artifactId>spring-boot-starter-webartifactId>
        dependency>


        <dependency>
            <groupId>org.springframework.bootgroupId>
            <artifactId>spring-boot-starter-data-redisartifactId>
        dependency>

        <dependency>
            <groupId>org.apache.commonsgroupId>
            <artifactId>commons-pool2artifactId>
        dependency>

        <dependency>
            <groupId>com.alibaba.fastjson2groupId>
            <artifactId>fastjson2artifactId>
            <version>2.0.34version>
        dependency>


        <dependency>
            <groupId>io.springfoxgroupId>
            <artifactId>springfox-swagger2artifactId>
            <version>2.9.2version>
        dependency>


        <dependency>
            <groupId>io.springfoxgroupId>
            <artifactId>springfox-swagger-uiartifactId>
            <version>2.9.2version>
        dependency>


        <dependency>
            <groupId>org.springframework.bootgroupId>
            <artifactId>spring-boot-starter-testartifactId>
            <scope>testscope>
        dependency>


        <dependency>
            <groupId>junitgroupId>
            <artifactId>junitartifactId>
            <version>4.12version>
            <scope>testscope>
        dependency>
    dependencies>

project>
关于使用哨兵模式的Redis缓存配置:
spring:
  profiles:
    active: cluster
---
spring:
  profiles: standalone
  # 默认使用的是lettuce框架封装的redis操作
  # 默认连接redis的s顺序: 先 Sentinel哨兵模式 -> Cluster集群 -> 单机Redis
  redis:
    host: 127.0.0.1 # 连接redis的ip
    port: 6379
    database: 0 # 连接的是redis的几号数据库
    password: 123456  # 连接redis的密码
    lettuce:
      #      连接池
      pool:
        max-wait: 100ms  # 连接的最大等待时间
        max-active: 8  # 最大连接数
        max-idle: 4 # 最大空闲连接数
        min-idle: 0 # 最小空闲连接数

---
spring:
  profiles: sentinel
  redis:
    host: 127.0.0.1 # 连接redis的ip
    port: 6379
    database: 0 # 连接的是redis的几号数据库
    password: 123456  # 连接redis的密码
    lettuce:
      #      连接池
      pool:
        max-wait: 100ms  # 连接的最大等待时间
        max-active: 8  # 最大连接数
        max-idle: 4 # 最大空闲连接数
        min-idle: 0 # 最小空闲连接数
    sentinel:
      master: mymaster  # 配置哨兵时候master的名字
      nodes:
        - 127.0.0.1:26379
        - 127.0.0.1:26380
        - 127.0.0.1:26381

---
spring:
  profiles: cluster
  redis:
    host: 127.0.0.1 # 连接redis的ip
    port: 6379
    database: 0 # 连接的是redis的几号数据库
    password: 123456  # 连接redis的密码
    lettuce:
      #      连接池
      pool:
        max-wait: 100ms  # 连接的最大等待时间
        max-active: 8  # 最大连接数
        max-idle: 4 # 最大空闲连接数
        min-idle: 0 # 最小空闲连接数
    # 配置集群
    cluster:
      nodes:
        - 127.0.0.1:6379
        - 127.0.0.1:6380
        - 127.0.0.1:6381
        - 127.0.0.1:7379
        - 127.0.0.1:7380
        - 127.0.0.1:7381
哨兵模式的配置中,特别注意:*ndes配置的是哨兵的IP和端口,并非缓存服务器的;
集群模式的配置,都是缓存服务器的IP和端口。
接下来我们验证一下哨兵模式和集群模式在使用结果上的差异;
哨兵模式
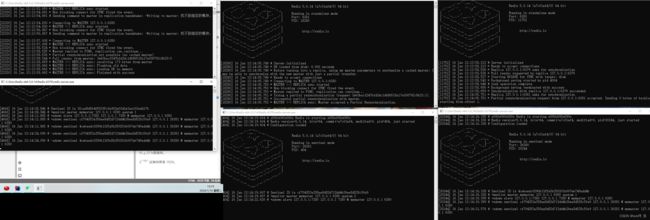
如下图所示:三台缓存服务器,每台服务都有对应哨兵;
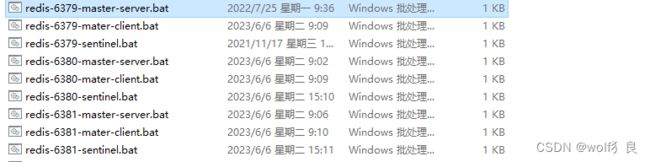
将6个服务启动后,如下图所示:
主:6380;从:6379、6381;
1、一主多从,读写分离
//测试方法
public Object getUserInfo(String username) {
if (redisTemplate.opsForValue().get(username) == null) {
System.out.println("未获取到缓存,新建用户信息.............");
Map<String, Object> user = new HashMap<>();
user.put("username", username);
user.put("usercode", "zhangsan");
user.put("sex", "男");
user.put("createtime", new Date());
redisTemplate.opsForValue().set(username, user);
}
return redisTemplate.opsForValue().get(username);
}
@Test
public void testRedis() throws InterruptedException {
System.out.println(userService.getUserInfo("1"));
System.out.println(userService.getUserInfo("2"));
System.out.println(userService.getUserInfo("3"));
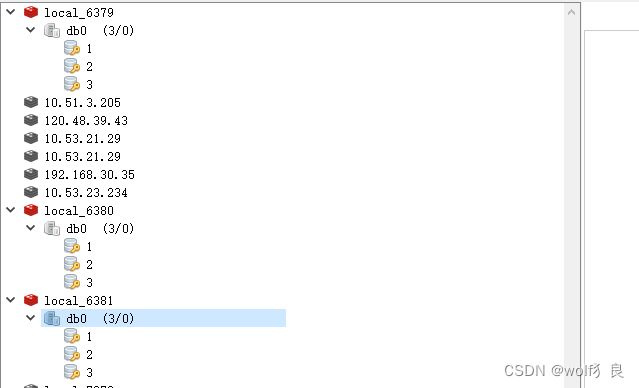
}
三台缓存服务器存储结果都是一致的,由此可见,哨兵模式是一主多从和读写分离模式。
2、主服务宕机,从服务升级主
哨兵模式另一目的就是当Master宏机后,从服务可快速自动升级为Master,不致于业务被中断。
当我们将主服务器6380停机之后,将会出现以下的内容。
三台哨兵控制台中都打印了,切换master的日志,可以看出主服务器已经变为6381这台服务器了。
对于我们的系统而言,由于缓存配置也是配置的哨兵的地址,主服务挂了之后,对于我们系统并无影响。
集群模式
集群模式一般需要6台服务器,3主3从,如下图共有6台缓存服务器。

分别启动6台服务器后,再cmd命令模式下执行一个命令,完成集群配置:
redis-cli --cluster create 127.0.0.1:6379 127.0.0.1:6380 127.0.0.1:6381 127.0.0.1:7379 127.0.0.1:7380 127.0.0.1:7381 --cluster-replicas 1 -a 123456
集群启动后:
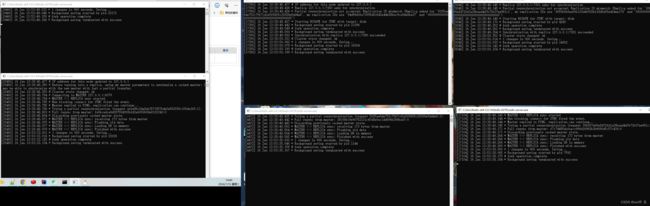
集群情况:
主:6379、6381、6380;从:7379、7380、7381;
1、分布式存储
    @Test
    public void testRedis() throws InterruptedException {
        System.out.println(userService.getUserInfo("1"));
        System.out.println(userService.getUserInfo("2"));
        System.out.println(userService.getUserInfo("20000001"));
        System.out.println(userService.getUserInfo("20200002"));
    }
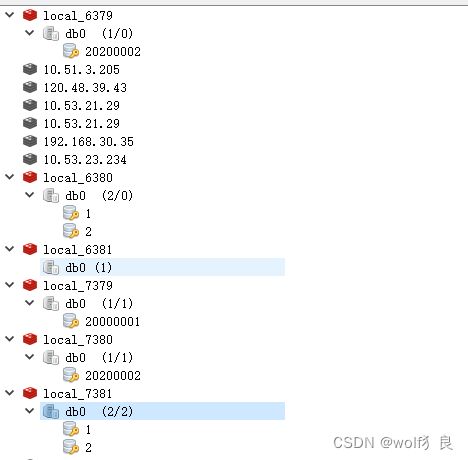
从结果看:
我们存储了4个值,1、2、2000001、20200002。
1,2------------> 主6380,从7381;
2000001----->主6381,从7379;
20200002—>主6379,从7380
2、高可用
我们关闭主节点6380,然后查看。
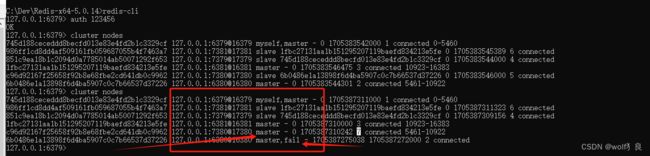
查看集群中各节点情况,6380显示fail。而7380已经变成了master节点了。
现在从缓存中读取前面缓存的4个值,虽然是异常提示:127.0.0.1:6380连接失败,但还是能获取到缓存内的值。(这里的异常是因为执行Test方法时,集群配置中有这台机器,初始化时连接不上的异常。若是一般在运行中的web项目不会出现这样的异常)

再次将6380启动起来后,6380变成了slave从节点。
6380启动日志:
[20520] 16 Jan 14:46:39.163 # Server initialized
[20520] 16 Jan 14:46:39.163 * DB loaded from append only file: 0.000 seconds
[20520] 16 Jan 14:46:39.163 * Ready to accept connections
[20520] 16 Jan 14:46:39.164 # Configuration change detected. Reconfiguring myself as a replica of c96d92167f25658f92b8e68fbe2cd641db0c9962
[20520] 16 Jan 14:46:39.164 * Before turning into a replica, using my master parameters to synthesize a cached master: I may be able to synchronize with the new master with just a partial transfer.
[20520] 16 Jan 14:46:39.165 # Cluster state changed: ok
[20520] 16 Jan 14:46:40.253 * Connecting to MASTER 127.0.0.1:7380
[20520] 16 Jan 14:46:40.253 * MASTER <-> REPLICA sync started
[20520] 16 Jan 14:46:40.256 * Non blocking connect for SYNC fired the event.
[20520] 16 Jan 14:46:40.256 * Master replied to PING, replication can continue...
[20520] 16 Jan 14:46:40.258 * Trying a partial resynchronization (request 3ce7caf46b989d9524c450b595a19e5d0c82b868:1).
[20520] 16 Jan 14:46:40.280 * Full resync from master: 609626e133d8d053640826b2da85b3789ed7ec02:5125
[20520] 16 Jan 14:46:40.280 * Discarding previously cached master state.
[20520] 16 Jan 14:46:40.419 * MASTER <-> REPLICA sync: receiving 419 bytes from master
[20520] 16 Jan 14:46:40.421 * MASTER <-> REPLICA sync: Flushing old data
[20520] 16 Jan 14:46:40.426 * MASTER <-> REPLICA sync: Loading DB in memory
[20520] 16 Jan 14:46:40.427 * MASTER <-> REPLICA sync: Finished with success
[20520] 16 Jan 14:46:40.442 * Background append only file rewriting started by pid 18008
[20520] 16 Jan 14:46:40.578 * AOF rewrite child asks to stop sending diffs.
[20520] 16 Jan 14:46:40.687 # fork operation complete
[20520] 16 Jan 14:46:40.697 * Background AOF rewrite terminated with success
[20520] 16 Jan 14:46:40.698 * Residual parent diff successfully flushed to the rewritten AOF (0.00 MB)
[20520] 16 Jan 14:46:40.700 * Background AOF rewrite finished successfully
