运维监控Zabbix部署——详细图文讲解
运维监控Zabbix部署
简介
Zabbix 由 Alexei Vladishev 创建,目前由其成立的公司—— Zabbix SIA 积极的持续开发更新维护, 并为用户提供技术支持服务。
Zabbix 是一个企业级分布式开源监控解决方案。
Zabbix 软件能够监控众多网络参数和服务器的健康度、完整性。Zabbix 使用灵活的告警机制,允许用户为几乎任何事件配置基于邮件的告警。这样用户可以快速响应服务器问题。Zabbix 基于存储的数据提供出色的报表和数据可视化功能。这些功能使得 Zabbix 成为容量规划的理想选择。
安装
安装整体步骤:
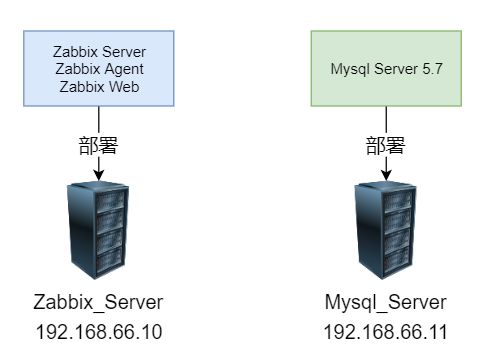
- 准备Linux 服务器(虚拟机)
- 安装Mysql
- 安装zabbix( 包含 server agent web)
- 配置 mysql, 为zabbix创建表结构
- 配置zabbix server
- 启动并开启开机自启动
安装前准备 - Mysql
安装ZabbixServer需要先安装好Mysql数据库
课程使用Mysql 5.7
安装步骤:
# 安装Mysql yum库
rpm -Uvh http://repo.mysql.com//mysql57-community-release-el7-7.noarch.rpm

# yum安装Mysql
yum -y install mysql-community-server

# 启动Mysql设置开机启动
systemctl start mysqld
systemctl enable mysqld

# 检查Mysql服务状态
systemctl status mysqld

# 第一次启动mysql,会在日志文件中生成root用户的一个随机密码,使用下面命令查看该密码
grep 'temporary password' /var/log/mysqld.log

# 修改root用户密码
mysql -u root -p -h localhost
Enter password:

mysql> ALTER USER 'root'@'localhost' IDENTIFIED BY 'Root!@#$';

# 如果你想设置简单密码,需要降低Mysql的密码安全级别
set global validate_password_policy=LOW; # 密码安全级别低
set global validate_password_length=4;	 # 密码长度最低4位即可

# 然后就可以用简单密码了(课程中使用简单密码,为了方便,生产中不要这样)
ALTER USER 'root'@'localhost' IDENTIFIED BY 'root';
mysql> grant all privileges on *.* to root@'%' identified by 'root';
安装Zabbix Server 和 Zabbix Agent
初始安装,我们先安装ZabbixServer以及在Server本机安装Agent。
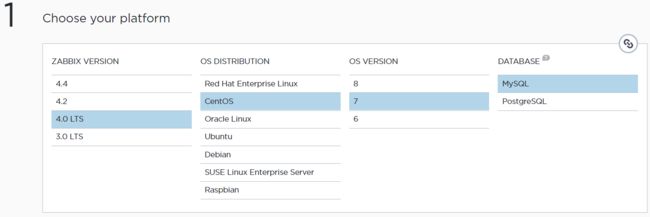
打开官网下载页面:https://www.zabbix.com/download?zabbix=4.0&os_distribution=centos&os_version=7&db=mysql
选择对应的版本,然后再下面官网给出了具体的安装命令,使用rpm和yum来进行安装。
需要有网络。
以下内容来自官方页面
a. 安装Zabbix yum库
documentation
rpm -Uvh https://repo.zabbix.com/zabbix/4.0/rhel/7/x86_64/zabbix-release-4.0-2.el7.noarch.rpm
yum clean all
b. 安装Zabbix Server、前端、Agent
yum -y install zabbix-server-mysql zabbix-web-mysql zabbix-agent
# 如果只需要安装Agent的话
yum -y install zabbix-agent
c. 初始化Mysql数据库
documentation
在Mysql中操作
# 登录Mysql 数据库
mysql -uroot -pYourPassword
mysql> create database zabbix character set utf8 collate utf8_bin;
mysql> grant all privileges on zabbix.* to zabbix@localhost identified by 'zabbix';
# 或者: grant all privileges on zabbix.* to zabbix@'%' identified by 'zabbix';
mysql> quit;
测试在Zabbix Server服务器上能否远程登录Mysql,如果可以登录继续向下走。
Import initial schema and data. You will be prompted to enter your newly created password.
# zcat /usr/share/doc/zabbix-server-mysql*/create.sql.gz | mysql -uzabbix -p zabbix
d. 为Zabbix Server配置数据库
Edit file /etc/zabbix/zabbix_server.conf
DBPassword=password
DBHost=mysql-host-ip-or-hostname
e. 配置Zabbix的PHP前端
Edit file /etc/httpd/conf.d/zabbix.conf, uncomment and set the right timezone for you.# php_value date.timezone Asia/Shanghai
Start Zabbix server and agent processes and make it start at system boot:
systemctl restart zabbix-server zabbix-agent httpd # 启动、重启
systemctl enable zabbix-server zabbix-agent httpd  # 开机自启
Now your Zabbix server is up and running!
配置zabbix 前端(WEB UI)
打开:http://192.168.88.131/zabbix
即可进入Zabbix页面,在首次打开的时候,会进入设置页面,如图:
点击下一步,会检查相应的设置是否都正常
如果一切正常,点击下一步。
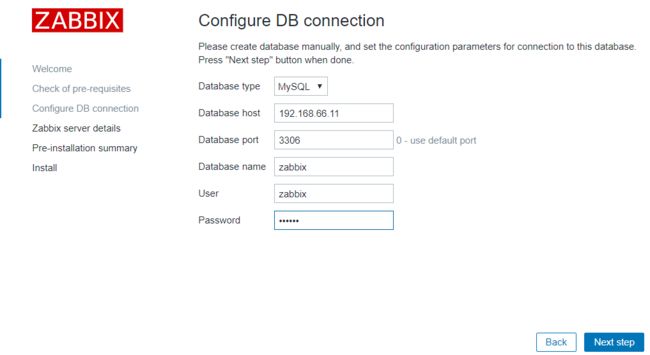
配置DB连接
按具体情况填写即可
配置Server细节
具体配置即可,Name表示这个Zabbix服务的名字,这里起名叫ITHEIMA-TEST
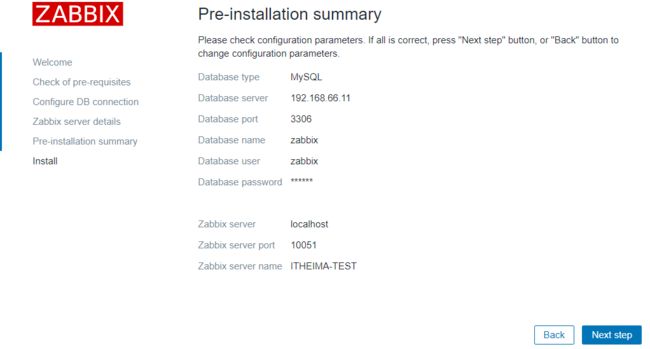
安装前总结预览
检查确认没有问题就下一步
配置完成
初始管理员账户Admin密码zabbix
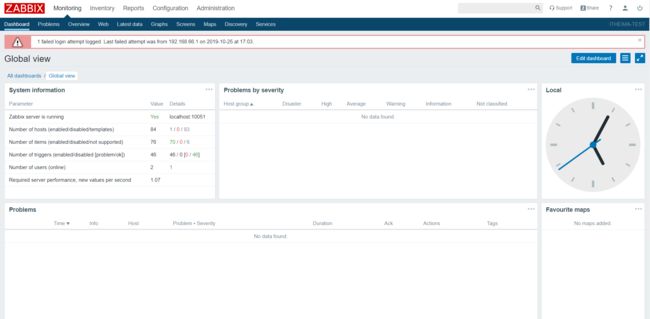
输入账户密码后,就能进入zabbix页面了。
如下图:
现在是一个崭新的zabbix等待我们去探索。
