VsCode插件开发之ChatGPT实战
基础介绍︎
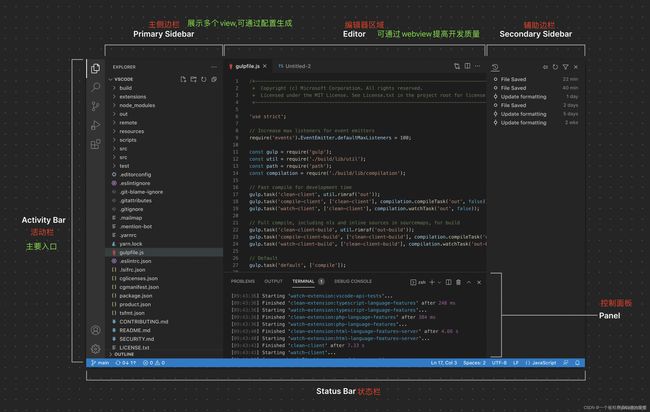
VSCode 是采用了 Electron开发的跨平台的桌面应用,它兼容 Mac、Windows 和Linux,可以构建出三个平台的应用程序,基于VSCode开发的插件,同样也能在多个平台同时运行。
VSCode布局:
插件开发
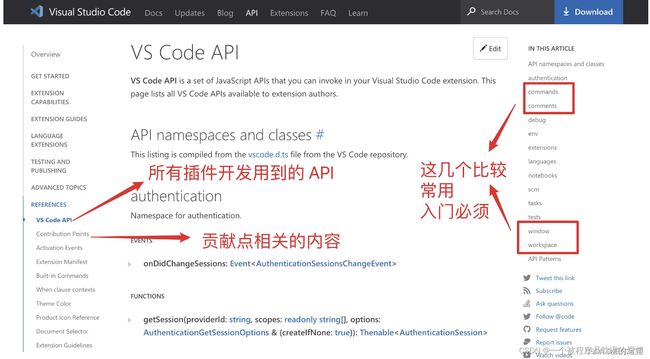
官方文档地址:https://code.visualstudio.com/api/references/vscode-api
开发环境准备
- 安装最新版本的VSCode
- 建议使用>18.0.0的node版本
- 使用官方推荐的脚手架工具Yeoman和Generator-code
- 插件打包和发布工具vsce
安装工具
全局安装
npm i -g yo generator-code
npm i -g vsce
脚手架使用✏
yo code
选择New Extension类型,然后依次填写插件名称、描述等基础信息。
package.json
{
    "name": "ai-codereview", // 插件的id
    "displayName": "ai-codereview",
    "description": "",
    "version": "0.0.1",
    "engines": { // 插件依赖的最低vscode版本
        "vscode": "^1.84.0"
    },
    "categories": [
        "Other"
    ],
    "activationEvents": [  // 激活事件
        "onCommand:ai-codereview.hellowWorld",
        "onLanguage:tsx"
    ],
    "main": "./extension.js", // 插件的主入口
    "contributes": { // 发布内容配置
        "commands": [
            {
                "command": "ai-codereview.helloWorld",
                "title": "Hello World"
            },
            {
                "command": "ai-codereview.codereview",
                "title": "AI codeReview"
            }
        ],
        "menus": {
            "editor/context": [
                {
                    "when": "editorFocus",
                    "command": "ai-codereview.codereview",
                    "group": "ai-codereview"
                }
            ]
        },
        "viewsContainers": {
            "activitybar": [
                {
                    "id": "hello",
                    "title": "hello",
                    "icon": "assets/icon.svg"
                }
            ]
        },
        "views": {
            "hello": [
                {
                    "id": "hello.view1",
                    "name": "VIEW 1"
                }
            ]
        }
    },
    "scripts": {
        "lint": "eslint .",
        "pretest": "npm run lint",
        "test": "node ./test/runTest.js"
    },
    "devDependencies": {
        "@types/vscode": "^1.84.0",
        "@types/mocha": "^10.0.3",
        "@types/node": "18.x",
        "eslint": "^8.52.0",
        "glob": "^10.3.10",
        "mocha": "^10.2.0",
        "typescript": "^5.2.2",
        "@vscode/test-electron": "^2.3.6"
    }
}
重点关注的主要有两部分内容:activationEvents以及contributes。
activationEvents:指明该插件在何种情况下才会被激活,因为只有激活后插件才能被正常使用,官网已经指明了激活的时机,具体是用的时候参照文档设置即可
- onLanguage 打开解析为特定语言文件时被激活,例如"onLanguage:python"
- onCommand 在调用命令时被激活
- onView 每当在 VS Code 侧栏中展开指定 id 的视图
- …
contributes:通过注册contributes来扩展vscode中的各项技能
运行插件✈
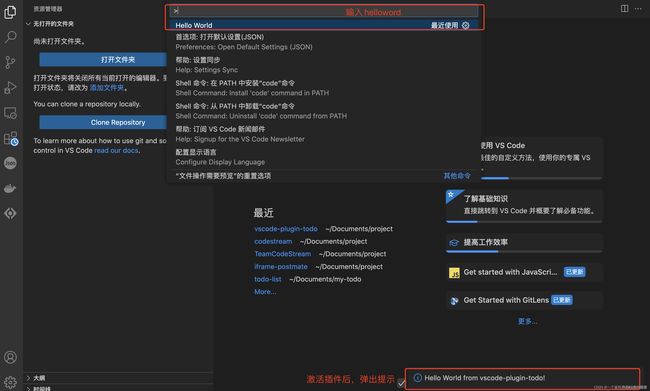
使用vscode打开插件所在目录,按下F5运行。在新打开的页面中,按command+shift+P进入[Command Palette],输入contributes.commands下配置的命令来运行插件。
打包发布
发布插件的方式有三种:
- 直接共享源文件
- 发布到插件市场
- 打包成vsix插件安装
这里只介绍第三种方式:
前面我们已经全局安装了vsce,现在只需要在插件根目录下执行vsce package即可打包插件
如果遇到Make sure to edit the README.md file before you package or publish your extension报错,请先修改完善README.md文件
打包完成后,即可安装插件或者分享给他人使用
