【MyBatis】Mybatis Generator超详细配置
配置Mybatis Generator Config
引入外部配置文件
MyBatis Generator config 是可以引入外部配置文件的,如下,路径为相对于当前配置文件的路径

代码如下,注意是配置在
配置文件中的内容如下

之后可以通过 ${xxx} 来引用外部配置文件中的值
配置context
注意是配置在
<context id="myContext" targetRuntime="MyBatis3" defaultModelType="flat">

context>
-
id : 随便填,保证多个 context id 不重复就行
-
defaultModelType : 可以不填,默认值 conditional,flat表示一张表对应一个po
-
targetRuntime :可以不填,默认值 MyBatis3,常用的还有 MyBatis3Simple,这个配置会影响生成的 dao 和 mapper.xml的内容
targetRuntime = MyBatis3Simple,生成的 dao 和 mapper.xml 如下,接口会少很多,只包含最最常用的。
唯一需要注意的就是targetRuntime的值,该配置成什么看个人喜好。
context的子元素
上一节只是配置了 context 节点, context 里面还有子元素需要配置。
context的子元素必须按照以下给出的个数、顺序配置。(是的,没错 MyBatis Generator 对配置的循序还有要求)
- property (0…N)
- plugin (0…N)
- commentGenerator (0 or 1)
- jdbcConnection (需要connectionFactory 或 jdbcConnection)
- javaTypeResolver (0 or 1)
- javaModelGenerator (至少1个)
- sqlMapGenerator (0 or 1)
- javaClientGenerator (0 or 1)
- table (1…N)
plugin
配置一个插件,例如
<plugin type="org.mybatis.generator.plugins.EqualsHashCodePlugin"/>
这个插件给生成的Java模型对象增加了equals和hashCode方法
commentGenerator
commentGenerator 用来配置生成的注释。默认是生成注释的,并且会生成时间戳。
如果你想要保留注释和时间戳,可以不配置 commentGenerator。如果你不想保留时间戳,需要如下配置
<commentGenerator>

    <property name="suppressDate" value="true"/>
commentGenerator>
默认生成的注释是不会有 db 表中字段的注释,如果你想知道每个字段在数据库中的含义(前提是数据库中对应表的字段你添加了注释),可以如下配置
<commentGenerator>

    <property name="addRemarkComments" value="true"/>
commentGenerator>
但说实话,MyBatis Generator 生成注释无用信息太多了,所以我一般都选择不生成注释
<commentGenerator>

    <property name="suppressAllComments" value="true"/>
commentGenerator>
jdbcConnection
MyBatis Generator 需要链接数据库,所以需要配置 jdbcConnection,具体如下
<jdbcConnection driverClass="com.mysql.cj.jdbc.Driver"
                connectionURL="jdbc:mysql://localhost:3306/wtushop?serverTimezone=Asia/Shanghai"
                userId="root"
                password="123456">

    <property name="nullCatalogMeansCurrent" value="true"/>
jdbcConnection>
这里面值得注意的是

javaTypeResolver
javaTypeResolver 是配置 JDBC 与 java 的类型转换规则,或者你也可以不用配置,使用它默认的转换规则。
就算配置也只能配置 bigDecimal 类型和时间类型的转换
<javaTypeResolver>

    <property name="forceBigDecimals" value="true"/>

    <property name="useJSR310Types" value="true"/>
javaTypeResolver>
javaModelGenerator
配置 pojo 生成的包路径和项目路径,如下
<javaModelGenerator targetPackage="wtushop.pojo" targetProject="src/main/java">


    <property name="trimStrings" value="true"/>
javaModelGenerator>

“数据库名” 的文件夹,生成的 po 会放在该文件夹下,也就是说会多一层目录,用的上的可以配置
sqlMapGenerator
配置 Mapper.xml 文件的生成目录
<sqlMapGenerator targetPackage="mapper" targetProject="src/main/resources">

sqlMapGenerator>
javaClientGenerator
配置 XxxMapper.java 文件的生成目录
<javaClientGenerator targetPackage="wtushop.dao" targetProject="src/main/java" type="XMLMAPPER">

javaClientGenerator>
type="XMLMAPPER" 会将接口的实现放在 mapper.xml中,也推荐这样配置。
也可以设置 type 为其他值,比如 type="ANNOTATEDMAPPER",接口的实现通过注解写在接口上面。如果采用这种方式,不会生成 mapper.xml 也不用配置 type配置成XMLMAPPER
table
一个 table 对应一张表,如果想同时生成多张表,需要配置多个 table
<table schema="" tableName="admin" domainObjectName="Admin"
       enableCountByExample="true" enableDeleteByExample="true" enableSelectByExample="true"
       enableUpdateByExample="true" selectByExampleQueryId="true">


table>
<table schema="" tableName="userinfo" domainObjectName="UserInfo"
       enableCountByExample="true" enableDeleteByExample="true" enableSelectByExample="true"
       enableUpdateByExample="true" selectByExampleQueryId="true">


table>
<table schema="" tableName="category" domainObjectName="Category"
       enableCountByExample="true" enableDeleteByExample="true" enableSelectByExample="true"
       enableUpdateByExample="true" selectByExampleQueryId="true">


table>
<table schema="" tableName="goods" domainObjectName="Goods"
       enableCountByExample="true" enableDeleteByExample="true" enableSelectByExample="true"
       enableUpdateByExample="true" selectByExampleQueryId="true">


table>
其中 domainObjectName 不配置时,它会按照帕斯卡命名法将表名转换成类名
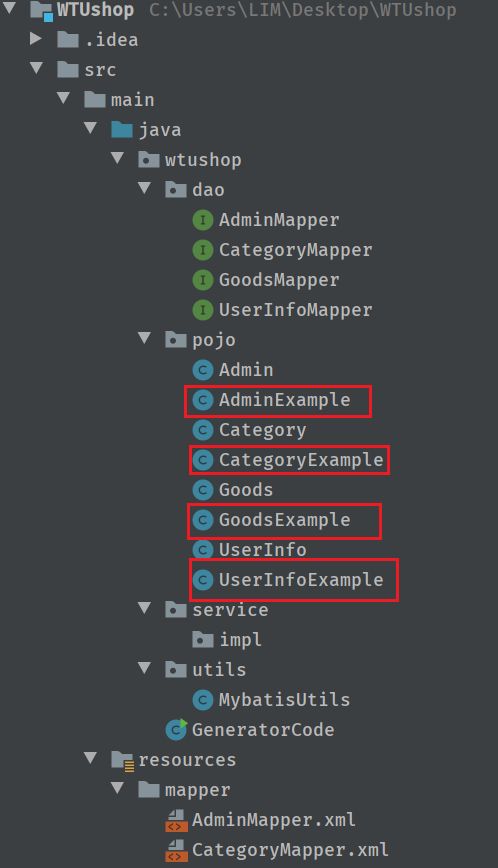
enableXXXByExample 默认为true,但只有在targetRuntime="MyBatis3"时才生效
生效时,会在pojo下多生成一个 XxxExample.java 的文件,如下
整体配置
DOCTYPE generatorConfiguration
        PUBLIC "-//mybatis.org//DTD MyBatis Generator Configuration 1.0//EN"
        "http://mybatis.org/dtd/mybatis-generator-config_1_0.dtd">

<generatorConfiguration>


    <context id="myContext" targetRuntime="MyBatis3" defaultModelType="flat">


        <commentGenerator>

            <property name="suppressAllComments" value="true"/>


        commentGenerator>


        <jdbcConnection driverClass="com.mysql.cj.jdbc.Driver"
                        connectionURL="jdbc:mysql://localhost:3306/wtushop?serverTimezone=Asia/Shanghai"
                        userId="root"
                        password="123456">

            <property name="nullCatalogMeansCurrent" value="true"/>
        jdbcConnection>


        <javaTypeResolver>

            <property name="forceBigDecimals" value="true"/>


        javaTypeResolver>


        <javaModelGenerator targetPackage="wtushop.pojo" targetProject="src/main/java">


            <property name="trimStrings" value="true"/>
        javaModelGenerator>


        <sqlMapGenerator targetPackage="mapper" targetProject="src/main/resources">

        sqlMapGenerator>


        <javaClientGenerator targetPackage="wtushop.dao" targetProject="src/main/java" type="XMLMAPPER">

        javaClientGenerator>


        <table schema="" tableName="admin" domainObjectName="Admin"
               enableCountByExample="true" enableDeleteByExample="true" enableSelectByExample="true"
               enableUpdateByExample="true" selectByExampleQueryId="true">


        table>
        <table schema="" tableName="userinfo" domainObjectName="UserInfo"
               enableCountByExample="true" enableDeleteByExample="true" enableSelectByExample="true"
               enableUpdateByExample="true" selectByExampleQueryId="true">


        table>
        <table schema="" tableName="category" domainObjectName="Category"
               enableCountByExample="true" enableDeleteByExample="true" enableSelectByExample="true"
               enableUpdateByExample="true" selectByExampleQueryId="true">


        table>
        <table schema="" tableName="goods" domainObjectName="Goods"
               enableCountByExample="true" enableDeleteByExample="true" enableSelectByExample="true"
               enableUpdateByExample="true" selectByExampleQueryId="true">


        table>
    context>
generatorConfiguration>
使用方式
1.Mybatis Generator 插件方式
1.引入Mybatis Generator插件
在pom的根节点下添加一下配置
<build>
    <plugins>
        <plugin>
            <groupId>org.mybatis.generatorgroupId>
            <artifactId>mybatis-generator-maven-pluginartifactId>
            <version>1.3.7version>
        plugin>
    <plugins>
build>
2.配置 MyBatis Generator 插件
光引入 MyBatis Generator 插件还不行,还得配置 MyBatis Generator插件
配置 MyBatis Generator config 文件路径
MyBatis Generator 插件需要根据一个 MyBatis Generator config 文件,来具体运行。配置如下,版本我用的是目前最新的版本 1.3.7
<build>
  <plugins>
      <plugin>
          <groupId>org.mybatis.generatorgroupId>
          <artifactId>mybatis-generator-maven-pluginartifactId>
          <version>1.3.7version>
          <configuration>

              <configurationFile>src/main/resources/generatorConfig.xmlconfigurationFile>           		   configuration>
     plugin>
 <plugins>
build>
注意,这个路径是你的配置文件相对于该 pom 文件的路径
允许覆盖生成的文件
有时候我们的数据库表添加了新字段,需要重新生成对应的文件。常规做法是手动删除旧文件,然后在用 MyBatis Generator 生成新文件。当然你也可以选择让 MyBatis Generator 覆盖旧文件,省下手动删除的步骤。
配置如下
<build>
  <plugins>
      <plugin>
          <groupId>org.mybatis.generatorgroupId>
          <artifactId>mybatis-generator-maven-pluginartifactId>
          <version>1.3.7version>
          <configuration>

              <configurationFile>src/main/resources/generatorConfig.xmlconfigurationFile>

              <overwrite>trueoverwrite>
          configuration>
     plugin>
 <plugins>
build>
值得注意的是,MyBatis Generator 只会覆盖旧的 po、dao、而 *mapper.xml 不会覆盖,而是追加,这样做的目的是防止用户自己写的 sql 语句一不小心都被 MyBatis Generator 给覆盖了
添加数据库驱动依赖
MyBatis Generator 需要链接数据库,肯定是需要对应数据库驱动的依赖的。
如下,给 MyBatis Generator 添加数据库驱动依赖
<build>
  <plugins>
      <plugin>
          <groupId>org.mybatis.generatorgroupId>
          <artifactId>mybatis-generator-maven-pluginartifactId>
          <version>1.3.7version>
          <configuration>

              <configurationFile>src/main/resources/generatorConfig.xmlconfigurationFile>

              <overwrite>trueoverwrite>
          configuration>
          <dependencies>

                <dependency>
                    <groupId>mysqlgroupId>
                    <artifactId>mysql-connector-javaartifactId>
                    <version>8.0.17version>
                dependency>
          dependencies>
     plugin>
 <plugins>
build>
我用的数据库是 mysql ,其他数据库同理。注意数据库驱动的版本号,不同的版本对应的 MyBatis Generator 配置有些许不同。
大部分情况下,我们的项目中已经配置过了对应数据库的JDBC驱动。现在在插件中又配置一次,感觉有些冗余,maven 提供了 includeCompileDependencies 属性,让我们在插件中引用 dependencies 的依赖,这样就不需要重复配置了。
配置如下
<build>
  <plugins>
      <plugin>
          <groupId>org.mybatis.generatorgroupId>
          <artifactId>mybatis-generator-maven-pluginartifactId>
          <version>1.3.7version>
          <configuration>

              <configurationFile>src/main/resources/generatorConfig.xmlconfigurationFile>

              <overwrite>trueoverwrite>

              <includeCompileDependencies>trueincludeCompileDependencies>
          configuration>
     plugin>
 <plugins>
build>
添加其他依赖
一般配置了 includeCompileDependencies 后就不需要配置其他依赖了,因为 includeCompileDependencies 会将当前 pom 的 dependencies 中所以 Compile 期的依赖全部添加到生成器的类路径中。
但有的人不想配置 includeCompileDependencies ,或者想在MyBatis Generator插件中使用另一个版本的依赖,就可以配置 dependencies
另外,我看到网上大部分文章都会配置 mybatis-generator-core 这个依赖,但是 MyBatis Generator 官网的案例中都没有提到说要配置这个依赖,我没有配置,并且可以正常使用 MyBatis Generator。
2. java代码方式
1.引入Mybatis Generator Core的依赖
<dependency>
    <groupId>org.mybatis.generatorgroupId>
    <artifactId>mybatis-generator-coreartifactId>
    <version>1.4.0version>
dependency>
2.编写java代码
package wtushop;

import org.mybatis.generator.api.MyBatisGenerator;
import org.mybatis.generator.config.Configuration;
import org.mybatis.generator.config.xml.ConfigurationParser;
import org.mybatis.generator.internal.DefaultShellCallback;

import java.io.File;
import java.util.ArrayList;
import java.util.List;

/**
 * @Package wtushop
 * @ClassName GeneratorCode
 * @Description TODO
 * @Date 20/7/24 17:41
 * @Author krislin
 * @Version V1.0
 */
public class GeneratorCode {
    public static void main(String[] args) {
        try {
            List<String> warnings = new ArrayList<String>();
            boolean overwrite = true;
            File configFile = new File("src/main/resources/generatorConfig.xml");
            ConfigurationParser cp = new ConfigurationParser(warnings);
            Configuration config = cp.parseConfiguration(configFile);
            DefaultShellCallback callback = new DefaultShellCallback(overwrite);
            MyBatisGenerator myBatisGenerator = new MyBatisGenerator(config, callback, warnings);
            myBatisGenerator.generate(null);
            System.out.println("Generator Code Success!");
        }catch (Exception e){
            e.printStackTrace();
        }
    }
}