DAY03_Spring—自动装配&注解模式&优化XML文件
目录
- 1 Spring注解模式
-
- 1.1 自动装配
-
- 1.1.1 说明
- 1.1.2 配置规则
- 1.2 注解模式
-
- 1.2.1 关于注解的说明
- 1.2.2 注解使用原理
- 1.2.3 编辑配置文件
- 1.2.4 属性注解
- 1.3 实现MVC结构的纯注解开发
-
- 1.3.1 编写java代码
- 1.3.2 编辑xml配置文件
- 1.3.3 编写测试类
- 1.3.4 关于注解说明
- 1.3.5 关于Spring工厂模式说明
- 1.4 优化xml配置文件
-
- 1.4.1配置类介绍
- 1.4.2编辑配置类
- 1.4.3 编辑测试代码
- 1.5 Spring注解模式执行过程
- 1.6 Spring中常见问题
-
- 1.6.1 接口多实现类情况说明
- 1.6.2 案例分析
- 1.7 Spring容器管理业务数据@Bean注解
-
- 1.7.1 @Bean作用
- 1.7.2 编辑UserController
- 1.8 Spring动态获取外部数据
-
- 1.8.1 编辑properties文件
- 1.8.2 编辑配置类
1 Spring注解模式
1.1 自动装配
1.1.1 说明
Spring基于配置文件 为了让属性(对象的引用)注入更加的简单.则推出了自动装配模式.
- 根据名称自动装配
- 根据类型自动装配
1.1.2 配置规则
<beans xmlns="http://www.springframework.org/schema/beans"
       xmlns:xsi="http://www.w3.org/2001/XMLSchema-instance"
       xsi:schemaLocation="http://www.springframework.org/schema/beans http://www.springframework.org/schema/beans/spring-beans.xsd">


    <bean id="user" class="com.jt.pojo.User">

        <property name="id" value="100"/>

        <property name="name">
            <value>]]>value>
        property>
    bean>


    <bean id="userDao" class="com.jt.dao.UserDaoImpl"/>


    <bean id="userService" class="com.jt.service.UserServiceImpl" autowire="byName">

    bean>


    <bean id="userController" class="com.jt.controller.UserController" autowire="byType">

    bean>
beans>
1.2 注解模式
1.2.1 关于注解的说明
Spring为了简化xml配置方式,则研发注解模式.
Spring为了程序更加的严谨,通过不同的注解标识不同的层级 但是注解的功能一样
- @Controller
- 用来标识Controller层的代码 相当于将对象交给Spring管理
- @Service
- 用来标识Service层代码
- @Repository
- 用来标识持久层
- @Component
- 万用注解
1.2.2 注解使用原理
/**
* 1.2.3 编辑配置文件
<beans xmlns="http://www.springframework.org/schema/beans"
       xmlns:context="http://www.springframework.org/schema/context"
       xmlns:xsi="http://www.w3.org/2001/XMLSchema-instance"
       xsi:schemaLocation="http://www.springframework.org/schema/beans http://www.springframework.org/schema/beans/spring-beans.xsd
                           http://www.springframework.org/schema/context http://www.springframework.org/schema/context/spring-context.xsd">


    <bean id="user" class="com.jt.pojo.User">
        <property name="id" value="100">property>
        <property name="name">
            <value>]]>value>
        property>
    bean>


    <context:component-scan base-package="com.jt">context:component-scan>


    <context:component-scan base-package="com.jt" use-default-filters="false">

        <context:include-filter type="annotation" expression="org.springframework.stereotype.Controller"/>
    context:component-scan>


    <context:component-scan base-package="com.jt">

       <context:exclude-filter type="annotation" expression="org.springframework.stereotype.Controller"/>
    context:component-scan>
beans>
1.2.4 属性注解
- @Autowired: 可以根据类型/属性名称进行注入 首先按照类型进行注入如果类型注入失败,则根据属性名称注入
- @Qualifier: 如果需要按照名称进行注入,则需要额外添加@Qualifier
- @Resource(type = “xxx.class”,name=“属性名称”)
- 关于注解补充:
- 由于@Resource注解 是由java原生提供的,不是Spring官方的.所以不建议使用
上述的属性的注入在调用时 自动的封装了Set方法,所以Set方法可以省略不写
import com.jt.dao.UserDao;
import com.jt.pojo.User;
import org.springframework.stereotype.Service;

@Service
public class UserServiceImpl implements UserService{
    @Autowired
    private UserDao userDao;//基于Spring注入dao  面向接口编程

   // public void setUserDao(UserDao userDao) {
   //     this.userDao = userDao;
   //}

    @Override
    public void addUser(User user) {
        String name = user.getName() + "加工数据";
        user.setName(name);
        userDao.addUser(user);
    }
}
1.3 实现MVC结构的纯注解开发
1.3.1 编写java代码
public class User {
    //自动装配不能注入简单属性
    private Integer id;
    private String username;

    public Integer getId() {
        return id;
    }

    public void setId(Integer id) {
        this.id = id;
    }

    public String getUsername() {
        return username;
    }

    public void setUsername(String username) {
        this.username = username;
    }

    @Override
    public String toString() {
        return "User{" +
                "id=" + id +
                ", username='" + username + '\'' +
                '}';
    }
}
import com.jt.pojo.User;

public interface UserDao {
    void addUser(User user);
}
import com.jt.pojo.User;
import org.springframework.stereotype.Repository;

@Repository
public class UserDaoImpl implements UserDao {
    @Override
    public void addUser(User user) {
        System.out.println("新增用户的数据" + user);
    }
}
import com.jt.pojo.User;

public interface UserService {
    void addUser(User user);
}
import com.jt.dao.UserDao;
import com.jt.pojo.User;
import org.springframework.beans.factory.annotation.Autowired;
import org.springframework.stereotype.Service;

@Service
public class UserServiceImpl implements UserService {
    @Autowired //根据类型进行注入 如需要根据属性名称注入需要添加@Qualifier注解————必须按照名称进行匹配
    private UserDao userDao;
    @Override
    public void addUser(User user) {
        userDao.addUser(user);
    }
}
import com.jt.pojo.User;
import com.jt.service.UserService;
import org.springframework.beans.factory.annotation.Autowired;
import org.springframework.stereotype.Controller;

@Controller
public class UserController {
    @Autowired
    private UserService userService;

    public void addUser() {
        User user = new User();
        user.setId(101);
        user.setUsername("王昭君|不知火舞");
        userService.addUser(user);
    }
}
1.3.2 编辑xml配置文件
<beans xmlns="http://www.springframework.org/schema/beans"
       xmlns:context="http://www.springframework.org/schema/context"
       xmlns:xsi="http://www.w3.org/2001/XMLSchema-instance"
       xsi:schemaLocation="http://www.springframework.org/schema/beans http://www.springframework.org/schema/beans/spring-beans.xsd
                           http://www.springframework.org/schema/context http://www.springframework.org/schema/context/spring-context.xsd">


   <context:component-scan base-package="com.jt"/>
beans>
1.3.3 编写测试类
@Test
    public void test01(){
        ApplicationContext context = new ClassPathXmlApplicationContext("application.xml");
        UserController userController = context.getBean(UserController.class);
        userController.addUser();
    }
- 测试结果
1.3.4 关于注解说明
- 注解作用
- 一些复杂的程序 以一种低耦合度的形式进行调用
- 元注解:
- @Target({ElementType.TYPE}) 标识注解对谁有效 type:类 method:方法有效
- @Retention(RetentionPolicy.RUNTIME) 运行期有效(大)
- @Documented 该注解注释编译到API文档中.
- 由谁加载
1.3.5 关于Spring工厂模式说明
- Spring源码中创建对象都是采用工厂模式
- 接口:BeanFactory(顶级接口)
- Spring开发中需要手动的创建对象时
- 一般采用 FactoryBean(业务接口)
- 关于bean对象注入问题说明 一般需要检查注解是否正确配置
警告: Exception encountered during context initialization - cancelling refresh attempt: org.springframework.beans.factory.UnsatisfiedDependencyException: Error creating bean with name 'userController': Unsatisfied dependency expressed through field 'userService'; nested exception is org.springframework.beans.factory.NoSuchBeanDefinitionException: No qualifying bean of type 'com.jt.service.UserService' available: expected at least 1 bean which qualifies as autowire candidate. Dependency annotations: {@org.springframework.beans.factory.annotation.Autowired(required=true)}

org.springframework.beans.factory.UnsatisfiedDependencyException: Error creating bean with name 'userController': Unsatisfied dependency expressed through field 'userService'; nested exception is org.springframework.beans.factory.NoSuchBeanDefinitionException: No qualifying bean of type 'com.jt.service.UserService' available: expected at least 1 bean which qualifies as autowire candidate. Dependency annotations: {@org.springframework.beans.factory.annotation.Autowired(required=true)}
1.4 优化xml配置文件
1.4.1配置类介绍
随着软件技术发展,xml配置文件显得臃肿 不便于操作,所以Spring后期提出了配置类的思想
将所有的配置文件中的内容,写到java类中.
1.4.2编辑配置类
import org.springframework.context.annotation.ComponentScan;
import org.springframework.context.annotation.Configuration;

@Configuration //标识我是一个配置类 相当于application.xml
@ComponentScan("com.jt") //如果注解中只有value属性 则可以省略
public class SpringConfig {

}
1.4.3 编辑测试代码
@Test
    public void testAnno(){
        ApplicationContext context = new AnnotationConfigApplicationContext(SpringConfig.class);
        UserController userController = context.getBean(UserController.class);
        userController.addUser();
    }
- 测试结果
1.5 Spring注解模式执行过程
- 当程序启动Spring容器时 AnnotationConfigApplicationContext 利用beanFactory实例化对象
- 根据配置类中的包扫描开始加载指定的注解(4个). 根据配置文件的顺序依次进行加载

- 当程序实例化Controller时,由于缺少Service对象,所以挂起线程 继续执行后续逻辑.
当构建Service时,由于缺少Dao对象,所以挂起线程 继续执行后续逻辑.
当实例化Dao成功时,保存到Spring所维护的Map集合中. 执行之前挂起的线程.
所以以此类推 所有对象实现封装.最终容器启动成功

- 根据指定的注解/注入指定的对象.之后统一交给Spring容器进行管理.最终程序启动成功.
1.6 Spring中常见问题
1.6.1 接口多实现类情况说明
Spring中规定 一个接口最好只有一个实现类.
- 业务需求:
- 要求给UserService接口提供2个实现类.
1.6.2 案例分析
import com.jt.pojo.User;
import com.jt.service.UserService;
import org.springframework.beans.factory.annotation.Autowired;
import org.springframework.beans.factory.annotation.Qualifier;
import org.springframework.stereotype.Controller;

@Controller
public class UserController {
    /**
     * @Autowired: 首先根据属性的类型进行注入,
     * 如果类型不能匹配,则根据属性的名称进行注入.
     * 如果添加了@Qualifier("userServiceA") 则根据属性名称注入
     * 如果名称注入失败,则报错返回.
     */
    @Autowired
    @Qualifier("userServiceB")
    private UserService userService;

    public void addUser() {
        User user = new User();
        user.setId(101);
        user.setUsername("王昭君|不知火舞");
        userService.addUser(user);
    }
}
1.7 Spring容器管理业务数据@Bean注解
1.7.1 @Bean作用
通过该注解,可以将业务数据实例化之后,交给Spring容器管理. 但是@Bean注解应该写到配置类中.
import com.jt.pojo.User;
import org.springframework.context.annotation.Bean;
import org.springframework.context.annotation.ComponentScan;
import org.springframework.context.annotation.Configuration;
@Configuration //标识我是一个配置类 相当于application.xml
@ComponentScan("com.jt") //如果注解中只有value属性 则可以省略
public class SpringConfig {
/*
1.Spring配置文件写法 1.7.2 编辑UserController
import com.jt.pojo.User;
import com.jt.service.UserService;
import org.springframework.beans.factory.annotation.Autowired;
import org.springframework.beans.factory.annotation.Qualifier;
import org.springframework.stereotype.Controller;

@Controller
public class UserController {
    /**
     * @Autowired: 首先根据属性的类型进行注入,
     * 如果类型不能匹配,则根据属性的名称进行注入.
     * 如果添加了@Qualifier("userServiceA") 则根据属性名称注入
     * 如果名称注入失败,则报错返回.
     */
    @Autowired
    @Qualifier("userServiceA")
    private UserService userService;
    @Autowired
    private User user;  //从容器中动态获取

    public void addUser() {
        userService.addUser(user);
    }
}
- 测试结果
1.8 Spring动态获取外部数据
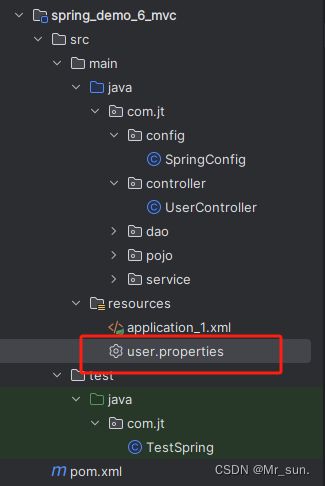
1.8.1 编辑properties文件
# 规则: properties文件
# 数据结构类型:  k-v结构
# 存储数据类型:  只能保存String类型
# 加载时编码格式: 默认采用ISO-8859-1格式解析 中文必然乱码
user.id=1001
# Spring容器获取的当前计算机的名称 所以user.name慎用
# user.name=你好啊哈哈哈
user.username=鲁班七号
1.8.2 编辑配置类
- @PropertySource
- 用法:
- @PropertySource(“classpath:/user.properties”)
- 说明:
- @PropertySource 作用: 加载指定的pro配置文件 将数据保存到Spring容器中
- 用法:
- @Value
java @Value(123) 将123值赋值给Id @Value("${user.id}") 在Spring容器中查找key=user.id的数据.通过${}语法获取
import com.jt.pojo.User;
import org.springframework.beans.factory.annotation.Value;
import org.springframework.context.annotation.Bean;
import org.springframework.context.annotation.ComponentScan;
import org.springframework.context.annotation.Configuration;
import org.springframework.context.annotation.PropertySource;
@Configuration //标识我是一个配置类 相当于application.xml
@ComponentScan("com.jt") //如果注解中只有value属性 则可以省略
//@PropertySource 作用: 加载指定的pro配置文件 将数据保存到Spring容器中
//encoding:指定字符集编码格式
@PropertySource(value = "classpath:/user.properties",encoding = "UTF-8")
public class SpringConfig {
//定义对象属性 准备接收数据
//@Value(123) 将123值赋值给Id
//@Value("${user.id}") 在Spring容器中查找key=user.id的数据.通过${} 进行触发 @Value("${user.id}")
@Value("${user.id}")
private Integer id;
@Value("${user.username}")
private String username;
/*
1.Spring配置文件写法 - 测试结果


