SpringMVC父子容器源码分析
书接上文
文章目录
-
- 一、 Spring整合SpringMVC
-
- 1. Spring整合SpringMVC案例分析
- 2. Spring和SpringMVC父子容器的关系
- 3. SPI机制详解
- 二、 源码分析
-
- 1. 注册父子容器
- 2. 加载父子容器
一、 Spring整合SpringMVC
1. Spring整合SpringMVC案例分析
Spring框架和Spring MVC框架是Java开发中常用的两个框架,它们可以很好地结合使用,提供了一个强大而灵活的开发环境。下面是一个简单的案例分析,演示如何整合Spring和Spring MVC。
- 主配置类
// AppConfig.java
@Configuration
@ComponentScan(basePackages = "com.example")
@EnableWebMvc
public class AppConfig {

    @Bean
    public InternalResourceViewResolver viewResolver() {
        InternalResourceViewResolver resolver = new InternalResourceViewResolver();
        resolver.setPrefix("/WEB-INF/views/");
        resolver.setSuffix(".jsp");
        return resolver;
    }

    // 其他配置项,如数据源、事务管理等

}
- SpringMVC控制器
// AppConfig.java
@Configuration
@ComponentScan(basePackages = "com.example")
@EnableWebMvc
public class AppConfig {

    @Bean
    public InternalResourceViewResolver viewResolver() {
        InternalResourceViewResolver resolver = new InternalResourceViewResolver();
        resolver.setPrefix("/WEB-INF/views/");
        resolver.setSuffix(".jsp");
        return resolver;
    }

    // 其他配置项,如数据源、事务管理等

}
- 启动类,初始化Spring容器
// AppConfig.java
@Configuration
@ComponentScan(basePackages = "com.example")
@EnableWebMvc
public class AppConfig {

    @Bean
    public InternalResourceViewResolver viewResolver() {
        InternalResourceViewResolver resolver = new InternalResourceViewResolver();
        resolver.setPrefix("/WEB-INF/views/");
        resolver.setSuffix(".jsp");
        return resolver;
    }

    // 其他配置项,如数据源、事务管理等

}
- web.xml
<web-app xmlns="http://xmlns.jcp.org/xml/ns/javaee"
         xmlns:xsi="http://www.w3.org/2001/XMLSchema-instance"
         xsi:schemaLocation="http://xmlns.jcp.org/xml/ns/javaee http://xmlns.jcp.org/xml/ns/javaee/web-app_4_0.xsd"
         version="4.0">


    <listener>
        <listener-class>org.springframework.web.context.ContextLoaderListenerlistener-class>
    listener>

    <context-param>
        <param-name>contextConfigLocationparam-name>
        <param-value>classpath:spring-core.xmlparam-value>
    context-param>


    <servlet>
        <servlet-name>springmvcservlet-name>
        <servlet-class>org.springframework.web.servlet.DispatcherServletservlet-class>

        <init-param>
            <param-name>contextConfigLocationparam-name>
            <param-value>classpath:spring-mvc.xmlparam-value>
        init-param>
        <load-on-startup>1load-on-startup>
        <async-supported>trueasync-supported>
    servlet>

    <servlet-mapping>
        <servlet-name>springmvcservlet-name>
        <url-pattern>/url-pattern>
    servlet-mapping>

web-app>
org.springframework.web.context.ContextLoaderListener是Spring框架提供的监听器,用于在Web应用程序启动时加载Spring的根应用上下文(Root ApplicationContext)。它负责初始化和销毁Spring容器,使得在整个Web应用程序的生命周期中,Spring容器能够管理和提供各种Bean,包括服务层、数据访问层等组件。通过该监听器,可以确保在Web应用程序启动时,Spring容器得以正确初始化,以便在整个应用程序中共享和管理Bean实例。
org.springframework.web.servlet.DispatcherServlet是Spring MVC框架的前端控制器,负责接收和分发所有进入应用程序的HTTP请求。作为中央调度器,它根据配置将请求分发给相应的控制器,处理请求的解析、控制器的执行以及视图的渲染,起到了统一调度和管理的作用,是Spring MVC应用程序的核心组件。通过配置,可以灵活指定其行为,包括控制器的位置、视图解析器等,从而实现对请求处理流程的定制和扩展。
2. Spring和SpringMVC父子容器的关系
在Spring框架中,父子容器的概念是常见的,而在Spring MVC中也可以利用父子容器的机制来组织应用程序的架构。以下是关于Spring MVC和Spring父子容器的一些概念:
Spring容器: Spring框架中的核心组件是Spring容器,它负责管理和组织应用程序中的Bean。Spring容器主要分为两种:应用上下文(Application Context)和父上下文(Parent Context)。
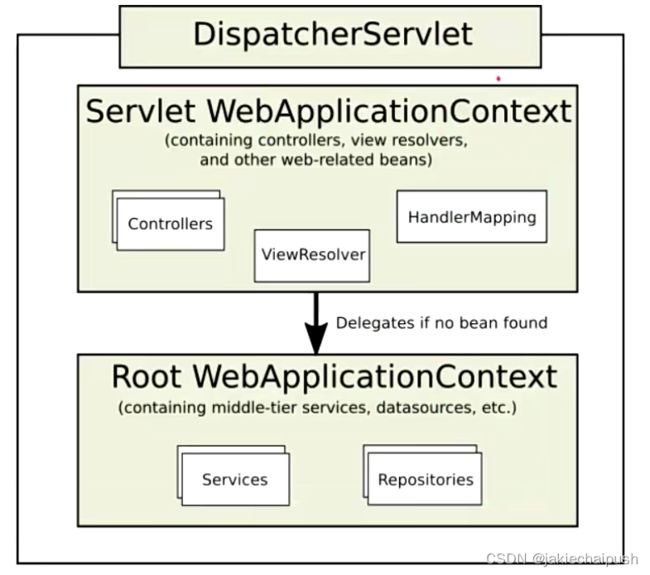
Spring MVC容器: 在Spring MVC中,通常会存在一个用于管理Web组件(如Controller、ViewResolver等)的Spring MVC容器。这个容器是WebApplicationContext的实例,负责加载和管理与Web相关的Bean。
父子容器关系: Spring MVC容器可以配置一个父上下文,通常是应用上下文。这种父子容器的关系使得Spring MVC容器能够访问应用上下文中定义的Bean,而应用上下文无法直接访问Spring MVC容器中的Bean。
好处: 使用父子容器的好处在于能够将应用程序的各个模块分开管理,提高了模块之间的解耦性。应用上下文可以包含业务逻辑、数据访问等模块的Bean,而Spring MVC容器专注于管理与Web相关的Bean,例如Controller、ViewResolver等。
配置方式: 在web.xml中配置ContextLoaderListener来加载父上下文,通常是应用上下文。在DispatcherServlet配置中,可以指定其上下文配置文件,该配置文件将会形成Spring MVC容器的上下文。
3. SPI机制详解
SPI(Service Provider Interface)是Java中一种用于实现组件扩展的机制,允许第三方实现提供服务,并通过接口被应用程序发现和调用。SPI机制主要涉及到Java的ServiceLoader类以及在META-INF/services目录下的配置文件。下面结合一个案例分析一下SPI如何使用:
- 定义接口: 定义一个接口,表示服务提供者需要实现的功能。
// ServiceInterface.java
public interface ServiceInterface {
    void execute();
}
- 编写服务提供者实现类: 编写多个实现了接口的服务提供者类。
// ServiceProviderA.java
public class ServiceProviderA implements ServiceInterface {
    @Override
    public void execute() {
        System.out.println("Service A is executing.");
    }
}
// ServiceProviderB.java
public class ServiceProviderB implements ServiceInterface {
    @Override
    public void execute() {
        System.out.println("Service B is executing.");
    }
}
- 创建配置文件: 在
META-INF/services目录下创建一个以接口全限定名为名字的文件,其中包含服务提供者的类名。
// META-INF/services/com.example.ServiceInterface
com.example.ServiceProviderA
com.example.ServiceProviderB
- 使用
ServiceLoader加载服务: 在应用程序中使用ServiceLoader类加载服务。
// ServiceConsumer.java
import java.util.ServiceLoader;

public class ServiceConsumer {
    public static void main(String[] args) {
        ServiceLoader<ServiceInterface> serviceLoader = ServiceLoader.load(ServiceInterface.class);

        for (ServiceInterface service : serviceLoader) {
            service.execute();
        }
    }
}
SPI的底层实现原理主要依赖于ServiceLoader类的服务发现机制。这个机制通过解析META-INF/services目录下的配置文件,动态加载实现了特定接口的服务提供者,并使得应用程序可以在运行时根据需要发现和调用这些服务提供者。这种机制提高了代码的可扩展性和灵活性,使得系统更容易实现组件的替换和升级。
二、 源码分析
1. 注册父子容器
前面我们在分析XML方式整合SpringMVC的时候,我们需要手动的配置DispatcherServlet,在这里Spring其实会通过前面介绍的SPI机制帮我们自动注册这些东西。
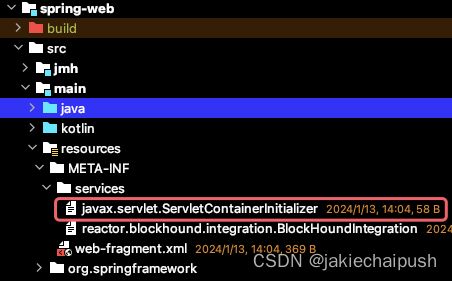
上面图片就是Spring-web模块下的META-INF/services模块下提供了一个javax.servlet.ServiletContainerInitializer的文件,这个就是Spi机制中需要配置的一个文件。我们看看这个文件中放了什么实现类:
@HandlesTypes(WebApplicationInitializer.class)
public class SpringServletContainerInitializer implements ServletContainerInitializer {
	@Override
	public void onStartup(@Nullable Set<Class<?>> webAppInitializerClasses, ServletContext servletContext)
			throws ServletException {

		List<WebApplicationInitializer> initializers = Collections.emptyList();

		if (webAppInitializerClasses != null) {
			initializers = new ArrayList<>(webAppInitializerClasses.size());
			for (Class<?> waiClass : webAppInitializerClasses) {
				// 接口和抽象类servlet容器也会给我们,但是我们不要
				// 排除接口和容器
				if (!waiClass.isInterface() && !Modifier.isAbstract(waiClass.getModifiers()) &&
						WebApplicationInitializer.class.isAssignableFrom(waiClass)) {
					try {
						// 实例化,然后添加到集合中
						initializers.add((WebApplicationInitializer)
								ReflectionUtils.accessibleConstructor(waiClass).newInstance());
					}
					catch (Throwable ex) {
						throw new ServletException("Failed to instantiate WebApplicationInitializer class", ex);
					}
				}
			}
		}

		if (initializers.isEmpty()) {
			servletContext.log("No Spring WebApplicationInitializer types detected on classpath");
			return;
		}

		servletContext.log(initializers.size() + " Spring WebApplicationInitializers detected on classpath");
		AnnotationAwareOrderComparator.sort(initializers);
		// 调用initializer.onStartup  进行扩展
		for (WebApplicationInitializer initializer : initializers) {
			initializer.onStartup(servletContext);
		}
	}

}
可以看见这个类实现了ServletContainerInitializer(Servlet容器初始化接口)接口,然后重写了startup方法,然后这个方法什么时候被调用呢?在Tomcat的启动流程中这个方法会被调用来初始化Servlet容器。
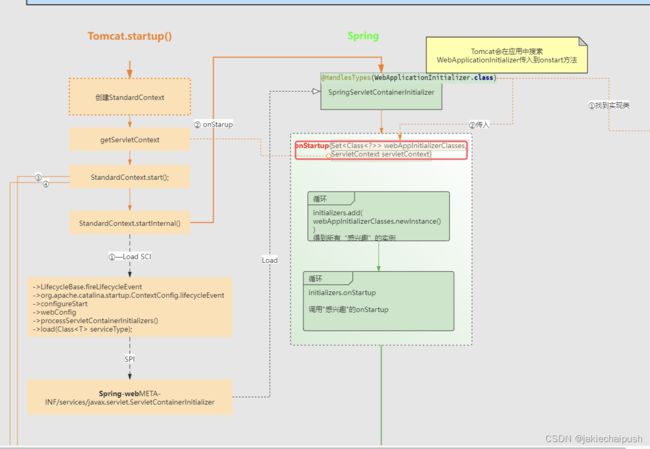
在上面的类上面有一个注解@HandlesTypes(WebApplicationInitializer.class),它注入了onstartup所需要的一个参数WebApplicationInitializer.class,这个注解可以理解为Spring感兴趣的一个接口,通过这个注解我们可以传入一个口,Tomcat会自动找到这个接口的实现类, 然后传入到onStartup(@Nullable Set 这个参数上。进入onStartup方法:
for (Class<?> waiClass : webAppInitializerClasses) {
				// 接口和抽象类servlet容器也会给我们,但是我们不要
				// 排除接口和容器
				if (!waiClass.isInterface() && !Modifier.isAbstract(waiClass.getModifiers()) &&
						WebApplicationInitializer.class.isAssignableFrom(waiClass)) {
					try {
						// 实例化,然后添加到集合中
						initializers.add((WebApplicationInitializer)
								ReflectionUtils.accessibleConstructor(waiClass).newInstance());
					}
					catch (Throwable ex) {
						throw new ServletException("Failed to instantiate WebApplicationInitializer class", ex);
					}
				}
			}
它首先会遍历webAppInitializerClasses的实现类,然后判断当前的实现类不是一个借口和抽象类。如果不是就会将我们这个实现了webAppInitializerClasses的类进行实例化,然后放到一个集合中。 然后执行下面代码:
for (WebApplicationInitializer initializer : initializers) {
			initializer.onStartup(servletContext);
		}
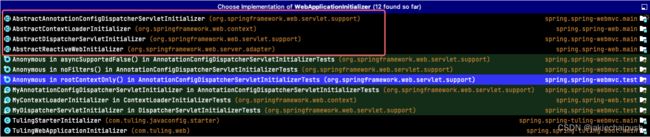
上面代码就是循环前面的集合,然后分别调用onStratup方法,即调用webAppInitializerClasses的实现类的onStartup方法。所以我们只需要在应用程序中就可以实现这个类或其子类来注册我们需要的DispatcherServlet和ContextLoaderListener(在XML方式下我们需要去手动配置)。例如下面代码:
public class TulingStarterInitializer extends AbstractAnnotationConfigDispatcherServletInitializer {

	/**
	 * 方法实现说明:IOC 父容器的启动类
	 * @author:xsls
	 * @date:2019/7/31 22:12
	 */
	@Override
	protected Class<?>[] getRootConfigClasses() {
		return new Class[]{RootConfig.class};
	}

	/**
	 * 方法实现说明 IOC子容器配置 web容器配置
	 * @author:xsls
	 * @date:2019/7/31 22:12
	 */
	@Override
	protected Class<?>[] getServletConfigClasses() {
		return new Class[]{WebAppConfig.class};
	}

	/**
	 * 方法实现说明
	 * @author:xsls
	 * @return: 我们前端控制器DispatcherServlet的拦截路径
	 * @exception:
	 * @date:2019/7/31 22:16
	 */
	@Override
	protected String[] getServletMappings() {
		return new String[]{"/"};
	}
}
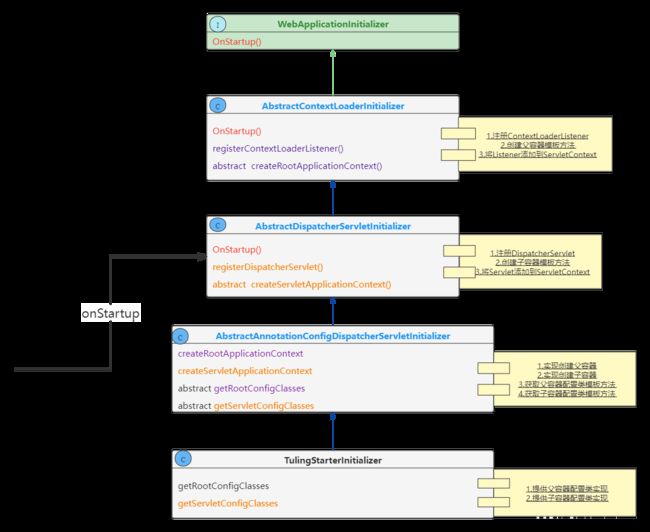
这里我们进入AbstractAnnotationConfigDispatcherServletInitializer这个父类,来查看它的onStartUp方法:
//AbstractDispatcherServletInitializer类中
@Override
	public void onStartup(ServletContext servletContext) throws ServletException {
		//registerContextLoaderListener  ok
		super.onStartup(servletContext);
		// registerDispatcherServlet
		registerDispatcherServlet(servletContext);
	}
上面首先执行super.onStartup(servletContext);,我们进入父类的onStartUp方法。
	@Override
	public void onStartup(ServletContext servletContext) throws ServletException {
		registerContextLoaderListener(servletContext);
	}
上面代码就是注册ContextLoaderListener,回到子类,子类的registerDispatcherServlet(servletContext);就是在注册DispatcherServlet。我们先看是如何注册ContextLoaderListener的。
protected void registerContextLoaderListener(ServletContext servletContext) {
		// 创建父容器 ,
		WebApplicationContext rootAppContext = createRootApplicationContext();
		if (rootAppContext != null) {
			ContextLoaderListener listener = new ContextLoaderListener(rootAppContext);
			// 设置初始化器
			listener.setContextInitializers(getRootApplicationContextInitializers());
			servletContext.addListener(listener);
		}
		else {
			logger.debug("No ContextLoaderListener registered, as " +
					"createRootApplicationContext() did not return an application context");
		}
	}
上面代码就是首先创建了一个WebApplicationContext对象,这里就是在创建真正的IOC容器了,这就是创建父容器。然后创建了一个ContextLoaderListener对象。我们进入createRootApplicationContext。
@Override
	@Nullable
	protected WebApplicationContext createRootApplicationContext() {
		Class<?>[] configClasses = getRootConfigClasses();
		if (!ObjectUtils.isEmpty(configClasses)) {
			AnnotationConfigWebApplicationContext context = new AnnotationConfigWebApplicationContext();
			context.register(configClasses);
			return context;
		}
		else {
			return null;
		}
	}
前面看过Spring源码的都知道,AnnotationConfigWebApplicationContext context = new AnnotationConfigWebApplicationContext();这句代码就是创建Spring上下文,然后将配置类configClasses加载了进去,但这里并没有refresh容器,而只是创建了一个IOC容器,然后返回。getRootConfigClasses就是获取我们的配置类,这个方法就是在我们前面自定义的TulingStarterInitializer实现了。
@Override
	protected Class<?>[] getRootConfigClasses() {
		return new Class[]{RootConfig.class};
	}

@Configuration
@ComponentScan(basePackages = "com.tuling",excludeFilters = {
		@ComponentScan.Filter(type = FilterType.ANNOTATION,value={Controller.class}),
		@ComponentScan.Filter(type = ASSIGNABLE_TYPE,value =WebAppConfig.class ),
})
public class RootConfig {

}
上面就是注册ContextLoaderListener对象,回到onStartup,看看是如何注册DispatcherServlet的。
protected void registerDispatcherServlet(ServletContext servletContext) {
		String servletName = getServletName();
		Assert.hasLength(servletName, "getServletName() must not return null or empty");
		// 创建子容器
		WebApplicationContext servletAppContext = createServletApplicationContext();
		Assert.notNull(servletAppContext, "createServletApplicationContext() must not return null");
		// 创建DispatcherServlet
		FrameworkServlet dispatcherServlet = createDispatcherServlet(servletAppContext);
		Assert.notNull(dispatcherServlet, "createDispatcherServlet(WebApplicationContext) must not return null");
		// 初始化器
		dispatcherServlet.setContextInitializers(getServletApplicationContextInitializers());

		ServletRegistration.Dynamic registration = servletContext.addServlet(servletName, dispatcherServlet);
		if (registration == null) {
			throw new IllegalStateException("Failed to register servlet with name '" + servletName + "'. " +
					"Check if there is another servlet registered under the same name.");
		}
		// 启动时加载
		registration.setLoadOnStartup(1);
		// 映射
		registration.addMapping(getServletMappings());
		// 是否异步支持
		registration.setAsyncSupported(isAsyncSupported());
		// 设置DispatcherServlet的过滤器
		Filter[] filters = getServletFilters();
		if (!ObjectUtils.isEmpty(filters)) {
			for (Filter filter : filters) {
				registerServletFilter(servletContext, filter);
			}
		}
		// 空方法, 可以再对DispatcherServlet进行定制
		customizeRegistration(registration);
	}
首先上面方法执行了下面语句创建了一个子容器:
WebApplicationContext servletAppContext = createServletApplicationContext();


	@Override
	protected WebApplicationContext createServletApplicationContext() {
		AnnotationConfigWebApplicationContext context = new AnnotationConfigWebApplicationContext();
		Class<?>[] configClasses = getServletConfigClasses();
		if (!ObjectUtils.isEmpty(configClasses)) {
			context.register(configClasses);
		}
		return context;
	}
我们发现上面同样创建了一个AnnotationConfigWebApplicationContext容器,这个就是我们的子容器。然后配置类的获取就是调用getServletConfigClasses,这个同样是在前面的TulingStarterInitializer类中配置的。
@Override
protected Class<?>[] getServletConfigClasses() {
return new Class[]{WebAppConfig.class};
}
@Configuration
@ComponentScan(basePackages = {"com.tuling"},includeFilters = {
@ComponentScan.Filter(type = FilterType.ANNOTATION,value = {RestController.class, Controller.class})
},useDefaultFilters =false)
@EnableWebMvc // = 上面子容器就创建好了,继续回到registerDispatcherServlet方法,然后创建DispatcherServlet。 设置启动时立即加载,设置过滤器,设置映射等。到这里子容器就创建成功了。
2. 加载父子容器
前面通过Tomcat的SPI机制引出的扩展类,并使用该扩展类创建类父子容器。Tomcat源码继续向下执行,然后Tomcat就会注册监听器。
首先它会执行ContextLoaderListener的contextInitializer方法。我们进入该方法:
@Override
	public void contextInitialized(ServletContextEvent event) {
		initWebApplicationContext(event.getServletContext());
	}
上面代码就调用了一个方法initWebApplicationContext,该方法是ContextLoaderListener的父类ContextLoader的方法。我们进入该方法:
public WebApplicationContext initWebApplicationContext(ServletContext servletContext) {
		if (servletContext.getAttribute(WebApplicationContext.ROOT_WEB_APPLICATION_CONTEXT_ATTRIBUTE) != null) {
			throw new IllegalStateException(
					"Cannot initialize context because there is already a root application context present - " +
					"check whether you have multiple ContextLoader* definitions in your web.xml!");
		}

		servletContext.log("Initializing Spring root WebApplicationContext");
		Log logger = LogFactory.getLog(ContextLoader.class);
		if (logger.isInfoEnabled()) {
			logger.info("Root WebApplicationContext: initialization started");
		}
		long startTime = System.currentTimeMillis();

		try {
			// xml会在这里创建,判断当前容器是否为null
			if (this.context == null) {
				this.context = createWebApplicationContext(servletContext);
			}
			if (this.context instanceof ConfigurableWebApplicationContext) {
				ConfigurableWebApplicationContext cwac = (ConfigurableWebApplicationContext) this.context;
				if (!cwac.isActive()) {
					// The context has not yet been refreshed -> provide services such as
					// setting the parent context, setting the application context id, etc
					if (cwac.getParent() == null) {
						// The context instance was injected without an explicit parent ->
						// determine parent for root web application context, if any.
						ApplicationContext parent = loadParentContext(servletContext);
						cwac.setParent(parent);
					}
					configureAndRefreshWebApplicationContext(cwac, servletContext);
				}
			}
			// 在servlet域中设置根容器(在子容器就可以直接拿到了)
			servletContext.setAttribute(WebApplicationContext.ROOT_WEB_APPLICATION_CONTEXT_ATTRIBUTE, this.context);


			// 获取线程上下文类加载器,默认为WebAppClassLoader
			ClassLoader ccl = Thread.currentThread().getContextClassLoader();
			// 如果spring的jar包放在每个webapp自己的目录中
			// 此时线程上下文类加载器会与本类的类加载器(加载spring的)相同,都是
			if (ccl == ContextLoader.class.getClassLoader()) {
				currentContext = this.context;
			}
			// 如果不同,也就是上面说的那个问题的情况,那么用一个map把刚才创建的
			else if (ccl != null) {
				// 一个webapp对应一个记录,后续调用时直接根据WebAppClassLoader来取出
				currentContextPerThread.put(ccl, this.context);
			}

			if (logger.isInfoEnabled()) {
				long elapsedTime = System.currentTimeMillis() - startTime;
				logger.info("Root WebApplicationContext initialized in " + elapsedTime + " ms");
			}

			return this.context;
		}
		catch (RuntimeException | Error ex) {
			logger.error("Context initialization failed", ex);
			servletContext.setAttribute(WebApplicationContext.ROOT_WEB_APPLICATION_CONTEXT_ATTRIBUTE, ex);
			throw ex;
		}
	}
首先我们看下面代码:
	if (this.context == null) {
				this.context = createWebApplicationContext(servletContext);
}
这里判断容器是否为空,我们前面知道,在使用Tomcat SPI创建容器的时候,创建的容器是不可能为空的,这句代码的意义就是,我们没有使用SPI,而是使用传统的使用web.xml配置形式创建的是欧,这里就会为空,就需要去创建容器。然后执行下面代码:
if (this.context instanceof ConfigurableWebApplicationContext) {
				ConfigurableWebApplicationContext cwac = (ConfigurableWebApplicationContext) this.context;
				if (!cwac.isActive()) {
					if (cwac.getParent() == null) {
						ApplicationContext parent = loadParentContext(servletContext);
						cwac.setParent(parent);
					}
					configureAndRefreshWebApplicationContext(cwac, servletContext);
				}
			}
上面代码首先判断当前容器是否继承了ConfigurableWebApplicationContext类,进入if然后执行ApplicationContext parent = loadParentContext(servletContext);这个loadParentContext固定是返回null的,这个就是提供了一个扩展点,我们可以自己再去在当前容器上实现一个父容器。最后最核心的就是执行configureAndRefreshWebApplicationContext(cwac, servletContext);,我们进入该方法:
protected void configureAndRefreshWebApplicationContext(ConfigurableWebApplicationContext wac, ServletContext sc) {
		if (ObjectUtils.identityToString(wac).equals(wac.getId())) {

			// 设置id
			String idParam = sc.getInitParameter(CONTEXT_ID_PARAM);
			if (idParam != null) {
				wac.setId(idParam);
			}
			else {
				// Generate default id...
				wac.setId(ConfigurableWebApplicationContext.APPLICATION_CONTEXT_ID_PREFIX +
						ObjectUtils.getDisplayString(sc.getContextPath()));
			}
		}
		// 设置ServletContext到spring上下文
		wac.setServletContext(sc);
		// 获得servlet容器中的全局参数contextConfigLocation  (xml)
		String configLocationParam = sc.getInitParameter(CONFIG_LOCATION_PARAM);
		if (configLocationParam != null) {
			wac.setConfigLocation(configLocationParam);
		}
		ConfigurableEnvironment env = wac.getEnvironment();
		if (env instanceof ConfigurableWebEnvironment) {
			((ConfigurableWebEnvironment) env).initPropertySources(sc, null);
		}
		// 在容器加载前 可以通过设置初始化参数contextInitializerClasses、globalInitializerClasses 进行扩展
		customizeContext(sc, wac);
		// 刷新容器
		wac.refresh();
	}
上面代码首先执行wac.setServletContext(sc);将Servlet容器设置到了ApplicationContext中,后续我们就可以拿到这个Servlet容器(通过继承回调接口),将我们需要的Servlet注入到这个容器中。
public class RootConfig extends ServletContextAware{

	@Override
	public void setServletContext(ServletContext servletContext) {
		 //添加Servlet
	}
}
如果是XML方式(web.xml),就会通过下面代码获取全局参数
// 获得servlet容器中的全局参数contextConfigLocation  (xml)
		String configLocationParam = sc.getInitParameter(CONFIG_LOCATION_PARAM);
		if (configLocationParam != null) {
			wac.setConfigLocation(configLocationParam);
		}
最后执行wac.refresh();就刷新了父容器,下面就是执行Spirng的Bean的生命周期流程了,这个前面我们已经分析很多了。到此父容器加载完成。
回到initWebApplicationContext方法,上面方法就是将上面加载的父容器设置到了session域中,后面执行容器绑定的时候就可以拿到容器了。
// 在servlet域中设置根容器(在子容器就可以直接拿到了)
			servletContext.setAttribute(WebApplicationContext.ROOT_WEB_APPLICATION_CONTEXT_ATTRIBUTE, this.context);
到此ContextLoaderListener就加载完毕了,下面就可以开始加载子容器DispatcherServlet。当我们设置了loadonStart方法(前面注册ContextLoaderListener的时候设置了),Tomcat就会自动帮我们调用HttpServletBean的init方法。
@Override
	public final void init() throws ServletException {

		// 解析 init-param 并封装只 pvs 中(xml)
		PropertyValues pvs = new ServletConfigPropertyValues(getServletConfig(), this.requiredProperties);
		if (!pvs.isEmpty()) {
			try {
				// 将当前的这个 Servlet 类转化为一个 BeanWrapper,从而能够以 Spring 的方法来对 init-param 的值进行注入
				BeanWrapper bw = PropertyAccessorFactory.forBeanPropertyAccess(this);
				ResourceLoader resourceLoader = new ServletContextResourceLoader(getServletContext());
				bw.registerCustomEditor(Resource.class, new ResourceEditor(resourceLoader, getEnvironment()));
				initBeanWrapper(bw);
				// 属性注入
				bw.setPropertyValues(pvs, true);
			}
			catch (BeansException ex) {
				if (logger.isErrorEnabled()) {
					logger.error("Failed to set bean properties on servlet '" + getServletName() + "'", ex);
				}
				throw ex;
			}
		}

		// Let subclasses do whatever initialization they like.
		// 初始化Servlet,创建Spring容器
		initServletBean();
	}
上面核心的就是调用initServletBean()方法。
//FrameWorkServlet类中
@Override
	protected final void initServletBean() throws ServletException {
		getServletContext().log("Initializing Spring " + getClass().getSimpleName() + " '" + getServletName() + "'");
		if (logger.isInfoEnabled()) {
			logger.info("Initializing Servlet '" + getServletName() + "'");
		}
		long startTime = System.currentTimeMillis();

		try {
			this.webApplicationContext = initWebApplicationContext();
			// 空方法,无实现·
			initFrameworkServlet();
		}
		catch (ServletException | RuntimeException ex) {
			logger.error("Context initialization failed", ex);
			throw ex;
		}

		if (logger.isDebugEnabled()) {
			String value = this.enableLoggingRequestDetails ?
					"shown which may lead to unsafe logging of potentially sensitive data" :
					"masked to prevent unsafe logging of potentially sensitive data";
			logger.debug("enableLoggingRequestDetails='" + this.enableLoggingRequestDetails +
					"': request parameters and headers will be " + value);
		}

		if (logger.isInfoEnabled()) {
			logger.info("Completed initialization in " + (System.currentTimeMillis() - startTime) + " ms");
		}
	}
上面首先执行了this.webApplicationContext = initWebApplicationContext();这句代码。
protected WebApplicationContext initWebApplicationContext() {
		// 获得ContextLoaderListener存的父容器
		WebApplicationContext rootContext =
				WebApplicationContextUtils.getWebApplicationContext(getServletContext());
		WebApplicationContext wac = null;

		if (this.webApplicationContext != null) {
			// 获得子容器
			wac = this.webApplicationContext;
			if (wac instanceof ConfigurableWebApplicationContext) {
				ConfigurableWebApplicationContext cwac = (ConfigurableWebApplicationContext) wac;
				if (!cwac.isActive()) {
					// 如果没有设置父容器   spring  doGetBean
					if (cwac.getParent() == null) {
						cwac.setParent(rootContext);
					}
					// 配置并且加载子容器
					configureAndRefreshWebApplicationContext(cwac);
				}
			}
		}
		if (wac == null) {
			// 从servlet上下文根据名字从域里面获取
			wac = findWebApplicationContext();
		}
		if (wac == null) {
			// xml会在这里创建
			wac = createWebApplicationContext(rootContext);
		}

		//refreshEventReceived 它会在容器加载完设置为true (通过事件onApplicationEvent)
		// springboot在这初始化组件
		if (!this.refreshEventReceived) {
			synchronized (this.onRefreshMonitor) {
				onRefresh(wac);
			}
		}

		if (this.publishContext) {
			// 将当前容器放到servlet域中, 可以再创建子容器
			String attrName = getServletContextAttributeName();
			getServletContext().setAttribute(attrName, wac);
		}

		return wac;
	}
上面代码首先调用getWebApplicationContext从前面Session域中获得的封装的父容器。然后执行下面代码:
if (wac instanceof ConfigurableWebApplicationContext) {
				ConfigurableWebApplicationContext cwac = (ConfigurableWebApplicationContext) wac;
				if (!cwac.isActive()) {
					// 如果没有设置父容器   spring  doGetBean
					if (cwac.getParent() == null) {
						cwac.setParent(rootContext);
					}
					// 配置并且加载子容器
					configureAndRefreshWebApplicationContext(cwac);
				}
			}
上面代码首先就是调用cwac.setParent(rootContext);设置了父容器,这里就完成了父子容器的绑定。然后执行configureAndRefreshWebApplicationContext(cwac);进行配置和加载子容器了。
protected void configureAndRefreshWebApplicationContext(ConfigurableWebApplicationContext wac) {
		if (ObjectUtils.identityToString(wac).equals(wac.getId())) {
			// 设置id
			if (this.contextId != null) {
				wac.setId(this.contextId);
			}
			else {
				// Generate default id...
				wac.setId(ConfigurableWebApplicationContext.APPLICATION_CONTEXT_ID_PREFIX +
						ObjectUtils.getDisplayString(getServletContext().getContextPath()) + '/' + getServletName());
			}
		}
		// 设置servlet上下文
		wac.setServletContext(getServletContext());
		wac.setServletConfig(getServletConfig());
		wac.setNamespace(getNamespace());
		// 监听器  委托设计模式
		wac.addApplicationListener(new SourceFilteringListener(wac, new ContextRefreshListener()));

		// 将init-param设置到Environment中
		ConfigurableEnvironment env = wac.getEnvironment();
		if (env instanceof ConfigurableWebEnvironment) {
			((ConfigurableWebEnvironment) env).initPropertySources(getServletContext(), getServletConfig());
		}
		// 空方法可扩展
		postProcessWebApplicationContext(wac);
		// 容器启动前初始化
		applyInitializers(wac);
		wac.refresh();
	}
下面这句代码就是添加了一个监听器,这个监听器就会加载我们上篇文章学习到的各种SpringMVC的组件。这个监听器监听的事件是容器加载事件,如果子容器创建完成就会调用监听器的方法。
// 监听器  委托设计模式
		wac.addApplicationListener(new SourceFilteringListener(wac, new ContextRefreshListener()));
最后就是调用refresh方法了。(子容器只有Controller的bean,所以需要和父容器绑定),容器加载完毕就会发布一个加载完毕的事件,这时候就可以调用前面说的的监听器事件了。
private class ContextRefreshListener implements ApplicationListener<ContextRefreshedEvent> {

		@Override
		public void onApplicationEvent(ContextRefreshedEvent event) {
			FrameworkServlet.this.onApplicationEvent(event);
		}
	}
它就会调用onApplicationEvent(event)方法。
public void onApplicationEvent(ContextRefreshedEvent event) {
		this.refreshEventReceived = true;
		synchronized (this.onRefreshMonitor) {
			onRefresh(event.getApplicationContext());
		}
	}
然后调用onRefresh方法。
@Override
	protected void onRefresh(ApplicationContext context) {
		initStrategies(context);
	}

	/**初始化策略,加了s都是多个
	 * Initialize the strategy objects that this servlet uses.
	 * May be overridden in subclasses in order to initialize further strategy objects.
	 */
	protected void initStrategies(ApplicationContext context) {
		initMultipartResolver(context);
		initLocaleResolver(context);
		initThemeResolver(context);
		initHandlerMappings(context);
		initHandlerAdapters(context);
		initHandlerExceptionResolvers(context);
		initRequestToViewNameTranslator(context);
		initViewResolvers(context);
		initFlashMapManager(context);
	}
上面那些SpringMVC得组建就被加载完成了。 在加载这些组件的时候,我们知道组件如果没有它就会从一个属性文件中去取默认的配置去加载,那么这些组件是那里来的呢?这个就得看一个关键的注解@EnableWebMvc 这个注解的作用等同于xml文件配置的
<mvc:annotation-driven/>
我们进入该注解:
@Retention(RetentionPolicy.RUNTIME)
@Target(ElementType.TYPE)
@Documented
@Import(DelegatingWebMvcConfiguration.class)
public @interface EnableWebMvc {
}
这个注解上关键的一个注解就是@Import(DelegatingWebMvcConfiguration.class),我们知道在Spring启动过程中会将@Import注解标注的类加载为bean。而这个DelegatingWebMvcConfiguration.class类中就配置了前面的各种SpringMVC组件以及其它一些SpringMVC关键的Bean,就在这里会被加载到容器中(这个类在Springboot中也会讲到)。