WPF事件
让我们看一个例子,创建一个简单的WindowsForm项目,在窗体上放一个Button
private void button1_Click(object sender, EventArgs e)
        {
            if (sender is Button)
            {
                MessageBox.Show((sender as Button).Name);
            }
        }
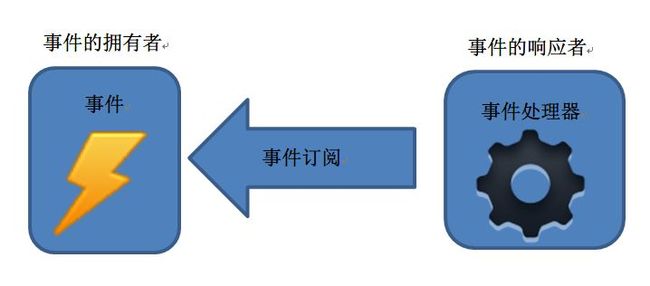
事件模型的几个关键部分
- 事件的拥有者:button1
- 事件:button1.Click
- 事件的响应者:窗体本身
- 事件处理器:this.button1_Click方法
- 订阅关系:可以在Form1.Designer.cs中找到这一句代码
this.button1.Click += new System.EventHandler(this.button1_Click);
只要委托与影响事件的方法签名保持一致,则一个事件可以由多个事件处理器来处理,一个事件处理器也可以响应多个事件。
这是传统的直接事件模型。
直接事件激发时,发送者直接将消息通过事件订阅交送给事件响应者,事件响应者使用其事件处理器对事件作出响应。
路由事件的事件拥有者和事件响应者之间没有显示的订阅关系,事件的拥有者只负责事件的激发,事件由谁响应它并不知道,事件的响应者则安装有时间侦听器,针对某类事件进行侦听,当有此类的事件传递至事件响应者就使用事件处理器来响应事件并且决定事件是否可以继续传递。在事件处理器内程序员可以查看路由事件的原始出发点是哪个控件,上一站是哪里,还可决定事件是否继续传递。
请看例子
<Grid x:Name="gridRoot" Background="Lime">
        <Grid x:Name="gridA" Margin="10" Background="Blue">
            <Grid.ColumnDefinitions>
                <ColumnDefinition/>
                <ColumnDefinition/>
            </Grid.ColumnDefinitions>
            <Canvas x:Name="canvasLeft" Grid.Column="0" Background="Red" Margin="10">
                <Button x:Name="buttonLeft" Content="Left" Width="40" Height="100" Margin="10"/>
            </Canvas>
            <Canvas x:Name="canvasRight" Grid.Column="1" Background="Yellow" Margin="10">
                <Button x:Name="buttonRight" Content="Right" Width="40" Height="100" Margin="10"/>
            </Canvas>
        </Grid>
    </Grid>
public MainWindow()
        {
            InitializeComponent();
            gridRoot.AddHandler(Button.ClickEvent,new RoutedEventHandler(this.ButtonClicked));
        }

        private void ButtonClicked(object sender, RoutedEventArgs e)
        {
            MessageBox.Show((e.OriginalSource as FrameworkElement).Name);
        }
- 自定义路由事件
创建自定义路由事件可以分为三步:
(1)声明并注册路由事件
(2)为路由事件添加CLR包装
(3)创建可以激发路由事件的方法
完整的注册代码是这样的
public static readonly RoutedEvent ClickEvent = EventManager.RegisterRoutedEvent("Click", RoutingStrategy.Bubble, typeof(EventHandler), typeof(ButtonBase));
最重要的是了解EventManager.RegisterRoutedEvent方法的四个参数
第一个参数为string类型,被称为路由事件的名称,按微软的建议,这个字符串应该与RoutedEvent变量的前缀和CLR事件包装器的名称一致。
第二个参数称为路由事件的策略。WPF的路由事件有3种策略:
public enum RoutingStrategy
    {
        // 摘要:
        //     路由事件使用隧道策略,以便事件实例通过树向下路由(从根到源元素)。
        Tunnel = 0,
        //
        // 摘要:
        //     路由事件使用冒泡策略,以便事件实例通过树向上路由(从事件元素到根)。
        Bubble = 1,
        //
        // 摘要:
        //     路由事件不通过元素树路由,但支持其他路由事件功能,例如类处理、System.Windows.EventTrigger 或 System.Windows.EventSetter。
        Direct = 2,
    }
第三种方式就是直接事件的方式。
第三个参数用于指定事件处理器的类型。事件处理器的返回值和参数列表必须与此参数指定的委托保持一致,不然会导致在编译时抛出异常。
第四个参数用于指定此路由事件的宿主是谁。
自定义路由事件
为了能让事件消息携带按钮被点击的时间,我们需要创建一个RoutedEventArgs的派生类,并为其添加ClickTime属性
class ReportTimeEventArgs : RoutedEventArgs
    {
        public ReportTimeEventArgs(RoutedEvent routedEvent,object source):base(routedEvent,source)
        {

        }

        public DateTime ClickTime { get; set; }
    }
在创建一个Button派生类
class TimeButton : Button
    {
        //声明和注册路由事件
        public static readonly RoutedEvent ReportTimeEvent = EventManager.RegisterRoutedEvent("ReportTime", RoutingStrategy.Tunnel, typeof(EventHandler<ReportTimeEventArgs>), typeof(TimeButton));

        //CLR事件包装器
        public event RoutedEventHandler ReportTime
        {
            add { this.AddHandler(ReportTimeEvent, value); }
            remove { this.RemoveHandler(ReportTimeEvent, value); }
        }

        //激发路由事件,借用Click事件的激发方法
        protected override void OnClick()
        {
            base.OnClick();

            ReportTimeEventArgs args = new ReportTimeEventArgs(ReportTimeEvent, this);
            args.ClickTime = DateTime.Now;
            this.RaiseEvent(args);
        }
    }
<Window x:Class="RoutedEventSample2.MainWindow"
        xmlns="http://schemas.microsoft.com/winfx/2006/xaml/presentation"
        xmlns:x="http://schemas.microsoft.com/winfx/2006/xaml"
        xmlns:local="clr-namespace:RoutedEventSample2"
        local:TimeButton.ReportTime="ReportTimeHandle"
        Title="MainWindow" Height="350" Width="525">
    <Grid x:Name="grid_1" local:TimeButton.ReportTime="ReportTimeHandle">
        <Grid x:Name="grid_2" local:TimeButton.ReportTime="ReportTimeHandle">
            <Grid x:Name="grid_3" local:TimeButton.ReportTime="ReportTimeHandle">
                <StackPanel x:Name="stackPanel_1" local:TimeButton.ReportTime="ReportTimeHandle">
                    <ListBox x:Name="listBox">
                        <local:TimeButton x:Name="timeButton" Width="80" Height="80" Content="报时" local:TimeButton.ReportTime="ReportTimeHandle"></local:TimeButton>
                    </ListBox>
                </StackPanel>
            </Grid>
        </Grid>
    </Grid>
</Window>
public partial class MainWindow : Window
    {
        public MainWindow()
        {
            InitializeComponent();
        }

        private void ReportTimeHandle(object sender, ReportTimeEventArgs e)
        {
            FrameworkElement element = sender as FrameworkElement;
            string timeStr = e.ClickTime.ToShortDateString();
            string content = string.Format("{0}到达{1}", timeStr, element.Name);
            this.listBox.Items.Add(content);
        }
    }
- RoutedEventArgs的Source和OriginalSource
路由事件是沿着VisualTree传递的,本意上应该说:“路由事件的消息在VisualTree上传递”,Source表示的是LogicalTree上的消息源头,而OriginalSource则表示VisualTree上的源头。
请看例子
UserControl
<UserControl x:Class="SourceAndOriginalSourceSample.UserControl1"
             xmlns="http://schemas.microsoft.com/winfx/2006/xaml/presentation"
             xmlns:x="http://schemas.microsoft.com/winfx/2006/xaml"
             xmlns:mc="http://schemas.openxmlformats.org/markup-compatibility/2006"
             xmlns:d="http://schemas.microsoft.com/expression/blend/2008"
             mc:Ignorable="d"
             d:DesignHeight="300" d:DesignWidth="300">
    <Border BorderBrush="Orange" BorderThickness="3" CornerRadius="5">
        <Button x:Name="innerButton" Width="80" Height="80" Content="OK"/>
    </Border>
</UserControl>
<Window x:Class="SourceAndOriginalSourceSample.MainWindow"
        xmlns="http://schemas.microsoft.com/winfx/2006/xaml/presentation"
        xmlns:local="clr-namespace:SourceAndOriginalSourceSample"
        xmlns:x="http://schemas.microsoft.com/winfx/2006/xaml"
        Title="MainWindow" Height="350" Width="525">
    <Grid>
        <local:UserControl1 x:Name="myUserControl"></local:UserControl1>
    </Grid>
</Window>
public partial class MainWindow : Window
    {
        public MainWindow()
        {
            InitializeComponent();
            this.AddHandler(Button.ClickEvent, new RoutedEventHandler(Button_Click));
        }

        private void Button_Click(object sender, RoutedEventArgs e)
        {
            string strOriginalSource = string.Format("VisualTree start point:{0},type is{1}", (e.OriginalSource as FrameworkElement).Name, e.OriginalSource.GetType().Name);
            string strSource = string.Format("LogicalTree start point:{0},type is{1}", (e.Source as FrameworkElement).Name, e.Source.GetType().Name);

            MessageBox.Show(strOriginalSource+"\r\n"+strSource);
        }
    }
- 附加事件(Attached Event)
其实附加事件就是路由事件,那为什么要叫附加事件呢?路由事件的宿主都是拥有可视化实体的元素界面,而附加事件则不具备显示在用户界面上的能力。

