全网最详细Centos 9 Stream安装部署最新Zabbix 6.4
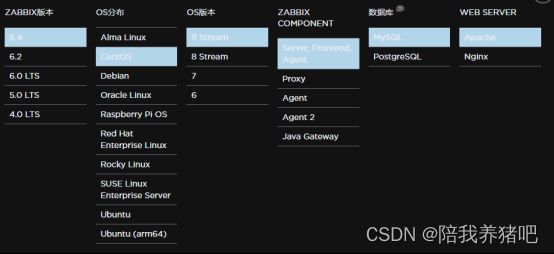
选择安装的版本如图片所示
一、信息汇总
1、服务器系统Centos 9 stream
镜像下载地址:CentOS Stream
2、Zabbix官网指南
下载Zabbix
3、服务器用户信息整合
①服务器用户
root 123456
Admin 123456
②MySQL用户
root 12456
zabbix password
③Zabbix6.4用户
zabbix password
前端WEB默认登录Admin zabbix
4、网络配置
根据自己的需求在配置文件或者图形界面中将网络改为静态IP,然后重启一下网络。
centos stream 9使用新网络设置方式,使用了新的NetworkManager,所以相比centos7、8设置不同。
①进入网卡配置文件,修改如下位置即可
vim /etc/NetworkManager/system-connections/enp2s0.nmconnection
[ipv4]
address1=172.20.20.200/24,172.20.20.254  #分别表示IP、子网掩码、网关
dns=114.114.114.114;
method=manual  #method是类型,默认的是auto
②重启网络
#nmcli connection reload
#nmcli connection down ens2s0
#nmcli connection up ens2s0
③查看网络信息,并测试网络和DNS
查看IP信息是否更改完成
ifconfig测试连通性
ping www.baidu.com二、关闭防火墙、SELINUX
1、关闭防火墙
①只关闭此次
systemctl stop firewalld②永久关闭
systemctl disable firewalld③查看firewalld服务状态,active为dead,则表示已经永久关闭
systemctl status firewalld2、关闭SElinux
①临时关闭
setenforce 0②永久关闭
vim /etc/selinux/config 将文件内SELINUX=enforcing这行改为SELINUX=disabled或者SELINUX=permissive,然后保存退出,重启centos 9生效
# This file controls the state of SELinux on the system.
# SELINUX= can take one of these three values:
#     enforcing - SELinux security policy is enforced.
#     permissive - SELinux prints warnings instead of enforcing.
#     disabled - No SELinux policy is loaded.
SELINUX=disabled  #改这里
# SELINUXTYPE= can take one of three values:
#     targeted - Targeted processes are protected,
#     minimum - Modification of targeted policy. Only selected processes are protected.
#     mls - Multi Level Security protection.
SELINUXTYPE=targeted
③查看状态是否关闭
getenforce三、安装MYSQL8
#yum remove -y mysql
#find / -name mysql
#rm -rf
#wget https://dev.mysql.com/get/mysql80-community-release-el8-1.noarch.rpm
#yum install mysql80-community-release-el8-1.noarch.rpm
#yum module disable mysql
#yum install mysql-community-server --nogpgchec
四、初始化MYSQL
1、修改my.cnf
vim /etc/my.cnfdefault-authentication-plugin=mysql_native_password 把这一行的注释去掉,没有的话直接加上,如下所示
2、重启mysql并设置开机自启动
#systemctl restart mysqld  #重启
#service mysqld status  #查看状态
#service enable mysqld  #设置开机自启
五、MYSQL密码配置
1、修改root密码,第一次登录时查找登录密码
①查找默认密码
grep ‘temporary password’ /var/log/mysqld.log 查找的密码例如为:b6aeg+rg8e!Y
②修改密码
#mysql -u root -p  #输入查找到的默认密码登录
#alter user root@"localhost" identified with mysql_native_password by "root_21ROOT"; #先创建复杂密码
#SHOW VARIABLES LIKE ‘validate_password%’; #查看、修改密码策略
#set global validate_password.policy=0;
#set global validate_password.mixed_case_count=0;
#set global validate_password.number_count=0;
#set global validate_password.special_char_count=0;
#set global validate_password.length=0;
#SHOW VARIABLES LIKE ‘validate_password%’;
#alter user root@"localhost" identified with mysql_native_password by "123456";  #修改密码
六、安装Zabbix6.4
1、安装zabbix存储库
#rpm -Uvh https://repo.zabbix.com/zabbix/6.4/rhel/9/x86_64/zabbix-release-6.4-1.el9.noarch.rpm
#dnf clean all
2、安装Zabbix server,Web前端,agent2
dnf install zabbix-server-mysql zabbix-web-mysql zabbix-apache-conf zabbix-sql-scripts zabbix-selinux-policy zabbix-agent2七、创建初始数据库
1、确保数据库服务器已启动并正在运行,执行如下命令
#mysql -uroot -p
#123456
#mysql> create database zabbix character set utf8mb4 collate utf8mb4_bin;
#mysql> create user zabbix@localhost identified with mysql_native_password by "password";
#mysql> grant all privileges on zabbix.* to zabbix@localhost;
#mysql> set global log_bin_trust_function_creators = 1;
#mysql> use mysql;  #删除空用户名。更新权限
#mysql> delete from user where user=' ';
#mysql> flush privileges;
#mysql> quit;
2、导入初始架构和数据,系统将提示您输入新创建的密码
zcat /usr/share/zabbix-sql-scripts/mysql/server.sql.gz | mysql --default-character-set=utf8mb4 -uzabbix -p zabbix#password
3、导入数据库架构后禁用log_bin_trust_function_creators选项
#mysql -uroot -p
#输入密码 123456
#mysql> set global log_bin_trust_function_creators = 0;
#mysql> quit;
八、为Zabbix server配置数据库
1、编辑配置文件/etc/zabbix/zabbix_server.conf
DBPassword=password #130行2、启动Zabbix server和agent进程,并为它们设置开机自启
#systemctl restart zabbix-server zabbix-agent2 httpd php-fpm
#systemctl enable zabbix-server zabbix-agent2 httpd php-fpm