Linux第33步_TF-A移植的第1步_创建新的设备树
TF-A移植第1步就是创建新的设备树,并命名为“stm32mp157d-atk”。
和“TF-A移植”有关的知识点:
1)设备树英文名字叫做Device tree,用来描述板子硬件信息的,比如开发板上的 CPU有几个核 、每个CPU核主频是多少,IIC、SPI这些外设的寄存器范围是多少,IIC接口下都挂了哪些设备等等。
2)、TF-A移植主要是修改“设备树”。
3)、DTC是设备树的编译器。“.dts”的设备树文件经过编译后,会生成“.dtb”文件,有点类似C语言中的“.bin文件”。
4)、设备树文件是一种文本格式的文件。
设备树文件后缀为“.dts”,类似于C语言中的“.c文件”;
设备树头文件后缀为“.dtsi”,类似于C语言中的“.h文件”;
因此“.dts”的设备树文件可以引用“.dtsi”的设备树头文件。
5)、设备树文件的位置:
linux/atk-mp1/atk-mp1/my-tfa/tf-a-stm32mp-2.2.r1\fdts
一、查看设备树文件
1、打开终端
输入“ls回车”,列出当前目录下所有的文件和文件夹
输入“cd linux回车”,切换“linux”目录下
输入“ls回车”,列出当前目录下所有的文件和文件夹
输入“cd my-tfa回车”,切换到“my-tfa”目录下
输入“ls回车”,列出“my-tfa”目录下所有的文件和文件夹
输入“cd tf-a-stm32mp-2.2.r1/回车”,进入到“tf-a-stm32mp-2.2.r1”目录下;
输入“ls回车”,列出“tf-a-stm32mp-2.2.r1”目录下所有的文件和文件夹;
输入“cd fdts/回车”,进入到“fdts”目录下;

2、输入“ls回车”,列出“fdts”目录下的所有设备树文件;

3、使用VSCode打开my-tfa目录下tf-a.code-workspace”;
找到“tf-a-stm32mp-2.2.r1/fdts”目录,就是设备树文件所在的目录。
见下图:

4、点击“stm32mpl57d-ev1.dts”,打开该文件,见下图:

5、“stm32mpl57d-ev1.dts”的文件内容见下图:

6、为正点原子STM32MP157开发板要准备的设备树
“stm32mp157d-ev1.dts”文件很简洁,主要原因是它引用了“stm32mp157d-ed1.dts”文件,主要工作是由“stm32mp157d-ed1.dts”文件来完成的。因此,我们要以“stm32mp157d-ed1.dts”为蓝本,复制一份,并命名为 “stm32mp157d-atk.dts”,这就是我们为正点原子STM32MP157开发板要准备的设备树。
输入“cp stm32mp157d-ed1.dts stm32mp157d-atk.dts回车”,复制文件;
输入“ls回车”,列出“fdts”目录下的所有设备树文件;
发现了“stm32mp157d-atk.dts”文件,这就是我们为正点原子STM32MP157开发板准备的“设备树文件”。
见下图:

7、回到VSCode,打开设备树文件“stm32mp157d-atk.dts”,见下图:

设备树文件“stm32mp157d-atk.dts”文件内容如下:
// SPDX-License-Identifier: (GPL-2.0+ OR BSD-3-Clause)
/*
* Copyright (C) STMicroelectronics 2019 - All Rights Reserved
* Author: Alexandre Torgue
*/
/dts-v1/;
#include "stm32mp157.dtsi"
#include "stm32mp15xd.dtsi"
#include "stm32mp15-pinctrl.dtsi"
#include "stm32mp15xxaa-pinctrl.dtsi"
#include "stm32mp15xx-edx.dtsi"
#include <dt-bindings/soc/st,stm32-etzpc.h>
/ {
model = "STMicroelectronics STM32MP157D eval daughter";
compatible = "st,stm32mp157d-ed1", "st,stm32mp157";
chosen {
stdout-path = "serial0:115200n8";
};
aliases {
serial0 = &uart4;
};
};
&cpu1 {
cpu-supply = <&vddcore>;
};
&etzpc {
st,decprot = <
DECPROT(STM32MP1_ETZPC_USART1_ID, DECPROT_NS_RW, DECPROT_UNLOCK)
DECPROT(STM32MP1_ETZPC_SPI6_ID, DECPROT_NS_RW, DECPROT_UNLOCK)
DECPROT(STM32MP1_ETZPC_I2C4_ID, DECPROT_NS_RW, DECPROT_UNLOCK)
DECPROT(STM32MP1_ETZPC_I2C6_ID, DECPROT_NS_RW, DECPROT_UNLOCK)
DECPROT(STM32MP1_ETZPC_RNG1_ID, DECPROT_NS_RW, DECPROT_UNLOCK)
DECPROT(STM32MP1_ETZPC_HASH1_ID, DECPROT_NS_RW, DECPROT_UNLOCK)
DECPROT(STM32MP1_ETZPC_DDRCTRL_ID, DECPROT_S_RW, DECPROT_LOCK)
DECPROT(STM32MP1_ETZPC_DDRPHYC_ID, DECPROT_S_RW, DECPROT_LOCK)
DECPROT(STM32MP1_ETZPC_STGENC_ID, DECPROT_S_RW, DECPROT_LOCK)
DECPROT(STM32MP1_ETZPC_BKPSRAM_ID, DECPROT_S_RW, DECPROT_LOCK)
DECPROT(STM32MP1_ETZPC_IWDG1_ID, DECPROT_S_RW, DECPROT_LOCK)
>;
};
8、“stm32mp15xx-edx.dtsi”是edx系列开发板的设备树通用头文件。因此,
我们要以stm32mp15xx-edx.dtsi为蓝本,创建正点原子STM32MP157开发板的“设备树文件的头文件”。
输入“cp stm32mp15xx-edx.dtsi stm32mp157d-atk.dtsi回车”,复制文件;
输入“ls回车”,列出“fdts”目录下的所有设备树文件;
发现了“stm32mp157d-atk.dtsi”文件,这就是我们为正点原子STM32MP157开发板准备的“设备树头文件”。
见下图:

9、回到VSCode,打开设备树头文件“stm32mp157d-atk.dtsi”,见下图:
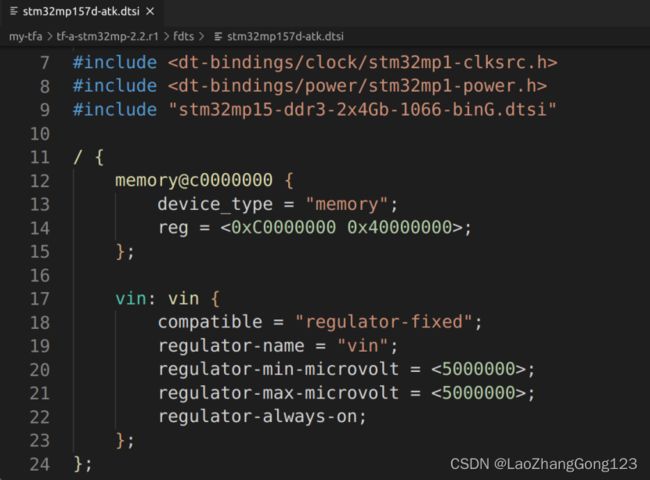
设备树头文件“stm32mp157d-atk.dtsi”文件内容如下:
// SPDX-License-Identifier: (GPL-2.0+ OR BSD-3-Clause)
/*
* Copyright (C) STMicroelectronics 2017 - All Rights Reserved
* Author: Ludovic Barre
*/
#include
#include
#include "stm32mp15-ddr3-2x4Gb-1066-binG.dtsi"
/ {
memory@c0000000 {
device_type = "memory";
reg = <0xC0000000 0x40000000>;
};
vin: vin {
compatible = "regulator-fixed";
regulator-name = "vin";
regulator-min-microvolt = <5000000>;
regulator-max-microvolt = <5000000>;
regulator-always-on;
};
};
&bsec {
board_id: board_id@ec {
reg = <0xec 0x4>;
st,non-secure-otp;
};
};
&clk_hse {
st,digbypass;
};
&cpu0{
cpu-supply = <&vddcore>;
};
&hash1 {
status = "okay";
};
&i2c4 {
pinctrl-names = "default";
pinctrl-0 = <&i2c4_pins_a>;
i2c-scl-rising-time-ns = <185>;
i2c-scl-falling-time-ns = <20>;
clock-frequency = <400000>;
status = "okay";
secure-status = "okay";
pmic: stpmic@33 {
compatible = "st,stpmic1";
reg = <0x33>;
interrupts-extended = <&exti_pwr 55 IRQ_TYPE_EDGE_FALLING>;
interrupt-controller;
#interrupt-cells = <2>;
status = "okay";
secure-status = "okay";
regulators {
compatible = "st,stpmic1-regulators";
buck1-supply = <&vin>;
buck2-supply = <&vin>;
buck3-supply = <&vin>;
buck4-supply = <&vin>;
ldo1-supply = <&v3v3>;
ldo2-supply = <&v3v3>;
ldo3-supply = <&vdd_ddr>;
ldo4-supply = <&vin>;
ldo5-supply = <&v3v3>;
ldo6-supply = <&v3v3>;
vref_ddr-supply = <&vin>;
boost-supply = <&vin>;
pwr_sw1-supply = <&bst_out>;
pwr_sw2-supply = <&bst_out>;
vddcore: buck1 {
regulator-name = "vddcore";
regulator-min-microvolt = <1200000>;
regulator-max-microvolt = <1350000>;
regulator-always-on;
regulator-initial-mode = <0>;
regulator-over-current-protection;
lp-stop {
regulator-on-in-suspend;
regulator-suspend-microvolt = <1200000>;
};
lplv-stop {
regulator-on-in-suspend;
regulator-suspend-microvolt = <900000>;
};
standby-ddr-sr {
regulator-off-in-suspend;
};
standby-ddr-off {
regulator-off-in-suspend;
};
};
vdd_ddr: buck2 {
regulator-name = "vdd_ddr";
regulator-min-microvolt = <1350000>;
regulator-max-microvolt = <1350000>;
regulator-always-on;
regulator-initial-mode = <0>;
regulator-over-current-protection;
lp-stop {
regulator-suspend-microvolt = <1350000>;
regulator-on-in-suspend;
};
lplv-stop {
regulator-suspend-microvolt = <1350000>;
regulator-on-in-suspend;
};
standby-ddr-sr {
regulator-suspend-microvolt = <1350000>;
regulator-on-in-suspend;
};
standby-ddr-off {
regulator-off-in-suspend;
};
};
vdd: buck3 {
regulator-name = "vdd";
regulator-min-microvolt = <3300000>;
regulator-max-microvolt = <3300000>;
regulator-always-on;
st,mask-reset;
regulator-initial-mode = <0>;
regulator-over-current-protection;
lp-stop {
regulator-suspend-microvolt = <3300000>;
regulator-on-in-suspend;
};
lplv-stop {
regulator-suspend-microvolt = <3300000>;
regulator-on-in-suspend;
};
standby-ddr-sr {
regulator-suspend-microvolt = <3300000>;
regulator-on-in-suspend;
};
standby-ddr-off {
regulator-suspend-microvolt = <3300000>;
regulator-on-in-suspend;
};
};
v3v3: buck4 {
regulator-name = "v3v3";
regulator-min-microvolt = <3300000>;
regulator-max-microvolt = <3300000>;
regulator-always-on;
regulator-over-current-protection;
regulator-initial-mode = <0>;
standby-ddr-sr {
regulator-off-in-suspend;
};
standby-ddr-off {
regulator-off-in-suspend;
};
};
vdda: ldo1 {
regulator-name = "vdda";
regulator-min-microvolt = <2900000>;
regulator-max-microvolt = <2900000>;
standby-ddr-sr {
regulator-off-in-suspend;
};
standby-ddr-off {
regulator-off-in-suspend;
};
};
v2v8: ldo2 {
regulator-name = "v2v8";
regulator-min-microvolt = <2800000>;
regulator-max-microvolt = <2800000>;
standby-ddr-sr {
regulator-off-in-suspend;
};
standby-ddr-off {
regulator-off-in-suspend;
};
};
vtt_ddr: ldo3 {
regulator-name = "vtt_ddr";
regulator-min-microvolt = <500000>;
regulator-max-microvolt = <750000>;
regulator-always-on;
regulator-over-current-protection;
lp-stop {
regulator-off-in-suspend;
};
lplv-stop {
regulator-off-in-suspend;
};
standby-ddr-sr {
regulator-off-in-suspend;
};
standby-ddr-off {
regulator-off-in-suspend;
};
};
vdd_usb: ldo4 {
regulator-name = "vdd_usb";
regulator-min-microvolt = <3300000>;
regulator-max-microvolt = <3300000>;
regulator-always-on;
standby-ddr-sr {
regulator-on-in-suspend;
};
standby-ddr-off {
regulator-off-in-suspend;
};
};
vdd_sd: ldo5 {
regulator-name = "vdd_sd";
regulator-min-microvolt = <2900000>;
regulator-max-microvolt = <2900000>;
regulator-boot-on;
standby-ddr-sr {
regulator-off-in-suspend;
};
standby-ddr-off {
regulator-off-in-suspend;
};
};
v1v8: ldo6 {
regulator-name = "v1v8";
regulator-min-microvolt = <1800000>;
regulator-max-microvolt = <1800000>;
standby-ddr-sr {
regulator-off-in-suspend;
};
standby-ddr-off {
regulator-off-in-suspend;
};
};
vref_ddr: vref_ddr {
regulator-name = "vref_ddr";
regulator-always-on;
regulator-over-current-protection;
lp-stop {
regulator-on-in-suspend;
};
lplv-stop {
regulator-on-in-suspend;
};
standby-ddr-sr {
regulator-on-in-suspend;
};
standby-ddr-off {
regulator-off-in-suspend;
};
};
bst_out: boost {
regulator-name = "bst_out";
};
vbus_otg: pwr_sw1 {
regulator-name = "vbus_otg";
};
vbus_sw: pwr_sw2 {
regulator-name = "vbus_sw";
regulator-active-discharge = <1>;
};
};
};
};
&iwdg2 {
timeout-sec = <32>;
status = "okay";
secure-status = "okay";
};
&nvmem_layout {
nvmem-cells = <&cfg0_otp>,
<&part_number_otp>,
<&monotonic_otp>,
<&nand_otp>,
<&uid_otp>,
<&package_otp>,
<&hw2_otp>,
<&pkh_otp>,
<&board_id>;
nvmem-cell-names = "cfg0_otp",
"part_number_otp",
"monotonic_otp",
"nand_otp",
"uid_otp",
"package_otp",
"hw2_otp",
"pkh_otp",
"board_id";
};
&pwr_regulators {
system_suspend_supported_soc_modes = <
STM32_PM_CSLEEP_RUN
STM32_PM_CSTOP_ALLOW_LP_STOP
STM32_PM_CSTOP_ALLOW_LPLV_STOP
STM32_PM_CSTOP_ALLOW_STANDBY_DDR_SR
>;
system_off_soc_mode =
vdd-supply = <&vdd>;
vdd_3v3_usbfs-supply = <&vdd_usb>;
};
&rcc {
st,hsi-cal;
st,csi-cal;
st,cal-sec = <60>;
st,clksrc = <
CLK_MPU_PLL1P
CLK_AXI_PLL2P
CLK_MCU_PLL3P
CLK_PLL12_HSE
CLK_PLL3_HSE
CLK_PLL4_HSE
CLK_RTC_LSE
CLK_MCO1_DISABLED
CLK_MCO2_DISABLED
>;
st,clkdiv = <
1 /*MPU*/
0 /*AXI*/
0 /*MCU*/
1 /*APB1*/
1 /*APB2*/
1 /*APB3*/
1 /*APB4*/
2 /*APB5*/
23 /*RTC*/
0 /*MCO1*/
0 /*MCO2*/
>;
st,pkcs = <
CLK_CKPER_HSE
CLK_FMC_ACLK
CLK_QSPI_ACLK
CLK_ETH_DISABLED
CLK_SDMMC12_PLL4P
CLK_DSI_DSIPLL
CLK_STGEN_HSE
CLK_USBPHY_HSE
CLK_SPI2S1_PLL3Q
CLK_SPI2S23_PLL3Q
CLK_SPI45_HSI
CLK_SPI6_HSI
CLK_I2C46_HSI
CLK_SDMMC3_PLL4P
CLK_USBO_USBPHY
CLK_ADC_CKPER
CLK_CEC_LSE
CLK_I2C12_HSI
CLK_I2C35_HSI
CLK_UART1_HSI
CLK_UART24_HSI
CLK_UART35_HSI
CLK_UART6_HSI
CLK_UART78_HSI
CLK_SPDIF_PLL4P
CLK_FDCAN_PLL4R
CLK_SAI1_PLL3Q
CLK_SAI2_PLL3Q
CLK_SAI3_PLL3Q
CLK_SAI4_PLL3Q
CLK_RNG1_LSI
CLK_RNG2_LSI
CLK_LPTIM1_PCLK1
CLK_LPTIM23_PCLK3
CLK_LPTIM45_LSE
>;
/* VCO = 1066.0 MHz => P = 266 (AXI), Q = 533 (GPU), R = 533 (DDR) */
pll2: st,pll@1 {
compatible = "st,stm32mp1-pll";
reg = <1>;
cfg = <2 65 1 0 0 PQR(1,1,1)>;
frac = <0x1400>;
};
/* VCO = 417.8 MHz => P = 209, Q = 24, R = 11 */
pll3: st,pll@2 {
compatible = "st,stm32mp1-pll";
reg = <2>;
cfg = <1 33 1 16 36 PQR(1,1,1)>;
frac = <0x1a04>;
};
/* VCO = 594.0 MHz => P = 99, Q = 74, R = 74 */
pll4: st,pll@3 {
compatible = "st,stm32mp1-pll";
reg = <3>;
cfg = <3 98 5 7 7 PQR(1,1,1)>;
};
};
&rng1 {
status = "okay";
secure-status = "okay";
};
&rtc {
status = "okay";
secure-status = "okay";
};
&sdmmc1 {
pinctrl-names = "default";
pinctrl-0 = <&sdmmc1_b4_pins_a &sdmmc1_dir_pins_a>;
disable-wp;
st,sig-dir;
st,neg-edge;
st,use-ckin;
bus-width = <4>;
vmmc-supply = <&vdd_sd>;
sd-uhs-sdr12;
sd-uhs-sdr25;
sd-uhs-sdr50;
sd-uhs-ddr50;
sd-uhs-sdr104;
status = "okay";
};
&sdmmc2 {
pinctrl-names = "default";
pinctrl-0 = <&sdmmc2_b4_pins_a &sdmmc2_d47_pins_a>;
non-removable;
no-sd;
no-sdio;
st,neg-edge;
bus-width = <8>;
vmmc-supply = <&v3v3>;
vqmmc-supply = <&vdd>;
mmc-ddr-3_3v;
status = "okay";
};
&timers15 {
secure-status = "okay";
st,hsi-cal-input = <7>;
st,csi-cal-input = <8>;
};
&uart4 {
pinctrl-names = "default";
pinctrl-0 = <&uart4_pins_a>;
status = "okay";
};
&usbotg_hs {
vbus-supply = <&vbus_otg>;
};
&usbphyc_port0 {
phy-supply = <&vdd_usb>;
};
&usbphyc_port1 {
phy-supply = <&vdd_usb>;
};
10、在VSCode中,打开设备树文件“stm32mp157d-atk.dts”将第12行的“stm32mp15xx-edx.dtsi”修改为“stm32mp157d-atk.dtsi”;
点击“文件”,再点击“保存(S)”;
见下图:

11、回到终端,
输入“cd ..回车”,退回到“tf-a-stm32mp-2.2.r1”目录;
输入“ls回车”,列出“tf-a-stm32mp-2.2.r1”目录下所有的文件和文件夹;
输入“cd ..回车”,退回到“my-tfa”目录
输入“ls回车”,列出“my-tfa”目录下所有的文件和文件夹;
输入“vim Makefile.sdk回车”,使用vim命令打开已有的“Makefile.sdk”文件,见下图:
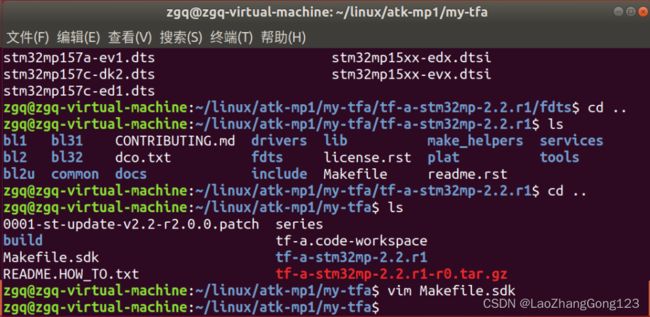
“Makefile.sdk”文件见下图:

12、创建新的设备树名字“stm32mp157d-atk”
将“stm32mp157d-atk”添加到TFA DEVICETREE 配置项中;
见下图:

13、按“ESC键”+“:wq键”,保存退出。
14、输入“cd tf-a-stm32mp-2.2.r1/回车”,进入到“tf-a-stm32mp-2.2.r1”目录下;
输入“ls回车”,列出“tf-a-stm32mp-2.2.r1”目录下所有的文件和文件夹;
输入“make -f ../Makefile.sdk all回车”, 执行编译, '-f'的意思是重新指定Makefile。
如果需要加快编译速度,可是使用多线程编译,线程数量最好和自己给虚拟机分配的物理核心保持一致,使用-j来指定线程数,命令如下:
make -f ../Makefile.sdk -j8 all //使用8线程编译
见下图:


14、输入“cd ..回车”返回到“my-tfa”目录
输入“ls回车”,列出“my-tfa”目录下所有的文件和文件夹;
输入“cd build/回车”,切换到“build”目录下;
输入“ls回车”,列出“build”目录下所有的文件和文件夹
输入“cd trusted/回车”,切换到“trusted”目录下;
输入“ls 回车”,列出当前目录下所有的文件和文件夹
编译成功,在“/linux/atk-mp1/my-tfa/build/trusted/”目录下,发现有以“tf-a-stm32mp157d-atk”开头的6个文件文件。
见下图:

至此,我们完成了TF-A移植第1步,新的设备树“stm32mp157d-atk”创建好了,接下来,我们要修改设备树,在下一节再讲,文章太长了,吃多了会无法消化。