SpringCloudAlibaba系列之Nacos配置管理
目录
说明
认识配置中心
Nacos架构图
Nacos配置管理实现原理
核心源码分析-客户端
核心源码分析-服务端
配置修改的实时通知
主流配置中心对比
小小收获
说明
本篇文章主要目的是从头到尾比较粗粒度的分析Nacos配置中心的一些实现,很多细节没有涉及,希望能给大家带来一定的启发。如果大家对其中更多的实现细节感兴趣,可以留言区留言大家一起讨论。下面就让我们一起开始Nacos配置中心的探索之旅吧!
认识配置中心
集中配置管理解决了之前各个应用单独维护配置在下面这些方面的不足:
- 动态更新
- 集中式管理
- 安全性和权限管理
- 不同部署环境的隔离问题
本篇内容将带领大家深入理解配置中心Nacos,如有纰漏,望大家及时指正。下面让我们一起开始进入正题。
Nacos架构图
学习任何技术,我们首先看下它官方的架构图,有个整体的认识。Nacos架构图如下:
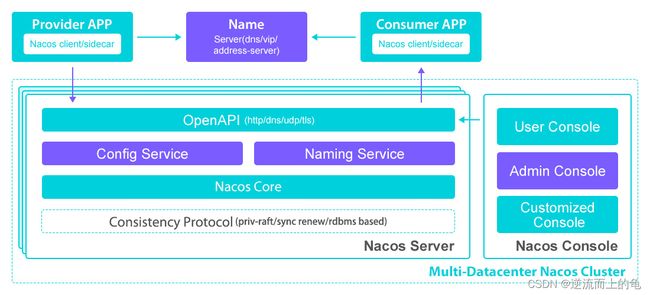
核心内容就是:Nacos Server作为Nacos的服务端,其中的Config Service模块提供了配置管理服务,然后对外提供了OpenAPI接口供客户端调用。实际应用当中,我们是通过Nacos客户端SDK来完成相关接口的调用的,SDK屏蔽了所有接口调用的细节,我们只需要完成相关的配置即可。
Nacos配置管理实现原理
实际应用的时候,我们会通过下面这样的方式来读取配置中心的值:
@Value("${manual.onFlag}")
private Boolean manualOnFlag;这是一个开关配置,为什么我们通过@Value注解,就可以获取到远程配置中心的数据呢?因为远程配置中心的所有数据,在应用程序启动完成之后,都会被填充到Enviroment中,它是Spring中管理所有属性值的对象。
接下来,我们就来一起梳理一下配置中心的实现细节,并搞懂下面几个事情:
- 配置中心的数据是怎么填充到Enviroment中的?
- 配置如何动态刷新?即改了配置内容,应用无需重启即可生效。
其整体实现思路:客户端启动,会去远程配置中心拉取当前应用关心的相关配置信息(这是主动拉取的过程,主动拉取的时候,会同服务端建立长轮询机制);如果服务端(Nacos-Server)配置信息发生了变更,会推送变更的配置项到客户端,然后客户端拉取变更的配置项对应的最新内容(这是服务端推送),基于长轮询机制实现。具体实现细节我们下面再慢慢分析。
这里贴两张图用于我们接下来更加直观地理解Nacos配置管理的实现原理。

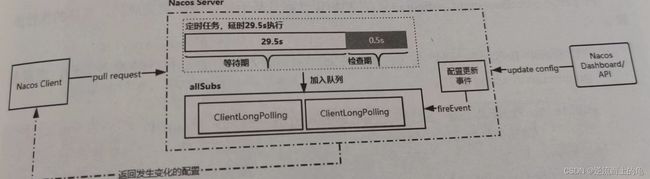
总的来说,Nacos配置中心采用了推拉结合的方式来实现配置管理,主动拉取会存在时效性,所以再基于长轮询机制实现了推模式,解决主动拉取方式存在的时效性问题。
核心源码分析-客户端
- 核心类
Spring Cloud中的PropertySourceLocator类实现应用外部化配置可动态加载,Spring Cloud Alibaba Nacos中的NacosPropertySourceLocator类实现了该接口,其中的locate方法就是配置获取的核心逻辑。
public PropertySource locate(Environment env) {
        this.nacosConfigProperties.setEnvironment(env);
        ConfigService configService = this.nacosConfigManager.getConfigService();
        if (null == configService) {
            log.warn("no instance of config service found, can't load config from nacos");
            return null;
        } else {
            long timeout = (long)this.nacosConfigProperties.getTimeout();
            this.nacosPropertySourceBuilder = new NacosPropertySourceBuilder(configService, timeout);
            String name = this.nacosConfigProperties.getName();
            String dataIdPrefix = this.nacosConfigProperties.getPrefix();
            if (StringUtils.isEmpty(dataIdPrefix)) {
                dataIdPrefix = name;
            }

            if (StringUtils.isEmpty(dataIdPrefix)) {
                dataIdPrefix = env.getProperty("spring.application.name");
            }

            CompositePropertySource composite = new CompositePropertySource("NACOS");
            this.loadSharedConfiguration(composite);
            this.loadExtConfiguration(composite);
            this.loadApplicationConfiguration(composite, dataIdPrefix, this.nacosConfigProperties, env);
            return composite;
        }
    }
从这里我们可以看出,三类配置的一个加载顺序:先是共享配置shared-config,然后是扩展配置ext-config,最后是应用配置。如果遇到相同的配置项,后者会覆盖前者。
//dataIdPrefix规则:spring.cloud.nacos.config.prefix如果没有配置,使用spring.cloud.nacos.config.name;如果prefix和name都未配置,使用spring.application.name
//fileExtension:配置文件中的spring.cloud.nacos.config.file-extension属性,默认为properties
private void loadApplicationConfiguration(CompositePropertySource compositePropertySource, String dataIdPrefix, NacosConfigProperties properties, Environment environment) {
    String fileExtension = properties.getFileExtension();
    String nacosGroup = properties.getGroup();
    //获取配置方式一:Nacos中的dataId为dataIdPrefix
    this.loadNacosDataIfPresent(compositePropertySource, dataIdPrefix, nacosGroup, fileExtension, true);
    //获取配置方式二:Nacos中的dataId为dataIdPrefix.fileExtension
    this.loadNacosDataIfPresent(compositePropertySource, dataIdPrefix + "." + fileExtension, nacosGroup, fileExtension, true);
    String[] var7 = environment.getActiveProfiles();
    int var8 = var7.length;

    for(int var9 = 0; var9 < var8; ++var9) {
        String profile = var7[var9];
        String dataId = dataIdPrefix + "-" + profile + "." + fileExtension;
        //获取配置方式三:Nacos中dataId为dataIdprefix-profile(区分不同环境).fileExtension
        this.loadNacosDataIfPresent(compositePropertySource, dataId, nacosGroup, fileExtension, true);
    }
}

private void loadNacosDataIfPresent(final CompositePropertySource composite, final String dataId, final String group, String fileExtension, boolean isRefreshable) {
    if (null != dataId && dataId.trim().length() >= 1) {
        if (null != group && group.trim().length() >= 1) {
            NacosPropertySource propertySource = this.loadNacosPropertySource(dataId, group, fileExtension, isRefreshable);
            this.addFirstPropertySource(composite, propertySource, false);
        }
    }
}

private NacosPropertySource loadNacosPropertySource(final String dataId, final String group, String fileExtension, boolean isRefreshable) {
    return NacosContextRefresher.getRefreshCount() != 0L && !isRefreshable ? NacosPropertySourceRepository.getNacosPropertySource(dataId, group) : this.nacosPropertySourceBuilder.build(dataId, group, fileExtension, isRefreshable);
}

private void addFirstPropertySource(final CompositePropertySource composite, NacosPropertySource nacosPropertySource, boolean ignoreEmpty) {
    if (null != nacosPropertySource && null != composite) {
        if (!ignoreEmpty || !((Map)nacosPropertySource.getSource()).isEmpty()) {
            composite.addFirstPropertySource(nacosPropertySource);
        }
    }
}

public void setNacosConfigManager(NacosConfigManager nacosConfigManager) {
    this.nacosConfigManager = nacosConfigManager;
}
客户端SDK调用Nacos-Server提供的OpenAPI接口获取配置信息。
NacosPropertySource build(String dataId, String group, String fileExtension, boolean isRefreshable) {
    List> propertySources = this.loadNacosData(dataId, group, fileExtension);
    NacosPropertySource nacosPropertySource = new NacosPropertySource(propertySources, group, dataId, new Date(), isRefreshable);
    NacosPropertySourceRepository.collectNacosPropertySource(nacosPropertySource);
    return nacosPropertySource;
}

private List> loadNacosData(String dataId, String group, String fileExtension) {
    String data = null;

    try {
        data = this.configService.getConfig(dataId, group, this.timeout);
        if (StringUtils.isEmpty(data)) {
            log.warn("Ignore the empty nacos configuration and get it based on dataId[{}] & group[{}]", dataId, group);
            return Collections.emptyList();
        }

        if (log.isDebugEnabled()) {
            log.debug(String.format("Loading nacos data, dataId: '%s', group: '%s', data: %s", dataId, group, data));
        }

        return NacosDataParserHandler.getInstance().parseNacosData(dataId, data, fileExtension);
    } catch (NacosException var6) {
        log.error("get data from Nacos error,dataId:{} ", dataId, var6);
    } catch (Exception var7) {
        log.error("parse data from Nacos error,dataId:{},data:{}", new Object[]{dataId, data, var7});
    }

    return Collections.emptyList();
} 到这里,我们从外部读取到了配置信息放入到PropertySource,那么它是在什么地方合并到Spring中的环境对象Environment中去的呢?答案是PropertySourceBootstrapConfiguration类中的initialize方法。
public void initialize(ConfigurableApplicationContext applicationContext) {
    List> composite = new ArrayList();
    AnnotationAwareOrderComparator.sort(this.propertySourceLocators);
    boolean empty = true;
    ConfigurableEnvironment environment = applicationContext.getEnvironment();
    Iterator var5 = this.propertySourceLocators.iterator();

    while(true) {
        Collection source;
        do {
            do {
                if (!var5.hasNext()) {
                    if (!empty) {
                        MutablePropertySources propertySources = environment.getPropertySources();
                        String logConfig = environment.resolvePlaceholders("${logging.config:}");
                        LogFile logFile = LogFile.get(environment);
                        Iterator var15 = environment.getPropertySources().iterator();

                        while(var15.hasNext()) {
                            PropertySource p = (PropertySource)var15.next();
                            if (p.getName().startsWith("bootstrapProperties")) {
                                propertySources.remove(p.getName());
                            }
                        }

                        this.insertPropertySources(propertySources, composite);
                        this.reinitializeLoggingSystem(environment, logConfig, logFile);
                        this.setLogLevels(applicationContext, environment);
                        this.handleIncludedProfiles(environment);
                    }

                    return;
                }

                PropertySourceLocator locator = (PropertySourceLocator)var5.next();
                source = locator.locateCollection(environment);
            } while(source == null);
        } while(source.size() == 0);

        List> sourceList = new ArrayList();
        Iterator var9 = source.iterator();

        while(var9.hasNext()) {
            PropertySource p = (PropertySource)var9.next();
            if (p instanceof EnumerablePropertySource) {
                EnumerablePropertySource enumerable = (EnumerablePropertySource)p;
                sourceList.add(new BootstrapPropertySource(enumerable));
            } else {
                sourceList.add(new SimpleBootstrapPropertySource(p));
            }
        }

        logger.info("Located property source: " + sourceList);
        composite.addAll(sourceList);
        empty = false;
    }
}
分析到这里,我们应该就能明白我们为何能在程序中通过@Value注解,获取对应的配置属性的值了。
- 配置监听
现在我们获取到了远程配置中心的配置数据,如果配置发生了变更,那我们怎么感知到呢?通过对相应的配置添加监听来实现配置变更的动态感知,当服务端配置发生变更,通过长轮询机制,推送变化的配置项key到客户端,然后客户端重新从服务端去获取最新的配置数据。
那么配置监听具体是怎么实现的呢?通过相关的自动装配类可以找到NacosContextRefresher类,它监听ApplicationReadyEvent事件,该事件在上下文准备完毕之后发布,这里会完成Nacos事件监听的注册。
package com.alibaba.cloud.nacos.refresh;
public class NacosContextRefresher implements ApplicationListener, ApplicationContextAware {
    private static final Logger log = LoggerFactory.getLogger(NacosContextRefresher.class);
    private static final AtomicLong REFRESH_COUNT = new AtomicLong(0L);
    private NacosConfigProperties nacosConfigProperties;
    private final boolean isRefreshEnabled;
    private final NacosRefreshHistory nacosRefreshHistory;
    private final ConfigService configService;
    private ApplicationContext applicationContext;
    private AtomicBoolean ready = new AtomicBoolean(false);
    private Map listenerMap = new ConcurrentHashMap(16);

    public NacosContextRefresher(NacosConfigManager nacosConfigManager, NacosRefreshHistory refreshHistory) {
        this.nacosConfigProperties = nacosConfigManager.getNacosConfigProperties();
        this.nacosRefreshHistory = refreshHistory;
        this.configService = nacosConfigManager.getConfigService();
        this.isRefreshEnabled = this.nacosConfigProperties.isRefreshEnabled();
    }

    //1.监听ApplicationReadyEvent事件,该事件在上下文准备完毕之后发布
    public void onApplicationEvent(ApplicationReadyEvent event) {
        if (this.ready.compareAndSet(false, true)) {
            this.registerNacosListenersForApplications();
        }
    }

    private void registerNacosListenersForApplications() {
        if (this.isRefreshEnabled()) {
            Iterator var1 = NacosPropertySourceRepository.getAll().iterator();

            while(var1.hasNext()) {
                NacosPropertySource propertySource = (NacosPropertySource)var1.next();
                if (propertySource.isRefreshable()) {
                    String dataId = propertySource.getDataId();
                    this.registerNacosListener(propertySource.getGroup(), dataId);
                }
            }
        }
    }

    //2.当监听到事件之后,会调用registerNacosListenersForApplications方法来实现Nacos事件监听的注册
    private void registerNacosListener(final String groupKey, final String dataKey) {
        String key = NacosPropertySourceRepository.getMapKey(dataKey, groupKey);
        Listener listener = (Listener)this.listenerMap.computeIfAbsent(key, (lst) -> {
            return new AbstractSharedListener() {
                public void innerReceive(String dataId, String group, String configInfo) {
                    NacosContextRefresher.refreshCountIncrement();
                    NacosContextRefresher.this.nacosRefreshHistory.addRefreshRecord(dataId, group, configInfo);
                    //通过applicationContext.publishEvent发布一个RefreshEvent事件,而这个事件的监听实现在RefreshEventListener类中。
                    NacosContextRefresher.this.applicationContext.publishEvent(new RefreshEvent(this, (Object)null, "Refresh Nacos config"));
                    if (NacosContextRefresher.log.isDebugEnabled()) {
                        NacosContextRefresher.log.debug(String.format("Refresh Nacos config group=%s,dataId=%s,configInfo=%s", group, dataId, configInfo));
                    }

                }
            };
        });

        try {
            this.configService.addListener(dataKey, groupKey, listener);
        } catch (NacosException var6) {
            log.warn(String.format("register fail for nacos listener ,dataId=[%s],group=[%s]", dataKey, groupKey), var6);
        }
    }
}
可以看到如果监听到了相应的事件,会发布RefreshEvent事件,它的监听实现在RefreshEventListener类中。
package org.springframework.cloud.endpoint.event;
public class RefreshEventListener implements SmartApplicationListener {
    private static Log log = LogFactory.getLog(RefreshEventListener.class);
    private ContextRefresher refresh;
    private AtomicBoolean ready = new AtomicBoolean(false);

    public void onApplicationEvent(ApplicationEvent event) {
        if (event instanceof ApplicationReadyEvent) {
            this.handle((ApplicationReadyEvent)event);
        } else if (event instanceof RefreshEvent) {
            this.handle((RefreshEvent)event);
        }

    }

    public void handle(ApplicationReadyEvent event) {
        this.ready.compareAndSet(false, true);
    }

    public void handle(RefreshEvent event) {
        if (this.ready.get()) {
            log.debug("Event received " + event.getEventDesc());
            Set keys = this.refresh.refresh();
            log.info("Refresh keys changed: " + keys);
        }
    }
}
完成配置的监听之后,也就启动了客户端长轮询定时任务。具体是在什么地方呢?客户端在构建ConfigService的时候,最终调用的代码如下所示:
package com.alibaba.nacos.api.config;

import com.alibaba.nacos.api.exception.NacosException;
import java.lang.reflect.Constructor;
import java.util.Properties;

public class ConfigFactory {
    public ConfigFactory() {
    }

    public static ConfigService createConfigService(Properties properties) throws NacosException {
        try {
            //1.通过Class.forName来加载NacosConfigService类。
            Class driverImplClass = Class.forName("com.alibaba.nacos.client.config.NacosConfigService");
            Constructor constructor = driverImplClass.getConstructor(Properties.class);
            //2.使用反射来完成ConfigService类的实例化。
            ConfigService vendorImpl = (ConfigService)constructor.newInstance(properties);
            return vendorImpl;
        } catch (Throwable var4) {
            throw new NacosException(-400, var4);
        }
    }

    public static ConfigService createConfigService(String serverAddr) throws NacosException {
        Properties properties = new Properties();
        properties.put("serverAddr", serverAddr);
        return createConfigService(properties);
    }
}
ClientWorker是Nacos客户端的一个工作类,它的构造方法如下:
public ClientWorker(final HttpAgent agent, ConfigFilterChainManager configFilterChainManager, Properties properties) {
    this.agent = agent;
    this.configFilterChainManager = configFilterChainManager;
    this.init(properties);

    //第一个线程池executor只拥有一个核心线程,每隔10s就会执行一次checkConfigInfo()方法,从方法名上可以知道每10s检查一次配置信息。
    this.executor = Executors.newScheduledThreadPool(1, new ThreadFactory() {
        public Thread newThread(Runnable r) {
            Thread t = new Thread(r);
            t.setName("com.alibaba.nacos.client.Worker." + agent.getName());
            t.setDaemon(true);
            return t;
        }
    });

    //第二个线程池executorService只完成了初始化,主要用于实现客户端的定时长轮询功能。
    this.executorService = Executors.newScheduledThreadPool(Runtime.getRuntime().availableProcessors(), new ThreadFactory() {
        public Thread newThread(Runnable r) {
            Thread t = new Thread(r);
            t.setName("com.alibaba.nacos.client.Worker.longPolling." + agent.getName());
            t.setDaemon(true);
            return t;
        }
    });
    //每隔10s执行一次,检查配置是否发生了变化
    this.executor.scheduleWithFixedDelay(new Runnable() {
        public void run() {
            try {
                ClientWorker.this.checkConfigInfo();
            } catch (Throwable var2) {
                ClientWorker.LOGGER.error("[" + agent.getName() + "] [sub-check] rotate check error", var2);
            }

        }
    }, 1L, 10L, TimeUnit.MILLISECONDS);
}
长轮询机制细节本篇文章不做过多分析,后续补充。
总的来说,长轮询机制主要目的是实现配置的拉取(默认30s),核心内容是ClientWorker类中的LongPollingRunnable线程,完成了如下内容:检查配置是否有变更;同服务端建立长轮询机制(/v1/cs/configs/listener);获取远程配置等。
核心源码分析-服务端
服务端长轮询处理入口如下:
/**
 * The client listens for configuration changes.
 */
@PostMapping("/listener")
@Secured(action = ActionTypes.READ, parser = ConfigResourceParser.class)
public void listener(HttpServletRequest request, HttpServletResponse response)
        throws ServletException, IOException {
    request.setAttribute("org.apache.catalina.ASYNC_SUPPORTED", true);
    String probeModify = request.getParameter("Listening-Configs");
    if (StringUtils.isBlank(probeModify)) {
        throw new IllegalArgumentException("invalid probeModify");
    }

    probeModify = URLDecoder.decode(probeModify, Constants.ENCODE);

    Map clientMd5Map;
    try {
        clientMd5Map = MD5Util.getClientMd5Map(probeModify);
    } catch (Throwable e) {
        throw new IllegalArgumentException("invalid probeModify");
    }

    // do long-polling
    inner.doPollingConfig(request, response, clientMd5Map, probeModify.length());
}
/**
* 轮询接口.
*/
public String doPollingConfig(HttpServletRequest request, HttpServletResponse response,
Map clientMd5Map, int probeRequestSize) throws IOException {
// Long polling.
if (LongPollingService.isSupportLongPolling(request)) {
longPollingService.addLongPollingClient(request, response, clientMd5Map, probeRequestSize);
return HttpServletResponse.SC_OK + "";
}
// Compatible with short polling logic.
List changedGroups = MD5Util.compareMd5(request, response, clientMd5Map);
// Compatible with short polling result.
String oldResult = MD5Util.compareMd5OldResult(changedGroups);
String newResult = MD5Util.compareMd5ResultString(changedGroups);
String version = request.getHeader(Constants.CLIENT_VERSION_HEADER);
if (version == null) {
version = "2.0.0";
}
int versionNum = Protocol.getVersionNumber(version);
// Before 2.0.4 version, return value is put into header.
if (versionNum < START_LONG_POLLING_VERSION_NUM) {
response.addHeader(Constants.PROBE_MODIFY_RESPONSE, oldResult);
response.addHeader(Constants.PROBE_MODIFY_RESPONSE_NEW, newResult);
} else {
request.setAttribute("content", newResult);
}
Loggers.AUTH.info("new content:" + newResult);
// Disable cache.
response.setHeader("Pragma", "no-cache");
response.setDateHeader("Expires", 0);
response.setHeader("Cache-Control", "no-cache,no-store");
response.setStatus(HttpServletResponse.SC_OK);
return HttpServletResponse.SC_OK + "";
} 上述代码中,首先会判断当前请求是否为长轮询(请求头包含Long-Pulling-Timeout),如果是,则调用addLongPollingClient。
- 获取客户端请求的超时时间,减去500ms后赋值给timeout变量。
- 判断isFixedPolling,如果为true,定时任务将会在30s后开始执行;否则,在29.5s后开始执行。
- 和服务端的数据进行MD5对比,如果发生过变化则直接返回。
- scheduler.execute执行ClientLongPolling线程。
这里的核心是ClientLongPolling,它封装了客户端的长轮询请求。
public void addLongPollingClient(HttpServletRequest req, HttpServletResponse rsp, Map clientMd5Map,
        int probeRequestSize) {

    String str = req.getHeader(LongPollingService.LONG_POLLING_HEADER);
    String noHangUpFlag = req.getHeader(LongPollingService.LONG_POLLING_NO_HANG_UP_HEADER);
    String appName = req.getHeader(RequestUtil.CLIENT_APPNAME_HEADER);
    String tag = req.getHeader("Vipserver-Tag");
    int delayTime = SwitchService.getSwitchInteger(SwitchService.FIXED_DELAY_TIME, 500);

    long timeout = Math.max(10000, Long.parseLong(str) - delayTime);
    if (isFixedPolling()) {
        timeout = Math.max(10000, getFixedPollingInterval());
        // Do nothing but set fix polling timeout.
    } else {
        long start = System.currentTimeMillis();
        List changedGroups = MD5Util.compareMd5(req, rsp, clientMd5Map);
        if (changedGroups.size() > 0) {
            generateResponse(req, rsp, changedGroups);
            return;
        } else if (noHangUpFlag != null && noHangUpFlag.equalsIgnoreCase(TRUE_STR)) {
            return;
        }
    }
    String ip = RequestUtil.getRemoteIp(req);

    // Must be called by http thread, or send response.
    final AsyncContext asyncContext = req.startAsync();

    // AsyncContext.setTimeout() is incorrect, Control by oneself
    asyncContext.setTimeout(0L);

    ConfigExecutor.executeLongPolling(
            new ClientLongPolling(asyncContext, clientMd5Map, ip, probeRequestSize, timeout, appName, tag));
}
class ClientLongPolling implements Runnable {
@Override
public void run() {
asyncTimeoutFuture = ConfigExecutor.scheduleLongPolling(new Runnable() {
@Override
public void run() {
try {
getRetainIps().put(ClientLongPolling.this.ip, System.currentTimeMillis());
boolean removeFlag = allSubs.remove(ClientLongPolling.this);
if (removeFlag) {
if (isFixedPolling()) {
List changedGroups = MD5Util
.compareMd5((HttpServletRequest) asyncContext.getRequest(),
(HttpServletResponse) asyncContext.getResponse(), clientMd5Map);
if (changedGroups.size() > 0) {
sendResponse(changedGroups);
} else {
sendResponse(null);
}
} else {
sendResponse(null);
}
} else {
}
} catch (Throwable t) {
}
}
}, timeoutTime, TimeUnit.MILLISECONDS);
allSubs.add(this);
}
void sendResponse(List changedGroups) {
if (null != asyncTimeoutFuture) {
asyncTimeoutFuture.cancel(false);
}
generateResponse(changedGroups);
}
void generateResponse(List changedGroups) {
if (null == changedGroups) {
asyncContext.complete();
return;
}
HttpServletResponse response = (HttpServletResponse) asyncContext.getResponse();
try {
final String respString = MD5Util.compareMd5ResultString(changedGroups);
// Disable cache.
response.setHeader("Pragma", "no-cache");
response.setDateHeader("Expires", 0);
response.setHeader("Cache-Control", "no-cache,no-store");
response.setStatus(HttpServletResponse.SC_OK);
response.getWriter().println(respString);
asyncContext.complete();
} catch (Exception ex) {
PULL_LOG.error(ex.toString(), ex);
asyncContext.complete();
}
}
ClientLongPolling(AsyncContext ac, Map clientMd5Map, String ip, int probeRequestSize,
long timeoutTime, String appName, String tag) {
this.asyncContext = ac;
this.clientMd5Map = clientMd5Map;
this.probeRequestSize = probeRequestSize;
this.createTime = System.currentTimeMillis();
this.ip = ip;
this.timeoutTime = timeoutTime;
this.appName = appName;
this.tag = tag;
}
final AsyncContext asyncContext;
final Map clientMd5Map;
final long createTime;
final String ip;
final String appName;
final String tag;
final int probeRequestSize;
final long timeoutTime;
Future asyncTimeoutFuture;
@Override
public String toString() {
return "ClientLongPolling{" + "clientMd5Map=" + clientMd5Map + ", createTime=" + createTime + ", ip='" + ip
+ '\'' + ", appName='" + appName + '\'' + ", tag='" + tag + '\'' + ", probeRequestSize="
+ probeRequestSize + ", timeoutTime=" + timeoutTime + '}';
}
} 从上面的分析我们可以看出,所谓的长轮询就是服务端收到请求之后,不立即返回,而是在延后(30-0.5)s才把请求结果返回给客户端,这就使得客户端和服务端之间在30s之内数据没有发生变化的情况下一直处于连接状态。
这里我们可能会有一个疑问,定时任务是延时29.5s之后执行的,并没有达到我们说的实时通知的目的,那我们修改配置之后是如何做到实时通知的呢?
配置修改的实时通知
核心是通过发布订阅机制以及DataChangeTask来实现的。
public LongPollingService() {
    allSubs = new ConcurrentLinkedQueue();

    ConfigExecutor.scheduleLongPolling(new StatTask(), 0L, 10L, TimeUnit.SECONDS);

    // Register LocalDataChangeEvent to NotifyCenter.
    NotifyCenter.registerToPublisher(LocalDataChangeEvent.class, NotifyCenter.ringBufferSize);

    // Register A Subscriber to subscribe LocalDataChangeEvent.
    NotifyCenter.registerSubscriber(new Subscriber() {

        @Override
        public void onEvent(Event event) {
            if (isFixedPolling()) {
                // Ignore.
            } else {
                if (event instanceof LocalDataChangeEvent) {
                    LocalDataChangeEvent evt = (LocalDataChangeEvent) event;
                    ConfigExecutor.executeLongPolling(new DataChangeTask(evt.groupKey, evt.isBeta, evt.betaIps));
                }
            }
        }

        @Override
        public Class subscribeType() {
            return LocalDataChangeEvent.class;
        }
    });

}
class DataChangeTask implements Runnable {
@Override
public void run() {
try {
ConfigCacheService.getContentBetaMd5(groupKey);
for (Iterator iter = allSubs.iterator(); iter.hasNext(); ) {
ClientLongPolling clientSub = iter.next();
if (clientSub.clientMd5Map.containsKey(groupKey)) {
// If published tag is not in the beta list, then it skipped.
if (isBeta && !CollectionUtils.contains(betaIps, clientSub.ip)) {
continue;
}
// If published tag is not in the tag list, then it skipped.
if (StringUtils.isNotBlank(tag) && !tag.equals(clientSub.tag)) {
continue;
}
getRetainIps().put(clientSub.ip, System.currentTimeMillis());
iter.remove(); // Delete subscribers' relationships.
clientSub.sendResponse(Arrays.asList(groupKey));
}
}
} catch (Throwable t) {
}
}
DataChangeTask(String groupKey, boolean isBeta, List betaIps) {
this(groupKey, isBeta, betaIps, null);
}
DataChangeTask(String groupKey, boolean isBeta, List betaIps, String tag) {
this.groupKey = groupKey;
this.isBeta = isBeta;
this.betaIps = betaIps;
this.tag = tag;
}
final String groupKey;
final long changeTime = System.currentTimeMillis();
final boolean isBeta;
final List betaIps;
final String tag;
} 遍历队列allSubs中的所有客户端长轮询请求,比较每一个客户端长轮询请求携带的groupKey,如果服务端变更的配置和客户端请求关注的配置一致,则直接返回。
主流配置中心对比
这里我们对比几个常用的配置中心,Nacos、Apollo和Spring Cloud Config。下面是网上找到的一个比较全面的比较内容,供大家参考:
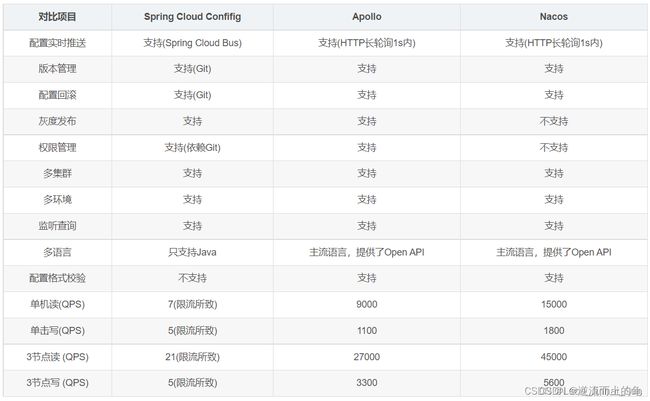
对于Spring Cloud Config、Apollo和Nacos这三个开源的配置中心中间件,Spring Cloud自带的Config配置中心依赖git,性能较差;Apollo相比较而已,功能更加完善,相比其他配置中心,它内置支持CAT,性能也算OK;Nacos毕竟是阿里开源,经过线上的各种考验,性能最优。总的来说,对于配置中心的选型,能满足我们的需求就行,再就是考虑和现有团队技术栈的一个吻合度。
小小收获
通过对Nacos由表及里的学习,我们能从中学习到的知识点包括以下这些方面,如果有大家感兴趣的点,建议大家去深入了解和学习一下,作为对自己的一个技术能力提升。
- SpringBoot启动原理(梳理启动原理找到配置获取的入口)
- 【重要】SpringBoot自动装配机制SPI(这个比较重要,Dubbo的核心思想之一,实现方式不同但是思想一致)
- Spring事件发布与订阅(阅读源码过程中,很多场景有涉及)
- Spring应用程序环境配置封装类Environment(配置项的载体)
- 反射机制(Java基础内容)
- 长轮询机制(配置中心核心内容)
- 线程池(定时线程池,延迟特定时间之后执行)
- 队列(长轮询机制实现,客户端请求封装之后全部放入队列,然后慢慢处理)