【SpringBoot】SSM案例
【SpringBoot】SSM案例
- 【SpringBoot】SSM案例
-
- 一、整合SSM
- 二、实现CRUD操作
-
- 2.1 结合thymeleaf实现用户展示
- 2.2 实现用户新增
- 2.3 用户修改
- 2.4 删除用户
【SpringBoot】SSM案例
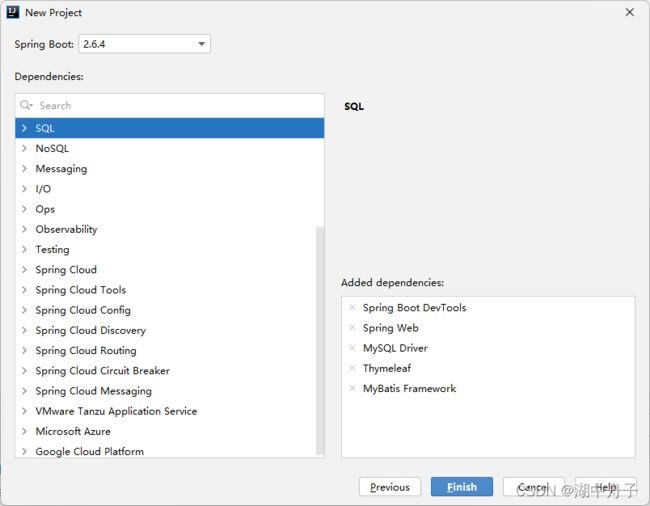
一、整合SSM
-
最终版本的pom依赖
<project xmlns="http://maven.apache.org/POM/4.0.0" xmlns:xsi="http://www.w3.org/2001/XMLSchema-instance" xsi:schemaLocation="http://maven.apache.org/POM/4.0.0 https://maven.apache.org/xsd/maven-4.0.0.xsd"> <modelVersion>4.0.0modelVersion> <parent> <groupId>org.springframework.bootgroupId> <artifactId>spring-boot-starter-parentartifactId> <version>2.6.4version> <relativePath/> parent> <groupId>com.examplegroupId> <artifactId>SpringBootDemoSSMartifactId> <version>0.0.1-SNAPSHOTversion> <name>SpringBootDemoSSMname> <description>Demo project for Spring Bootdescription> <properties> <java.version>1.8java.version> properties> <dependencies> <dependency> <groupId>org.springframework.bootgroupId> <artifactId>spring-boot-starter-thymeleafartifactId> dependency> <dependency> <groupId>org.springframework.bootgroupId> <artifactId>spring-boot-starter-webartifactId> dependency> <dependency> <groupId>org.mybatis.spring.bootgroupId> <artifactId>mybatis-spring-boot-starterartifactId> <version>2.2.2version> dependency> <dependency> <groupId>org.springframework.bootgroupId> <artifactId>spring-boot-devtoolsartifactId> dependency> <dependency> <groupId>mysqlgroupId> <artifactId>mysql-connector-javaartifactId> <scope>runtimescope> dependency> <dependency> <groupId>org.springframework.bootgroupId> <artifactId>spring-boot-starter-testartifactId> <scope>testscope> dependency> <dependency> <groupId>com.alibabagroupId> <artifactId>druidartifactId> <version>1.2.6version> dependency> dependencies> <build> <plugins> <plugin> <groupId>org.springframework.bootgroupId> <artifactId>spring-boot-maven-pluginartifactId> <configuration> <fork>truefork> configuration> plugin> plugins> build> project> -
配置数据库及mybatis
# jdbc的相关配置 # MySQL的版本不同,需要的驱动器也不同 spring.datasource.driver-class-name=com.mysql.cj.jdbc.Driver spring.datasource.url=jdbc:mysql://*.*.*.*:3306/springboot?serverTimezone=UTC spring.datasource.username=*** spring.datasource.password=*** # 配置连接池 spring.datasource.type=com.alibaba.druid.pool.DruidDataSource # 指定mybatis的别名 mybatis.type-aliases-package=com.example.mapper #指定MyBatis的映射文件的路径 mybatis.mapper-locations=classpath:mapper/*.xml -
数据表结构
CREATE TABLE `users` ( `id` int(11) NOT NULL AUTO_INCREMENT, `name` varchar(255) DEFAULT NULL, `age` int(11) DEFAULT NULL, PRIMARY KEY (`id`) ) ENGINE=InnoDB DEFAULT CHARSET=utf8; -
新建数据表对应实体类
package com.example.entity; public class User { private Integer id; private String name; private Integer age; //省略getter、setter、toString } -
创建UserMapper接口
package com.example.mapper; import com.example.entity.User; import java.util.List; public interface UserMapper { /** * 查询所有用户 * @return */ public List<User> queryAll(); } -
在resource目录下创建mapper文件夹,在文件夹中新建文件
UserMapper.xml,-
文件名与UserMapper接口一致
-
id对应UserMapper接口中的方法名
-
命名空间对应UserMapper全限定路径名
DOCTYPE mapper PUBLIC "-//mybatis.org//DTD Mapper 3.0//EN" "http://mybatis.org/dtd/mybatis-3-mapper.dtd"> <mapper namespace="com.example.mapper.UserMapper"> <select id="queryAll" resultType="com.example.entity.User"> select * from users select> mapper> -
-
新建service接口与接口实现
package com.example.service;

import com.example.entity.User;

import java.util.List;

public interface IUserService {

    /**
     * 查询全部用户
     * @return
     */
    public List<User> queryAll();
}
package com.example.service.impl; import com.example.entity.User; import com.example.mapper.UserMapper; import com.example.service.IUserService; import org.springframework.beans.factory.annotation.Autowired; import org.springframework.stereotype.Service; import java.util.List; @Service public class UserServiceImpl implements IUserService { @Autowired private UserMapper userMapper; @Override public List<User> queryAll() { return userMapper.queryAll(); } }接口实现中在使用UserMapper接口对象的时候会报红,这个不影响
-
创建Controller层
package com.example.controller; import com.example.entity.User; import com.example.service.IUserService; import org.springframework.beans.factory.annotation.Autowired; import org.springframework.web.bind.annotation.RequestMapping; import org.springframework.web.bind.annotation.RestController; import java.util.List; @RestController public class UserController { @Autowired private IUserService userService; @RequestMapping("/user/queryAll") public List<User> queryAll(){ return userService.queryAll(); } } -
测试
在浏览器中输入:
localhost:8080/user/queryAll
二、实现CRUD操作
2.1 结合thymeleaf实现用户展示
-
新建前端模板
user.htmlDOCTYPE html> <html lang="en" xmlns="http://www.w3.org/1999/xhtml" xmlns:th="http://www.thymeleaf.org"> <head> <meta charset="UTF-8"> <title>用户信息title> head> <body> <h1>用户管理h1> <table border="1" style="width: 300px"> <tr> <th>用户IDth> <th>用户姓名th> <th>用户年龄th> tr> <tr th:each="user:${list}"> <td th:text="${user.id}">td> <td th:text="${user.name}">td> <td th:text="${user.age}">td> tr> table> body> html> -
controller设置前端传值
package com.example.controller; import com.example.service.IUserService; import org.springframework.beans.factory.annotation.Autowired; import org.springframework.stereotype.Controller; import org.springframework.ui.Model; import org.springframework.web.bind.annotation.RequestMapping; //返回页面就不可以再用@RestController注解了 //@RestController @Controller public class UserController { @Autowired private IUserService userService; @RequestMapping("/user/queryAll") public String queryAll(Model model){ model.addAttribute("list",userService.queryAll()) return "user"; } } -
测试
鼠标点击,测试页面:用户信息
2.2 实现用户新增
-
修改用户展示页面,增加用户新增按钮
DOCTYPE html> <html lang="en" xmlns="http://www.w3.org/1999/xhtml" xmlns:th="http://www.thymeleaf.org"> <head> <meta charset="UTF-8"> <title>用户信息title> head> <body> <h1>用户管理h1> <a href="/user/addPage">新增用户a> <table border="1" style="width: 300px"> <tr> <th>用户IDth> <th>用户姓名th> <th>用户年龄th> tr> <tr th:each="user:${list}"> <td th:text="${user.id}">td> <td th:text="${user.name}">td> <td th:text="${user.age}">td> tr> table> body> html> -
新增用户新增页面
userAdd.htmlDOCTYPE html> <html lang="en" xmlns="http://www.w3.org/1999/xhtml" xmlns:th="http://www.thymeleaf.org"> <head> <meta charset="UTF-8"> <title>用户信息title> head> <body> <h1>添加用户h1> <form th:action="@{/user/save}" method="post"> <label>姓名:label><input type="text" name="name"><br> <label>年龄:label><input type="text" name="age"><br> <input type="submit" value="提交"> form> body> html> -
编辑UserMapper接口类与UserMapper.xml文件
/** * 新增用户 * @return */ public Integer addUser(User user);<insert id="addUser" parameterType="com.example.entity.User"> insert into users (name,age)VALUES(#{name},#{age}) insert> -
修改service
//IUserService

/**
* 新增用户
* @return
*/
public Integer addUser(User user);
// UserServiceImpl @Override public Integer addUser(User user) { return userMapper.addUser(user); } -
修改controller
/**
 * 跳转用户新增页面
 * @return
 */
@RequestMapping("/user/addPage")
public String addPage(){
    return "userAdd";
}

/**
 * 跳回用户展示页面
 * @param user
 * @return
 */
@RequestMapping("/user/save")
public String userSave(User user){
    userService.addUser(user);
    return "redirect:/user/queryAll";
}
2.3 用户修改
-
修改用户展示页面,增加修改按钮
DOCTYPE html> <html lang="en" xmlns="http://www.w3.org/1999/xhtml" xmlns:th="http://www.thymeleaf.org"> <head> <meta charset="UTF-8"> <title>用户信息title> head> <body> <h1>用户管理h1> <a href="/user/addPage">新增用户a> <table border="1" style="width: 300px"> <tr> <th>用户IDth> <th>用户姓名th> <th>用户年龄th> <th>操作th> tr> <tr th:each="user:${list}"> <td th:text="${user.id}">td> <td th:text="${user.name}">td> <td th:text="${user.age}">td> <td> <a th:href="@{/user/updatePage(id=${user.id})}">修改a> td> tr> table> body> html> -
增加用户修改页面
DOCTYPE html> <html lang="en" xmlns="http://www.w3.org/1999/xhtml" xmlns:th="http://www.thymeleaf.org"> <head> <meta charset="UTF-8"> <title>用户信息title> head> <body> <h1>更新用户h1> <form th:action="@{/user/update}" method="post"> <input type="hidden" name="id" th:value="${user.id}"> <label>姓名:label><input type="text" name="name" th:value="${user.name}"><br> <label>年龄:label><input type="text" name="age" th:value="${user.age}"><br> <input type="submit" value="提交"> form> body> html> -
编辑UserMapper接口类与UserMapper.xml文件
/** * 根据id查询用户信息 * @param id * @return */ public User queryById(Integer id); /** * 修改用户 * @param user * @return */ public Integer updateUser(User user);<select id="queryById" resultType="com.example.entity.User" > select * from users where id = #{id} select> <update id="updateUser" parameterType="com.example.entity.User"> update users set name=#{name},age=#{age} where id =#{id} update> -
修改service
//IUserService

/**
 * 根据id查询用户信息
 * @param id
 * @return
 */
public User queryById(Integer id);

/**
 * 修改用户
 * @param user
 * @return
 */
public Integer updateUser(User user);
// UserServiceImpl @Override public User queryById(Integer id) { return userMapper.queryById(id); } @Override public Integer updateUser(User user) { return userMapper.updateUser(user); } -
修改controller
/**
 * 查询需要修改的用户信息,并将其展示到修改页面
 * @param id
 * @param model
 * @return
 */
@RequestMapping("/user/updatePage")
public String updateInfo(Integer id,Model model){
    User user = userService.queryById(id);
    model.addAttribute("user",user);
    return "userUpdate";
}

/**
 * 修改用户
 * @param user
 * @return
 */
@RequestMapping("/user/update")
public String updateUser(User user){
    userService.updateUser(user);
    return "redirect:/user/queryAll";
}
2.4 删除用户
参照用户查询、新增、修改
