iOS UICollectionView控件
iOS流布局UICollectionView系列一——初识与简单使用UICollectionView
一、简介
UICollectionView是iOS6之后引入的一个新的UI控件,它和UITableView有着诸多的相似之处,其中许多代理方法都十分类似。简单来说,UICollectionView是比UITbleView更加强大的一个UI控件,有如下几个方面:
1、支持水平和垂直两种方向的布局
2、通过layout配置方式进行布局
3、类似于TableView中的cell特性外,CollectionView中的Item大小和位置可以自由定义
4、通过layout布局回调的代理方法,可以动态的定制每个item的大小和collection的大体布局属性
5、更加强大一点,完全自定义一套layout布局方案,可以实现意想不到的效果
这篇博客,我们主要讨论CollectionView使用原生layout的方法和相关属性,其他特点和更强的制定化,会在后面的博客中介绍
二、先来实现一个最简单的九宫格类布局
在了解UICollectionView的更多属性前,我们先来使用其进行一个最简单的流布局试试看,在controller的viewDidLoad中添加如下代码:
// 创建一个layout布局类
UICollectionViewFlowLayout *layout = [[UICollectionViewFlowLayout alloc]init];
// 设置布局方向为垂直流布局
layout.scrollDirection = UICollectionViewScrollDirectionVertical;
// 设置每个item的大小为100*100
layout.itemSize = CGSizeMake(100, 100);
// 创建collectionView 通过一个布局策略layout来创建
UICollectionView *collect = [[UICollectionView alloc] initWithFrame:self.view.frame collectionViewLayout:layout];
// 代理设置
collect.delegate=self;
collect.dataSource=self;
// 注册item类型 这里使用系统的类型
[collect registerClass:[UICollectionViewCell class] forCellWithReuseIdentifier:@"cellid"];

[self.view addSubview:collect];
这里有一点需要注意,collectionView在完成代理回调前,必须注册一个cell,类似如下:
[collect registerClass:[UICollectionViewCell class] forCellWithReuseIdentifier:@"cellid"];
这和tableView有些类似,又有些不同,因为tableView除了注册cell的方法外,还可以通过临时创建来做:
// tableView在从复用池中取cell的时候,有如下两种方法
// 使用这种方式如果复用池中无,是可以返回nil的,我们在临时创建即可
- (nullable __kindof UITableViewCell *)dequeueReusableCellWithIdentifier:(NSString *)identifier;
// 6.0后使用如下的方法直接从注册的cell类获取创建,如果没有注册会崩溃
- (__kindof UITableViewCell *)dequeueReusableCellWithIdentifier:(NSString *)identifier forIndexPath:(NSIndexPath *)indexPath NS_AVAILABLE_IOS(6_0);
我们可以分析:因为UICollectionView是iOS6.0之前的新类,因此这里统一了从复用池中获取cell的方法,没有再提供可以返回nil的方式,并且在UICollectionView的回调代理中,只能使用从复用池中获取cell的方式进行cell的返回,其他方式会崩溃,例如:
// 这是正确的方法
-(UICollectionViewCell *)collectionView:(UICollectionView *)collectionView cellForItemAtIndexPath:(NSIndexPath *)indexPath {
    UICollectionViewCell *cell  = [collectionView dequeueReusableCellWithReuseIdentifier:@"cellid" forIndexPath:indexPath];
    cell.backgroundColor = [UIColor colorWithRed:arc4random()%255/255.0 green:arc4random()%255/255.0 blue:arc4random()%255/255.0 alpha:1];
    return cell;
}

// 这样做会崩溃
-(UICollectionViewCell *)collectionView:(UICollectionView *)collectionView cellForItemAtIndexPath:(NSIndexPath *)indexPath{
// UICollectionViewCell * cell  = [collectionView dequeueReusableCellWithReuseIdentifier:@"cellid" forIndexPath:indexPath];
// cell.backgroundColor = [UIColor colorWithRed:arc4random()%255/255.0 green:arc4random()%255/255.0 blue:arc4random()%255/255.0 alpha:1];
    UICollectionViewCell *cell = [[UICollectionViewCell alloc]init];
    return cell;
}
上面错误的方式会崩溃,信息如下,让我们使用从复用池中取cell的方式:

上面的设置完成后,我们来实现如下几个代理方法:
这里与TableView的回调方式十分类似
// 返回分区个数
- (NSInteger)numberOfSectionsInCollectionView:(UICollectionView *)collectionView {
    return 1;
}

// 返回每个分区的item个数
- (NSInteger)collectionView:(UICollectionView *)collectionView numberOfItemsInSection:(NSInteger)section {
    return 10;
}

// 返回每个item
- (UICollectionViewCell *)collectionView:(UICollectionView *)collectionView cellForItemAtIndexPath:(NSIndexPath *)indexPath {
    UICollectionViewCell *cell  = [collectionView dequeueReusableCellWithReuseIdentifier:@"cellid" forIndexPath:indexPath];
    cell.backgroundColor = [UIColor colorWithRed:arc4random()%255/255.0 green:arc4random()%255/255.0 blue:arc4random()%255/255.0 alpha:1];
    return cell;
}
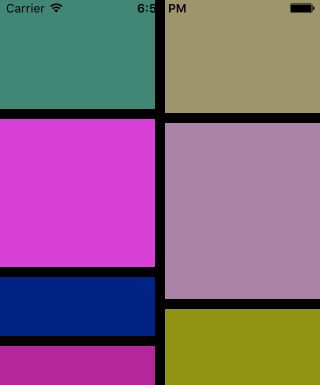
效果如下:

同样,如果内容的大小超出一屏,和tableView类似是可以进行视图滑动的。
还有一点细节,我们在上面设置布局方式的时候设置了垂直布局:
layout.scrollDirection = UICollectionViewScrollDirectionVertical;
// 这个是水平布局
// layout.scrollDirection = UICollectionViewScrollDirectionHorizontal;
这样系统会在一行充满后进行第二行的排列,如果设置为水平布局,则会在一列充满后,进行第二列的布局,这种方式也被称为流式布局
三、UICollectionView中的常用方法和属性
// 通过一个布局策略初识化CollectionView
- (instancetype)initWithFrame:(CGRect)frame collectionViewLayout:(UICollectionViewLayout *)layout;

// 获取和设置collection的layout
@property(nonatomic, strong) UICollectionViewLayout *collectionViewLayout;

// 数据源和代理
@property(nonatomic, weak, nullable) id<UICollectionViewDelegate> delegate;
@property(nonatomic, weak, nullable) id<UICollectionViewDataSource> dataSource;

// 从一个class或者xib文件进行cell(item)的注册
- (void)registerClass:(nullable Class)cellClass forCellWithReuseIdentifier:(NSString *)identifier;
- (void)registerNib:(nullable UINib *)nib forCellWithReuseIdentifier:(NSString *)identifier;

// 下面两个方法与上面相似,这里注册的是头视图或者尾视图的类
// 其中第二个参数是设置 头视图或者尾视图 系统为我们定义好了这两个字符串
// UIKIT_EXTERN NSString *const UICollectionElementKindSectionHeader NS_AVAILABLE_IOS(6_0);
// UIKIT_EXTERN NSString *const UICollectionElementKindSectionFooter NS_AVAILABLE_IOS(6_0);
- (void)registerClass:(nullable Class)viewClass forSupplementaryViewOfKind:(NSString *)elementKind withReuseIdentifier:(NSString *)identifier;
- (void)registerNib:(nullable UINib *)nib forSupplementaryViewOfKind:(NSString *)kind withReuseIdentifier:(NSString *)identifier;

// 这两个方法是从复用池中取出cell或者头尾视图
- (__kindof UICollectionViewCell *)dequeueReusableCellWithReuseIdentifier:(NSString *)identifier forIndexPath:(NSIndexPath *)indexPath;
- (__kindof UICollectionReusableView *)dequeueReusableSupplementaryViewOfKind:(NSString *)elementKind withReuseIdentifier:(NSString *)identifier forIndexPath:(NSIndexPath *)indexPath;

// 设置是否允许选中 默认yes
@property(nonatomic) BOOL allowsSelection;

// 设置是否允许多选 默认no
@property(nonatomic) BOOL allowsMultipleSelection;

// 获取所有选中的item的位置信息
- (nullable NSArray<NSIndexPath *> *)indexPathsForSelectedItems;

// 设置选中某一item,并使视图滑动到相应位置,scrollPosition是滑动位置的相关参数,如下:
/*
typedef NS_OPTIONS(NSUInteger, UICollectionViewScrollPosition) {
    // 无
    UICollectionViewScrollPositionNone                 = 0,
    // 垂直布局时使用的 对应上中下
    UICollectionViewScrollPositionTop                  = 1 << 0,
    UICollectionViewScrollPositionCenteredVertically   = 1 << 1,
    UICollectionViewScrollPositionBottom               = 1 << 2,
    // 水平布局时使用的  对应左中右
    UICollectionViewScrollPositionLeft                 = 1 << 3,
    UICollectionViewScrollPositionCenteredHorizontally = 1 << 4,
    UICollectionViewScrollPositionRight                = 1 << 5
};
*/
- (void)selectItemAtIndexPath:(nullable NSIndexPath *)indexPath animated:(BOOL)animated scrollPosition:(UICollectionViewScrollPosition)scrollPosition;

// 将某一item取消选中
- (void)deselectItemAtIndexPath:(NSIndexPath *)indexPath animated:(BOOL)animated;

// 重新加载数据
- (void)reloadData;

// 下面这两个方法,可以重新设置collection的布局,后面的方法多了一个布局完成后的回调,iOS7后可以用
// 使用这两个方法可以产生非常炫酷的动画效果
- (void)setCollectionViewLayout:(UICollectionViewLayout *)layout animated:(BOOL)animated;
- (void)setCollectionViewLayout:(UICollectionViewLayout *)layout animated:(BOOL)animated completion:(void (^ __nullable)(BOOL finished))completion NS_AVAILABLE_IOS(7_0);

// 下面这些方法更加强大,我们可以对布局更改后的动画进行设置
// 这个方法传入一个布局策略layout,系统会开始进行布局渲染,返回一个UICollectionViewTransitionLayout对象
// 这个UICollectionViewTransitionLayout对象管理动画的相关属性,我们可以进行设置
- (UICollectionViewTransitionLayout *)startInteractiveTransitionToCollectionViewLayout:(UICollectionViewLayout *)layout completion:(nullable UICollectionViewLayoutInteractiveTransitionCompletion)completion NS_AVAILABLE_IOS(7_0);
// 准备好动画设置后,我们需要调用下面的方法进行布局动画的展示,之后会调用上面方法的block回调
- (void)finishInteractiveTransition NS_AVAILABLE_IOS(7_0);
// 调用这个方法取消上面的布局动画设置,之后也会进行上面方法的block回调
- (void)cancelInteractiveTransition NS_AVAILABLE_IOS(7_0);

// 获取分区数
- (NSInteger)numberOfSections;

// 获取某一分区的item数
- (NSInteger)numberOfItemsInSection:(NSInteger)section;

// 下面两个方法获取item或者头尾视图的layout属性,这个UICollectionViewLayoutAttributes对象
// 存放着布局的相关数据,可以用来做完全自定义布局,后面博客会介绍
- (nullable UICollectionViewLayoutAttributes *)layoutAttributesForItemAtIndexPath:(NSIndexPath *)indexPath;
- (nullable UICollectionViewLayoutAttributes *)layoutAttributesForSupplementaryElementOfKind:(NSString *)kind atIndexPath:(NSIndexPath *)indexPath;

// 获取某一点所在的indexpath位置
- (nullable NSIndexPath *)indexPathForItemAtPoint:(CGPoint)point;

// 获取某个cell所在的indexPath
- (nullable NSIndexPath *)indexPathForCell:(UICollectionViewCell *)cell;

// 根据indexPath获取cell
- (nullable UICollectionViewCell *)cellForItemAtIndexPath:(NSIndexPath *)indexPath;

// 获取所有可见cell的数组
- (NSArray<__kindof UICollectionViewCell *> *)visibleCells;

// 获取所有可见cell的位置数组
- (NSArray<NSIndexPath *> *)indexPathsForVisibleItems;

// 下面三个方法是iOS9中新添加的方法,用于获取头尾视图
- (UICollectionReusableView *)supplementaryViewForElementKind:(NSString *)elementKind atIndexPath:(NSIndexPath *)indexPath NS_AVAILABLE_IOS(9_0);
- (NSArray<UICollectionReusableView *> *)visibleSupplementaryViewsOfKind:(NSString *)elementKind NS_AVAILABLE_IOS(9_0);
- (NSArray<NSIndexPath *> *)indexPathsForVisibleSupplementaryElementsOfKind:(NSString *)elementKind NS_AVAILABLE_IOS(9_0);

// 使视图滑动到某一位置,可以带动画效果
- (void)scrollToItemAtIndexPath:(NSIndexPath *)indexPath atScrollPosition:(UICollectionViewScrollPosition)scrollPosition animated:(BOOL)animated;

// 下面这些方法用于动态添加,删除,移动某些分区获取items
- (void)insertSections:(NSIndexSet *)sections;
- (void)deleteSections:(NSIndexSet *)sections;
- (void)reloadSections:(NSIndexSet *)sections;
- (void)moveSection:(NSInteger)section toSection:(NSInteger)newSection;

- (void)insertItemsAtIndexPaths:(NSArray<NSIndexPath *> *)indexPaths;
- (void)deleteItemsAtIndexPaths:(NSArray<NSIndexPath *> *)indexPaths;
- (void)reloadItemsAtIndexPaths:(NSArray<NSIndexPath *> *)indexPaths;
- (void)moveItemAtIndexPath:(NSIndexPath *)indexPath toIndexPath:(NSIndexPath *)newIndexPath;
iOS流布局UICollectionView系列二——UICollectionView的代理方法
一、引言
在上一篇博客中,介绍了最基本的UICollectionView的使用和其中我们常用的属性和方法,也介绍了瀑布流布局的过程与思路,这篇博客来讨论关于UICollectionView的代理方法的使用。
二、UICollectionViewDataSource协议
这个协议主要用于collectionView相关数据的处理,包含方法如下:
首先,有两个方法是我们必须实现的:
// 设置每个分区的Item个数
- (NSInteger)collectionView:(UICollectionView *)collectionView numberOfItemsInSection:(NSInteger)section;

// 设置返回每个item的属性
- (UICollectionViewCell *)collectionView:(UICollectionView *)collectionView cellForItemAtIndexPath:(NSIndexPath *)indexPath;

// 下面的方法是可选实现的:
// 虽然这个方法是可选的,一般我们都会去实现,设置分区数
- (NSInteger)numberOfSectionsInCollectionView:(UICollectionView *)collectionView;

// 对头视图或者尾视图进行设置
- (UICollectionReusableView *)collectionView:(UICollectionView *)collectionView viewForSupplementaryElementOfKind:(NSString *)kind atIndexPath:(NSIndexPath *)indexPath;

// 设置某个item是否可以被移动,返回NO则不能移动
- (BOOL)collectionView:(UICollectionView *)collectionView canMoveItemAtIndexPath:(NSIndexPath *)indexPath NS_AVAILABLE_IOS(9_0);

// 移动item的时候,会调用这个方法
- (void)collectionView:(UICollectionView *)collectionView moveItemAtIndexPath:(NSIndexPath *)sourceIndexPath toIndexPath:(NSIndexPath*)destinationIndexPath;
三、UICollectionViewDelegate协议
这个协议用来设置和处理collectionView的功能和一些逻辑,所有方法都是可选实现:
// 是否允许某个Item的高亮,返回NO,则不能进入高亮状态
- (BOOL)collectionView:(UICollectionView *)collectionView shouldHighlightItemAtIndexPath:(NSIndexPath *)indexPath;

// 当item高亮时触发的方法
- (void)collectionView:(UICollectionView *)collectionView didHighlightItemAtIndexPath:(NSIndexPath *)indexPath;

// 结束高亮状态时触发的方法
- (void)collectionView:(UICollectionView *)collectionView didUnhighlightItemAtIndexPath:(NSIndexPath *)indexPath;

// 是否可以选中某个Item,返回NO,则不能选中
- (BOOL)collectionView:(UICollectionView *)collectionView shouldSelectItemAtIndexPath:(NSIndexPath *)indexPath;

// 是否可以取消选中某个Item
- (BOOL)collectionView:(UICollectionView *)collectionView shouldDeselectItemAtIndexPath:(NSIndexPath *)indexPath;

// 已经选中某个item时触发的方法
- (void)collectionView:(UICollectionView *)collectionView didSelectItemAtIndexPath:(NSIndexPath *)indexPath;

// 取消选中某个Item时触发的方法
- (void)collectionView:(UICollectionView *)collectionView didDeselectItemAtIndexPath:(NSIndexPath *)indexPath;

// 将要加载某个Item时调用的方法
- (void)collectionView:(UICollectionView *)collectionView willDisplayCell:(UICollectionViewCell *)cell forItemAtIndexPath:(NSIndexPath *)indexPath NS_AVAILABLE_IOS(8_0);

// 将要加载头尾视图时调用的方法
- (void)collectionView:(UICollectionView *)collectionView willDisplaySupplementaryView:(UICollectionReusableView *)view forElementKind:(NSString *)elementKind atIndexPath:(NSIndexPath *)indexPath NS_AVAILABLE_IOS(8_0);

// 已经展示某个Item时触发的方法
- (void)collectionView:(UICollectionView *)collectionView didEndDisplayingCell:(UICollectionViewCell *)cell forItemAtIndexPath:(NSIndexPath *)indexPath;

// 已经展示某个头尾视图时触发的方法
- (void)collectionView:(UICollectionView *)collectionView didEndDisplayingSupplementaryView:(UICollectionReusableView *)view forElementOfKind:(NSString *)elementKind atIndexPath:(NSIndexPath *)indexPath;

// 这个方法设置是否展示长按菜单
- (BOOL)collectionView:(UICollectionView *)collectionView shouldShowMenuForItemAtIndexPath:(NSIndexPath *)indexPath;

// 这个方法用于设置要展示的菜单选项
- (BOOL)collectionView:(UICollectionView *)collectionView canPerformAction:(SEL)action forItemAtIndexPath:(NSIndexPath *)indexPath withSender:(nullable id)sender;

// 这个方法用于实现点击菜单按钮后的触发方法,通过测试,只有copy,cut和paste三个方法可以使用
- (void)collectionView:(UICollectionView *)collectionView performAction:(SEL)action forItemAtIndexPath:(NSIndexPath *)indexPath withSender:(nullable id)sender;

// collectionView进行重新布局时调用的方法
- (nonnull UICollectionViewTransitionLayout *)collectionView:(UICollectionView *)collectionView transitionLayoutForOldLayout:(UICollectionViewLayout *)fromLayout newLayout:(UICollectionViewLayout *)toLayout;
长按菜单中可以触发一下类复制粘贴的方法,效果如下:

通过下面的方式可以将点击按钮的方法名打印出来:
- (void)collectionView:(UICollectionView *)collectionView performAction:(SEL)action forItemAtIndexPath:(NSIndexPath *)indexPath withSender:(id)sender {
    NSLog(@"%@",NSStringFromSelector(action));
}
iOS流布局UICollectionView系列三——使用FlowLayout进行更灵活布局
一、引言
前面的博客介绍了UICollectionView的相关方法和其协议中的方法,但对布局的管理类UICollectionViewFlowLayout没有着重探讨,这篇博客介绍关于布局的相关设置和属性方法。通过layout的设置,我们可以编写更加灵活的布局效果。
二、将九宫格式的布局进行升级
在第一篇博客中,通过UICollectionView,我们很轻松的完成了一个九宫格的布局,但是如此中规中矩的布局方式,有时候并不能满足我们的需求,有时我们需要每一个·Item展示不同的大小,代码如下:
- (void)viewDidLoad {
    [super viewDidLoad];
    // Do any additional setup after loading the view, typically from a nib.
    UICollectionViewFlowLayout *layout = [[UICollectionViewFlowLayout alloc]init];
    layout.scrollDirection = UICollectionViewScrollDirectionVertical;
    UICollectionView *collect = [[UICollectionView alloc]initWithFrame:CGRectMake(0, 0, 320, 400) collectionViewLayout:layout];
    collect.delegate=self;
    collect.dataSource=self;

    [collect registerClass:[UICollectionViewCell class] forCellWithReuseIdentifier:@"cellid"];

    [self.view addSubview:collect];
}

// 设置每个item的大小,双数的为50*50 单数的为100*100
- (CGSize)collectionView:(UICollectionView *)collectionView layout:(UICollectionViewLayout *)collectionViewLayout sizeForItemAtIndexPath:(NSIndexPath *)indexPath {
    if (indexPath.row%2==0) {
        return CGSizeMake(50, 50);
    }else{
        return CGSizeMake(100, 100);
    }
}

// 代理相应方法
- (NSInteger)numberOfSectionsInCollectionView:(UICollectionView *)collectionView {
    return 1;
}

- (NSInteger)collectionView:(UICollectionView *)collectionView numberOfItemsInSection:(NSInteger)section {
    return 100;
}

- (UICollectionViewCell *)collectionView:(UICollectionView *)collectionView cellForItemAtIndexPath:(NSIndexPath *)indexPath {
    UICollectionViewCell *cell  = [collectionView dequeueReusableCellWithReuseIdentifier:@"cellid" forIndexPath:indexPath];
    cell.backgroundColor = [UIColor colorWithRed:arc4random()%255/255.0 green:arc4random()%255/255.0 blue:arc4random()%255/255.0 alpha:1];
    return cell;
}
效果如下:

现在的布局效果是不是炫酷了许多。
三、UICollectionViewFlowLayout相关属性方法
ICollectionViewFlowLayout系统提供给我们一个封装好的流布局设置类,其中有一些布局属性我们可以进行设置:
// 设置行与行之间的间距最小距离
@property(nonatomic) CGFloat minimumLineSpacing;

// 设置列与列之间的间距最小距离
@property(nonatomic) CGFloat minimumInteritemSpacing;

// 设置每个item的大小
@property(nonatomic) CGSize itemSize;

// 设置每个Item的估计大小,一般不需要设置
@property(nonatomic) CGSize estimatedItemSize NS_AVAILABLE_IOS(8_0);

// 设置布局方向
@property(nonatomic) UICollectionViewScrollDirection scrollDirection;
/**
这个UICollectionViewScrollDirection的枚举如下:

typedef NS_ENUM(NSInteger, UICollectionViewScrollDirection) {
    UICollectionViewScrollDirectionVertical,//水平布局
    UICollectionViewScrollDirectionHorizontal//垂直布局
};
*/

// 设置头视图尺寸大小
@property(nonatomic) CGSize headerReferenceSize;

// 设置尾视图尺寸大小
@property(nonatomic) CGSize footerReferenceSize;

// 设置分区的EdgeInset
@property(nonatomic) UIEdgeInsets sectionInset;
这个属性可以设置分区的偏移量,例如我们在刚才的例子中添加如下设置:
layout.sectionInset = UIEdgeInsetsMake(20, 20, 20, 20);
效果如下,会看到分区的边界闪出了20像素

下面这两个方法设置分区的头视图和尾视图是否始终固定在屏幕上边和下边
@property(nonatomic) BOOL sectionHeadersPinToVisibleBounds NS_AVAILABLE_IOS(9_0);

@property(nonatomic) BOOL sectionFootersPinToVisibleBounds NS_AVAILABLE_IOS(9_0);
四、动态的配置layout的相关属性UICollectionViewDelegateFlowLayout
上面的方法在创建FlowLayout时静态的进行设置,如果我们需要动态的设置这些属性,就像我们例子中的,每个item的大小会有差异,我们可以通过代理来实现。
UICollectionViewDelegateFlowLayout是UICollectionViewDelegate的子协议,其中常用方法如下,我们只需要实现我们需要的即可:
// 动态设置每个Item的尺寸大小
- (CGSize)collectionView:(UICollectionView *)collectionView layout:(UICollectionViewLayout *)collectionViewLayout sizeForItemAtIndexPath:(NSIndexPath *)indexPath;

// 动态设置每个分区的EdgeInsets
- (UIEdgeInsets)collectionView:(UICollectionView *)collectionView layout:(UICollectionViewLayout *)collectionViewLayout insetForSectionAtIndex:(NSInteger)section;

// 动态设置每行的间距大小
- (CGFloat)collectionView:(UICollectionView *)collectionView layout:(UICollectionViewLayout *)collectionViewLayout minimumLineSpacingForSectionAtIndex:(NSInteger)section;

// 动态设置每列的间距大小
- (CGFloat)collectionView:(UICollectionView *)collectionView layout:(UICollectionViewLayout *)collectionViewLayout minimumInteritemSpacingForSectionAtIndex:(NSInteger)section;

// 动态设置某个分区头视图大小
- (CGSize)collectionView:(UICollectionView *)collectionView layout:(UICollectionViewLayout *)collectionViewLayout referenceSizeForHeaderInSection:(NSInteger)section;

// 动态设置某个分区尾视图大小
- (CGSize)collectionView:(UICollectionView *)collectionView layout:(UICollectionViewLayout *)collectionViewLayout referenceSizeForFooterInSection:(NSInteger)section;
iOS流布局UICollectionView系列四——自定义FlowLayout进行瀑布流布局
一、引言
前几篇博客从UICollectionView的基础应用到设置UICollectionViewFlowLayout更加灵活的进行布局,但都限制在系统为我们准备好的布局框架中,还是有一些局限性,例如,如果我要进行瀑布流似的不定高布局,前面的方法就很难满足我们的需求了,如下:
这种布局无疑在app的应用中更加广泛,商品的展示,书架书目的展示,都会倾向于采用这样的布局方式,当然,通过自定义FlowLayout,我们也很容易实现。
二、进行自定义瀑布流布局
首先,我们新建一个文件继承于UICollectionViewFlowLayout:
@interface MyLayout : UICollectionViewFlowLayout
为了演示的方便,这里我不做更多的封装,只添加一个属性,直接让外界将item个数传递进来,我们把重心方法重写布局的方法上:
@interface MyLayout : UICollectionViewFlowLayout
@property(nonatomic, assign) int itemCount;
@end
前面说过,UICollectionViewFlowLayout是一个专门用来管理collectionView布局的类,因此,collectionView在进行UI布局前,会通过这个类的对象获取相关的布局信息,FlowLayout类将这些布局信息全部存放在了一个数组中,数组中是UICollectionViewLayoutAttributes类,这个类是对item布局的具体设置,以后咱们在讨论这个类。总之,FlowLayout类将每个item的位置等布局信息放在一个数组中,在collectionView布局时,会调用FlowLayout类layoutAttributesForElementsInRect:方法来获取这个布局配置数组。因此,我们需要重写这个方法,返回我们自定义的配置数组,另外,FlowLayout类在进行布局之前,会调用prepareLayout方法,所以我们可以重写这个方法,在里面对我们的自定义配置数据进行一些设置。
简单来说,自定义一个FlowLayout布局类就是两个步骤:
1、设计好我们的布局配置数据 prepareLayout方法中
2、返回我们的配置数组 layoutAttributesForElementsInRect方法中
示例代码如下:
@implementation MyLayout
{
    // 这个数组就是我们自定义的布局配置数组
    NSMutableArray * _attributeAttay;
}
// 数组的相关设置在这个方法中
// 布局前的准备会调用这个方法
- (void)prepareLayout{
    _attributeAttay = [[NSMutableArray alloc] init];
    [super prepareLayout];
    // 演示方便 我们设置为静态的2列
    // 计算每一个item的宽度
    float WIDTH = ([UIScreen mainScreen].bounds.size.width-self.sectionInset.left-self.sectionInset.right-self.minimumInteritemSpacing)/2;
    // 定义数组保存每一列的高度
    // 这个数组的主要作用是保存每一列的总高度,这样在布局时,我们可以始终将下一个Item放在最短的列下面
    CGFloat colHight[2]={self.sectionInset.top,self.sectionInset.bottom};
    // itemCount是外界传进来的item的个数 遍历来设置每一个item的布局
    for (int i = 0; i < _itemCount; i++) {
        // 设置每个item的位置等相关属性
        NSIndexPath *index = [NSIndexPath indexPathForItem:i inSection:0];
        // 创建一个布局属性类,通过indexPath来创建
        UICollectionViewLayoutAttributes * attris = [UICollectionViewLayoutAttributes layoutAttributesForCellWithIndexPath:index];
        // 随机一个高度 在40——190之间
        CGFloat hight = arc4random()%150+40;
        // 哪一列高度小 则放到那一列下面
        // 标记最短的列
        int width = 0;
        if (colHight[0] < colHight[1]) {
            // 将新的item高度加入到短的一列
            colHight[0] = colHight[0] + hight + self.minimumLineSpacing;
            width = 0;
        } else {
            colHight[1] = colHight[1] + hight + self.minimumLineSpacing;
            width = 1;
        }

        // 设置item的位置
        attris.frame = CGRectMake(self.sectionInset.left+(self.minimumInteritemSpacing+WIDTH)*width, colHight[width]-hight-self.minimumLineSpacing, WIDTH, hight);
        [_attributeAttay addObject:attris];
    }

    // 设置itemSize来确保滑动范围的正确 这里是通过将所有的item高度平均化,计算出来的(以最高的列位标准)
    if (colHight[0] > colHight[1]) {
        self.itemSize = CGSizeMake(WIDTH, (colHight[0]-self.sectionInset.top)*2/_itemCount-self.minimumLineSpacing);
    } else {
          self.itemSize = CGSizeMake(WIDTH, (colHight[1]-self.sectionInset.top)*2/_itemCount-self.minimumLineSpacing);
    }

}
// 这个方法中返回我们的布局数组
- (NSArray<UICollectionViewLayoutAttributes *> *)layoutAttributesForElementsInRect:(CGRect)rect{
    return _attributeAttay;
}

@end
自定义完成FlowLayout后,我们在ViewController中进行使用:
- (void)viewDidLoad {
    [super viewDidLoad];
    // Do any additional setup after loading the view, typically from a nib.
    MyLayout *layout = [[MyLayout alloc]init];
    layout.scrollDirection = UICollectionViewScrollDirectionVertical;
    layout.itemCount=100;
     UICollectionView *collect  = [[UICollectionView alloc]initWithFrame:CGRectMake(0, 0, 320, 400) collectionViewLayout:layout];
    collect.delegate = self;
    collect.dataSource = self;

    [collect registerClass:[UICollectionViewCell class] forCellWithReuseIdentifier:@"cellid"];

    [self.view addSubview:collect];
}

- (NSInteger)numberOfSectionsInCollectionView:(UICollectionView *)collectionView{
    return 1;
}

- (NSInteger)collectionView:(UICollectionView *)collectionView numberOfItemsInSection:(NSInteger)section{
    return 100;
}

- (UICollectionViewCell *)collectionView:(UICollectionView *)collectionView cellForItemAtIndexPath:(NSIndexPath *)indexPath{
    UICollectionViewCell *cell  = [collectionView dequeueReusableCellWithReuseIdentifier:@"cellid" forIndexPath:indexPath];
    cell.backgroundColor = [UIColor colorWithRed:arc4random()%255/255.0 green:arc4random()%255/255.0 blue:arc4random()%255/255.0 alpha:1];
    return cell;
}
运行效果就是我们引言中的截图。
三、UICollectionViewLayoutAttributes类中我们可以配置的属性
通过上面的例子,我们可以了解,collectionView的item布局其实是LayoutAttributes类具体配置的,这个类可以配置的布局属性不止是frame这么简单,其中还有许多属性:
//配置item的布局位置
@property(nonatomic) CGRect frame;
//配置item的中心
@property(nonatomic) CGPoint center;
//配置item的尺寸
@property(nonatomic) CGSize size;
//配置item的3D效果
@property(nonatomic) CATransform3D transform3D;
//配置item的bounds
@property(nonatomic) CGRect bounds NS_AVAILABLE_IOS(7_0);
//配置item的旋转
@property(nonatomic) CGAffineTransform transform NS_AVAILABLE_IOS(7_0);
//配置item的alpha
@property(nonatomic) CGFloat alpha;
//配置item的z坐标
@property(nonatomic) NSInteger zIndex; // default is 0
//配置item的隐藏
@property(nonatomic, getter=isHidden) BOOL hidden;
//item的indexpath
@property(nonatomic, strong) NSIndexPath *indexPath;
//获取item的类型
@property(nonatomic, readonly) UICollectionElementCategory representedElementCategory;
@property(nonatomic, readonly, nullable) NSString *representedElementKind;

//一些创建方法
+ (instancetype)layoutAttributesForCellWithIndexPath:(NSIndexPath *)indexPath;
+ (instancetype)layoutAttributesForSupplementaryViewOfKind:(NSString *)elementKind withIndexPath:(NSIndexPath *)indexPath;
+ (instancetype)layoutAttributesForDecorationViewOfKind:(NSString *)decorationViewKind withIndexPath:(NSIndexPath *)indexPath;
通过上面的属性,可以布局出各式各样的炫酷效果,正如一句话:没有做不到,只有想不到。
iOS流布局UICollectionView系列五——圆环布局的实现
一、引言
前边的几篇博客,我们了解了UICollectionView的基本用法以及一些扩展,在不定高的瀑布流布局中,我们发现,可以通过设置具体的布局属性类UICollectionViewLayoutAttributes来设置设置每个item的具体位置,我们可以再扩展一下,如果位置我们可以自由控制,那个布局我们也可以更加灵活,就比如创建一个如下的circleLayout:

这种布局方式在apple的官方文档中也有介绍,是UICollectionView的一个应用示例。
二、设计一个圆环布局
先自定义一个layout类,这个类继承于UICollectionViewLayout,UICollectionLayout是一个布局抽象基类,我们要使用自定义的布局方式,必须将其子类化,可能你还记得,我们在进行瀑布流布局的时候使用过UICollectionViewFlowLayout类,这个类就是继承于UICollectionViewLayout类,系统为我们实现好的一个布局方案。
@interface MyLayout : UICollectionViewLayout
//这个int值存储有多少个item
@property(nonatomic, assign) int itemCount;
@end
我们需要重写这个类的三个方法,来进行圆环布局的设置,首先是prepareLayout,为布局做一些准备工作,使用collectionViewContentSize来设置内容的区域大小,最后使用layoutAttributesForElementsInRect方法来返回我们的布局信息字典,这个和前面瀑布流布局的思路是一样的:
@implementation MyLayout
{
    NSMutableArray * _attributeAttay;
}

- (void)prepareLayout{
    [super prepareLayout];
    // 获取item的个数
    _itemCount = (int)[self.collectionView numberOfItemsInSection:0];
    _attributeAttay = [[NSMutableArray alloc]init];
    // 先设定大圆的半径 取长和宽最短的
    CGFloat radius = MIN(self.collectionView.frame.size.width, self.collectionView.frame.size.height)/2;
    // 计算圆心位置
    CGPoint center = CGPointMake(self.collectionView.frame.size.width/2, self.collectionView.frame.size.height/2);
    // 设置每个item的大小为50*50 则半径为25
    for (int i = 0; i < _itemCount; i++) {
        UICollectionViewLayoutAttributes *attris = [UICollectionViewLayoutAttributes layoutAttributesForCellWithIndexPath:[NSIndexPath indexPathForItem:i inSection:0]];
        // 设置item大小
        attris.size = CGSizeMake(50, 50);
        // 计算每个item的圆心位置
        // 计算每个item中心的坐标
        // 算出的x y值还要减去item自身的半径大小
        float x = center.x+cosf(2*M_PI/_itemCount*i)*(radius-25);
        float y = center.y+sinf(2*M_PI/_itemCount*i)*(radius-25);

        attris.center = CGPointMake(x, y);
        [_attributeAttay addObject:attris];
    }
}

// 设置内容区域的大小
- (CGSize)collectionViewContentSize{
    return self.collectionView.frame.size;
}

//返回设置数组
- (NSArray<UICollectionViewLayoutAttributes *> *)layoutAttributesForElementsInRect:(CGRect)rect{
    return _attributeAttay;
}
在viewController中代码如下:
- (void)viewDidLoad {
    [super viewDidLoad];
    // Do any additional setup after loading the view, typically from a nib.
    MyLayout *layout = [[MyLayout alloc]init];
     UICollectionView *collect  = [[UICollectionView alloc]initWithFrame:CGRectMake(0, 0, 320, 400) collectionViewLayout:layout];
    collect.delegate = self;
    collect.dataSource = self;

    [collect registerClass:[UICollectionViewCell class] forCellWithReuseIdentifier:@"cellid"];
    [self.view addSubview:collect];
}

- (NSInteger)numberOfSectionsInCollectionView:(UICollectionView *)collectionView{
    return 1;
}

- (NSInteger)collectionView:(UICollectionView *)collectionView numberOfItemsInSection:(NSInteger)section{
    return 10;
}

- (UICollectionViewCell *)collectionView:(UICollectionView *)collectionView cellForItemAtIndexPath:(NSIndexPath *)indexPath{
    UICollectionViewCell *cell  = [collectionView dequeueReusableCellWithReuseIdentifier:@"cellid" forIndexPath:indexPath];
    cell.layer.masksToBounds = YES;
    cell.layer.cornerRadius = 25;
    cell.backgroundColor = [UIColor colorWithRed:arc4random()%255/255.0 green:arc4random()%255/255.0 blue:arc4random()%255/255.0 alpha:1];
    return cell;
}
如上非常简单的一些逻辑控制,我们就实现哦圆环布局,随着item的多少,布局会自动调整,如果不是UICollectionView的功劳,实现这样的功能,我们可能要写上一阵子了 ^_^。
