SpringCloud+Consul快速开发示例
简介
本章通过最新的springcloud版本与官方最新consul开源版服务,进行演示,如何快速搭建开发环境和注册与发现服务中心;
本文假设已知具备SpringCloud的基础开发能力,以及提前了解consul服务的使用,因此本文不会详细描述各API使用细节与服务作用;
主要演示以下几点
- 将springcloud的服务注册到consul节点
- 演示基于consul服务发现功能,完成loadBalanced负载均衡测试
- 从consul服务配置中拉取指定运行环境配置到springCloud服务中,可获取指定key/value内容
- 从springCloud服务向consul服务中推送自定义配置
- 动态修改consul服务指定配置数据后,springCloud服务监听数据变更,重新加载并动态展示
环境
- JDK:17
- SpringCloud:2023.0.0
- SpringBoot:3.2.0
- SpringCloudConsul:4.1.0
- Consul:v1.17.0
安装Consul
Consul是一个服务网格解决方案,提供了一个功能齐全的控制平面,具有服务发现、配置和分段功能。
在开发中常用的consul功能如下:
- 服务注册与发现
- Key/Value数据存储
- 健康检查
官网
HashiCorp Developer
安装下载
https://releases.hashicorp.com/consul/1.17.0/consul_1.17.0_linux_amd64.zip
上传到服务器指定目录下,通过unzip consul_1.17.0_linux_amd64.zip 解压,获得consul执行文件,并移动到指定目录中,如:/opt/consul-1.70.0;
config配置
在consul安装目录下,分别创建config和data文件夹,进入config目录,创建consul.json单机配置文件,写入如下配置内容:
{
    "server":true,
    "bootstrap": false,
    "ui_config": {
      "enabled": true
    },
    "datacenter":"dc1",
    "log_level":"INFO",
    "node_name":"server1",
    "data_dir":"/opt/consul-1.70.0/data",
    "addresses":{
        "http":"0.0.0.0"
    },
    "ports":{
        "http":8500
    }
}
官网文档配置说明
Agents Overview | Consul | HashiCorp Developer
启动
# 命令行运行
./consul agent -config-dir=./config/consul.json
# 后台运行
nohup ./consul agent -config-file=./config/consul.json > log.out 2>&1 &
访问
http://主机IP:8500/
搭建工程
在Idea开发工具下创建一个名为consul-example的工程,或者可以通过https://start.spring.io/官方网页的Spring初始化工具,快速搭建项目工程;
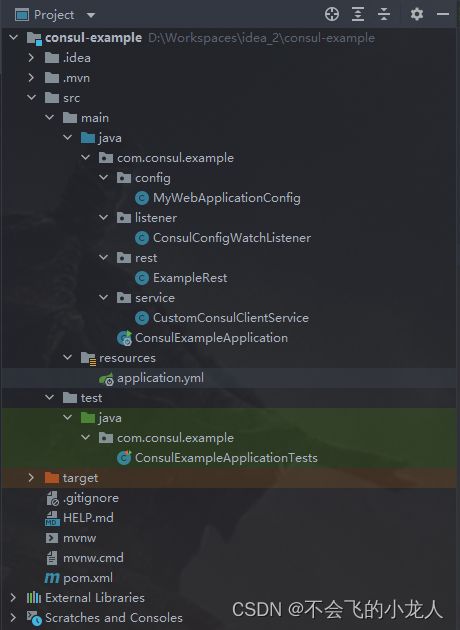
工程结构
文件说明
- MyWebApplicationConfig.java:工程初始化配置类
- ConsulConfigWatchListener.java:consul配置中心配置变更监听类
- CustomConsulClientService.java:自定义consul配置获取、推送测试业务类
- ExampleRest.java:控制器测试方法类
- ConsulExampleApplication.java:工程启动主类
pom.xml
   4.0.0

      org.springframework.boot
      spring-boot-starter-parent
      3.2.0


   com.consul.example
   consul-example
   0.0.1-SNAPSHOT
   consul-example
   Demo project for Spring Boot

      17
      2023.0.0


         org.springframework.boot
         spring-boot-starter-actuator


         org.springframework.boot
         spring-boot-starter-webflux


         org.springframework.cloud
         spring-cloud-starter-consul-config


         org.springframework.cloud
         spring-cloud-starter-consul-discovery


         org.projectlombok
         lombok
         true


         org.springframework.boot
         spring-boot-starter-test
         test


         io.projectreactor
         reactor-test
         test


         com.github.ben-manes.caffeine
         caffeine
         3.1.8


            org.springframework.cloud
            spring-cloud-dependencies
            ${spring-cloud.version}
            pom
            import


            org.springframework.boot
            spring-boot-maven-plugin


                     org.projectlombok
                     lombok
application.yml
# 本地服务访问
server:
  # 服务端口
  port: 8081
  # 服务IP
  address: 0.0.0.0

spring:
  profiles:
    # 指定运行环境,不填默认为default
    active: dev
  # 应用服务名
  application:
    name: consul-example
  config:
    # 此处在启动时会加载consul服务中指定prefixes下的default-context配置属性
    # 会根据spring.profiles.active加载default或dev配置目录,default为默认无目录后缀,dev为开发环境目录名后缀为-dev,其它如:test,prod等
    # 如:dev,则加载的文件为 consul/config/testApp-dev/data,如应配置${prefixes}/${default-context}${profile-separator}${spring.profiles.active}/目录下,对应的${data-key}键/值
    # 也可手动指定加载固定目录key/value配置,如:optional:consul:127.0.0.1:8500/config/testApp,无data-key指定后缀
    import: optional:consul:192.168.1.36:8500
  cloud:
    # consul配置
    # https://docs.spring.io/spring-cloud-consul/docs/4.0.2/reference/html/#registering-with-consul
    consul:
      # consul服务host和port
      host: 192.168.1.36
      port: 8500
      # 注册成服务
      service-registry:
        enabled: true
      config:
        # 启用配置中心管理
        enabled: true
        # 注册配置中心名称
        name: ${spring.application.name}
        # 是否运行时启用导入consul中心配置
        import-check:
          enabled: "true"
        # 注意此组合很重要:prefixes,default-context,profile-separator,format,data-key
        # 表示在consul服务上"Key/Value"菜单界面创建如下目录:config/testApp::dev/data,并且在testApp目录下,有一个为data的key名,值按yaml格式存储
        # 设置配置存储值的根文件夹名(前缀),consul默认情况下应用配置放在config目录下
        prefixes: [ config ]
        # 设置所有应用程序使用的文件夹名称(通常以项目名创建,并放在prefixes表示的config目录下)
        default-context: ${spring.application.name}
        # 设置用于分隔属性源中的配置文件名称和配置文件的分隔符的值,如:config/testApp-dev/data
        profile-separator: '-'
        # 设置注册中心配置的数据格式
        format: yaml
        # consul中核心key/value的key名
        data-key: data
        # 当注册中心的数据发生更改,则会发布刷新事件,向注册的端点服务发起调用通知
        watch:
          # 启用配置文件监视
          enabled: true
          # 查询conusl配置中心数据变更刷新间隔,用于判断当前应用相关配置数据是否已发生更改,如有获得最新数据,则发布刷新事件
          delay: 1000
          # 延迟等待多久后,如果检测到数据更新,则执行数据刷新事件重新加载配置,如未检查到更新,则继续使用旧配置;此项影响监听事件推送,默认为55s,官方建议小于60s以内
          # 此配置的目的是防止短时间内高频修改配置,避免重复加载配置,从而减少对服务稳定性与性能等影响
          wait-time: 10
        # 当 consul配置不可用时,只警告而不抛出异常,使应用可以正常运行(默认true)
        fail-fast: true
      # 向consul服务注册与发现、配置健康检查项
      # https://docs.spring.io/spring-cloud-consul/docs/4.0.2/reference/html/#spring-cloud-consul-discovery
      discovery:
        # 启用服务发现(默认true)
        enabled: true
        # 启用服务注册(默认true)
        register: true
        # 向注册中心提供的服务发现名称
        service-name: ${spring.application.name}
        # 指定数据中心名称,当存在多个注册中心集群时,此配置用作区分当前服务注册所在数据中心
        # datacenters: dc1
        # 向注册中心提供的健康检测地址;
        # 注:如果开启自定义management.server.port检测端口,则可以使用 ${management.server.servlet.context-path}映射检测路径
        health-check-path: /actuator/health
        # 向注册中心创建的实例ID,random.value生成随机数
        instance-id: ${spring.application.name}:${server.port}:${random.value}
        # 当健康检测超过指定时长内未恢复正常状态,则注销当前服务,表示当前服务不可用
        health-check-critical-timeout: 60s
        # 每次健康检测的请求超时限制
        health-check-timeout: 10s
        # 启用注册中心心跳检测
        heartbeat:
          # 开启心跳信号发送
          enabled: true
          # 发送间隔(默认30s)
          ttl: 10s
        # 自定义tags参数
        tags: version=1.0,author=JL,describes="springcloud+consul test exaple!"
        # 定时查询consul服务频率,如当服务上线下线能够及时获得,默认1000毫秒
        catalog-services-watch-delay: 5000

# 配置日志
logging:
  level:
    # log 级别
    org.springframework: info
    # 引入spring-cloud-starter-consul-discovery包,会在启动时抛BeanPostProcessorChecker警告,经检测此由bean的加载顺序引起,并非实际容器未创建原因
    # 关闭启动服务时的WARN警告 [xxxx] not eligible for getting processed by all BeanPostProcessors (for example: not eligible for auto-proxying).
    org.springframework.context.support.PostProcessorRegistrationDelegate: error
  file:
    # 配置日志保存相对路径和文件名
    name: ./logs/consul-catalina.log

#是否开启debug调试模式
debug: false
MyWebApplicationConfig.java
package com.consul.example.config;

import org.springframework.cloud.client.loadbalancer.LoadBalanced;
import org.springframework.context.annotation.Bean;
import org.springframework.context.annotation.Configuration;
import org.springframework.context.annotation.Lazy;
import org.springframework.web.client.RestTemplate;

/**
 * @Description WEB配置与bean创建
 * @Version V1.0
 */
@Configuration(proxyBeanMethods = false)
public class MyWebApplicationConfig {
    /**
     * SpringRestTemplate 支持使用逻辑服务名称/id 而不是物理 URL 来查找服务。
     * Feign 和发现感知的 RestTemplate 都利用Spring Cloud LoadBalancer进行客户端负载平衡。
     * @return
     */
    @LoadBalanced
    @Bean
    public RestTemplate loadbalancedRestTemplate() {
        return new RestTemplate();
    }
}
ConsulConfigWatchListener.java
package com.consul.example.listener;

import lombok.extern.slf4j.Slf4j;
import org.springframework.beans.factory.annotation.Value;
import org.springframework.cloud.context.config.annotation.RefreshScope;
import org.springframework.cloud.context.environment.EnvironmentChangeEvent;
import org.springframework.context.ApplicationListener;
import org.springframework.stereotype.Component;
import java.util.Set;

/**
 * @Description 通过EnvironmentChangeEvent事件获得consul配置变更
 * @Version V1.0
 */
@Slf4j
@RefreshScope
@Component
public class ConsulConfigWatchListener implements ApplicationListener {

    /**
     * 从consul中修改key/value值后,动态刷新映射到变量上,需要在当前类上加入@RefreshScope注解
     */
    @Value("${test.name}")
    private String testName;

    /**
     * 监听器方法,获得EnvironmentChangeEvent事件回调
     * @param refreshEvent
     */
    //支持注解 @EventListener(classes = EnvironmentChangeEvent.class)
    @Override
    public void onApplicationEvent(EnvironmentChangeEvent refreshEvent) {
        log.info("事件执行 -- EnvironmentChangeEvent");
        Set keys = refreshEvent.getKeys();
        for (String key : keys) {
            log.info("listener consul to config yaml update, key = {}, value = {}", key, testName);
        }
    }
}
CustomConsulClientService.java
package com.consul.example.service;

import com.ecwid.consul.v1.ConsulClient;
import com.ecwid.consul.v1.Response;
import com.ecwid.consul.v1.kv.model.GetValue;
import com.google.gson.Gson;
import jakarta.annotation.Resource;
import lombok.SneakyThrows;
import lombok.extern.slf4j.Slf4j;
import org.springframework.beans.factory.annotation.Value;
import org.springframework.context.annotation.Lazy;
import org.springframework.stereotype.Service;
import java.nio.charset.StandardCharsets;
import java.util.ArrayList;
import java.util.List;

/**
 * @Description 推送配置到consul服务的key/value中
 * @Version V1.0
 */
@Slf4j
@Service
public class CustomConsulClientService {

    /**
     * consul客户端访问类
     */
    @Resource
    private ConsulClient consulClient;

    /**
     * key所在的目录前缀,格式为:config/应用名称/
     */
    @Value("#{'${spring.cloud.consul.config.prefixes[0]:}/'.concat('${spring.cloud.consul.config.default-context:}')}")
    private String keyPrefix;

    /**
     * consul配置多环境运行文件分隔符,如:default = config/testApp/, dev = config/testApp-dev/,其中-即为profile-separator配置
     */
    @Value("${spring.cloud.consul.config.profile-separator:}")
    private String profileSeparator;

    /**
     * 应用运行环境,如:default, dev, test
     */
    @Value("${spring.profiles.active:}")
    private String active;

    /**
     * 核心配置数据key名
     */
    @Value("${spring.cloud.consul.config.data-key:}")
    private String dataKey;

    /**
     * 推送配置到consul
     * @param value
     */
    public void pushConfig(String value) {
        pushConfig(dataKey, value);
    }

    /**
     * 推送配置到consul
     * @param key
     * @param value
     */
    public void pushConfig(String key, String value) {
        String configKey = getKeyPrefixPath() + key;
        log.info("push config to consul, {} = {}", configKey, value);
        consulClient.setKVValue(configKey, value);
    }

    /**
     * 获取基于应用环境类型的consul配置config文件夹目录
     * @return
     */
    private String getKeyPrefixPath() {
        if (!"default".equals(active)) {
            return keyPrefix + profileSeparator + active + "/";
        }
        return keyPrefix + "/";
    }

    /**
     * 获得指定key的value
     * @param key
     * @return
     */
    @SneakyThrows
    public String getConfigValue(String key) {
        String configKey = getKeyPrefixPath() + key;
        Response response = this.consulClient.getKVValue(configKey);
        if (response == null) {
            return null;
        }

        GetValue value = response.getValue();
        if (value != null) {
            log.info("consul config, key={}, value={}", configKey, value);
            return value.getDecodedValue(StandardCharsets.UTF_8);
        }
        return null;
    }

    /**
     * 获得指定key的value
     * @return
     */
    public String getConfigKeys() {
        return new Gson().toJson((getConfigKeyList(getKeyPrefixPath())));
    }

    /**
     * 获得指定前缀目录下所有key信息
     * @param keyPrefix
     * @return
     */
    public List getConfigKeyList(String keyPrefix) {
        List list = new ArrayList<>();
        try {
            Response> response = this.consulClient.getKVKeysOnly(keyPrefix);
            if (response.getValue() == null) {
                return list;
            }
            for (String key : response.getValue()) {
                if (key != null && key.length() > 0) {
                    int index = key.lastIndexOf("/") + 1;
                    String temp = key.substring(index);
                    list.add(temp);
                }
            }
        } catch (Exception e) {
            log.error("get consul config error, execute to 'consulClient.getKVKeysOnly()' exception: {}, keyPrefix: {}", e.getMessage(), keyPrefix);
        }
        return list;
    }
}
ExampleRest.java
package com.consul.example.rest;

import com.consul.example.service.CustomConsulClientService;
import jakarta.annotation.Resource;
import lombok.SneakyThrows;
import org.springframework.beans.factory.annotation.Value;
import org.springframework.cloud.context.config.annotation.RefreshScope;
import org.springframework.context.annotation.Lazy;
import org.springframework.http.HttpStatus;
import org.springframework.web.bind.annotation.RequestMapping;
import org.springframework.web.bind.annotation.RestController;
import org.springframework.web.client.RestTemplate;
import java.util.concurrent.CompletableFuture;

/**
 * @Description API控制器测试类
 * @Version V1.0
 */
@RefreshScope
@RestController
public class ExampleRest {

    @Resource
    private RestTemplate restTemplate;

    @Resource
    private CustomConsulClientService customConsulClientService;

    @Value("${server.port:}")
    private String prot;
    /**
     * 从consul中修改key/value值后,动态刷新映射到变量上,需要在当前类上加入@RefreshScope注解
     */
    @Value("${test.name}")
    private String testName;

    /**
     * 测试示例,获取consul中的配置属性值
     * @return
     */
    @RequestMapping("/getName")
    public Object getName() {
        return "test.name: " + testName + "," + System.currentTimeMillis();
    }

    /**
     * 测试示例,推送配置到consul配置中心
     * @param value
     * @return
     */
    @RequestMapping("/pushConfig")
    public Object pushConfig(String value) {
        customConsulClientService.pushConfig(value);
        return HttpStatus.OK + "," + System.currentTimeMillis();
    }

    /**
     * 测试示例,获取当前运行环境下所配置的dataKey列表
     * @return
     */
    @RequestMapping("/getConfigKeys")
    public Object getConfigKeys() {
        String value = customConsulClientService.getConfigKeys();
        return value + "," + System.currentTimeMillis();
    }

    /**
     * 获取指定dataKey内容
     * @param key
     * @return
     */
    @RequestMapping("/getConfigValue")
    public Object getConfig(String key) {
        String value = customConsulClientService.getConfigValue(key);
        return value + "," + System.currentTimeMillis();
    }

    /**
     * 测试示例
     * @return
     */
    @RequestMapping("/info")
    public Object info() {
        return HttpStatus.OK +",prot:" + prot+ "," + System.currentTimeMillis();
    }

    /**
     * 测试示例,通过负载再次调用/info控制器方法
     * @return
     */
    @RequestMapping("/loadbalanced/info")
    public Object loadbalanced() {
        return getFirstProduct();
    }

    /**
     * 通过注册服务名请求指定路径(支持负载均衡)
     * @return
     */
    @SneakyThrows
    public String getFirstProduct() {
        //注意:此处需要异常请求,否则会引WebFlux同步阻塞抛错:block()/blockFirst()/blockLast() are blocking, which is not supported in thread reactor-http-nio-1
        CompletableFuture completableFuture = CompletableFuture.supplyAsync(() -> {
            //使用注册名称consul-example,而不是IP:port的方式发起请求
            return this.restTemplate.getForObject("http://consul-example/info", String.class);
        });
        return completableFuture.get();
    }
}
ConsulExampleApplication.java
package com.consul.example;

import org.springframework.boot.SpringApplication;
import org.springframework.boot.autoconfigure.SpringBootApplication;
import org.springframework.cloud.client.discovery.EnableDiscoveryClient;

/**
 * 启动类
 */
@SpringBootApplication
@EnableDiscoveryClient
public class ConsulExampleApplication {
   public static void main(String[] args) {
      SpringApplication.run(ConsulExampleApplication.class, args);
   }
}
服务测试
服务配置
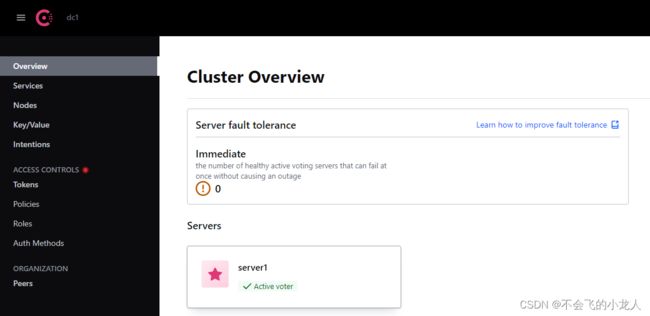
此处将consul搭建在虚拟机linux环境上,访问:http://ip:8500/
此server1即为consul安装时config.json中所配置的node_name值,为consul服务节点本身信息;
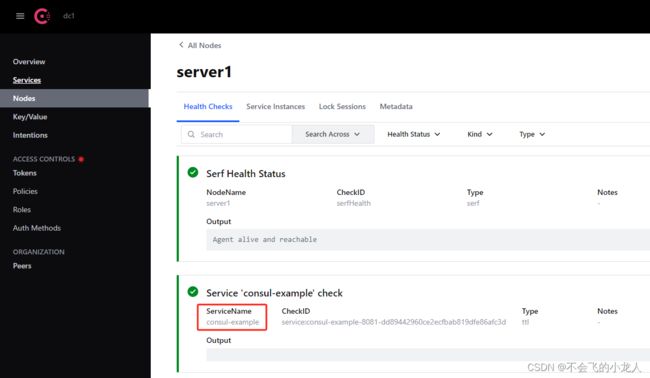
启动consul-example工程,从ConsulExampleApplication启动类中右键Run或Debug运行;
查看consul服务nodes,serviceName=consul-example已成功获得心跳检测,注册成consul节点子服务成功;
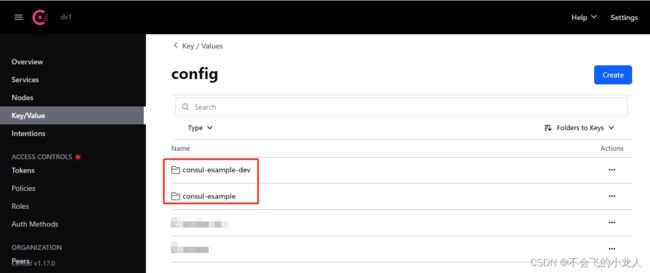
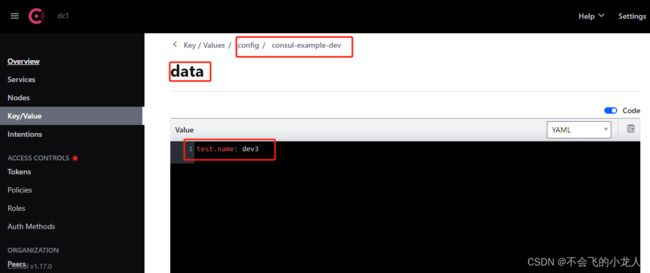
需提前在consul服务中通过Key/Value菜单进入配置界面,通过右上角"Create"按钮,创建两个文件目录:config/consul-example/、config/consul-example-dev/,(注意:在consul界面中创建名称后带/则表示文件夹名),其中consul-example-dev配置目录表示spring.profiles.active=dev运行环境,默认不填则为default环竟加载consul-example配置目录,通过此方式,可以在一个consul集群或单节点上,建立多个可运行环境,如:dev,test,pro;但通常不建议放在一起,为了数据安全性,因该对不同的环境做独立conusl集群或单节点隔离运行;
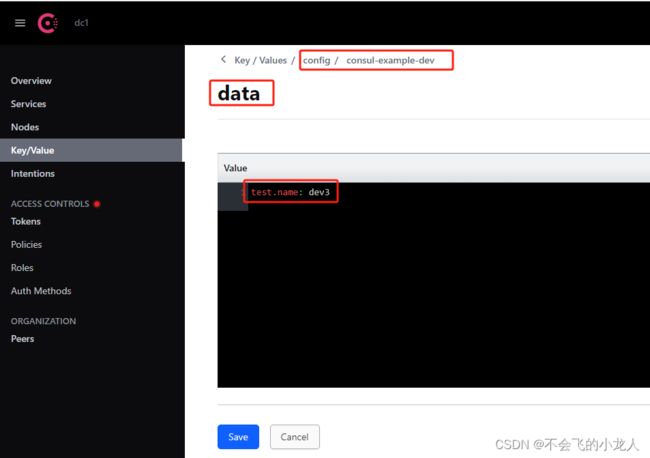
进入consul-example-dev目录下,通过右上角"Create"按钮继续创建名为data的键(dataKey),data为工程项目代码application.yml配置里对应spring.cloud.consul.config.data-key,其中Value值即为项目运行过程中需要动态加载的内容;
接口测试
访问consul-example工程示例接口测试;
访问http://127.0.0.1:8081/info 获取简单响应
200 OK,1702374324638
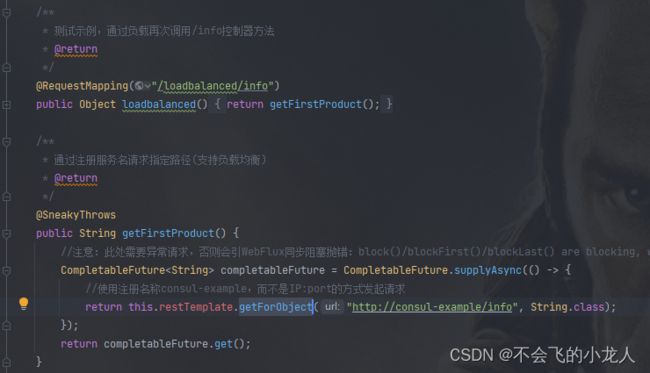
访问http://127.0.0.1:8081/loadbalanced/info负载均衡接口,首先在idea里分别设置8081和8082两个服务端口并启动应用,在consul>Service里查注册服务信息,默认多次请求8081端口的API获取指定服务ID的负载均衡响应
200 OK,prot:8081,1702381796922
200 OK,prot:8082,1702381806726
访问http://127.0.0.1:8081/getConfigKeys,获取当前应用运行环境下config/consul-example-dev/配置目录中所有key名
["","data"],1702374354725
访问http://127.0.0.1:8081/getName,获取当前应用在指定运行环境下从config/consul-example-dev/data配置中拉取并加载到SpringCloud中的配置项类变量值
test.name: dev2,1702374505442
访问http://127.0.0.1:8081/getConfigValue?key=data,获取当前应用在指定运行环境下config/consul-example-dev/配置中data键名所有内容(注意:和上面getName有区别,通过consulClient客户端类获取)
test.name: dev2,1702374662615
访问http://127.0.0.1:8081/pushConfig?value=test.name:%20dev3,向当前应用在指定运行环境config/consul-example-dev/data键名中推送value配置
200 OK,1702375268604
控制台打印定时刷新配置后,推送的监听记录;手动在consul服务节点上修改配置,同样会触发ConsulConfigWatchListener.onApplicationEvent()方法;
2023-12-12T18:02:13.834+08:00  INFO 29428 --- [consul-example] [        task-14] c.c.e.service.CustomConsulClientService  : push config to consul, config/consul-example-dev/data = test.name: dev3
2023-12-12T18:02:20.528+08:00  INFO 29428 --- [consul-example] [TaskScheduler-1] c.c.e.l.ConsulConfigWatchListener        : 事件执行 -- EnvironmentChangeEvent
2023-12-12T18:02:20.529+08:00  INFO 29428 --- [consul-example] [TaskScheduler-1] c.c.e.l.ConsulConfigWatchListener        : listener consul to config yaml update, key = test.name, value = dev3
2023-12-12T18:02:20.529+08:00  INFO 29428 --- [consul-example] [TaskScheduler-1] o.s.c.e.event.RefreshEventListener       : Refresh keys changed: [test.name]
结尾
本章内容是根据spring官网的spring-cloud项目下的spring-cloud-consul组件文档描述进行参考与搭建,conusl配置与使用则来源于官网文档说明;同时还有许多consul服务功能的用法与集成,未在本文中演示,可以尝试自行去了解;更多内容,请上相关官网学习与了解;
到此完成一个简单的springcloud+consul注册与发现服务的工程开发,后续可以在此基础上,根据业务需要扩展开发;
谢谢!

