“学骑自行车最快的方式就是先骑上去”
一、安装node和npm
1、一种是通过编译node源文件安装node(注意:需要Python 2.6或2.7已经安装)
$ wget http://nodejs.org/dist/v0.10.26/node-v0.10.26.tar.gz
$ tar -zxvf node-v0.10.26.tar.gz
$ make && make install
2、windows下安装属于比较省心的安装方式,只需要把现在下来的msi文件点击安装即可。
成功安装node之后,npm(node package manager)已经包含在内了,不需要独立安装,可以执行一下npm检查是否安装好。
C:\Users\admin>npm Usage: npmwhere is one of: add-user, adduser, apihelp, author, bin, bugs, c, cache, completion, config, ddp, dedupe, deprecate, docs, edit, explore, faq, find, find-dupes, get, help, help-search, home, i, info, init, install, isntall, issues, la, link, list, ll, ln, login, ls, outdated, owner, pack, prefix, prune, publish, r, rb, rebuild, remove, repo, restart, rm, root, run-script, s, se, search, set, show, shrinkwrap, star, stars, start, stop, submodule, t, tag, test, tst, un, uninstall, unlink, unpublish, unstar, up, update, v, version, view, whoami npm -h quick help on npm -l display full usage info npm faq commonly asked questions npm help search for help on npm help npm involved overview
二、创建repository
接下来我们需要创建module所需的repository,默认你拥有一个github账号(如果没有自行解决),这个repository用来托管我们module的代码,并方便用户报告bug,最重要的是可以让其他开发者向module贡献代码,这也是乐趣所在。
三、初始化package.json
接下来我们创建package.json文件,这个文件包含了module的所有信息,比如名称、版本、描述、依赖、作者、license等。笔者以自己的easy_mongo(注意:npm要求项目的名称必须为小写字母)项目为例,看如何创建package.json。
首先创建我们module的目录
$ mkdir 37wan && cd 37wan
之后执行npm init,系统会提示你输入所需的信息,不想输入的直接输入Enter可以跳过。
D:\nodeHome\37wan>npm init This utility will walk you through creating a package.json file. It only covers the most common items, and tries to guess sane defaults. See `npm help json` for definitive documentation on these fields and exactly what they do. Use `npm install--save` afterwards to install a package and save it as a dependency in the package.json file. Press ^C at any time to quit. name: (37wan)
你输入的这些所需的信息都会反映在你的项目中的package.json文件中的。
看一下完整的结果:
D:\nodeHome\37wan>npm init This utility will walk you through creating a package.json file. It only covers the most common items, and tries to guess sane defaults. See `npm help json` for definitive documentation on these fields and exactly what they do. Use `npm install--save` afterwards to install a package and save it as a dependency in the package.json file. Press ^C at any time to quit. name: (37wan) version: (1.0.0) description: this is a channel for 37wan entry point: (index.js) test command: make test git repository: https://github.com/weierbufan/jason_node.git keywords: channel 37wan node author: weierbufan license: (ISC) About to write to D:\nodeHome\37wan\package.json:
输入完成之后,系统会要你确认文件的内容是否有误,如果没有问题直接输入yes,那么package.json就创建好了。
About to write to D:\nodeHome\37wan\package.json:

{
  "name": "37wan",
  "version": "1.0.0",
  "description": "this is a channel for 37wan",
  "main": "index.js",
  "scripts": {
    "test": "make test"
  },
  "repository": {
    "type": "git",
    "url": "https://github.com/weierbufan/jason_node.git"
  },
  "keywords": [
    "channel",
    "37wan",
    "node"
  ],
  "author": "weierbufan",
  "license": "ISC",
  "bugs": {
    "url": "https://github.com/weierbufan/jason_node/issues"
  },
  "homepage": "https://github.com/weierbufan/jason_node"
}


Is this ok? (yes) y
npm init创建的package.json文件只包含了基本的信息,我们还需要加入对其他module的依赖关系:
"dependencies": {
    "mocha" : "1.18.2",
    "should" : "3.3.0",
    "mongodb" : "1.3.19"
}
四、项目结构
package.json文件只是第一步,要完成一个module,我们还需要许多其他文件,整体的文件夹结构如下:
37wan
├─┬ lib
│ └── easy_mongo.js
├─┬ test
│ └── all.js
├── .gitignore
├── .npmignore
├── .travis.yml
├── index.js
├── LICENSE
├── makefile
├── package.json
├── README.md
这些文件的作用是:
- lib目录下存放业务逻辑文件
- test目录下存放单元测试用例
- .npmignore记录哪些文件不需要被发布到npmjs.org
- .travis.yml是持续集成服务travis的描述文件
- index.js是入口文件
- makefile方便我们用
make test进行测试 README.md是此module的描述和使用方法
五、持续集成
开源项目多如牛毛,从中找出靠谱的项目需要花费一定的精力,开发者都会对持续更新,并且经过测试(很多公司采用)的项目更加的信赖,对于刚上线并且用户数量很少的项目开发者都会有个疑虑:这项目靠谱吗?所以你需要对自己的项目打上一个标识:老子的项目靠谱。如何做?持续集成。
目前Github已经整合了持续集成服务travis,我们只需要在项目中添加.travis.yml文件,在下一次push之后,travis就会定时执行npm test来测试你的项目,并且会在测试失败的时候通知到你,你也可以把项目当前的状态显示在README.md中,让人一目了然,比如:
.travis.yml是一个YAML文件,关于node.js相关的配置见这里,例子如下:
language: node_js
node_js:
   - "0.10"
   - "0.8"
   - "0.6"
services:
    - mongodb
这个例子的是让travis在node.js的0.6.x,0.8.x,0.10.x三个版本下对项目进行测试,并且需要mongodb的服务。
六、发布
完成了上面的步骤之后,我们接下来要在www.npmjs.org注册一个账号,这个账号会被添加到npm本地的配置中,用来发布module用。
$ npm adduser
Username: your name
Password: your password
Email: yourmail[@gmail](/user/gmail).com
如果出现以下错误,可能是你的npm版本太低,通过sudo npm install -g npm升级一下。
npm WARN adduser Incorrect username or password
npm WARN adduser You can reset your account by visiting:
npm WARN adduser
npm WARN adduser     http://admin.npmjs.org/reset
npm WARN adduser
npm ERR! Error: forbidden may not mix password_sha and pbkdf2
npm ERR! You may need to upgrade your version of npm:
npm ERR!   npm install npm -g
npm ERR! Note that this may need to be run as root/admin (sudo, etc.)
成功之后,npm会把认证信息存储在~/.npmrc中,并且可以通过以下命令查看npm当前使用的用户:
$ npm whoami
以上完成之后,我们终于可以发布自己的module了:
$ npm publish --tag 0.1.0
npm http PUT https://registry.npmjs.org/easy_mongo
npm http 201 https://registry.npmjs.org/easy_mongo
+ easy_mongo[@0](/user/0).1.0
npm社区版本号规则采用的是semver(语义化版本),主要规则如下:
版本格式:主版号.次版号.修订号,版号递增规则如下:
    主版号:当你做了不相容的 API 修改,
    次版号:当你做了向下相容的功能性新增,
    修订号:当你做了向下相容的问题修正。
    先行版号及版本编译资讯可以加到「主版号.次版号.修订号」的后面,作为延伸。
至此,我们已经成功把module发布到了npmjs.org,是不是很简单,快动手把自己的module也贡献出来吧。
Have fun :)
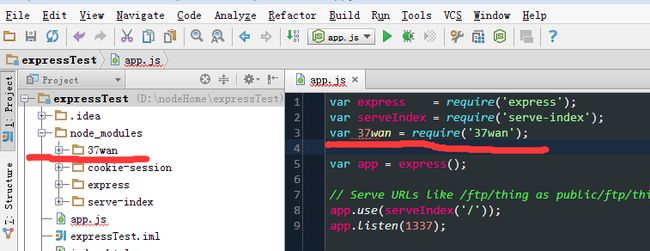
其实我们在创建好自己要发布的项目之后,可以导入到以前项目的node_modules文件下中,实现本地安装。这样在我们以前的项目中就可以通过require来引入要发布的模块了。
以前面创建的37wan为例:

导入以前的express项目中,然后引用
#参考
- https://github.com/npm/npm
- https://www.npmjs.org/doc/api/npm-publish.html
- https://www.npmjs.org/doc/cli/npm-adduser.html
- http://docs.travis-ci.com/user/languages/javascript-with-nodejs/
- http://docs.travis-ci.com/user/database-setup/
- http://semver.org/
- http://yijiebuyi.com/blog/7e51daaf75cbbabf29661c9e5676a4be.html