QKCP容器平台安装qkcp &paas deployment
22年底23年初做的容器云平台的项目,该份是当初实施部署真实生产环境的手册,关键ip和端口已经更改,现贴来给大伙参阅。
x公司qkcp容器平台安装部署手册
目录
x公司qkcp容器平台安装部署手册 1
-
集群基础环境 3
1.1. 集群规划信息 3
1.2. 标准环境配置 4
1.2.1. 修改hostname 4
1.2.2. 修改节点语言 4
1.2.3. 配置节点免密登录 4
1.2.4. 关闭防火墙 4
1.2.5. 初始化数据盘 5
1.2.6. 关闭swap分区 5
1.2.7. 配置时间同步 5
1.2.8. 安装依赖包 6
1.3. 环境检查 6
1.3.1. 磁盘检查 6
1.3.2. 防火墙检查 6
1.3.3. 验证swap分区 6
1.3.4. 检查时间同步 6
1.3.5. 检查内核版本 7
1.3.6. 上传所需镜像文件与离线安装包 7
1.3.7. 安装docker服务(CRI) 7 -
QKCP实施阶段 7
2.1. LB安装(HAproxy+keepalived) 7
2.1.1. 集群架构 7
2.1.2. 配置负载均衡 8
2.1.3. 安装Keepalived 和 HAproxy 8
2.2. 高可用组件安装 8
2.2.1. 安装HAProxy和KeepAlived 8
2.2.2. 安装KeepAlived 9
2.2.3. HAProxy和KeepAlived测试 11
2.2.4. Harbor 镜像仓库安装 11
2.2.5. Harbor信息 11
2.2.6. 部署Harbor HTTPS 12
3、批量创建kubesphere的harbor项目 12
2.2.7. 上传所需镜像至harbor 13
2.3. QKCP平台部署 14
2.3.1. 生成kubernetes集群配置文件 14
2.3.2. 配置config-sample.yaml 14
2.3.3. 部署kubernetens集群 15
2.3.4. 生成etcd secret 16
2.3.5. 部署QKCP 16
2.3.5.1. 修改kubesphere-installer.yaml配置文件 16
2.3.5.2. 修改cluster-configuration.yaml 16
2.3.5.3. 开始部署 21
2.3.6. 修改es的资源限制 21
2.3.7. 修改jenkins的资源限制 22
2.3.8. 开始安装 22
2.3.9. 安装验证 22
1.运行以下命令以检查安装日志。如有报错进行排查即可 22
2.4. SonarQube集成 23
2.4.1. 安装 SonarQube 服务器 23
2.4.2. 获取 SonarQube 控制台地址 23
2.4.3. 创建 SonarQube 管理员令牌 (Token) 23
2.4.4. 创建 Webhook 服务器 24
3、点击 Create。 25
2.4.5. 将 SonarQube 配置添加到 ks-installer 26
2.4.6. 将 SonarQube 服务器添加至 Jenkins 26
2.4.7. 将 sonarqubeURL 添加到 KubeSphere 控制台 26
2.4.8. 重启服务 27 -
集群基础环境
集群规划信息详见下表《x公司部署实施规划方案信息表》
1.1. 集群规划信息
管理集群网络规划
描述 规划 备注
POD网络 10.233.64.0/18
SVC网络 10.233.0.0/18 Service服务网络
节点ip 10.0.200.201 master01
10.0.200.202 master02
10.0.200.203 master03
10.0.200.204 node01
10.0.200.205 node02
LB(负载均衡) 10.0.200.219220 暴露端口16443 80
ETCD(安装在master上) 10.0.200.201
10.0.200.202
10.0.200.203
Kubsphere web cloud.ihlt.com 10.0.200.219 220
Apiserver (安装在master上? 10.0.200.219220
生产集群网络规划
描述 规划 备注
POD网络 10.234.64.0/18
SVC网络 10.234.0.0/18
节点ip 10.0.200.208 master01
10.0.200.209 master02
10.0.200.210 master03
10.0.200.211 node01
10.0.200.212 node02
10.0.200.213 node03
10.0.200.214 node04
LB(负载均衡) 10.0.200.221 暴露端口16443
ETCD 10.0.200.208
10.0.200.209
10.0.200.210
Apiserver 10.0.200.221
测试集群网络规划
描述 规划 备注
POD网络 10.235.64.0/18
SVC网络 10.235.0.0/18
节点ip 10.6.100.81 master01
10.6.100.82 master02
10.6.100.83 master03
10.6.100.84 node01
10.6.100.85 node02
LB(负载均衡) 10.6.100.91 暴露端口16443
ETCD 10.6.100.81
10.6.100.82
10.6.100.83
Apiserver 10.6.100.91
1.2. 标准环境配置
1.2.1. 修改hostname
按照规划表,依次修改节点主机名,修改方法如下:
hostnamectl set-hostname host-master01
1.2.2. 修改节点语言
echo LANG=“en_US.UTF-8” >> /etc/profile
source /etc/profile
1.2.3. 配置节点免密登录
执行如下命令,生成密钥对
ssh-keygen -t rsa
修改ssh配置
echo PubkeyAcceptedKeyTypes=+ssh-rsa >> /etc/ssh/sshd_config
systemctl reload sshd
将节点密钥分发到其他机器
ssh-copy-id -i ~/.ssh/id_rsa.pub KaTeX parse error: Expected 'EOF', got '#' at position 83: … 1.2.5. 初始化数据盘 #̲!/bin/bash set …disk" ; then
ls $disk
exit -1
fi
mkdir -p /var/lib/docker
echo “Yes” | parted $disk “mklabel gpt”
echo “ignore”| parted $disk “mkpart primary 1 -1”
sleep 0.2
mkfs.ext4 ${disk}1
disk_id=blkid |grep ${disk}1 |awk '{print $2}'|awk -F "=" '{print $2}'|sed 's/\"//g'
echo KaTeX parse error: Expected 'EOF', got '#' at position 15: disk_id echo "#̲##############"…{disk_id} /data ext4 defaults 0 0" >> /etc/fstab
mount -a
echo “/data/docker /var/lib/docker none rw,bind 0 1” >> /etc/fstab
mkdir -p /data/docker
mount -a
1.2.6. 关闭swap分区
swapoff -a
yes | cp /etc/fstab /etc/fstab_bak
cat /etc/fstab_bak |grep -v swap > /etc/fstab
1.2.7. 配置时间同步
安装ntp软件包
apt install ntp
添加如下配置,并注释掉其他默认配置
tos maxdist 15
server 10.0.100.2 iburst
设置时区
防止系统重启后时区改变,执行下面一行命令
ln -sf /usr/share/zoneinfo/Asia/Shanghai /etc/localtime

1.2.8. 安装依赖包
apt install -y socat ipset conntrack ipvsadm ebtables curl
1.3. 环境检查
1.3.1. 磁盘检查
检查各个节点docker的磁盘挂载情况,确认docker服务使用的是数据盘
root@prd-master01:~# df -h /var/lib/docker
文件系统 容量 已用 可用 已用% 挂载点
/dev/sdb1 98G 2.0G 91G 3% /var/lib/docker
1.3.2. 防火墙检查
root@prd-master01:~# systemctl status ufw
○ ufw.service - Uncomplicated firewall
Loaded: loaded (/lib/systemd/system/ufw.service; disabled; vendor preset: enabled)
Active: inactive (dead)
Docs: man:ufw(8)
1.3.3. 验证swap分区
root@prd-master01:~# free -g
total used free shared buff/cache available
内存: 15 2 0 0 12 12
交换: 0 0 0
1.3.4. 检查时间同步
root@prd-master01:~/qkcp-all-v3.2.1-offline-linux-amd64/qkcp-installer# ntpq -pn
remote refid st t when poll reach delay offset jitter
*10.0.100.2 20.189.79.72 4 u 90 128 377 0.956 +46.302 24.107
1.3.5. 检查内核版本
root@prd-master01:~# uname -r
5.15.0-50-generic
1.3.6. 上传所需镜像文件与离线安装包
上传qkcp安装包,并校验MD5值
root@prd-master01:~# md5sum qkcp-all-v3.2.1-offline-linux-amd64.tar.gz
c178cfa3a93f0f08e19a34182fdc7e63 qkcp-all-v3.2.1-offline-linux-amd64.tar.gz
1.3.7. 安装docker服务(CRI)
容器运行时接口(Container Runtime Interface),简称 CRI。CRI 中定义了 容器 和 镜像 的服务的接口,因为容器运行时与镜像的生命周期是彼此隔离的,因此需要定义两个服务。
docker:Kuberentes 最初就开始支持的容器运行时,目前还没完全从 kubelet 中解耦,Docker 公司同时推广了 OCI 标准
dpkg -i containerd.io_1.6.8-1_amd64.deb
dpkg -i docker-ce-cli_20.10.18_3-0_ubuntu-jammy_amd64.deb
dpkg -i docker-ce_20.10.18_3-0_ubuntu-jammy_amd64.deb
ps:三个软件包之间有依赖关系,注意软件安装的先后顺序
2. QKCP实施阶段
2.1. LB安装(HAproxy+keepalived)
高可用 Kubernetes 集群能够确保应用程序在运行时不会出现服务中断。
- 正式部署由客户提供资源,客户自行负责客户数据
- LB资源需检查及验证
- 测试环境,可基于虚机搭建,提供存储资源。
2.1.1. 集群架构
示例集群有三个主节点,三个工作节点,两个用于负载均衡的节点,以及一个虚拟 IP 地址。本示例中的虚拟 IP 地址也可称为“浮动 IP 地址”。这意味着在节点故障的情况下,该 IP 地址可在节点之间漂移,从而实现高可用。

请注意,在本示例中,Keepalived 和 HAproxy 安装在单独的两台节点上。也可以,单独配置两个用于负载均衡的特定节点(如上图,您可以按需增加更多此类节点)会更加安全、灵活。
2.1.2. 配置负载均衡
Keepalived 提供 VRPP 实现,并允许您配置 Linux 机器使负载均衡,预防单点故障。HAProxy 提供可靠、高性能的负载均衡,能与 Keepalived 完美配合。
由于 lb1 和 lb2 上安装了 Keepalived 和 HAproxy,如果其中一个节点故障,虚拟 IP 地址(即浮动 IP 地址)将自动与另一个节点关联,使集群仍然可以正常运行,从而实现高可用。若有需要,也可以此为目的,添加更多安装 Keepalived 和 HAproxy 的节点。
2.1.3. 安装Keepalived 和 HAproxy
2.2. 高可用组件安装
2.2.1. 安装HAProxy和KeepAlived
ha01与ha02节点通过apt安装HAProxy和KeepAlived:
apt install keepalived haproxy -y
ha01与ha02节点配置HAProxy(ha1与ha2节点的HAProxy配置相同):
vim /etc/haproxy/haproxy.cfg
root@prd-lb01:~# cat /etc/haproxy/haproxy.cfg
global
maxconn 2000
ulimit-n 16384
log 127.0.0.1 local0 err
stats timeout 30s
defaults
log global
mode http
option httplog
timeout connect 5000
timeout client 50000
timeout server 50000
timeout http-request 15s
timeout http-keep-alive 15s
frontend monitor-in
bind *:33305
mode http
option httplog
monitor-uri /monitor
frontend k8s-master
bind 0.0.0.0:16443
bind 127.0.0.1:16443
mode tcp
option tcplog
tcp-request inspect-delay 5s
default_backend qyk8s-master
backend qyk8s-master
mode tcp
option tcplog
option tcp-check
balance roundrobin
default-server inter 10s downinter 5s rise 2 fall 2 slowstart 60s maxconn 250 maxqueue 256 weight 100
server host-master01 10.0.200.208:6443 check
server host-master02 10.0.200.209:6443 check
server host-master03 10.0.200.210:6443 check
2.2.2. 安装KeepAlived
ha1与ha2节点配置KeepAlived,配置不一样
ha1节点的配置:
mkdir /etc/keepalived
vim /etc/keepalived/keepalived.conf
root@prd-lb01:~# cat /etc/keepalived/keepalived.conf
! Configuration File for keepalived
global_defs {
router_id LVS_DEVEL
}
vrrp_script chk_apiserver {
script “/etc/keepalived/check_apiserver.sh”
interval 5
weight -5
fall 2
rise 1
}
vrrp_instance VI_1 {
state MASTER
interface ens3
# mcast_src_ip 10.0.200.217 #发送多播包的地址,如果不设置默认使用绑定网卡的primary ip
virtual_router_id 151 #VRID标记 ,路由ID,可通过#tcpdump vrrp查看
priority 101 #优先级,高优先级竞选为master
advert_int 2
authentication {
auth_type PASS
auth_pass K8SHA_KA_AUTH
}
virtual_ipaddress {
10.0.200.221/24 #设置vip
}
track_script {
chk_apiserver
}
}
ha2节点的配置:
root@prd-lb02:~# cat /etc/keepalived/keepalived.conf
! Configuration File for keepalived
global_defs {
router_id LVS_DEVEL
}
vrrp_script chk_apiserver {
script “/etc/keepalived/check_apiserver.sh”
interval 5
weight -5
fall 2
rise 1
}
vrrp_instance VI_1 {
state BACKUP
interface ens3
#mcast_src_ip 10.0.200.218
virtual_router_id 151
priority 100
advert_int 2
authentication {
auth_type PASS
auth_pass K8SHA_KA_AUTH
}
virtual_ipaddress {
10.0.200.221/24
}
track_script {
chk_apiserver
}
}
注意上述的健康检查是开启的,如有报错,可以等集群建立完成后再开启:
track_script {
chk_apiserver
}
配置KeepAlived健康检查文件:
cat /etc/keepalived/check_apiserver.sh
#!/bin/bash
err=0
for k in ( s e q 13 ) d o c h e c k c o d e = (seq 1 3) do check_code= (seq13)docheckcode=(pgrep haproxy)
if [[ c h e c k c o d e = = " " ] ] ; t h e n e r r = check_code == "" ]]; then err= checkcode==""]];thenerr=(expr $err + 1)
sleep 1
continue
else
err=0
break
fi
done
if [[ $err != “0” ]]; then
echo “systemctl stop keepalived”
/usr/bin/systemctl stop keepalived
exit 1
else
exit 0
fi
添加脚本执行权限:
chmod +x /etc/keepalived/check_apiserver.sh
启动haproxy和keepalived
systemctl restart haproxy
systemctl restart keepalived
systemctl enable haproxy && systemctl enable keepalived
2.2.3. HAProxy和KeepAlived测试
重要:安装keepalived和haproxy后,需要测试keepalived是否是正常的
测试:
root@prd-master01:~# telnet 10.0.200.220 16443
Trying 10.0.200.220…
Connected to 10.0.200.220.
Escape character is ‘^]’.
如果telnet没有出现 ‘^]’ ,则认为VIP不可用,不可在继续往下执行,需要排查keepalived的问题,比如防火墙和selinux,haproxy和keepalived的状态,监听端口等
2.2.4. Harbor 镜像仓库安装
2.2.5. Harbor信息
先安装Docker和Docker Compose 一个二进制工具,直接下载之后放在系统二进制目录下就能使用了。下载注意linux版本
root@harbor:~# cp /home/harbor/docker-compose-linux-x86_64 /usr/bin/docker-compose
[root@harbor:~# chmod +x /usr/bin/docker-compose
2.2.6. 部署Harbor HTTPS
root@harbor:~# md5sum harbor-offline-installer-v2.6.0.tar
2d8bd08b3679f2c8e2d9dcda720ad2e1 harbor-offline-installer-v2.6.0.tar
root@harbor:~# tar -xvf harbor-offline-installer-v2.6.0.tar
harbor/harbor.v2.6.0.tar.gz
harbor/prepare
harbor/LICENSE
harbor/install.sh
harbor/common.sh
harbor/harbor.yml.tmpl
修改habor.yml,这里存储的都是镜像仓库的配置信息
[root@localhost harbor]# cp harbor.yml.tmpl harbor.yml
[root@localhost harbor]# vim harbor.yml
hostname: harbor.ihlt.com #harbor 的访问地址
certificate: /data/cert/harbor.ihlt.com.crt
private_key: /data/cert/harbor.ihlt.com.key
harbor_admin_password: Harbor12345
data_volume: /data/harbor_data
创建harbor的数据目录
root@prd-harbor01:~# mkdir /data/harbor_data
上传harbor的证书文件
root@prd-harbor01:~# mkdir -p /etc/docker/certs.d/harbor.ihlt.com/
root@prd-harbor01:~# cp harbor.ihlt.com.cert /etc/docker/certs.d/harbor.ihlt.com/
root@prd-harbor01:~# cp harbor.ihlt.com.key /etc/docker/certs.d/harbor.ihlt.com/
#启动harbor
#参数 --with-chartmuseum开启helm仓库功能
[root@harbor harbor]# ./install.sh --with-chartmuseum
#docker login 到harbor镜像仓库
root@host-master01:~/qkcp-all-v3.2.1-offline-linux-amd64# docker login harbor.ihlt.com -u admin -p Harbor12345
WARNING! Using --password via the CLI is insecure. Use --password-stdin.
WARNING! Your password will be stored unencrypted in /root/.docker/config.json.
Configure a credential helper to remove this warning. See
https://docs.docker.com/engine/reference/commandline/login/#credentials-store
Login Succeeded
3、批量创建kubesphere的harbor项目
执行脚本创建harbor project
tar zxvf qkcp-all-v3.2.1-offline-linux-amd64.tar.gz -C /root
cd kubesphere-all-v3.1.1-offline-linux-amd64
bash project.sh
ps:执行project.sh脚本前,需要修改脚本中的url为harbor地址

2.2.7. 上传所需镜像至harbor
#解压QKCP离线安装包
tar zxvf qkcp-all-v3.2.1-offline-linux-amd64.tar.gz -C /root
#上传所需镜像
修改config-sample.yaml文件
registry:
plainHTTP: false
privateRegistry: “harbor.ihlt.com” ##私有镜像仓库
namespaceOverride: “”
registryMirrors: []
namespaceOverride: “”
insecureRegistries: [harbor.ihlt.com]
auths: # if docker add by docker login, if containerd append to /etc/containerd/config.toml
“harbor.ihlt.com”: ##镜像仓库地址
username: “admin” ##镜像仓库账号
password: “Harbor12345” ##镜像仓库密码
skipTLSVerify: false # Allow contacting registries over HTTPS with failed TLS verification.
plainHTTP: false # Allow contacting registries over HTTP.
certsPath: “/etc/docker/certs.d/harbor.ihlt.com” # Use certificates at path (*.crt, *.cert, *.key) to connect to the registry. ##https使用的证书
addons: []

root@host-master01:~/qkcp-all-v3.2.1-offline-linux-amd64# ./kk artifact images push -f config-sample.yaml -a kubekey-artifact.tar.gz
2.3. QKCP平台部署
2.3.1. 生成kubernetes集群配置文件
#执行之后会创建一个实例文件config-sample.yaml,备份后进行编辑
root@host-master01:~/qkcp-all-v3.2.1-offline-linux-amd64# ./kk create config --with-kubernetes v1.22.1
2.3.2. 配置config-sample.yaml
root@prd-master01:~/qkcp-all-v3.2.1-offline-linux-amd64# cat config-sample.yaml
apiVersion: kubekey.kubesphere.io/v1alpha2
kind: Cluster
metadata:
name: sample
spec:
hosts:
- {name: prd-master01, address: 10.0.200.208, internalAddress: 10.0.200.208, user: root}
- {name: prd-master02, address: 10.0.200.209, internalAddress: 10.0.200.209, user: root}
- {name: prd-master03, address: 10.0.200.210, internalAddress: 10.0.200.210, user: root}
- {name: prd-node01, address: 10.0.200.211, internalAddress: 10.0.200.211, user: root}
- {name: prd-node02, address: 10.0.200.212, internalAddress: 10.0.200.212, user: root}
- {name: prd-node03, address: 10.0.200.213, internalAddress: 10.0.200.213, user: root}
- {name: prd-node04, address: 10.0.200.214, internalAddress: 10.0.200.214, user: root}
roleGroups:
etcd:- prd-master01
- prd-master02
- prd-master03
control-plane: - prd-master01
- prd-master02
- prd-master03
worker: - prd-node01
- prd-node02
- prd-node03
- prd-node04
controlPlaneEndpoint:
Internal loadbalancer for apiservers
internalLoadbalancer: haproxy
domain: lb.kubesphere.local
address: “10.0.200.221”
port: 16443
system:ntpServers: # The ntp servers of chrony.
- 10.0.100.2
#timezone: “Asia/Shanghai”
debs: # Specify additional packages to be installed. The ISO file which is contained in the artifact is required.- nfs-common
kubernetes:
version: v1.22.1
clusterName: cluster.local
imageRepo: kubesphere
containerManager: docker # Container Runtime, support: containerd, cri-o, isula. [Default: docker]
autoRenewCerts: true # Whether to install a script which can automatically renew the Kubernetes control plane certificates. [Default: false]
masqueradeAll: false # masqueradeAll tells kube-proxy to SNAT everything if using the pure iptables proxy mode. [Default: false].
maxPods: 110 # maxPods is the number of Pods that can run on this Kubelet. [Default: 110]
podPidsLimit: 10000 # podPidsLimit is the maximum number of PIDs in any pod. [Default: 10000]
nodeCidrMaskSize: 24 # The internal network node size allocation. This is the size allocated to each node on your network. [Default: 24]
proxyMode: ipvs # Specify which proxy mode to use. [Default: ipvs]
featureGates: # enable featureGates, [Default: {“ExpandCSIVolumes”:true,“RotateKubeletServerCertificate”: true,“CSIStorageCapacity”:true, “TTLAfterFinished”:true}]
CSIStorageCapacity: true
ExpandCSIVolumes: true
RotateKubeletServerCertificate: true
TTLAfterFinished: true
etcd:
type: kubekey
network:
plugin: calico
kubePodsCIDR: 10.234.64.0/18
kubeServiceCIDR: 10.234.0.0/18
ipipMode: CrossSubnet # IPIP Mode to use for the IPv4 POOL created at start up. If set to a value other than Never, vxlanMode should be set to “Never”. [Always | CrossSubnet | Never] [Default: Always]
vxlanMode: Never # VXLAN Mode to use for the IPv4 POOL created at start up. If set to a value other than Never, ipipMode should be set to “Never”. [Always | CrossSubnet | Never] [Default: Never]
vethMTU: 0 # The maximum transmission unit (MTU) setting determines the largest packet size that can be transmitted through your network. By default, MTU is auto-detected. [Default: 0]
multus support. https://github.com/k8snetworkplumbingwg/multus-cni
multusCNI:
enabled: false
storage:
openebs:
basePath: /var/openebs/local # base path of the local PV provisioner
registry:
plainHTTP: false
privateRegistry: “harbor.ihlt.com”
namespaceOverride: “”
registryMirrors: []
namespaceOverride: “”
insecureRegistries: [harbor.ihlt.com]
auths: # if docker add bydocker login, if containerd append to/etc/containerd/config.toml
“harbor.ihlt.com”:
username: “admin”
password: “Harbor12345”
skipTLSVerify: false # Allow contacting registries over HTTPS with failed TLS verification.
plainHTTP: false # Allow contacting registries over HTTP.
certsPath: “/etc/docker/certs.d/harbor.ihlt.com” # Use certificates at path (*.crt, *.cert, *.key) to connect to the registry.
addons: []
2.3.3. 部署kubernetens集群
root@prd-master01:~/qkcp-all-v3.2.1-offline-linux-amd64#./kk create cluster -f config-sample.yaml -a kubekey-artifact.tar.gz --with-local-storage
2.3.4. 生成etcd secret
root@prd-master01:~kubectl create ns kubesphere-monitoring-system
root@prd-master01:~/qkcp-all-v3.2.1-offline-linux-amd64# kubectl -n kubesphere-monitoring-system create secret generic kube-etcd-client-certs --from-file=etcd-client-ca.crt=/etc/ssl/etcd/ssl/ca.pem --from-file=etcd-client.crt=/etc/ssl/etcd/ssl/node-prd-master01.pem --from-file=etcd-client.key=/etc/ssl/etcd/ssl/node-prd-master01-key.pem
ps:每个集群etcd证书路径不一样,可以通过ps -ef|grep etcd查看etcd的证书路径
2.3.5. 部署QKCP
2.3.5.1. 修改kubesphere-installer.yaml配置文件
cd /root/ qkcp-all-v3.2.1-offline-linux-amd64/qkcp-installer
vim kubesphere-installer.yaml
…
containers:- name: installer
image: harbor.ihlt.com/qkcp/ks-installer:v3.2.1
…

2.3.5.2. 修改cluster-configuration.yaml
根据组件部署(Metrics Server,网络策略,审计,事件,日志,通知,告警)等需求编辑
root@prd-master01:~/qkcp-all-v3.2.1-offline-linux-amd64/qkcp-installer# cat cluster-configuration.yaml
apiVersion: installer.kubesphere.io/v1alpha1
kind: ClusterConfiguration
metadata:
name: ks-installer
namespace: kubesphere-system
labels:
version: v3.2.1
spec:
persistence:
storageClass: “” # If there is no default StorageClass in your cluster, you need to specify an existing StorageClass here.
authentication:
jwtSecret: “” # Keep the jwtSecret consistent with the Host Cluster. Retrieve the jwtSecret by executing “kubectl -n kubesphere-system get cm kubesphere-config -o yaml | grep -v “apiVersion” | grep jwtSecret” on the Host Cluster.
local_registry: “harbor.ihlt.com” # Add your private registry address if it is needed.
dev_tag: “” # Add your kubesphere image tag you want to install, by default it’s same as ks-install release version.
etcd:
monitoring: true # Enable or disable etcd monitoring dashboard installation. You have to create a Secret for etcd before you enable it.
endpointIps: 10.0.200.208,10.0.200.209,10.0.200.210 # etcd cluster EndpointIps. It can be a bunch of IPs here.
port: 2379 # etcd port.
tlsEnable: true
common:
core:
console:
enableMultiLogin: true # Enable or disable simultaneous logins. It allows different users to log in with the same account at the same time.
port: 30880
type: NodePort
# apiserver: # Enlarge the apiserver and controller manager’s resource requests and limits for the large cluster
# resources: {}
# controllerManager:
# resources: {}
redis:
enabled: false
volumeSize: 2Gi # Redis PVC size.
openldap:
enabled: false
volumeSize: 2Gi # openldap PVC size.
minio:
volumeSize: 20Gi # Minio PVC size.
monitoring:
# type: external # Whether to specify the external prometheus stack, and need to modify the endpoint at the next line.
endpoint: http://prometheus-operated.kubesphere-monitoring-system.svc:9090 # Prometheus endpoint to get metrics data.
GPUMonitoring: # Enable or disable the GPU-related metrics. If you enable this switch but have no GPU resources, Kubesphere will set it to zero.
enabled: false
gpu: # Install GPUKinds. The default GPU kind is nvidia.com/gpu. Other GPU kinds can be added here according to your needs.
kinds:
- resourceName: “nvidia.com/gpu”
resourceType: “GPU”
default: true
es: # Storage backend for logging, events and auditing.
# master:
# volumeSize: 4Gi # The volume size of Elasticsearch master nodes.
# replicas: 1 # The total number of master nodes. Even numbers are not allowed.
# resources: {}
# data:
# volumeSize: 20Gi # The volume size of Elasticsearch data nodes.
# replicas: 1 # The total number of data nodes.
# resources: {}
logMaxAge: 7 # Log retention time in built-in Elasticsearch. It is 7 days by default.
elkPrefix: logstash # The string making up index names. The index name will be formatted as ks-
basicAuth:
enabled: false
username: “”
password: “”
externalElasticsearchUrl: “”
externalElasticsearchPort: “”
alerting: # (CPU: 0.1 Core, Memory: 100 MiB) It enables users to customize alerting policies to send messages to receivers in time with different time intervals and alerting levels to choose from.
enabled: true # Enable or disable the KubeSphere Alerting System.
# thanosruler:
# replicas: 1
# resources: {}
auditing: # Provide a security-relevant chronological set of records,recording the sequence of activities happening on the platform, initiated by different tenants.
enabled: true # Enable or disable the KubeSphere Auditing Log System.
# operator:
# resources: {}
# webhook:
# resources: {}
devops: # (CPU: 0.47 Core, Memory: 8.6 G) Provide an out-of-the-box CI/CD system based on Jenkins, and automated workflow tools including Source-to-Image & Binary-to-Image.
enabled: false # Enable or disable the KubeSphere DevOps System.
# resources: {}
jenkinsMemoryLim: 2Gi # Jenkins memory limit.
jenkinsMemoryReq: 1500Mi # Jenkins memory request.
jenkinsVolumeSize: 8Gi # Jenkins volume size.
jenkinsJavaOpts_Xms: 512m # The following three fields are JVM parameters.
jenkinsJavaOpts_Xmx: 512m
jenkinsJavaOpts_MaxRAM: 2g
dmp:
enabled: false
events: # Provide a graphical web console for Kubernetes Events exporting, filtering and alerting in multi-tenant Kubernetes clusters.
enabled: true # Enable or disable the KubeSphere Events System.
# operator:
# resources: {}
# exporter:
# resources: {}
# ruler:
# enabled: true
# replicas: 2
# resources: {}
logging: # (CPU: 57 m, Memory: 2.76 G) Flexible logging functions are provided for log query, collection and management in a unified console. Additional log collectors can be added, such as Elasticsearch, Kafka and Fluentd.
enabled: true # Enable or disable the KubeSphere Logging System.
containerruntime: docker
logsidecar:
enabled: true
replicas: 2
# resources: {}
metrics_server: # (CPU: 56 m, Memory: 44.35 MiB) It enables HPA (Horizontal Pod Autoscaler).
enabled: true # Enable or disable metrics-server.
monitoring:
storageClass: “” # If there is an independent StorageClass you need for Prometheus, you can specify it here. The default StorageClass is used by default.
# kube_rbac_proxy:
# resources: {}
# kube_state_metrics:
# resources: {}
# prometheus:
# replicas: 1 # Prometheus replicas are responsible for monitoring different segments of data source and providing high availability.
# volumeSize: 20Gi # Prometheus PVC size.
# resources: {}
# operator:
# resources: {}
# adapter:
# resources: {}
# node_exporter:
# resources: {}
# alertmanager:
# replicas: 1 # AlertManager Replicas.
# resources: {}
# notification_manager:
# resources: {}
# operator:
# resources: {}
# proxy:
# resources: {}
gpu: # GPU monitoring-related plugins installation.
nvidia_dcgm_exporter:
enabled: false
# resources: {}
multicluster:
clusterRole: none # host | member | none # You can install a solo cluster, or specify it as the Host or Member Cluster.
network:
networkpolicy: # Network policies allow network isolation within the same cluster, which means firewalls can be set up between certain instances (Pods).
# Make sure that the CNI network plugin used by the cluster supports NetworkPolicy. There are a number of CNI network plugins that support NetworkPolicy, including Calico, Cilium, Kube-router, Romana and Weave Net.
enabled: false # Enable or disable network policies.
ippool: # Use Pod IP Pools to manage the Pod network address space. Pods to be created can be assigned IP addresses from a Pod IP Pool.
type: none # Specify “calico” for this field if Calico is used as your CNI plugin. “none” means that Pod IP Pools are disabled.
topology: # Use Service Topology to view Service-to-Service communication based on Weave Scope.
type: none # Specify “weave-scope” for this field to enable Service Topology. “none” means that Service Topology is disabled.
openpitrix: # An App Store that is accessible to all platform tenants. You can use it to manage apps across their entire lifecycle.
store:
enabled: false # Enable or disable the KubeSphere App Store.
servicemesh: # (0.3 Core, 300 MiB) Provide fine-grained traffic management, observability and tracing, and visualized traffic topology.
enabled: false # Base component (pilot). Enable or disable KubeSphere Service Mesh (Istio-based).
kubeedge: # Add edge nodes to your cluster and deploy workloads on edge nodes.
enabled: false # Enable or disable KubeEdge.
cloudCore:
nodeSelector: {“node-role.kubernetes.io/worker”: “”}
tolerations: []
cloudhubPort: “10000”
cloudhubQuicPort: “10001”
cloudhubHttpsPort: “10002”
cloudstreamPort: “10003”
tunnelPort: “10004”
cloudHub:
advertiseAddress: # At least a public IP address or an IP address which can be accessed by edge nodes must be provided.
- “” # Note that once KubeEdge is enabled, CloudCore will malfunction if the address is not provided.
nodeLimit: “100”
service:
cloudhubNodePort: “30000”
cloudhubQuicNodePort: “30001”
cloudhubHttpsNodePort: “30002”
cloudstreamNodePort: “30003”
tunnelNodePort: “30004”
edgeWatcher:
nodeSelector: {“node-role.kubernetes.io/worker”: “”}
tolerations: []
edgeWatcherAgent:
nodeSelector: {“node-role.kubernetes.io/worker”: “”}
tolerations: []
notification:
history:
enabled: false
springcloud:
enabled: false
# Refer to https://raw.githubusercontent.com/nacos-group/nacos-k8s/master/helm/values.yaml
nacos:
# Default values for nacos.
# This is a YAML-formatted file.
# Declare variables to be passed into your templates.
global:
# mode: cluster
mode: standalone
############################nacos###########################
nacos:
image:
repository: nacos/nacos-server
tag: latest
pullPolicy: IfNotPresent
plugin:
enable: true
image:
repository: nacos/nacos-peer-finder-plugin
tag: 1.1
replicaCount: 1
domainName: cluster.local
preferhostmode: hostname
serverPort: 8848
health:
enabled: false
storage:
type: embedded
# type: mysql
# db:
# host: localhost
# name: nacos
# port: 3306
# username: usernmae
# password: password
# param: characterEncoding=utf8&connectTimeout=1000&socketTimeout=3000&autoReconnect=true&useSSL=false
persistence:
enabled: false
data:
accessModes:
- ReadWriteOnce
storageClassName: manual
resources:
requests:
storage: 5Gi
service:
type: ClusterIP
port: 8848
ingress:
enabled: false
annotations: { }
resources:
# We usually recommend not to specify default resources and to leave this as a conscious
# choice for the user. This also increases chances charts run on environments with little
# resources, such as Minikube. If you do want to specify resources, uncomment the following
# lines, adjust them as necessary, and remove the curly braces after ‘resources:’.
# limits:
# cpu: 100m
# memory: 128Mi
requests:
cpu: 500m
memory: 2Gi
annotations: {}
nodeSelector: {}
tolerations: []
affinity: {}
2.3.5.3. 开始部署
kubectl apply -f kubesphere-installer.yaml
kubectl apply -f cluster-configuration.yaml
2.3.6. 修改es的资源限制
root@prd-master01:~/qkcp-all-v3.2.1-offline-linux-amd64/qkcp-installer# kubectl edit sts -n kubesphere-logging-system elasticsearch-logging-data
ps:配置了sts的limits后,需要重启elasticsearch-logging-data才能生效

2.3.7. 修改jenkins的资源限制
root@prd-master01:~/qkcp-all-v3.2.1-offline-linux-amd64/qkcp-installer# kubectl edit deploy -n kubesphere-devops-system devops-jenkins

2.3.8. 开始安装
kubectl apply -f kubesphere-installer.yaml
kubectl apply -f cluster-configuration.yaml
2.3.9. 安装验证
1.运行以下命令以检查安装日志。如有报错进行排查即可
kubectl logs -n kubesphere-system $(kubectl get pod -n kubesphere-system -l app=ks-installer -o jsonpath=‘{.items[0].metadata.name}’) -f
2.看到以下信息时,表明QKCP集群已成功创建。
3.登录QKCP控制台
登录cloud.ihlt.com
用户名:admin
密 码:p@ssword Password

2.4. SonarQube集成
2.4.1. 安装 SonarQube 服务器
root@host-master01:~# helm version
version.BuildInfo{Version:“v3.6.3”, GitCommit:“d506314abfb5d21419df8c7e7e68012379db2354”, GitTreeState:“clean”, GoVersion:“go1.16.5”}
root@host-master01:~#helm upgrade --install sonarqube sonarqube --repo https://charts.kubesphere.io/main -n kubesphere-devops-system --create-namespace --set service.type=NodePort
ps:请您确保使用 Helm 3 安装 SonarQube Server。
2.4.2. 获取 SonarQube 控制台地址
SonarQube服务地址
root@host-master01:~# kubectl get --namespace kubesphere-devops-system -o jsonpath=“{.spec.ports[0].nodePort}” services sonarqube-sonarqube
30949
SonarQube服务端口
root@host-master01:~# kubectl get nodes --namespace kubesphere-devops-system -o jsonpath=“{.items[0].status.addresses[0].address}”
10.0.200.201
SonarQube url地址:http://10.0.200.201:30949
账号:admin 密码:admin@hlt
2.4.3. 创建 SonarQube 管理员令牌 (Token)
1|、点击右上角字母 A,然后从菜单中选择 My Account 以转到 Profile 页面。

2、点击 Security 并输入令牌名称qkcp

3、点击 Generate 并复制此令牌。
token:444c9180912cb325fb0e4b16976ae26f81e5ae23
2.4.4. 创建 Webhook 服务器
1、执行以下命令获取 SonarQube Webhook 的地址。
root@host-master01:~# kubectl get --namespace kubesphere-devops-system -o jsonpath=“{.spec.ports[0].nodePort}” services devops-jenkins
30180
root@host-master01:~# kubectl get nodes --namespace kubesphere-devops-system -o jsonpath=“{.items[0].status.addresses[0].address}”
10.0.200.201
SonarQube Webhook 的地址:http://10.0.200.201:30180/sonarqube-webhook/
2、依次点击 Administration、Configuration 和 Webhooks 创建一个 Webhook。
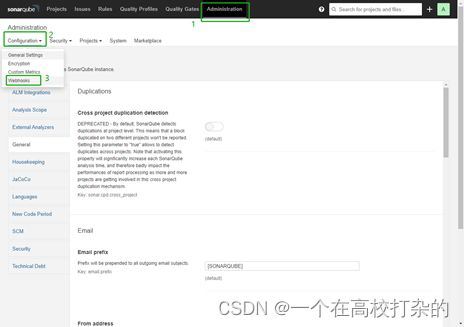
3、点击 Create。

4、在弹出的对话框中输入 Name 和 Jenkins Console URL(即 SonarQube Webhook 地址)。点击 Create 完成操作。

2.4.5. 将 SonarQube 配置添加到 ks-installer
在集群配置中添加sonarqube相关配置
kubectl edit cc -n kubesphere-system ks-installer

2.4.6. 将 SonarQube 服务器添加至 Jenkins
Jenkins服务地址
root@host-master01:~# kubectl get --namespace kubesphere-devops-system -o jsonpath=“{.spec.ports[0].nodePort}” services devops-jenkins
30180
Jenkins服务地端口
root@host-master01:~# kubectl get nodes --namespace kubesphere-devops-system -o jsonpath=“{.items[0].status.addresses[0].address}”
10.0.200.201
Jenkins url地址:http://10.0.200.201:30180
账号:admin 密码:P@88w0rd
1、依次点击 系统管理、Manage Credentials 、Stores scoped to Jenkins下的jenkins、全局凭证、添加凭证创建一个全局凭证

secret为SonarQube 管理员令牌
2.4.7. 将 sonarqubeURL 添加到 KubeSphere 控制台
在ks-console-config的cm中添加sonarqubeURL
kubectl edit cm -n kubesphere-system ks-console-config

2.4.8. 重启服务
kubectl -n kubesphere-devops-system rollout restart deploy devops-apiserver
kubectl -n kubesphere-system rollout restart deploy ks-console