在 Vue2 中引入高德地图和三维模型
在 Vue2 中引入高德地图和三维模型
-
-
- 概述
- 注册高德 web key
- 在 Vue 中引入高德地图
- 在 Vue 引入三维模型
-
- 地图展示的配置
- async、awiat 方式加载地图
- 加载三维模型
- 最终效果
- 最终代码
-
概述
最近在做一个前端项目,需要在地图上引入一个三维模型,前端使用 Vue2,好在现在都有功能丰富的地图 API 供开发者调用(腾讯地图、百度地图、高德地图等等),在此项目中我们采用高德开放平台提供的 API,但是在引入三维模型遇到了各种问题,在这里把引入三维模型所遇到的问题和实现流程做个汇总。
注册高德 web key
网址:高德开发平台
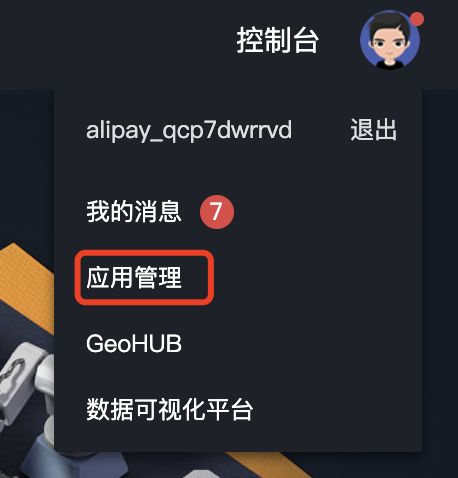
登陆成功后,我们进入应用管理注册我们的应用,如下:
创建完应用后,我们添加服务,在服务中我们选择 Web 端(JS API) ,高德的大部分 API 都在这里,添加完毕后我们能获取到一个 key,后续需在 Vue2 中使用。
至此,高德部分的应用注册完成,为了专注于如何引入三维模型,在这里我使用 vue-cli 创建一个空白项目来引入高德地图。
首先这里默认你已经有了自己的 vue2 项目,不过多阐述 vue2 项目的创建
在 Vue 中引入高德地图
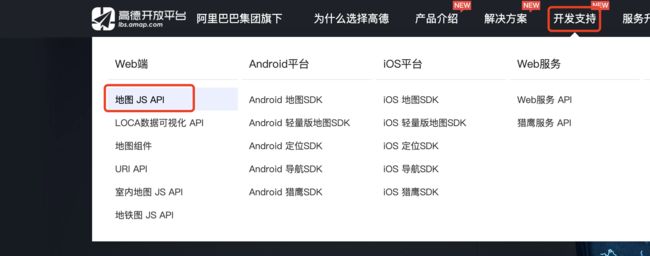
打开高德开放的文档,很容易找到我们需要找的 api 文档,如下:
高德开放平台 Web 端 API 文档
跟着高德开放平台的在 Vue 中引入高德地图步骤:
-
安装高德插件
npm i @amap/amap-jsapi-loader --save -
在 script 最上方引入高德的 API
import AMapLoader from '@amap/amap-jsapi-loader'; -
methods中添加初始化地图的方法,并在mounted周期回调中调用方法mounted() { this.initMap() }, methods: { initMap() { AMapLoader.load({ key: "", // 申请好的Web端开发者Key,首次调用 load 时必填 version: "2.0", // 指定要加载的 JSAPI 的版本,缺省时默认为 1.4.15 plugins: [""], // 需要使用的的插件列表,如比例尺'AMap.Scale'等 }).then((AMap) => { this.map = new AMap.Map("container", { //设置地图容器id viewMode: "3D", //是否为3D地图模式 zoom: 5, //初始化地图级别 center: [105.602725, 37.076636], //初始化地图中心点位置 }); }).catch((e) => { console.log(e); }); }, } -
添加 css 和 html 代码
-
完整代码
请在 key 中填写前面注册的 key
在 Vue 引入三维模型
先在高德查找相关文档,好在高德是提供了一个原生的 html 中引入三维模型的方式

那么现在就是要解决 html 代码向 Vue 代码的转化
我们先分析哪部分代码是核心代码,我们很容易找到加载地图和加载模型两个部分是核心代码:

你可能不知道中间的 AMap.Lights 是干嘛的,我们可以借助它提供的实时运行代码的方式发现,就是模型的光线,在这里存在第一个坑,在后面解决这个坑。
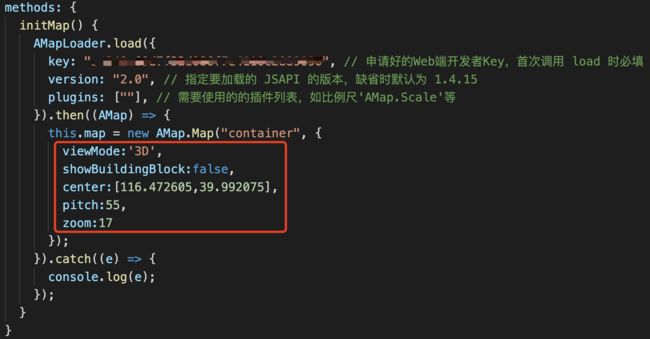
地图展示的配置
我们先来看上图第一个框中的 map 对象,它创建了一个 map 实例,我们把这部分搬到之前初始化代码的地方
效果如下:

async、awiat 方式加载地图
我们回到高德示例,如下图,发现我们需要 new AMap 对象上的各种属性,为了方便后续使用,我们需要将高德初始化后的 AMap 保存在 data 中,但官方给我们 Vue 引入高德的示例是基于 Promise 的,Promise 采用异步编程,所以在 then 中接收参数是不能在同一个函数中的 then 方法以外使用的,此时我们需要修改代码,使用 async 和 await 的方式。

在 data() 中创建变量,我这里取名为 AMaper,并且修改代码为 async 和 await 模式,如下:
接下去对示例代码的 Lights 光效部分加入 Vue,在 initMap() 的 try 代码 最后加入下面代码光效:
// 初始化光线
this.map.AmbientLight = new this.AMaper.Lights.AmbientLight([1,1,1],1);
this.map.DirectionLight = new this.AMaper.Lights.DirectionLight([1,0,-0.5],[1,1,1],1);
检查控制台,发现报错 Uncaught (in promise) TypeError: Cannot read properties of undefined (reading ‘AmbientLight’)

这个错误肯定不陌生,当 this.AMaper.Lights 获取到的结果为 undefined 就获取不到后面的属性,则抛出这个异常,经过查看官方的文档,发现这个三维模型的实例代码是基于 1.x 的高德 API 版本,我们使用的 2.0 而且之前查看的文档也是 2.0 的文档,我们把 AMaperLoader.load() 中的 version: “2.0” 去除,默认就使用了 1.4.15 版本,报错解决,即删除下面框内代码:

加载三维模型
将示例的 loadModel 方法搬到 Vue 中,搬过来后能够发现各种问题:

Step1: 简单处理 map 和 AMap 问题,将它们改为我们 data 的对象即可,操作比较简单,首先我们发现了一个回调函数如下图,这种函数的写法有自己的函数作用域,我们无法通过 this 获取到 data 中的数据,最简单的做法是将其改为箭头函数。

修改后如下:

Step2: 导入 threejs 库,代码中很明显可以看到一个很红的波浪线 THREE,我们需要对其进行引入,先看看 npm 中有没有 three,那必然是有的,npm 的 threejs 链接。
-
在 Vue 安装 three
npm install three -
仿照官网在 Vue 组件中导入

-
保存代码,并且运行我们的项目,抛出警告

-
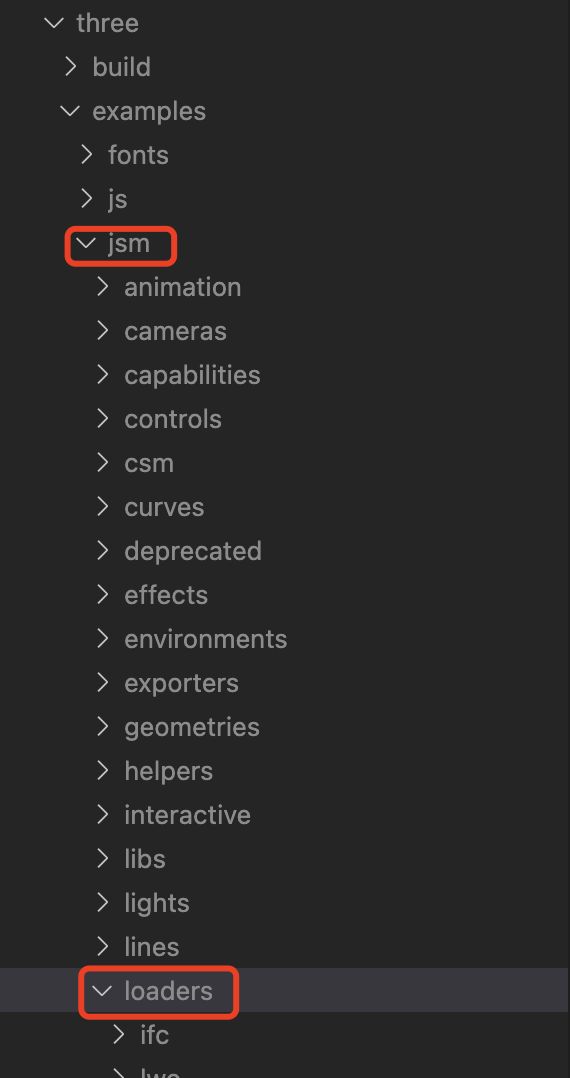
我们查看 node_modules 中的代码,在 loaders 目录下,并没有 OBJLoader2,查阅官方文档的加载 obj 模型部分,需要加入 OBJLoader,这个类可以用于加载三维模型文件,高德地图也是使用这个方法,只是高德使用的 three 版本比较旧,新版本中移除了 OBJLoader2,高德中还加入贴图 MTL 的渲染,我们需要对其引入 MTLLoader。
-
在上面官方文档链接,我们看看它是如何引入三维模型的,如下图,先载入贴图,再载入模型,那我们通过下面代码对高德示例代码进行修改。

-
分析高德示例代码的构成,如下图绿色注释部分

-
根据 threejs 官网的方式对高德代码进行重新布局,重写后的代码如下:
loadModel() { new MTLLoader().load('https://a.amap.com/jsapi_demos/static/demo-center/model/1519/1519.mtl', /**贴图回调 */ function ( materials ) { // 回调中加载 obj 模型 new OBJLoader().setMaterials(materials).load('https://a.amap.com/jsapi_demos/static/demo-center/model/1519/1519.obj', /**加载模型的回调 */ ( event ) => { var object3Dlayer = new this.AMaper.Object3DLayer(); var meshes = event.detail.loaderRootNode.children; for(var i=0;i<meshes.length;i++){ var vecticesF3 = meshes[i].geometry.attributes.position; var vecticesNormal3 = meshes[i].geometry.attributes.normal; var vecticesUV2 = meshes[i].geometry.attributes.uv; var vectexCount = vecticesF3.count; var mesh = new this.AMaper.Object3D.MeshAcceptLights(); var geometry = mesh.geometry; var c,opacity; var material = meshes[i].material[0]||meshes[i].material; if(material.map) mesh.textures.push('https://a.amap.com/jsapi_demos/static/demo-center/model/1519/1519.bmp') c = material.color; opacity = material.opacity for(var j=0;j<vectexCount;j+=1){ var s = j*3; geometry.vertices.push(vecticesF3.array[s],vecticesF3.array[s+2],-vecticesF3.array[s+1]); if(vecticesNormal3) { geometry.vertexNormals.push(vecticesNormal3.array[s],vecticesNormal3.array[s+2],-vecticesNormal3.array[s+1]); } if(vecticesUV2) { geometry.vertexUVs.push(vecticesUV2.array[j*2],1-vecticesUV2.array[j*2+1]); } geometry.vertexColors.push(c.r,c.g,c.b,opacity) } mesh.DEPTH_TEST = material.depthTest mesh.transparent = opacity<1; mesh.scale(6,6,6) mesh.rotateZ(-48) mesh.position(new this.AMaper.LngLat(116.472605,39.992075)) object3Dlayer.add(mesh) } this.map.add(object3Dlayer) }) }) } -
在
mounted生命钩子中调用加载模型的方法,运行后,控制台报错 TypeError: Cannot read properties of undefined (reading ‘AMaper’)
问题也很简单,为什么 AMaper 没有定义,我们仔细看上面代码,这个报错来自
加载模型的回调,因为这个回调使用箭头函数,this 指向它的上层作用域,上层作用域是一个函数,有自己的作用域,所以我们只需把上一层回调函数改为箭头函数即可。 -
如果出现以下报错:TypeError: Cannot read properties of null (reading ‘Object3DLayer’)

原因是因为我们没有获取到 AMaper 对象,这个对象来自地图的加载,在 mounted 钩子中加载地图时,还没加载完成就进入了模型加载,所以我们需要对 mounted 钩子做如下更改,这样会强行使
initMap完成才会进入loadModel:
-
因为我们使用的 threejs 和高德示例的版本有出入,会出现以下错误:TypeError: Cannot read properties of undefined (reading ‘loaderRootNode’)
采用最简单粗暴的方式,在控制台输出 event 对象,我们发现新版本中直接将
children提到对象的最外面,如下:
修改原来的代码,如下:

最终效果
最终代码
<template>
  <div id="app">
    <div id="container">div>
  div>
template>

<script>
import AMapLoader from "@amap/amap-jsapi-loader";
import { OBJLoader } from 'three/examples/jsm/loaders/OBJLoader';
import { MTLLoader } from 'three/examples/jsm/loaders/MTLLoader';
export default {
  name: "App",
  data() {
    return {
      map: null,
      AMaper: null
    };
  },
  async mounted() {
    await this.initMap()
    this.loadModel()
  },
  methods: {
    async initMap() {
      try {
        this.AMaper = await AMapLoader.load({
        	// 这里写你的 web key
          key: "xxxxxxxxxxxxxxxxxxxx",
          plugins: [""],
        })
        this.map = new this.AMaper.Map("container", {
          viewMode:'3D',
          showBuildingBlock:false,
          center:[116.472605,39.992075],
          pitch:55,
          zoom:17
        });
        // 初始化光线
        this.map.AmbientLight = new this.AMaper.Lights.AmbientLight([1,1,1],1);
        this.map.DirectionLight = new this.AMaper.Lights.DirectionLight([1,0,-0.5],[1,1,1],1);
      } catch (e) {
        console.log(e)
      }
    },
    loadModel() {
      new MTLLoader().load('https://a.amap.com/jsapi_demos/static/demo-center/model/1519/1519.mtl', /**贴图回调 */ ( materials ) => {
        // 回调中加载 obj 模型
        new OBJLoader().setMaterials(materials).load('https://a.amap.com/jsapi_demos/static/demo-center/model/1519/1519.obj', /**加载模型的回调 */ ( event ) => {
          var object3Dlayer = new this.AMaper.Object3DLayer();
          var meshes = event.children;
          for(var i=0;i<meshes.length;i++){
            var vecticesF3 = meshes[i].geometry.attributes.position;
            var vecticesNormal3 = meshes[i].geometry.attributes.normal;
            var vecticesUV2 = meshes[i].geometry.attributes.uv;
            var vectexCount =  vecticesF3.count;

            var mesh = new this.AMaper.Object3D.MeshAcceptLights();
            var geometry = mesh.geometry;
            var c,opacity;
            var material = meshes[i].material[0]||meshes[i].material;
            if(material.map)
              mesh.textures.push('https://a.amap.com/jsapi_demos/static/demo-center/model/1519/1519.bmp')
            c = material.color;
            opacity = material.opacity
            for(var j=0;j<vectexCount;j+=1){
                var s = j*3;
                geometry.vertices.push(vecticesF3.array[s],vecticesF3.array[s+2],-vecticesF3.array[s+1]);
                if(vecticesNormal3) {
                      geometry.vertexNormals.push(vecticesNormal3.array[s],vecticesNormal3.array[s+2],-vecticesNormal3.array[s+1]);
                }
                if(vecticesUV2) {
                  geometry.vertexUVs.push(vecticesUV2.array[j*2],1-vecticesUV2.array[j*2+1]);
              }
                geometry.vertexColors.push(c.r,c.g,c.b,opacity)
            }
            mesh.DEPTH_TEST = material.depthTest
            mesh.transparent = opacity<1;
            mesh.scale(6,6,6)
            mesh.rotateZ(-48)
            mesh.position(new this.AMaper.LngLat(116.472605,39.992075))
            object3Dlayer.add(mesh)
          }
          this.map.add(object3Dlayer)
        })
			})
    }
  }
};
script>

<style>
#container {
  padding: 0px;
  margin: 0px;
  width: 100%;
  height: 100vh;
}
style>