MySQL主从复制
准备环境
#防火墙 selinux
systemctl stop firewalld --now &&setenforce 0
#修改主机名:hostnamectl set-hostname 名字
tip:vim /etc/sysconfig/network-scripts/ifcfg-ens33
BOOTPRTOT=static
IPADDR=192.168.100.175
PREFIX=24
GATEWAY=192.168.100.2
DNS1=114.114.114.114
DNS2=8.8.8.8
### 添加|删除一个临时ip
#主机名解析 vim /etc/hosts     两台机器
ip地址   主机名
ip地址 	主机名
清理环境
yum erase -y mariadb mysql
rm -rf /etc/my* && rm -rf /var/lib/mysql && rm -rf /usr/bin/mysql
#检查一下
[[ ! -f /etc/my.cnf ]] && [[ ! -d /var/lib/mysql ]] && [[ ! -f /usr/bin/mysql ]] && echo "环境已经清理完成" || echo "环境未清理"
安装数据库
#1yum安装
#2启动
#3修改密码
mysqladmin -uroot -p'`awk '/temporary password/{p=$NF}END{print p}' /var/log/mysqld.log`' password 'Qq111111.'
无数据[master]
#开启binlog
[root@master ~]# mkidr -pv /data/
[root@master ~]# chown mysql.mysql /data
[root@master ~]# vim /etc/my.cnf
server-id=203
log-bin=/data/mysql-bin
# 重启数据库
# 创建一个账号
mysql> grant replication slave on *.* to 'relication'@'%' identified by 'Qianfeng@123';
mysql> flush privileges;
# 查看当前binlog日志文件以及pos位置点
mysql> show master status\G
*************************** 1. row ***************************
             File: mysql-bin.000001
         Position: 154
     Binlog_Do_DB:
 Binlog_Ignore_DB:
Executed_Gtid_Set:
1 row in set (0.00 sec)
从库
#配置文件中增加server-id
[root@slave ~]# vim /etc/my.cnf
server-id=204
[root@slave ~]# systemctl restart mysqld
mysql> ? change master to
mysql> CHANGE MASTER TO
  MASTER_HOST='master',
  MASTER_USER='relication',
  MASTER_PASSWORD='Qianfeng@123',
  MASTER_PORT=3306,
  MASTER_LOG_FILE='mysql-bin.000001',
  MASTER_LOG_POS=154,
  MASTER_CONNECT_RETRY=10;
# 启动slave
mysql>start slave;
# 查看主从是否成功
mysql> show slave status\G
## 14 15行。两个YES表示主从成功
## 关注39-42的信息
## 38行表示主从复制延迟时间
## 46 行UUID要不一致
mysql> show slave status\G
*************************** 1. row ***************************
               Slave_IO_State: Waiting for master to send event
                  Master_Host: master
                  Master_User: relication
                  Master_Port: 3306
                Connect_Retry: 10
              Master_Log_File: mysql-bin.000001
          Read_Master_Log_Pos: 154
               Relay_Log_File: slave-relay-bin.000002
                Relay_Log_Pos: 320
        Relay_Master_Log_File: mysql-bin.000001
             Slave_IO_Running: Yes
            Slave_SQL_Running: Yes
              Replicate_Do_DB:
          Replicate_Ignore_DB:
           Replicate_Do_Table:
       Replicate_Ignore_Table:
      Replicate_Wild_Do_Table:
  Replicate_Wild_Ignore_Table:
                   Last_Errno: 0
                   Last_Error:
                 Skip_Counter: 0
          Exec_Master_Log_Pos: 154
              Relay_Log_Space: 527
              Until_Condition: None
               Until_Log_File:
                Until_Log_Pos: 0
           Master_SSL_Allowed: No
           Master_SSL_CA_File:
           Master_SSL_CA_Path:
              Master_SSL_Cert:
            Master_SSL_Cipher:
               Master_SSL_Key:
        Seconds_Behind_Master: 0
Master_SSL_Verify_Server_Cert: No
                Last_IO_Errno: 0
                Last_IO_Error:
               Last_SQL_Errno: 0
               Last_SQL_Error:
  Replicate_Ignore_Server_Ids:
             Master_Server_Id: 203
                  Master_UUID: 6f6d0551-a073-11ee-9f28-000c298a6e96
             Master_Info_File: /var/lib/mysql/master.info
                    SQL_Delay: 0
          SQL_Remaining_Delay: NULL
      Slave_SQL_Running_State: Slave has read all relay log; waiting for more updates
           Master_Retry_Count: 86400
                  Master_Bind:
      Last_IO_Error_Timestamp:
     Last_SQL_Error_Timestamp:
               Master_SSL_Crl:
           Master_SSL_Crlpath:
           Retrieved_Gtid_Set:
            Executed_Gtid_Set:
                Auto_Position: 0
         Replicate_Rewrite_DB:
                 Channel_Name:
           Master_TLS_Version:
1 row in set (0.00 sec)
重新配置主从
mysql>stop slave;
mysql> reset slave;
mysql>CHANGE MASTER TO
  MASTER_HOST='master',
  MASTER_USER='relication',
  MASTER_PASSWORD='Qianfeng@123',
  MASTER_PORT=3306,
  MASTER_LOG_FILE='mysql-bin.000001',
  MASTER_LOG_POS=154,
  MASTER_CONNECT_RETRY=10;
## 启动slave
mysql>start slave;
有数据
主库
#锁表备份
mysql> grant replication slave on *.* to 'repl'@'%' identified by 'Qq12345.';
mysql>flush privileges;
# 创建必要目录
[root@master ~]# mkdir /data
[root@master ~]# chown mysql.mysql /data
# 修改配置文件
[root@master ~]# vim /etc/my.cnf
server-id = 203
log-bin = /data/mysql-bin
# 重启数据库
[root@master ~]# systemctl restart mysqld
#锁表备份
mysql>flush tables with read lock;
# 新开一会终端窗口
[root@master ~]# mysqldump -uroot -pQq111111. -A > all.sql
[root@master ~]# 远程拷贝至从库
#查看二进制日志文件以及位置点信息
mysql>show master status\G
*************************** 1. row ***************************
             File: mysql-bin.000001
         Position: 154
     Binlog_Do_DB:
 Binlog_Ignore_DB:
Executed_Gtid_Set:
1 row in set (0.00 sec)
从库
#导入数据
[root@slave ~]# mysql -uroot -pQq111111. < all.sql
#配置主从
[root@slave ~]# vim /etc/my.cnf
server-id = 204
# 重启数据库
[root@slave ~]# systemctl restart mysqld
mysql> ? change master to	(帮助)
change master to
master_host='master',
master_user='repl',
master_password='Qq12345.',
master_port=3306,
master_log_file='mysql-bin.000001',
master_log_pos=154;
#启动slave
mysql>start slave;
# 查看主从状态
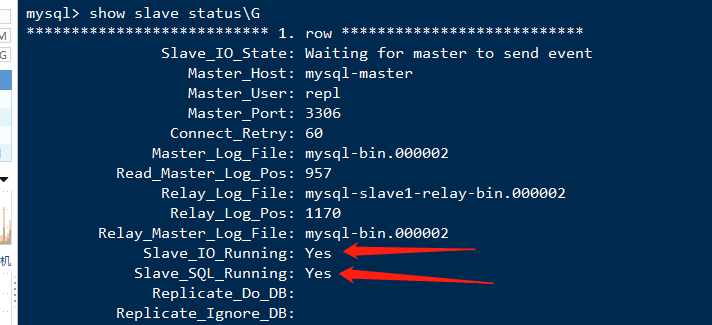
mysql> show slave status\G
*************************** 1. row ***************************
               Slave_IO_State: Waiting for master to send event
                  Master_Host: master
                  Master_User: repl
                  Master_Port: 3306
                Connect_Retry: 60
              Master_Log_File: mysql-bin.000001
          Read_Master_Log_Pos: 154
               Relay_Log_File: slave-relay-bin.000002
                Relay_Log_Pos: 320
        Relay_Master_Log_File: mysql-bin.000001
             Slave_IO_Running: Yes
            Slave_SQL_Running: Yes
              Replicate_Do_DB:
          Replicate_Ignore_DB:
           Replicate_Do_Table:
       Replicate_Ignore_Table:
      Replicate_Wild_Do_Table:
  Replicate_Wild_Ignore_Table:
                   Last_Errno: 0
                   Last_Error:
                 Skip_Counter: 0
          Exec_Master_Log_Pos: 154
              Relay_Log_Space: 527
              Until_Condition: None
               Until_Log_File:
                Until_Log_Pos: 0
           Master_SSL_Allowed: No
           Master_SSL_CA_File:
           Master_SSL_CA_Path:
              Master_SSL_Cert:
            Master_SSL_Cipher:
               Master_SSL_Key:
        Seconds_Behind_Master: 0
Master_SSL_Verify_Server_Cert: No
                Last_IO_Errno: 0
                Last_IO_Error:
               Last_SQL_Errno: 0
               Last_SQL_Error:
  Replicate_Ignore_Server_Ids:
             Master_Server_Id: 203
                  Master_UUID: 5aad69d6-a09e-11ee-b909-000c298a6e96
             Master_Info_File: /var/lib/mysql/master.info
                    SQL_Delay: 0
          SQL_Remaining_Delay: NULL
      Slave_SQL_Running_State: Slave has read all relay log; waiting for more updates
           Master_Retry_Count: 86400
                  Master_Bind:
      Last_IO_Error_Timestamp:
     Last_SQL_Error_Timestamp:
               Master_SSL_Crl:
           Master_SSL_Crlpath:
           Retrieved_Gtid_Set:
            Executed_Gtid_Set:
                Auto_Position: 0
         Replicate_Rewrite_DB:
                 Channel_Name:
           Master_TLS_Version:
解锁
unlock tables;
或者直接退出
跳过错误码
vim /etc/my.cnf
slave-skip-errors=1062
配置gtid
实验环境要求: 5.7.6 以上版本
主从均清除刚才实验的环境
[root@mysql-master ~]# systemctl stop mysqld
[root@mysql-slave1 ~]# systemctl stop mysqld
注意:以下两步均危险操作,在以后工作环境中,绝对不能删除数据库。
可以先mysqldump导出一份备份文件,在执行此操作
[root@mysql-master ~]# rm -rf /var/lib/mysql/*
[root@mysql-master ~]# rm -rf /var/log/mysql/*
[root@mysql-slave1 ~]# rm -rf /var/lib/mysql/*
主库配置 vim /etc/my.cnf
[mysqld]
log-bin=/var/log/mysql/mysql-bin
server-id=1
#打开gtid模式
gtid_mode=ON
enforce_gtid_consistency=1
重启服务
systemctl start mysqld
分别找出主从服务器root用户的初始密码
[root@mysql-master ~]# grep password /var/log/mysqld.log
主服务器修改数据库root用户密码(可选操作)
[root@mysql-master ~]# mysqladmin -uroot -p'QsgW(=D#F9&i' password 'Syf_123456'
从服务器修改数据库root用户密码(可选操作)
[root@mysql-slave1 ~]# mysqladmin -uroot -p'tUthsaZ0sh(?' password 'Syf_123456'
其他和之前的一样
- 创建专属用户并授权
- 假如有数据导出数据
mysql> GRANT REPLICATION SLAVE ON *.* TO 'repl'@'%' identified by 'Qf_123456';
从库配置
测试用户有效性
mysql -urepl -p'Qf_123456' -hmysql-master
连接成功,退出
# vim /etc/my.cnf  #在配置文件中添加配置
[mysqld]
server-id=2
#打开gtid模式
gtid_mode=ON
enforce_gtid_consistency=1

重启服务
systemctl start mysqld
Mysql 从服务器终端执行连接信息
mysql> CHANGE MASTER TO
MASTER_HOST='mysql-master',
MASTER_USER='repl',
MASTER_PASSWORD='Qf_123456',
MASTER_AUTO_POSITION=1;

> start slave;
查看是否同步成功
mysql> show slave status\G
互为主从
两边互相写入
mysql>CHANGE MASTER TO
  MASTER_HOST='master',
  MASTER_USER='relication',
  MASTER_PASSWORD='Qianfeng@123',
  MASTER_PORT=3306,
  MASTER_LOG_FILE='mysql-bin.000001',
  MASTER_LOG_POS=154,
  MASTER_CONNECT_RETRY=10;
## 启动slave
mysql>start slave;
