springboot 整合 ElasticSearch 方法 (一)
下载 ES
相当于安装 MySQL, 可以在官网上下载 (链接在后面). 要注意安装的 ES 的版本要和项目中用的 Springboot 的版本对应.
比如我用的 Springboot 版本是 2.6, 所以ES要下载7.15 版本的.

官网链接: https://www.elastic.co/cn/downloads/elasticsearch
点右边这个查看更多版本, 然后找到对应的版本下载就可以了.
这里我点了以后网页怎么都打不开, 找不到对应的版本下载, 然后我就直接把url改成这样下载到的 (把版本换成了7.15.2, 后缀换成了zip): https://artifacts.elastic.co/downloads/elasticsearch/elasticsearch-7.15.2-windows-x86_64.zip

安装
下载到安装包以后, 解压这个安装包, 然后点击这个 bat 文件运行就可以了.


(看别的文章说, 项目运行的时候这个命令框要开着.)
看到 successfully 以后去 localhost:9200 (这个端口默认是9200) 看一下有没有成功. 像下面这个图一样的结果就是成功了.
localhost:9200

依赖
pom.xml中引入es依赖:
        <dependency>
            <groupId>org.springframework.bootgroupId>
            <artifactId>spring-boot-starter-data-elasticsearchartifactId>
        dependency>
说明:
spring-boot-starter-data-elasticsearch 这个依赖是 springboot 重新整合了 ES 的一个依赖, 并不是 ES 本身的依赖.
有些文章中会提到, 安装依赖的时候安装的是 elasticsearch, elasticsearch-rest-high-level-client 之类的 , 这才是 es 本身的依赖 ( 另一篇文章: 方法(二) 中用的就是这种方法).
配置
ES 的配置有两种方式: 一种是把配置信息写在 application.yml 文件中; 另一种是写一个配置类. 两种方法都可以, 写配置类的方法更加灵活.
配置类
新建一个 config 文件夹, 然后把测试类写在这里:

package com.example.demo.config;

import lombok.Data;
import org.elasticsearch.client.RestHighLevelClient;
import org.springframework.beans.factory.annotation.Value;
import org.springframework.context.annotation.Bean;
import org.springframework.context.annotation.Configuration;
import org.springframework.data.elasticsearch.client.ClientConfiguration;
import org.springframework.data.elasticsearch.client.RestClients;
import org.springframework.data.elasticsearch.config.AbstractElasticsearchConfiguration;

@Data
@Configuration
public class ElasticConfig extends AbstractElasticsearchConfiguration {

    @Bean
    @Override
    public RestHighLevelClient elasticsearchClient() {

        final ClientConfiguration clientConfiguration = ClientConfiguration.builder()
                .connectedTo("localhost:9200")
//                .withSocketTimeout(600000)
                .build();

        return RestClients.create(clientConfiguration).rest();
    }
}
使用
实体类
package com.example.demo.pojo;

import lombok.Data;
import org.springframework.data.annotation.Id;
import org.springframework.data.elasticsearch.annotations.Document;

import java.util.Date;

@Data
@Document(indexName = "log") // 索引的名称
public class Log {

    @Id
    private String id;
    private String content;
    private Date time;

}
说明
实体类中的 id 是必须有的, 不管是String 还是Integer形式的都不影响, 但是要有这个字段. 不然创建mapper这个bean的时候会报错的.
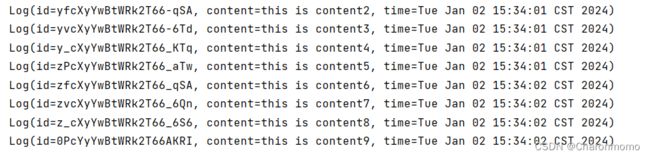
实体类有id这个字段, 存数据的时候, id不是必传的, 不传也不会报错, 不传ES会自动生成id, 下面就是把 id 设置为 String 类型, 存储的时候不传id得到的数据:
Mapper / Repository
好多文章里写的是新建一个 Repository 文件夹.
mapper 中 extends 了一个方法, 这样就在 LogMapper 中提供了一些基本的增删改查方法, 就不需要再在 mapper 里再自己手动写这些方法了.
extends ElasticsearchRepository 后面第一个参数是实体类的名称(这里是Log), 第二个参数是实体类id的类型(这里Log实体类中id为Integer)
提供的这些方法在测试类里面 @Autowired 注入 logMapper 以后, 输入 logMapper. 也会有提示的.
但是这个依赖提供的 extends ElasticsearchRepository 好像有些 springboot 的版本是不支持的, 就会报各种错以及各种标红 (我试了出错的版本是 springboot 2.10, 处理方法在另一篇文章: 方法(二) 中).

package com.example.demo.mapper;

import com.example.demo.pojo.Log;
import org.springframework.data.elasticsearch.repository.ElasticsearchRepository;
import org.springframework.stereotype.Repository;

@Repository
public interface LogMapper extends ElasticsearchRepository<Log,Integer> {
}
( 这个里面可以不写方法的, 默认会使用一些自带的方法, 没有漏粘代码. )
测试类
这个测试类可以直接写在这个默认的里面就好了. 反正只是测试一下, 真实项目也要改的.
如果新建了测试类, 不要忘记加 @RunWith(SpringRunner.class) 注解(因为配置类是写在config文件夹下面的, 需要 @Autowired 注入一起启动)
注入一下 logMapper, 然后就可以开始写不同的测试类了.

一些简单的方法:
package com.example.demo;

import com.example.demo.mapper.LogMapper;
import com.example.demo.pojo.Log;
import org.junit.jupiter.api.Test;
import org.springframework.beans.factory.annotation.Autowired;
import org.springframework.boot.test.context.SpringBootTest;

import javax.annotation.Resource;
import java.util.ArrayList;
import java.util.Date;
import java.util.Optional;

@SpringBootTest
class DemoApplicationTests {

    @Autowired
    private LogMapper logMapper;

    @Test
    void add() {
        for(int i=1;i<11;i++) {
            Log log = new Log();
            Date currentDate = new Date();

            log.setId(i);
            log.setContent("this is content"+i);
            log.setTime(currentDate);

            logMapper.save(log);
        }
    }

    @Test
    void delete(){
        Integer id = 1;
        logMapper.deleteById(id);
    }

    @Test
    void update() {
        Log updateLog = new Log();
        Date currentDate = new Date();

        updateLog.setId(2);
        updateLog.setContent("update message");
        updateLog.setTime(currentDate);

        logMapper.save(updateLog);
    }

    @Test
    void find() {
        Iterable<Log> all = logMapper.findAll(); // 查找全部的文档数据, 返回结果是没有顺序的
        ArrayList<Log> list = new ArrayList<>(); // 利用list给返回的结果排序

        for(Log log:all){
            list.add(log);
            System.out.println(log);
        }
        // 使用list的方法实现排序
    }

    @Test
    void findById() {
        Optional<Log> byId = logMapper.findById(4);
        System.out.println(byId);
    }

    @Test
    void findByIdAll() {
        ArrayList<Integer> ids = new ArrayList<>();
        ids.add(1);
        ids.add(2);
        Iterable<Log> allById = logMapper.findAllById(ids);

        // 打印结果
        for(Log log:allById){
            System.out.println(log); // 如果给的id在索引里没有, 就不会输出(这里不会报错的)
        }
    }

}
如果不传id, 不会报错, es会自动生成id的, 如下:
