如何在SPA Angular应用程序中使用FastCube .NET
FastReport.Mono 是一款为Mono Framework设计的功能全面的报表生成工具。FastReport.Mono 是一个多平台的报表解决方法。它可以应用于Windows, Linux, Mac OS X,以及任何支持Xamarin Mono的操作系统。
在FastReport Mono 2021.1的新版本中,添加了新条形码-Deutsche Post Leitcode。将RTF转换为报告对象的算法已得到显着改进。并且还添加了用于转换数字的新功能。欢迎下载体验。(点击下方按钮下载)
点击下载 FastReport.Mono v2021.1 新版本
如果您对FastReport感兴趣,欢迎加入FastReport QQ交流群:801349317
用于创建单页应用程序的最受欢迎的框架之一是Angular。它基于MVC模板,从而简化了此类应用程序的开发和测试。报表生成器FastReport的许多用户需要在Angular Web应用程序中显示他们的报表,我们在本文中使用FR Core Web Report in Single Page Application Angular 7中讨论了这些内容 。现在,在网页上,我们不仅可以显示报告,还可以显示来自FastCube .NET的数据立方体。让我们看看如何去做。
最初,应该已经安装:平台Node.js和NET Core SDK 2.0或更高版本。
您可以使用sdk中的模板创建应用程序。为此,请在命令行中键入命令:
dotnet new angular -o FCubeAngular
此命令将创建一个演示应用程序,准备启动。我们要做的就是添加我们的功能。现在,在命令行中,借助命令,使用创建的应用程序转到目录:
cd FCubeAngular
并使用以下命令安装javascript软件包:
npm install
在开始使用我们的Web应用程序之前,有必要使用FastCube库准备Nuget软件包。打开FastCube.Core.sln解决方案并构造该对象。您将获得两个软件包-FastCube.Web.2020.2.1.nupkg和FastCube.Core.2020.2.1.nupkg。应该将它们放置在本地目录中,您以后将其用作Nuget程序包的本地源。
现在,您可以启动之前创建的项目。我们可以立即开始安装FastCube软件包。打开Nuget程序包管理器。在窗口的右上角,您可以看到一个齿轮图标,它会打开软件包源的设置。单击它并添加一个新的程序包源–包含我们的FastCube程序包的目录:
在下拉列表中选择添加的软件包源,然后安装软件包:
通过添加以下代码,在Configure()方法中的Startup.cs文件中插入FastCube:
app.UseFastCube();
我们的应用程序已经包含控制器WeatherForecastController。让我们向其中添加我们的web方法:
 [HttpGet("[action]")]
 public IActionResult ShowCube()
 {
 Cube cube = new Cube();
 Slice slice = new Slice()
 {
 Cube = cube
 };
 FilterManager filterManager = new FilterManager()
 {
 Cube = cube
 };
 WebGrid grid;
 grid = new WebSliceGrid()
 {
 Slice = slice
 };

 ViewBag.WebGrid = grid;

 cube.SourceType = SourceType.File;
 cube.Load(Path.Combine("C:\\Users\\FR\\Downloads\\fastcube-net-master\\Demos\\Data\\", "Cubes", "calculated_measures.mdc"));
 return View();
 }
如果在返回的显示上遇到问题,请检查从中继承控制器的类。它必须是Controller,而不是BaseController。
现在让我们考虑我们添加的Web方法。多维数据集和切片对象已连接,因为实际上,切片是多维数据集的一部分。要输出交互式交叉表,请使用WebGrid对象。它可以同时输出WebCubeGrid切片和WebSliceGrid多维数据集。我们下载早期在桌面版FastCube .NET中创建的多维数据集。
要显示它,我们将需要一个视图。可以通过右键单击ShowCube方法签名来完成。该视图将包含单个代码行:
@await ViewBag.WebGrid.Render()
让我们转到位于ClientApp目录中的SPA应用程序。我们需要将组件添加到app目录中。它将显示带有我们上面创建的视图的iframe。在app目录中添加一个多维数据集子目录。向其中添加两个文件:cube.component.html和cube.component.ts。第一个是显示器,第二个是控制器。
<!DOCTYPE html>
<html>
<head>
 <meta charset="utf-8" />
 <title></title>
</head>
<body>
 <input type="button" (click)="Clicked()" value="Show Report" />
 <div *ngIf="show">
 <iframe id="report" height="1000" width="1000" [src]="url | safeUrl"></iframe>
 </div>
</body>
</html>
注意函数safeUrl,它将URL转换为安全模式。我们将在以后添加。
该按钮将激活Click功能,该功能将安装show标志以显示框架,并在后端的控制器中将url设置为ShowCube方法。
这是cube.component.ts文件中Click函数的实现:
import { Component } from '@angular/core';

@Component({
 selector: 'app-cube-component',
 templateUrl: './cube.component.html'
})
export class CubeComponent {
 public show: boolean = false;
 public url: string;

 Clicked() {
 this.show = true;
 this.url = "/WeatherForecast/ShowCube";
 }
}
现在,我们添加了将链接转换为普通模式的功能–将文件safeUrl.pipe.ts添加到同一目录中:
import { Pipe, PipeTransform } from '@angular/core';
import { DomSanitizer } from '@angular/platform-browser';

@Pipe({ name: 'safeUrl' })
export class SafeUrlPipe implements PipeTransform {
 constructor(private sanitizer: DomSanitizer) { }
 transform(url) {
 return this.sanitizer.bypassSecurityTrustResourceUrl(url);
 }
}
添加的组件和功能必须在app.module.ts文件中注册:
import { BrowserModule } from '@angular/platform-browser';
import { NgModule } from '@angular/core';
import { FormsModule } from '@angular/forms';
import { HttpClientModule } from '@angular/common/http';
import { RouterModule } from '@angular/router';

import { AppComponent } from './app.component';
import { NavMenuComponent } from './nav-menu/nav-menu.component';
import { HomeComponent } from './home/home.component';
import { CounterComponent } from './counter/counter.component';
import { FetchDataComponent } from './fetch-data/fetch-data.component';
import { CubeComponent } from './cube/cube.component';
import { SafeUrlPipe } from './cube/safeUrl.pipe';

@NgModule({
 declarations: [
 AppComponent,
 NavMenuComponent,
 HomeComponent,
 CounterComponent,
 FetchDataComponent,
 CubeComponent,
 SafeUrlPipe
 ],
 imports: [
 BrowserModule.withServerTransition({ appId: 'ng-cli-universal' }),
 HttpClientModule,
 FormsModule,
 RouterModule.forRoot([
 { path: '', component: HomeComponent, pathMatch: 'full' },
 { path: 'counter', component: CounterComponent },
 { path: 'fetch-data', component: FetchDataComponent },
 { path: 'cube', component: CubeComponent }
 ])
 ],
 providers: [],
 bootstrap: [AppComponent]
})
export class AppModule { }
另外,我们在文件nav-menu.component.html的菜单中添加一个新标题:
<header>
 <nav
 class="navbar navbar-expand-sm navbar-toggleable-sm navbar-light bg-white border-bottom box-shadow mb-3"
 >
 <div class="container">
 <a class="navbar-brand" [routerLink]="['/']">FRCoreAngular</a>
 <button
 class="navbar-toggler"
 type="button"
 data-toggle="collapse"
 data-target=".navbar-collapse"
 aria-label="Toggle navigation"
 [attr.aria-expanded]="isExpanded"
 (click)="toggle()"
 >
 <span class="navbar-toggler-icon"></span>
 </button>
 <div
 class="navbar-collapse collapse d-sm-inline-flex justify-content-end"
 [ngClass]="{ show: isExpanded }"
 >
 <ul class="navbar-nav flex-grow">
 <li class="nav-item"
 [routerLinkActive]="['link-active']"
 [routerLinkActiveOptions]="{ exact: true }">
 <a class="nav-link text-dark" [routerLink]="['/']">Home</a>
 </li>
 <li class="nav-item" [routerLinkActive]="['link-active']">
 <a class="nav-link text-dark" [routerLink]="['/counter']">Counter</a>
 </li>
 <li class="nav-item" [routerLinkActive]="['link-active']">
 <a class="nav-link text-dark" [routerLink]="['/fetch-data']">Fetch data</a>
 </li>
 <li class="nav-item" [routerLinkActive]="['link-active']">
 <a class="nav-link text-dark" [routerLink]="['/cube']">Cube</a>
 </li>
 </ul>
 </div>
 </div>
 </nav>
</header>
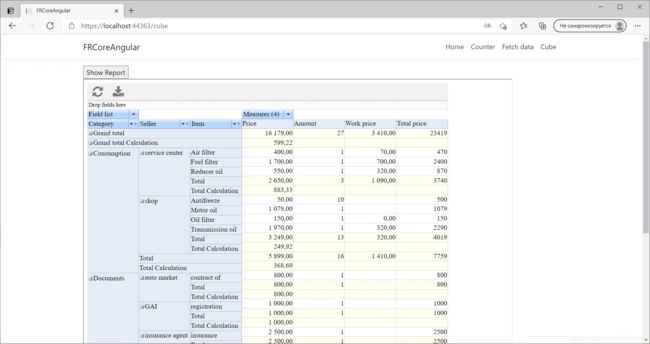
该应用程序已准备就绪。我们运行它:
这个简单的示例说明了如何在单页应用程序Angular中显示基于FastCube库的数据多维数据集。现在,Web应用程序为您提供了方便的数据分析工具。您可以添加或删除度量,事实,或过滤数据。


