企业微信自定义应用 企业可信IP配置
现在创建应用想要使用需要设置企业可信IP,而配置企业可信IP需要先配置 设置可信域名 或 设置接收消息服务器URL,域名需要花钱而且配置麻烦,这里选择 设置接收消息服务器URL。
不设置就报这个错误:
真麻烦呀!!!
{u'errcode': 60020, u'errmsg': u'not allow to access from your ip, hint: [1692000515331], from ip: xxx.xxx.xxx.xx, more info at https://open.work.weixin.qq.com/devtool/query?e=60020'}配置条件:
* 找一台有公网的linux服务器 没有可以选择内网穿透软件 都没有我也没办法
* 安装python3 百度一下
创建自定义应用

登录网页版 >应用管理>创建应用>进入应用>最下面有个企业可信IP>选择设置接收消息服务器URL
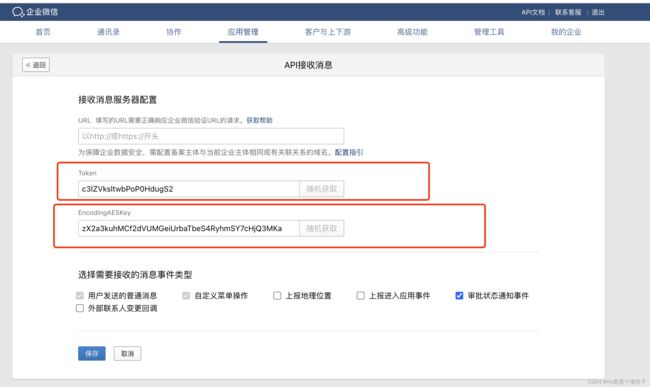
脚本里的这段代码配置一下
点击一下这里获取个随机值Token 和 EncodingAESKey 粘贴进去就行了,注意: 不要关闭网页一会还要用。
企业信息的ID在我的企业可以找到

qy_api = [
    WXBizMsgCrypt("XXXXXXX", "XXXXXXX", "XXXXXXX"),
] #对应接受消息回调模式中的token,EncodingAESKey 和 企业信息中的企业id
使用如下代码需要修改一下:
引入WXBizMsgCrypt模块步骤
将这个文件放在和脚本同一个目录即可
# 下载项目
wget https://github.com/sbzhu/weworkapi_python/archive/refs/heads/master.zip

# 解压
unzip master.zip

# 改名
mv weworkapi_python-master weworkapi_python
随便起个名vim到一个文件即可 我这里叫2.py
[root@apphost dba]# cat 2.py
#-*- encoding:utf-8 -*-
from flask import abort, request
from flask import Flask
from xml.dom.minidom import parseString
import _thread
import time
import os
import sys
sys.path.append("weworkapi_python/callback")  # 正确的模块导入路径
from WXBizMsgCrypt3 import WXBizMsgCrypt   # https://github.com/sbzhu/weworkapi_python 项目地址
app = Flask(__name__)

# 对应步骤4中接受消息回调模式中的URL,如域名是'www.example.com' 那么在步骤4中填入的url就为"http://www.example.com/hook_path"
@app.route('/hook_path', methods=['GET','POST'])
def douban():
    if request.method == 'GET':
        echo_str = signature(request, 0)
        return(echo_str)
    elif request.method == 'POST':
        echo_str = signature2(request, 0)
        return(echo_str)

qy_api = [
    WXBizMsgCrypt("XXXXXXX", "XXXXXXX", "XXXXXXX"),
] #对应接受消息回调模式中的token,EncodingAESKey 和 企业信息中的企业id

# 开启消息接受模式时验证接口连通性
def signature(request, i):
    msg_signature = request.args.get('msg_signature', '')
    timestamp = request.args.get('timestamp', '')
    nonce = request.args.get('nonce', '')
    echo_str = request.args.get('echostr', '')
    ret,sEchoStr=qy_api[i].VerifyURL(msg_signature, timestamp,nonce,echo_str)
    if (ret != 0):
        print("ERR: VerifyURL ret: " + str(ret))
        return("failed")
    else:
        return(sEchoStr)

# 实际接受消息
def signature2(request, i):
    msg_signature = request.args.get('msg_signature', '')
    timestamp = request.args.get('timestamp', '')
    nonce = request.args.get('nonce', '')
    data = request.data.decode('utf-8')
    ret,sMsg=qy_api[i].DecryptMsg(data,msg_signature, timestamp,nonce)
    if (ret != 0):
        print("ERR: DecryptMsg ret: " + str(ret))
        return("failed")
    else:
        with open ("/var/log/qywx.log", 'a+') as f: # 消息接收日志
            doc = parseString(sMsg)
            collection = doc.documentElement
            name_xml = collection.getElementsByTagName("FromUserName")
            msg_xml = collection.getElementsByTagName("Content")
            type_xml = collection.getElementsByTagName("MsgType")
            pic_xml = collection.getElementsByTagName("PicUrl")
            msg = ""
            name = ""
            msg_type = type_xml[0].childNodes[0].data
            if msg_type == "text": #文本消息
                name = name_xml[0].childNodes[0].data        #发送者id
                msg = msg_xml[0].childNodes[0].data          #发送的消息内容
                f.write(time.strftime('[%Y-%m-%d %H:%M:%S]') + "[ch%d] %s:%s\n" % (i, name, msg))
                _thread.start_new_thread(os.system, ("python3 command.py '%s' '%s' '%d' '%d'" % (name, msg, i, 0), )) #此处将消息进行外部业务处理

            elif msg_type == "image": #图片消息
                name = name_xml[0].childNodes[0].data
                pic_url = pic_xml[0].childNodes[0].data
                f.write(time.strftime('[%Y-%m-%d %H:%M:%S]') + "[ch%d] %s:图片消息\n" % (i, name))
                _thread.start_new_thread(os.system, ("python3 command.py '%s' '%s' '%d' '%d'" % (name, pic_url, i, 1), ))  #此处将消息进行外部业务处理

            f.close()

        return("ok")

if __name__=='__main__':
    app.run("0.0.0.0", 888)  #本地监听端口,可自定义
运行项目
python3 2.py这里运行的时候可能会缺少模块,缺少什么模块会提示使用下面的命令安装即可,安装不上百度直接贴百度,有些包名不一样
pip3 install 模块名这样就运行起来了
运行时注意引入的库是否引入正确
脚本里的端口注意不要和现有的端口冲突了
防火墙是否开放了888端口
解决以上问题后访问你的url即可
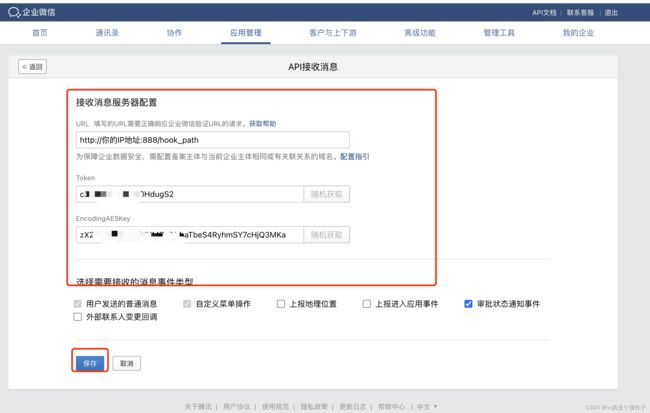
# 路径要写上
http://你的IP地址:888/hook_path
这样就说明好了
然后在API接收消息的网页上输入这个路径点击保存即可成功
注意:
确保网页上的Token 和 EncodingAESKey 和脚本里的一致
这样就可以写可信IP了 铁汁
把你的IP写进去就不报错了
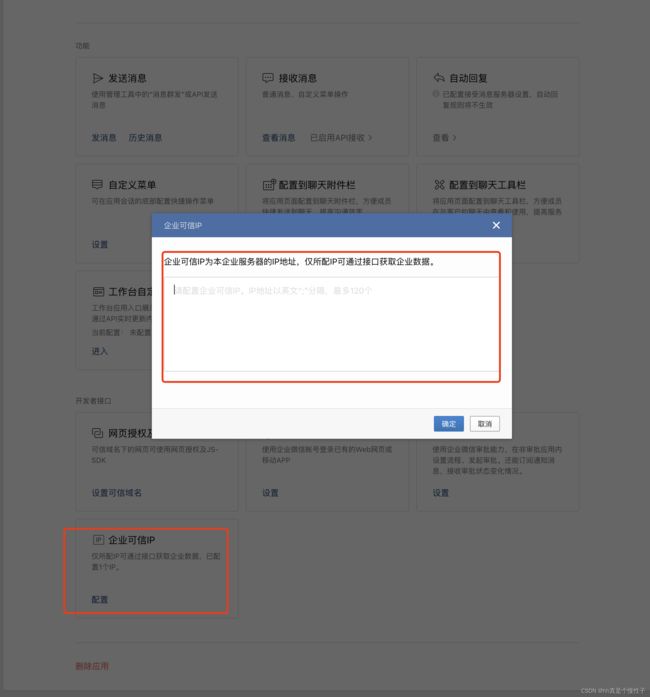
用完把脚本关了就行,铁汁们