Latex 基本操作
好久没写博客了,最近一直在写毕业论文,不过对 Latex 的使用进一步了解,这里整理下来方便小伙伴们学习和参考。可以在 Gituhub 上找自己学校的模板,通常我们都是在找到的模板上进行写作,只需要掌握一下基本操作:公式编写、图片插入、表格制作、插入算法伪代码、、插入代码块、文字设置颜色等。
1 公式编写
提示:
\begin{align}与\begin{equation}不能同时使用\begin{aligned}只能与\begin{equation}同时使用- 要想使用
\begin{align},需要在\begin{document}之前插入\usepackage{amsmath} \begin{align}的用法应该与\begin{gather}用法相同,区别是:-
\begin{align}是默认右对齐,或者用 & 指定对齐位置
-
\begin{gather}默认是居中对齐,不能与 & 结合使用
概括:
- 导言区要加上,amsmath宏包
- 如果想有编号,可以用 gather,align
- 如果想某一行没有编号,在用\换行前使用
\nonumber - 如果不想有编号,可以gather*,align*,或者在后面加上命令
\notag - 如果想一行公式分开写,用split
- 如果想选择判断,用cases
- align,split,cases 的公式对齐,用&
1.1 多行公式编号
这里主要介绍使用 \begin{align}的公式编号,以LSTM的公式为例子:
1. 多行公式多编号
% 多行公式多编号
\begin{align}
    \hat{C}_t &= tanh(W_C\odot[h_{t-1},x_t]+b_C) \\
    i_t&=\sigma(W_i\odot[h_{t-1},x_t]+b_i) \\
    f_t&=\sigma(W_f\odot[h_{t-1},x_t]+b_f) \\
    C_t&=f_t * C_{t-1}+i_t * \hat{C}_t \\
    o_t&=\sigma(W_o\odot[h_{t-1},x_t]+b_o) \\
    h_t&=o_t * tanh(C_t)
\end{align}
2. 多行公式单编号,编号居中
% 多行公式单编号
\begin{equation}
    \begin{aligned}
        &\hat{C}_t = tanh(W_C\odot[h_{t-1},x_t]+b_C) \\
        &i_t=\sigma(W_i\odot[h_{t-1},x_t]+b_i) \\
        &f_t=\sigma(W_f\odot[h_{t-1},x_t]+b_f) \\
        &C_t=f_t * C_{t-1}+i_t * \hat{C}_t \\
        &o_t=\sigma(W_o\odot[h_{t-1},x_t]+b_o) \\
        &h_t=o_t * tanh(C_t)
    \end{aligned}
\end{equation}
3. 多行公式无编号
% 多行公式无编号
\begin{align*}
    \hat{C}_t &= tanh(W_C\odot[h_{t-1},x_t]+b_C) \\
    i_t&=\sigma(W_i\odot[h_{t-1},x_t]+b_i) \\
    f_t&=\sigma(W_f\odot[h_{t-1},x_t]+b_f) \\
    C_t&=f_t * C_{t-1}+i_t * \hat{C}_t \\
    o_t&=\sigma(W_o\odot[h_{t-1},x_t]+b_o) \\
    h_t&=o_t * tanh(C_t)
\end{align*}
4. 多行公式多编号,有的行没有编号
% 多行公式多编号,有的行没有编号
\begin{align}
    \hat{C}_t &= tanh(W_C\odot[h_{t-1},x_t]+b_C) \\
    i_t&=\sigma(W_i\odot[h_{t-1},x_t]+b_i)  \nonumber \\
    f_t&=\sigma(W_f\odot[h_{t-1},x_t]+b_f) \\
    C_t&=f_t * C_{t-1}+i_t * \hat{C}_t \\
    o_t&=\sigma(W_o\odot[h_{t-1},x_t]+b_o) \\
    h_t&=o_t * tanh(C_t)
\end{align}
5. 一行公式分多行写
% split环境(用$对齐)(一个公式分为多行排版)
\begin{equation}
	\begin{split}
	\cos 2x &= \cos^2 x - \sin^2 x\\
	        &= 2\cos^2 x - 1
	\end{split}
\end{equation}
6. 情况(case)划分
\begin{equation}
	D(x) = \begin{cases}
	      1, & if \ x \in Q \\
	      0, & if \ x \in R
		   \end{cases}
\end{equation}
7. 大括号单编号
\begin{align}
\left\{     % 在equation环境下使用,用\left\{命令添加左大括号,用\right.以打点.结束
	\begin{aligned}
	x&=eq1\\
	y&=eq2+1
	\end{aligned}
\right.
\end{align}
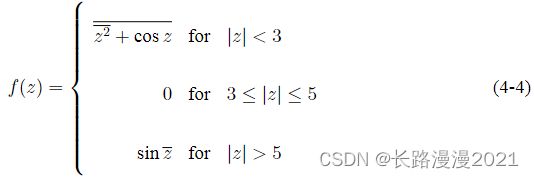
8. 调整对齐
%% array 除了l还可以为c,r分别代表居左、居中、居右
\begin{equation}
    f(z) = \left\{ \begin{array}{rcl}
    \overline{\overline{z^2}+\cos z} & \mbox{for}
    & |z|<3 \\ 0 & \mbox{for} & 3\leq|z|\leq5 \\
    \sin\overline{z} & \mbox{for} & |z|>5
    \end{array}\right
\end{equation}
行内公式的表写,只需要使用
$equation$,比如$s=\pi\cdot r^2$显示为: s = π ⋅ r 2 s=\pi\cdot r^2 s=π⋅r2。公式引用只需要加入\label{eq:1-1},在正文部分可以使用\autoref{eq:1-1}。
2 图片插入
本节将详细介绍如何在LaTeX中插入和处理图像,包括基本步骤、常用命令和一些高级技巧。
1. 插入图像
在LaTeX中插入图片之前,首先需要确保引入了处理图像的包。最常用的是 graphicx 包,它提供了包括插入和缩放图像在内的多种命令。
\usepackage{graphicx}
使用 \includegraphics 命令可以插入图像。你需要指定图像的文件路径和名称。例如,要插入名为 example.jpg 的图像,可以使用以下命令:
\includegraphics{example.jpg}
graphicx 包允许你调整图像的大小。使用 width 和 height 参数可以指定图像的宽度和高度:
\includegraphics[width=0.5\textwidth]{example.jpg}
这里,图像的宽度被设置为文本宽度的一半。
2. 图像的定位
通常,图像会被放置在一个 figure 浮动环境中,这样可以更好地控制图像在文档中的位置。例如:
\begin{figure}[h]
    \centering
    \includegraphics[width=0.5\textwidth]{example.jpg}
    \caption{Example of an image}
    \label{fig:example}
\end{figure}
在这个例子中,[h] 参数告诉LaTeX尽量在当前位置插入图像。\centering 命令将图像居中显示。\caption 和 \label 分别用于添加标题和引用标签。
3. 多图排列
在LaTeX中,你可以在一个 figure 环境内插入多个图像,并进行排列。例如,水平排列两个图像:
\begin{figure}[h]
    \centering
    \includegraphics[width=0.45\textwidth]{example1.jpg}
    \includegraphics[width=0.45\textwidth]{example2.jpg}
    \caption{Two images side by side}
    \label{fig:side_by_side}
\end{figure}
4. 子图使用
当需要对每个子图进行单独描述时,可以使用 subcaption 包来创建子图:
\usepackage{subcaption}

\begin{figure}[h]
    \centering
    \begin{subfigure}[b]{0.4\textwidth}
        \includegraphics[width=\textwidth]{example1.jpg}
        \caption{First Image}
        \label{fig:first}
    \end{subfigure}
    \begin{subfigure}[b]{0.4\textwidth}
        \includegraphics[width=\textwidth]{example2.jpg}
        \caption{Second Image}
        \label{fig:second}
    \end{subfigure}
    \caption{Subfigures Example}
    \label{fig:subfigures}
\end{figure}
5. 图像的旋转和剪裁
graphicx 包还支持旋转和剪裁图像。例如,旋转一个图像 45 度:
\includegraphics[angle=45]{example.jpg}
6. 使用外部图像文件夹
为了组织大量图像,建议将它们放在外部文件夹中。在文档的前言部分,你可以设置图像的路径:
\graphicspath{{images/}}
这样,LaTeX会在名为 images 的文件夹中查找所有图像
3 表格制作
在本节中,我们将深入探讨如何在 LaTeX 中制作表格,包括基础知识和一些高级技巧。
3.1 创建一个简单的表格
1. 表格定位和标题
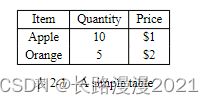
在 LaTeX 中创建表格的基础命令是 \begin{table} 和 \end{table}。表格中的每一行以 \ 结束,而列则由 & 分隔。以下是一个简单的例子:
\begin{table}[h]
    \centering
    \begin{tabular}{|c|c|c|}
        \hline
        Item & Quantity & Price \\
        \hline
        Apple & 10 & \$1 \\
        Orange & 5 & \$2 \\
        \hline
    \end{tabular}
    \caption{A simple table}
    \label{tab:my_table}
\end{table}
这里,tabular 环境用于定义表格内容,而 {|c|c|c|} 则指定了三列,每列居中对齐(c),并且每列之间用竖线分隔。
\begin{table}[h] 中的 [h] 参数告诉 LaTeX 将表格放置在当前位置。其他常用选项包括 [t](页顶)、[b](页底)和 [p](单独一页)。\caption 和 \label 命令分别用于给表格添加标题和标签。

2. 合并单元格
在 LaTeX 中,可以使用 \multicolumn 和 \multirow 命令合并单元格。这需要 \usepackage{multirow} 包。
\begin{table}[h]
    \centering
    \rowcolors{1}{gray!25}{white}
    \begin{tabular}{|c|c|c|}
        \hline
        \multicolumn{2}{|c|}{Item} & Price \\
        \hline
        Apple & 10 & \$1 \\
        \hline
    \end{tabular}
    \caption{A simple table}
    \label{tab:my_table}
\end{table}

3. 调整列宽和行高
可以使用 p{width} 命令指定列宽,例如 p{3cm}。调整行高可以在行结束命令 \ 之前添加 [height]。
\begin{table}[h]
    \centering
    \begin{tabular}{|p{3cm}|p{2cm}|p{2cm}|}
        \hline
        Item & Quantity & Price \\[0.5cm]
        \hline
        Apple & 10 & \$1 \\
        \hline
    \end{tabular}
    \caption{A simple table}
    \label{tab:my_table}
\end{table}

4. 颜色和背景
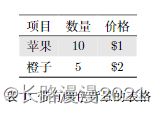
首先,确保你在文档的前言部分(\begin{document} 之前)包含了 xcolor 和 colortbl 包,同时定义了你想使用的颜色。然后,在你的表格中,使用 \rowcolors 命令来设置行的颜色。例如:
\documentclass{article}
\usepackage[table]{xcolor} % 包含 xcolor 包
\definecolor{lightgray}{gray}{0.9}
\begin{document}
\begin{table}[h]
    \centering
    \rowcolors{1}{white}{lightgray} % 从第一行开始交替颜色
    \begin{tabular}{ccc}
        \hline
        项目 & 数量 & 价格 \\
        \hline
        苹果 & 10 & \$1 \\
        橙子 & 5 & \$2 \\
        \hline
    \end{tabular}
    \caption{带有颜色背景的表格}
    \label{tab:colored_table}
\end{table}
\end{document}

5. 边框样式
可以通过 \cline{i-j} 命令添加部分边框,其中 i 和 j 指定了边框开始和结束的列。
\begin{table}[h]
    \centering
    \begin{tabular}{|c|c|c|}
        \hline
        Item & Quantity & Price \\
        \cline{1-2}
        Apple & 10 & \$1 \\
        \hline
    \end{tabular}
    \caption{A simple table}
    \label{tab:my_table}
\end{table}

6. 三线表
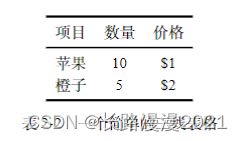
三线表(也称为书写式表格)是一种在学术论文中常用的表格样式,特点是只有顶部、底部和标题下方有横线,看起来更为简洁和专业。使用 \toprule、\midrule 和 \bottomrule 命令来分别添加顶部线、标题下的线和底部线。下面是一个简单的三线表格的例子:
\begin{table}[h]
    \centering
    \begin{tabular}{ccc}
        \toprule
        项目 & 数量 & 价格 \\
        \midrule
        苹果 & 10 & \$1 \\
        橙子 & 5 & \$2 \\
        \bottomrule
    \end{tabular}
    \caption{一个简单的三线表格}
    \label{tab:example}
\end{table}
在这个例子中:
\toprule创建了表格顶部的粗横线。\midrule在表头下方创建了一条横线。\bottomrule创建了表格底部的粗横线。

4 插入算法伪代码
4.1 使用 Aurora 在 Word 中插入算法伪代码教程
1. 安装Aurora和miktex软件
安装miktex,附百度网盘链接链接,提取码:v0t5
下载完成后,点击exe文件,点击运行,按照提示安装。
4.2 使用 Overleaf 在毕业论文中插入算法伪代码,高效美观
接下来使用 Overleaf
%在菜单中,编译器选择XeLaTex

\documentclass[11pt]{ctexart}
\usepackage[top=2cm, bottom=2cm, left=2.5cm, right=2.5cm]{geometry}                         % 定义页边距
\usepackage{algorithm}
\usepackage{algorithmicx}
\usepackage{algpseudocode}
\usepackage{amsmath}                % 数学公式
\usepackage[UTF8]{ctex}             % 输出中文
\floatname{algorithm}{Algorithm}    % 算法
\renewcommand{\algorithmicrequire}{\textbf{Input:}} % 输入
\renewcommand{\algorithmicensure}{\textbf{Output:}} % 输出

\begin{document}
\renewcommand{\thealgorithm}{2} % 这里用来定义算法1,算法2等
    \begin{algorithm}
        \caption{K-Means聚类盲均衡算法} %标题
        \begin{algorithmic}[1] %每行显示行号,1表示每1行进行显示
            \Require 输入样本集$D$ = \{$x_1,x_2,...,x_N$\},分簇数$K=2$,最大迭代次数为$M$,从分簇样本中随机选取两点\{$u_1$,$u_2$\}作为初始质心
            \Ensure 样本分簇质心\{$C_1$,$C_2$\}
            \For{$m = 1 \to M$} //$m$表示迭代次数
                \State $C_1 \Leftarrow \emptyset, C_2 \Leftarrow \emptyset$ //初始化各簇
                \For{$i = 1,2,...,N$}     //$i$表示样本集编号
                    \State $d_{i1} \Leftarrow {\Vert x_i-u_1 \Vert}^2$, $d_{i2} \Leftarrow {\Vert x_i-u_2 \Vert}^2$ //计算$x_i$到两质心的欧式距离
                    \If {$d_{i1} \leq d_{i2}$}
                    \State $C_1 \Leftarrow C_1 \cup \{x_i\}$ //将$x_i$划分到相应的簇
                    \Else
                    \State $C_2 \Leftarrow C_2 \cup \{x_i\}$ %有时候需要用\来转译
                \EndIf
                \EndFor
                \State $\tilde{u_1} \Leftarrow \frac{1}{\vert C_1 \vert}\sum_{x \in C_1} x$, $\tilde{u_2} \Leftarrow \frac{1}{\vert C_2 \vert}\sum_{x \in C_2} x$ //重新计算各簇质心
                \If{$(\tilde{u_1} == u_1) && (\tilde{u_2} == u_2)$} //各簇质心未改变,跳出循环
                    \State \textbf{break} from line 3 %\textbf为加粗
                    \Else
                    \State $u_1 \Leftarrow \tilde{u_1}, u_2 \Leftarrow \tilde{u_2}$ //更新各簇质心
                \EndIf
            \EndFor
            \State \Return $C_1, C_2$ //输出结果
        \end{algorithmic}
    \end{algorithm}
\end{document}
选择菜单,设置下的编译器中选择 XeLaTeX,点击右侧的编译,如图所示:

这里给大家安利一个写LaTex数学公式大全,LATEX Mathematical Symbols,非常全面,PDF可以下载自己保存,然后通过查表来进行LaTex编程。
5 插入代码块
在 LaTeX 文档中插入代码块是一种常见需求,尤其是在撰写技术或学术文档时。LaTeX 提供了多种方式来实现这一点,其中最常用的是使用 listings 包。这个包允许你以格式化和高亮的方式插入代码,支持多种编程语言。
第一步:包含listings包
在文档的前言部分,使用以下命令包含listings包:
\usepackage{listings}
第二步:设置代码样式
listings 包允许你自定义代码的显示样式,包括字体、颜色和其他格式。例如,设置一个基本的代码样式
\lstset{
    basicstyle=\ttfamily\small,
    breaklines=true,
    frame=single
}
第三步:插入代码
现在你可以使用\begin{lstlisting}和\end{lstlisting}环境插入代码块。例如:
\begin{lstlisting}[language=Python, caption=Python example]
def hello_world():
    print("Hello, world!")
\end{lstlisting}
高级选项
- 语言支持:listings包支持多种编程语言,你可以通过设置language选项来指定。
- 代码行号:通过添加numbers=left选项可以在代码左侧添加行号。
- 代码高亮:可以通过进一步的设置来为关键字、注释等添加不同的颜色。
示例完整代码
\documentclass{article}
\usepackage{listings}
\usepackage{xcolor}

\lstset{
    basicstyle=\ttfamily\small,
    breaklines=true,
    frame=single,
    language=Python,
    numbers=left,
    keywordstyle=\color{blue},
    stringstyle=\color{red},
    commentstyle=\color{green}
}

\begin{document}

\begin{lstlisting}[caption=Python example]
def hello_world():
    # Print a greeting
    print("Hello, world!")
\end{lstlisting}

\end{document}
6 列表
在 LaTeX 中插入序号通常是指创建有序列表(编号列表)。LaTeX 提供了几种不同的环境来创建有序列表,其中最常用的是 enumerate 环境。在这个环境中,每个列表项自动被赋予一个序号,通常是数字,但也可以是字母或罗马数字。
下面是如何在 LaTeX 文档中创建一个基本的有序列表:
1. 基础有序列表
\begin{enumerate}
    \item 第一个项目
    \item 第二个项目
    \item 第三个项目
\end{enumerate}
在这个例子中,enumerate 环境会生成一个数字列表,其中每个 \item 表示一个列表项。
2. 自定义列表标签
你还可以自定义列表中的标签。例如,使用字母或罗马数字作为序号:
\begin{enumerate}[label=\alph*)] % 使用字母作为序号
    \item 第一个项目
    \item 第二个项目
\end{enumerate}

\begin{enumerate}[label=\Roman*)] % 使用罗马数字作为序号
    \item 第一个项目
    \item 第二个项目
\end{enumerate}
为了使用这种自定义格式,你可能需要包含 enumitem 包,这可以通过在文档的前言部分添加以下代码来实现:
\usepackage{enumitem}
3. 嵌套列表
在 LaTeX 中,你还可以创建嵌套的有序列表,即在一个列表项内部创建另一个列表:
\begin{enumerate}
    \item 第一个主要项目
        \begin{enumerate}
            \item 子项目一
            \item 子项目二
        \end{enumerate}
    \item 第二个主要项目
\end{enumerate}
7 文字设置颜色
以下的三种方式都需要导入color包,即 \usepackage{color}。
1. 使用系统自定义的颜色
「使用语法:」 \textcolor{red/blue/green/black/white/cyan/magenta/yellow}{text} 「其中:」 {red/blue/green/black/white/cyan/magenta/yellow} 为系统自定义的颜色。 {text} 为需要着色的文字内容。 「例如:」
\textcolor{red}{AIAS编程有道}、\textcolor{blue}{AIAS编程有道}、\textcolor{yellow}{AIAS编程有道}、\textcolor{green}{AIAS编程有道}
2. 使用RGB组合值设置颜色
「使用语法:」 \textcolor[rgb]{r,g,b}{text} \textcolor[RGB]{R,G,B}{text} 「其中:」 [rgb]设置 \textcolor 选用rgb配色方案; {r,g,b}代表red、green和blue三种颜色的组合,取值范围为[0-1] {text}为需要着色的文字内容。 {R,G,B}代表red、green和blue三种颜色的组合,取值范围为[0-255] 「例如:」
\textcolor[rgb]{0.5,0.6,0.7}{AIAS编程有道}、\textcolor[rgb]{0.5,0.8,0.7}{AIAS编程有道}、\textcolor[rgb]{0.1,0.8,0.9}{AIAS编程有道}

\textcolor[RGB]{18,220,168}{AIAS编程有道}、
\textcolor[RGB]{202,12,22}{AIAS编程有道}、\textcolor[RGB]{1,8,9}{AIAS编程有道}
「结果:」

注:需使用十进制数字。
3. 自定义一种颜色,直接调用
自定义方式1: \definecolor{ColorName}{rgb}{r,g,b}。这时r/g/b的定义域就在[0-1],可参考方法2。
自定义方式2: \definecolor{ColorName}{RGB}{R,G,B}。这时R/G/B的定义域就在[0-255],可参考方法2。
这里为颜色定义了名称ColorName,下面可以直接调用这个颜色方案即可。 调用方式:\textcolor{ColorName}{text}。操作方式可参考方法2。
参考
- 使用Aurora在Word中插入算法伪代码教程,亲测有效,写论文必备:https://blog.csdn.net/jucksu/article/details/116307244
- 使用Overleaf在毕业论文中插入算法伪代码,高效美观:https://blog.csdn.net/jucksu/article/details/123489825
- LaTeX 算法伪代码基本格式排版:https://blog.csdn.net/qq_41775769/article/details/121433682
- Latex公式编号:https://blog.csdn.net/Strive_For_Future/article/details/118609968
- Latex排版大括号让其左对齐:https://blog.csdn.net/alxe_made/article/details/104914943
- LaTeX中设置字体颜色的三种方式:https://zhuanlan.zhihu.com/p/138818311


