Vue 技术的小技巧
-
Vue 项目开发中经常遇到事件阻止冒泡的需求。在传统的写法上就是调用
event.preventDefault()、event.stopPropagation()。尽管我们可以在 methods 里面这样写,但是更好的规范是:methods 只做数据的逻辑处理,而不是去处理 DOM 相关的细节(阻止事件冒泡) -
为了解决这个问题, Vue 为 v-on 提供了事件修饰符。通过
.表示的指令后缀来调用修饰符
- .stop
- .prevent
- .capture
- .self
- .once
...


...
- 给 props 属性设置多个类型
props 在开发组件的时候几乎是必用,为了更好的容错处理,比如给自定义的 button 上暴露一个 width 属性
flexiable-button
export default {
prop: {
width: [String, Number],
default: '100px'
},
computed: {
computedWidth () {
let attr = {}
if (typeof this.width === 'String') {
attr.width = this.width
}
if (typeof this.width === 'Number') {
attr.width = this.width + 'px'
}
return attr
}
}
}
在其他组件里面使用
  按钮1
  按钮2
- data 初始化
因为 props 要比 data 先初始化完成,所以我们可以用 props 对 data 完成初始化操作
export default {
  data () {
    return {
      buttonSize: this.size
    }
  },
  props: {
    size: String
  }
}
除了以上,子组件的 data 函数还可以有参数(当前实例对象),我们可以用这一点做一些自己的判断
export default {
  data (vm) {
    return {
      buttonSize: vm.size
    }
  },
  props: {
    size: String
  }
}
- template
我们经常需要条件渲染或者循环展示,当 v-for 遇上 v-if 会结合产生什么故事呢?
之前有一个需求,在个人中心模块展示「收藏列表」。收藏列表分为很多类:公司、个人、商品、类别等等。当用户点击某个大的类别的时候再去展示相应的列表。当然想到的是 v-for 和 v-if。但是当直接操作 ul 加上 v-if 和 v-for 之后发现结果并不符合预期,最后想到的是 template。这样子解决了我们的需求
        法定代表人:{ {item.legal_person} }


        注册资本:{ {item.register_capital} }万元


        注册类别:{ {item.category} }


        注册等级:{ {item.level} }
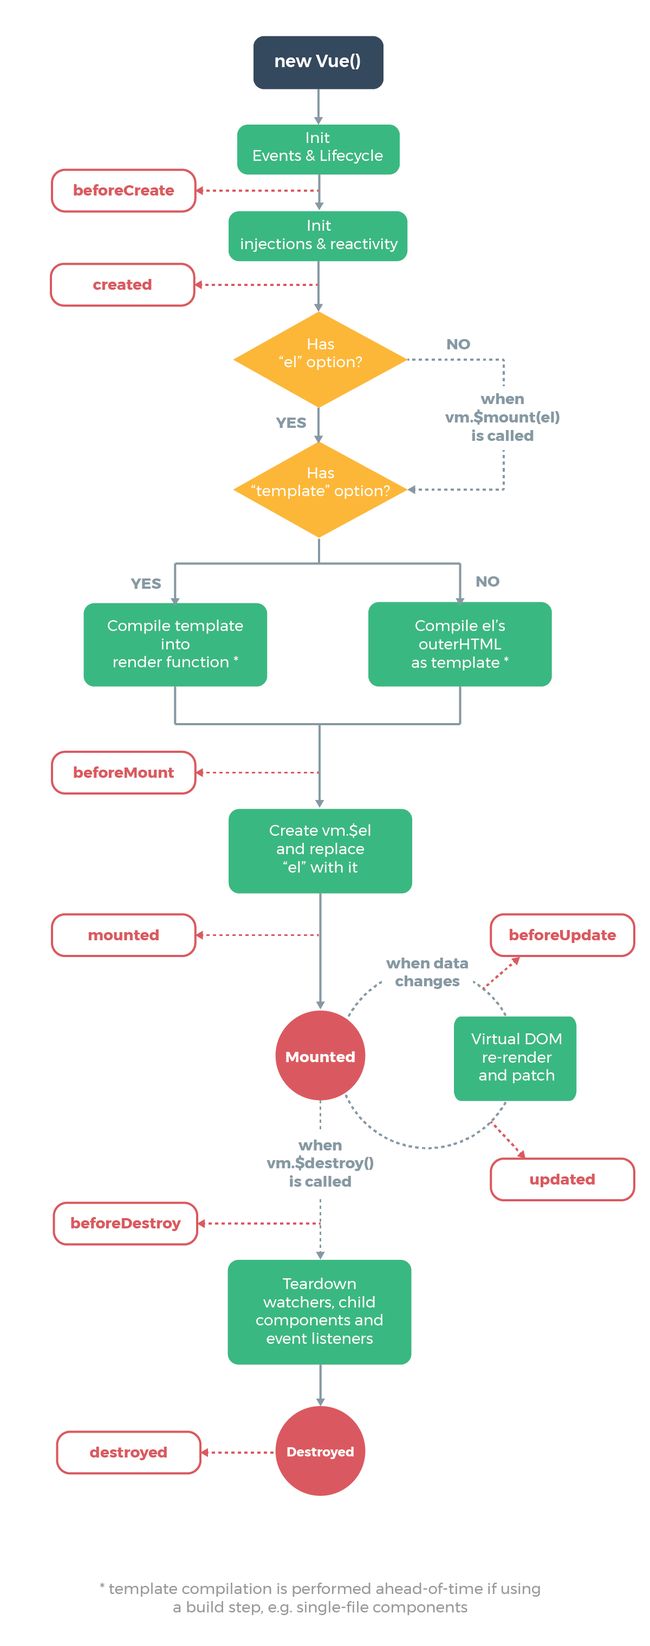
- lifecyele hook
-
生命周期钩子可以是一个数组类型,且数组中的函数会依次执行
-
生命周期的钩子函数还可以作用于 DOM 元素上,利用这一点,我们可以用父组件中的方法来初始化子组件的生命周期钩子
下面的例子结合了上面2个知识点
company-basic-info.vue子组件
created: [
  function callA () {
    console.log('子组件-callA')
  },
  function callB () {
    console.log('子组件-callB')
  },
  function callC () {
    console.log('子组件-callC')
  }
]
company-detail.vue父组件
子组件-callA
company-basic-info.vue?58e9:85 子组件-callB
company-basic-info.vue?58e9:88 子组件-callC
company-detail.vue?8308:103 我观察到子组件创建了
7.render 函数
    title
    this is content
用 render 函数实现
export default {
  render (h) {
    let _c = h
    return _c('div',
      { class: 'box'},
      [_c('h2', {}, 'title'), 'this is content'])
  }
}
事实上,Vue 会把模版(template)编译成渲染函数(render)。上面的模版会被编译成类似下面的渲染函数
let render = function () {
  return _c('div',
    {staticClass:"box"},
    [_c('h2', [_v("title")]), _v("this is content")])
}
官方解释说 render 函数比 template 更加接近编译器。
template -> 预编译工具(vue-loader、vue-template-compile)-> render -> resolve vnode
渲染函数的好处:
- errorCaptured
它会在捕获一个来自子孙组件的错误时被调用。有时候我们想收集错误日志,却不想把错误信息暴露到浏览器控制台,利用它可以实现。
company-basic-info.vue子组件报错
mounted () {
  this.$nextTick(() => {
    consol.log('我是故意发生的错误')
  })
}
company.vue父组件拦截到错误
methods: {
  errorCaptured (err, vm, info) {
    console.log(err)
    console.log(vm)
    console.log(info)
    //return false
    //不 return false 的话报错信息继续向上冒泡
  }
}
App.vue拦截错误
errorCaptured (err, vm, info) {
  console.log('AppVue' + err)
  console.log('vm' + vm)
  console.log('info' + info)
}
- v-once
v-once 创建低开销的静态组件。渲染普通的 HTML 元素在 Vue 中是非常快的,但是有的时候你可能需要一个包含了大量内容的组件。你可以在根元素上添加 v-once 特性以确保这些内容只计算了一次然后缓存起来。
...
- slot-scope
作用域插槽,当我们用过很多框架就知道很多设计的第三方组件都支持插槽。用户可以插入自定义的 HTML 内容来自定义使用。
插槽也就是 slot,是组件的一块 HTML 模版,这块模版的显不显示、以及怎样显示由父组件决定。所以 slot 关心的问题是「显示不显示」、「怎样显示」
由于插槽是一块模版,所以从模版种类划分为为:非插槽模版、插槽模版
-
非插槽模版指的是 HTML 模版,指的是 ‘div、span、ul、table’ 这些,非插槽模版的显示与隐藏以及怎样显示由插件自身控制
-
插槽模版也就是 slot,是一个空壳子,因为它的显示于隐藏以及最后用什么样的 HTML 模版显示由父控件自身控制。但是插槽的显示位置却由子组件自身决定, slot 写的组件 template 的哪块,父组件传过来的模版将来就显示在哪块。
单个插槽 | 默认插槽 | 匿名插槽
单个插槽是 Vue 官方的叫法,但其实它也被叫做「默认插槽」。与「具名插槽」相对应。我们可以叫做「匿名插槽」,因为它不用设置 name 属性
单个插槽可以放在组件的任何位置。但是见名知意,一个组件中只可以存在一个匿名插槽。相对应具名插槽就可以有很多个,但是必须设置名字(name属性)不同就可以了。
父组件
    这是父组件


        iOS
        Web
        Vue
子组件
这里是子组件
在父组件里面写了 html 模版所哟子组件匿名插槽这块模版被使用了。最终结果

具名插槽
匿名插槽没有设置 name 属性,所以是匿名插槽。那么插槽添加了 name 属性,那么就变成了「具名插槽」。具名插槽可以在一个组件中出现 n次。
父组件
这里是父组件
菜单1
菜单2
菜单3
菜单4
菜单5
菜单6
菜单-1
菜单-2
菜单-3
菜单-4
菜单-5
菜单-6
菜单->1
菜单->2
菜单->3
菜单->4
菜单->5
菜单->6
子组件
// 具名插槽
这里是子组件
// 具名插槽
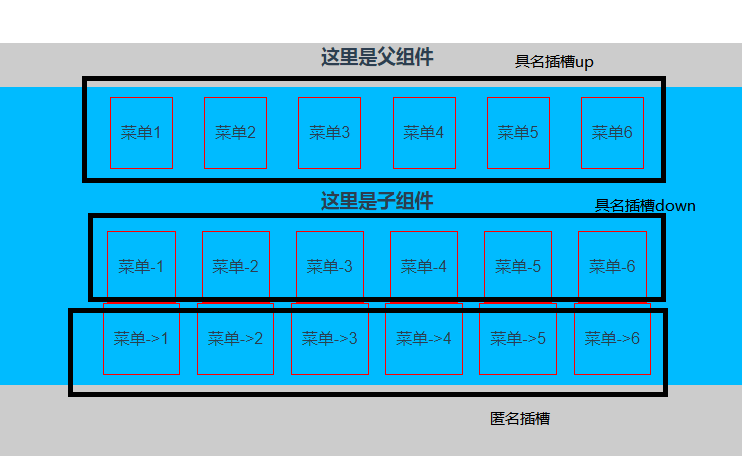
父组件通过 html 模版上的 slot 属性关联具名插槽,没有 slot 属性的 html 模版默认关联匿名插槽
作用域插槽 | 带数据的插槽
Vue 官方叫做作用域插槽。对比前面几种情况我们可以叫做「带数据的插槽」。作用域插槽要求在 slot 上面绑定数据
- 组件之间的通信
- 父->子组件之间的通信
父向子组件传递数据通过 props
//父
- 子->父组件之间的通信
通过 $emit 和 $on 传递数据
//父
- 非父子组件
可以通过一个空的 Vue 实例作为中央事件总线(也可以使用当前的 App 实例,不需要额外创建)
方式1
import Vue from 'Vue'
export default new Vue()
方式2
window.VueInstance = new Vue({
el: '#app',
router,
store,
components: { App },
template: '
- 路由切换判断是否需要登录
我们在做前端项目的时候经常需要添加路由设置。其中有个需求就是当你可能跳转一个页面的时候需要判断用户是否登录,如果登录的话直接跳转,未登录先跳转到登录页。
我们可能想到的是监听 Router 的变化,在跳转前判断,如果用户是登录状态直接跳转;用户未登录状态则先跳转到登陆页,登录成功后回退到之前的页面。
Vue 的 router 已经提供了这样的功能
- 在 main.js 里面添加监听、判断的逻辑
/* 控制判断哪些页面需要用户登录才可以访问 */
router.beforeEach((to, from, next) => {
if (to.matched.some(record => record.meta.requireAuth)) {
if (!window.VueInstance.$store.getters.getUserInfo) {
next({
path: '/Auth/login',
query: {redirect: to.fullPath} // 将跳转的路由path作为参数,登录成功后跳转到该路由
})
} else {
if (!window.VueInstance.$store.getters.getUserInfo.uid && !window.VueInstance.$store.getters.getUserInfo.token) {
next({
path: '/Auth/login',
query: {redirect: to.fullPath} // 将跳转的路由path作为参数,登录成功后跳转到该路由
})
} else {
next()
}
}
} else {
next()
}
})
- 在 router 的 index.js 里面为需要登录才可以访问的页面添加配置项
let routes = [
{ path: '/SearchCompany', name: 'SearchCompany', component: SearchCompany, meta: {requireAuth: true} },
//...
]
- 在登录页为登录成功后做判断处理
if (this.$route.query.redirect) {
this.$router.push({path: this.$route.query.redirect})
} else {
this.$router.push({path: '/' })
}
- Vue 上传文件
if (document.getElementById("bidFile").files[0]) {
const formData = new FormData()
formData.append('file', document.getElementById("bidFile").files[0])
formData.append('uid', this.$store.getters.getUserInfo.uid)
formData.append('token', this.$store.getters.getUserInfo.token)
formData.append('project_id', this.project_id)
let loader = this.$loading.show({
loader: 'dots',
container: this.fullPage ? null : this.$refs.formContainer,
canCancel: true,
onCancel: this.onCancel,
})
fetch.bhfilepost('order/upBidingFile',formData).then((res) => {
loader.hide()
if (res.status !== -404) {
this.selectedProjectInfo = res.data.data
}
})
}
//fetch.js
bhfilepost (url, params) {
Axios.defaults.baseURL = 'https://bh.datacubr.com'
params['key'] = key
return Axios({
method: 'post',
url,
data: params,
headers: {
'Content-Type': ' multipart/form-data'
}
}).then((response) => {
return checkStatus(response)
}).then((res) => {
return checkCode(res)
})
},
- Vue 以base64形式下载pdf/压缩包也可以
压缩包的话,content-type 设置为 type: "application/zip"
base64ToArrayBuffer(data) {
let binaryString = window.atob(data)
let binaryLen = binaryString.length
let bytes = new Uint8Array(binaryLen)
for (let i = 0; i < binaryLen; i++) {
let ascii = binaryString.charCodeAt(i)
bytes[i] = ascii
}
return bytes
}
handleDownload (filename, operationname) {
let loader = this.$loading.show({
loader: 'dots',
container: this.fullPage ? null : this.$refs.formContainer,
canCancel: true,
onCancel: this.onCancel,
})
fetch.bhpost('document/templateTmp',{
type: operationname,
uid: this.$store.getters.getUserInfo.uid,
token: this.$store.getters.getUserInfo.token,
order_no: this.order_no
}).then((res) => {
loader.hide()
if (res.status === 200) {
var arrBuffer = this.base64ToArrayBuffer(res.data.data.info)
// It is necessary to create a new blob object with mime-type explicitly set
// otherwise only Chrome works like it should
var newBlob = new Blob([arrBuffer], { type: "application/pdf" })
// IE doesn't allow using a blob object directly as link href
// instead it is necessary to use msSaveOrOpenBlob
if (window.navigator && window.navigator.msSaveOrOpenBlob) {
window.navigator.msSaveOrOpenBlob(newBlob)
return
}
// For other browsers:
// Create a link pointing to the ObjectURL containing the blob.
var data = window.URL.createObjectURL(newBlob)
var link = document.createElement('a')
document.body.appendChild(link) //required in FF, optional for Chrome
link.href = data
link.download = filename + ".pdf"
link.click()
window.URL.revokeObjectURL(data)
link.remove()
}
})
},
- 推荐几个好用的库
最近用 Vue 全家桶和 Bootstrap-Vue 框架做了一版网站。所以有一些好用的包或者组件分享一下。
- cxlt-vue2-toastr
说明:cxlt-vue2-toastr是弹出提示的Vue2组件,基于toastr的样式和animate.css的动画效果。
- vue-photo-preview
说明:可以全屏、切换、预览、文字说明的图片查看器
- animate.css
说明:基本上 JS 可以实现的动画效果基本都可以实现。蛮强大的
- axios
说明:支持 promise、可以跑在浏览器和 Node 环境、可以拦截请求和响应头
- vee-validate
说明:一个校验的包,内置蛮多规则,你也可以自定义,支持国际化