ESP32-WROVER-DEV + W5500有线网络客户端实现
实验目的:ESP32-WROVER-DEV + W5500 客户端有线网络通讯。
开发环境:Arduino2.2.1
实验结果:PC和ESP32之间互相传输数据,ping通。
一. 硬件连接:
- ESP32 USB连接PC, PC对应的串口COM12;
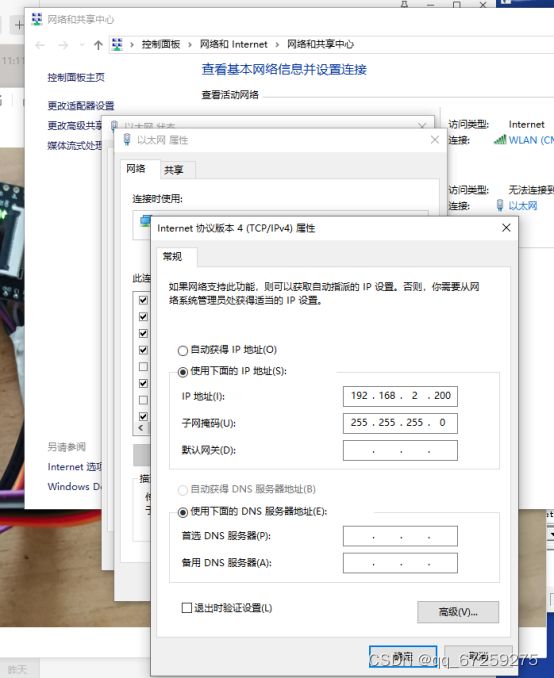
- W5500 网线连接PC,PC对应的网卡设置为:192.168.2.200;
- ESP32和W5500的连接,杜邦线连接如下:
ESP32-12 --> MISO-W5500,
ESP32-13 --> MOSI-W5500,
ESP32-33 --> SCS -W5500,
ESP32-14 --> SCLK-W5500,
二. 代码修改
见网络示例程序:
C:\Users\**userName**\AppData\Local\Arduino15\libraries\Ethernet\examples\WebClientRepeating
在这个示例基础上修改代码。
第一步:修改SPI.H
(C:\Users\**userName**\AppData\Local\Arduino15\packages\esp32\hardware\esp32\2.0.9\libraries\SPI\src\SPI.h)
在文件开始添加如下SCK,MISO,MOSI,SS的定义:
#ifndef _SPI_H_INCLUDED
#define _SPI_H_INCLUDED

#include
#include "pins_arduino.h"
#include "esp32-hal-spi.h"
#include "freertos/FreeRTOS.h"
#include "freertos/semphr.h"

#define SPI_HAS_TRANSACTION

#define SCK 14
#define MISO 12
#define MOSI 13
#define SS 33
第二步:工程完整代码如下(WebClientRepeating.ino)
#include
#include

#define LED_BUILTIN 2
//#define SCK 14
//#define MISO 12
//#define MOSI 13
//#define SS 33

// assign a MAC address for the Ethernet controller.
// fill in your address here:
byte mac[] = {
  0xDE, 0xAD, 0xBE, 0xEF, 0xFE, 0xED
};
// Set the static IP address to use if the DHCP fails to assign
IPAddress ip(192, 168, 2, 177);
IPAddress myDns(192, 168, 2, 1);

// initialize the library instance:
EthernetClient client;

//char server[] = "www.arduino.cc";  // also change the Host line in httpRequest()
//IPAddress server(64,131,82,241);
IPAddress server(192,168,2,200);

unsigned long lastConnectionTime = 0;           // last time you connected to the server, in milliseconds
const unsigned long postingInterval = 10*1000;  // delay between updates, in milliseconds

unsigned long lastFlashLedTime = 0;
short serverPort = 8080;

void setup() {
  delay(4000);
  pinMode(LED_BUILTIN, OUTPUT);
  // You can use Ethernet.init(pin) to configure the CS pin
  //Ethernet.init(10);  // Most Arduino shields
  //Ethernet.init(5);   // MKR ETH Shield
  //Ethernet.init(0);   // Teensy 2.0
  //Ethernet.init(20);  // Teensy++ 2.0
  //Ethernet.init(15);  // ESP8266 with Adafruit FeatherWing Ethernet
  //Ethernet.init(33);  // ESP32 with Adafruit FeatherWing Ethernet
  Ethernet.init(33); // CS/SS pin == 33

  // start serial port:
  Serial.begin(115200);//Serial.begin(9600);
  while (!Serial) {
    ; // wait for serial port to connect. Needed for native USB port only
  }

  // start the Ethernet connection:
  Serial.println("Initialize Ethernet with DHCP:");
  if (Ethernet.begin(mac) == 0) {
    Serial.println("Failed to configure Ethernet using DHCP");
    // Check for Ethernet hardware present
    if (Ethernet.hardwareStatus() == EthernetNoHardware) {
      Serial.println("Ethernet shield was not found.  Sorry, can't run without hardware. :(");
      while (true) {
        delay(1); // do nothing, no point running without Ethernet hardware
      }
    }
    if (Ethernet.linkStatus() == LinkOFF) {
      Serial.println("Ethernet cable is not connected.");
    }
    // try to configure using IP address instead of DHCP:
    Ethernet.begin(mac, ip, myDns);
    Serial.print("My IP address: ");
    Serial.println(Ethernet.localIP());
  } else {
    Serial.print("  DHCP assigned IP ");
    Serial.println(Ethernet.localIP());
  }
  // give the Ethernet shield a second to initialize:
  delay(1000);
}

void loop() {
  // if there's incoming data from the net connection.
  // send it out the serial port.  This is for debugging
  // purposes only:
  if (client.available()) {
    char c = client.read();
    Serial.write(c);
  }

  // if ten seconds have passed since your last connection,
  // then connect again and send data:
  if (millis() - lastConnectionTime > postingInterval) {
    httpRequest();
  }
  if (millis() - lastFlashLedTime > 5000) {
    lastFlashLedTime =millis();
    digitalWrite(LED_BUILTIN, !digitalRead(LED_BUILTIN));
  }
}

// this method makes a HTTP connection to the server:
void httpRequest() {
  // close any connection before send a new request.
  // This will free the socket on the Ethernet shield
  client.stop();

  // if there's a successful connection:
  if (client.connect(server, serverPort)) {
    Serial.println("connecting...");
    // send the HTTP GET request:
    client.println("GET /latest.txt HTTP/1.1");
    client.println("Host: www.arduino.cc");
    client.println("User-Agent: arduino-ethernet");
    client.println("Connection: close");
    client.println();

    // note the time that the connection was made:
    lastConnectionTime = millis();
  } else {
    // if you couldn't make a connection:
    Serial.println("connection failed");
  }
}
结果测试
通讯连接测试ping:
数据收发测试,使用USR-TCP232-Test.exe 串口网络调试助手:
ESP32连接过来后,在网络数据发送区填入“hello1”,发送出去;
在串口数据接收,可以看到“hello1”。


