AJAX的原理(重点)
◆ XMLHttpRequest
-
什么是XMLHttpRequest?
定义:
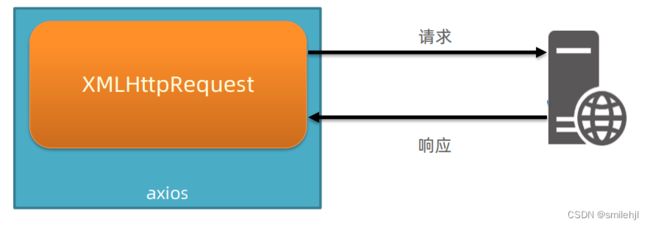
关系:axios 内部采用 XMLHttpRequest 与服务器交互
注意:直白点说就是axios内部就是封装了XMLHttpRequest这个对象来实现发送异步请求的
-
使用 XMLHttpRequest
步骤:
1. 创建 XMLHttpRequest 对象
2. 配置请求方法和请求 url 地址
3. 监听 loadend 事件,接收响应结果
4. 发起请求
1.无参数的情况
获取并展示所有省份名字
  //1. 创建 XMLHttpRequest 对象
    const xhr = new XMLHttpRequest()
    //2. 配置请求方法和请求 url 地址
    xhr.open('GET','http://hmajax.itheima.net/api/province')
    //3. 监听 loadend 事件,接收响应结果
    xhr.addEventListener('loadend',function(){
      console.log(xhr.response);
      const rs = JSON.parse(xhr.response)
      console.log(rs.list.join('
'));
      document.querySelector('p').innerHTML = rs.list.join('
')
    })
    //4. 发起请求
    xhr.send()
2.有URL查询参数的情况
- 使用字符串拼接
- 使用浏览器提供的内置对对象 URLSearchParams
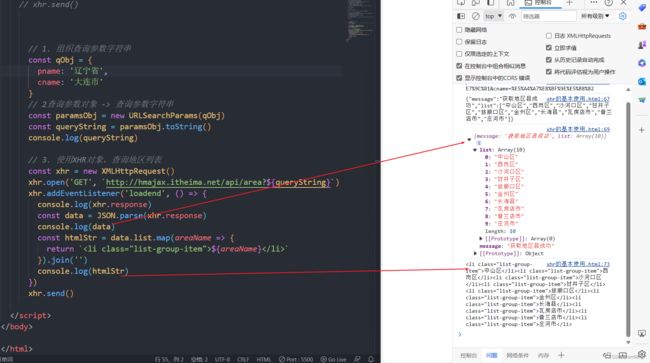
// 1. 组织查询参数字符串
const qObj = {
pname: '辽宁省',
cname: '大连市'
}
// 2查询参数对象 -> 查询参数字符串
const paramsObj = new URLSearchParams(qObj)
const queryString = paramsObj.toString()
console.log(queryString)
// 3. 使用XHR对象,查询地区列表
const xhr = new XMLHttpRequest()
xhr.open('GET', `http://hmajax.itheima.net/api/area?${queryString}`)
xhr.addEventListener('loadend', () => {
console.log(xhr.response)
const data = JSON.parse(xhr.response)
console.log(data)
const htmlStr = data.list.map(areaName => {
return `${areaName} `
}).join('')
console.log(htmlStr)
})
xhr.send()3.以请求体(JSON)的方式发送数据的情况
需求:通过 XHR 提交用户名和密码,完成注册功能
核心:
请求头设置 Content-Type:application/json
请求体携带 JSON 字符串
       /**
     * 目标:使用xhr进行数据提交-完成注册功能
    */
    document.querySelector('.reg-btn').addEventListener('click', () => {
      const xhr = new XMLHttpRequest()
      xhr.open('POST', 'http://hmajax.itheima.net/api/register')
      xhr.addEventListener('loadend', () => {
        console.log(xhr.response)
      })

      // 设置请求头-告诉服务器内容类型(JSON字符串)
      xhr.setRequestHeader('Content-Type', 'application/json')
      // 准备提交的数据
      const userObj = {
        username: 'itheima007',
        password: '7654321'
      }
      //将对象转化成JSON字符串
      const userStr = JSON.stringify(userObj)
      // 设置请求体,发起请求
      xhr.send(userStr)
    })
总结:
. AJAX 原理是什么?
- ➢ XMLHttpRequest 对象
2. 为什么学习 XHR?
- ➢ 有更多与服务器数据通信方式
- ➢ 了解 axios 内部原理
3. XHR 使用步骤?
- ➢ 创建 XHR 对象
- ➢ 调用 open 方法,设置 url 和请求方法
- ➢ 监听 loadend 事件,接收结果
- ➢ 调用 send 方法,发起请求
4.上传图片等二进制的情况
 //4  上传图片等二进制的情况
     //1. 获取图片文件
     document.querySelector('.upload').addEventListener('change',(e)=>{
        //  console.log(e.target.files);
        //2. 使用 FormData 携带图片文件
        const fd = new FormData()
        // append()  追加元素
        fd.append('img',e.target.files[0])

        //3 使用XmlHttpRequest提交数据
        const xhr = new XMLHttpRequest()
        //设置方法和url
        xhr.open('POST','http://hmajax.itheima.net/api/uploadimg')
        //设置回调函数
        xhr.addEventListener('loadend',function(){
            console.log(xhr.response);  //这里不是一个对象,是字符串
            console.log(JSON.parse(xhr.response));
            document.querySelector('img').src = JSON.parse(xhr.response).data.url

        })
        xhr.send(fd)
    })
◆ Promise
什么是 Promise?
- 表示(管理)一个异步操作最终状态和结果值的对象
定义:
Promise 使用步骤
Promise - 三种状态
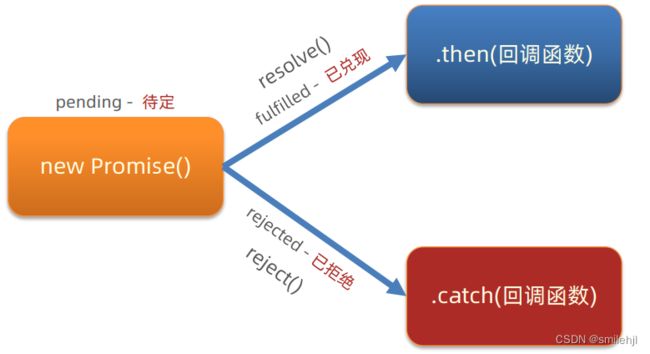
概念:一个Promise对象,必然处于以下几种状态之一
- 待定(pending) :初始状态,既没有被兑现,也没有被拒绝
- 已兑现(fulfilled) :意味着,操作成功完成
- 已拒绝(rejected) :意味着,操作失败
注意:Promise对象一旦被兑现/拒绝 就是已敲定了,状态无法再被改变
案例_使用Promise+XHR_获取省份列表
总结
◆ 封装简易版 axios
function myAxios(config) {
  return new Promise((resolve, reject) => {
    const xhr = new XMLHttpRequest()
    if (config.params) {
      const paramsObj = new URLSearchParams(config.params)
      const queryString = paramsObj.toString()
      config.url += `?${queryString}`
    }
    xhr.open(config.method || 'GET', config.url)
    xhr.addEventListener('loadend', () => {
      if (xhr.status >= 200 && xhr.status < 300) {
        resolve(JSON.parse(xhr.response))
      } else {
        reject(new Error(xhr.response))
      }
    })
    if (config.data) {
      const jsonStr = JSON.stringify(config.data)
      xhr.setRequestHeader('Content-Type', 'application/json')
      xhr.send(jsonStr)
    } else {
      xhr.send()
    }
  })
}
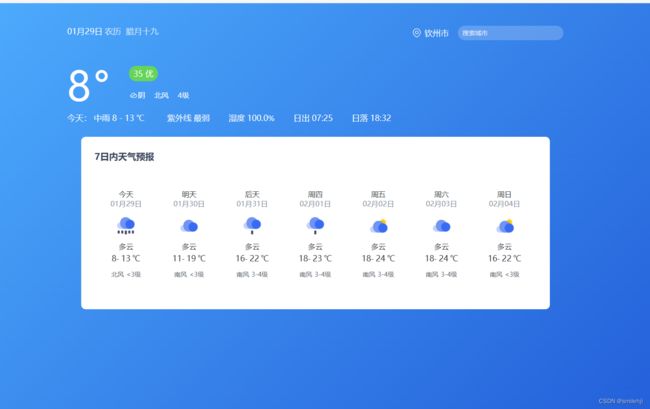
◆ 案例 - 天气预报
步骤:
1. 获取北京市天气数据,展示
2. 搜索城市列表,展示
3. 点击城市,显示对应天气数据
案例_天气预报
10月28日
农历
十月初四
 城市名
城市名
- 北京市
12
°
55
良
-
 多云
多云
- 东南风
- 2级
今天:
晴
9
-
14
℃
-
紫外线
强
-
湿度
53%
-
日出
06:38
-
日落
17:18
7日内天气预报
-
今天
10月28日
 多云
12-
12
℃
东南风
<3级
-
今天
10月28日
 多云
12-
12
℃
东南风
<3级
-
今天
10月28日
 多云
12-
12
℃
东南风
<3级
-
今天
10月28日
 多云
12-
12
℃
东南风
<3级
-
今天
10月28日
 多云
12-
12
℃
东南风
<3级
-
今天
10月28日
 多云
12-
12
℃
东南风
<3级
-
今天
10月28日
 多云
12-
12
℃
东南风
<3级


