Qt简单串口助手
自己对嵌入式和物联网方向比较感兴趣,参加了一个小比赛使用ht32单片机做一个简单的智能家居demo,就尝试写一个串口助手可以对板子进行调试。
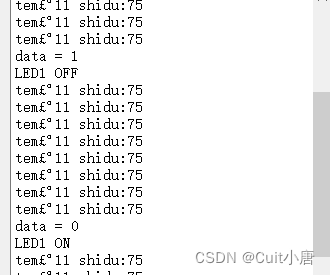
demo结果:
将单片机测量到的温湿度打印到串口助手,串口发送1和0控制单片机LED1的亮灭。最后也是基本成功,但是无法识别中文和空格等字符,可以进一步进行优化处理。
实现步骤
1.需求分析
实现基本串口收发功能,需要串口搜索、基本参数的设置等。
2.UI界面构建
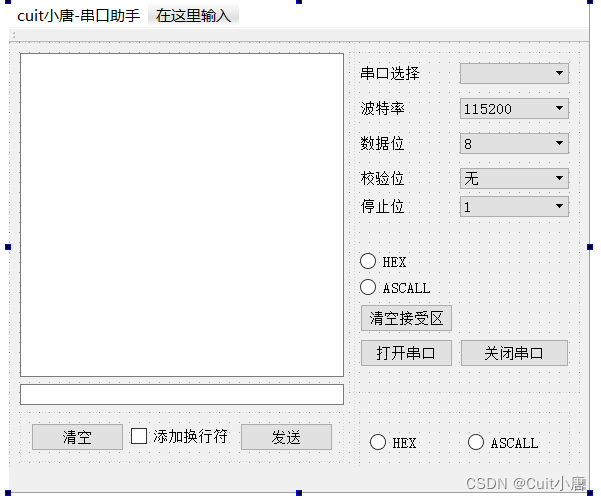
在qt的ui界面对串口助手进行设计,如下(其实应该使用widget,但是我创建项目时选择了mainwindow,无伤大雅 这里的HEX和ASCALL我用的是radioButton,没有使用group,但是只需要在初始化时进行一个默认选择即可。):
3. 代码实现
这里因为需要使用串口,所以需要在过程文件中加入串口需要的serialport
串口搜索即获取所有的可用串口:
//获取列表
QStringList MainWindow::getPortNameList()
 {
    QStringList serialPortName;
    foreach(const QSerialPortInfo &info,QSerialPortInfo::availablePorts()) //查找所有的允许使用的串口
    {
       m_serialPortName << info.portName(); //将查找到的放入LIST
       qDebug() <comboBox->addItems(m_serialPortName);//添加到显示界面

    return  serialPortName;
 }
打开串口按钮功能:这里点击打开按钮,便会根据上面选择的参数进行相应的处理,对串口进行设置,同时里面绑定了两个槽函数,读取串口的信息以及显示的跟新。
void MainWindow::on_open_port_clicked()
{
        m_serialPort = new QSerialPort();//实例化串口类一个对象

        if(m_serialPort->isOpen())//如果串口已经打开了 先给他关闭了
        {
            m_serialPort->clear();
            m_serialPort->close();
        }

        //设置串口名字 假设我们上面已经成功获取到了 并且使用第一个
        m_serialPort->setPortName(ui->comboBox->currentText());

        if(!m_serialPort->open(QIODevice::ReadWrite))//用ReadWrite 的模式尝试打开串口 读写
        {
            qDebug()<comboBox->currentText() << " 打开失败!";
            return;
        }
        //打开成功

        //设置波特率 只做了两个最常用的
        if(ui->comboBox_2->currentText() == tr("9600"))//根据组合框内容对串口进行设置
           m_serialPort->setBaudRate(QSerialPort::Baud9600,QSerialPort::AllDirections);//设置波特率和读写方向
        else if(ui->comboBox_2->currentText() == tr("115200"))
           m_serialPort->setBaudRate(QSerialPort::Baud115200,QSerialPort::AllDirections);//设置波特率和读写方向

        //设置数据位
        if(ui->comboBox_3->currentText() == tr("8"))
           m_serialPort->setDataBits(QSerialPort::Data8);		//数据位为8位
        else if(ui->comboBox_3->currentText() == tr("7"))
           m_serialPort->setDataBits(QSerialPort::Data7);		//数据位为8位

        //设置奇偶校验
        if(ui->comboBox_4->currentText() == tr("无"))
            m_serialPort->setParity(QSerialPort::NoParity);	//无校验位
        else if(ui->comboBox_5->currentText() == tr("奇校验"))
            m_serialPort->setParity(QSerialPort::OddParity);	//奇校验位
        else if(ui->comboBox_5->currentText() == tr("偶校验"))
            m_serialPort->setParity(QSerialPort::EvenParity);	//偶校验位


        //设置停止位
        if(ui->comboBox_5->currentText() == tr("1"))
           m_serialPort->setStopBits(QSerialPort::OneStop); //一位停止位
        else if(ui->comboBox_5->currentText() == tr("2"))
           m_serialPort->setStopBits(QSerialPort::TwoStop); //两位停止位

        m_serialPort->setFlowControl(QSerialPort::NoFlowControl);//无流控制


        //连接信号槽 当下位机发送数据QSerialPortInfo 会发送个 readyRead 信号,我们定义个槽readMycom()
            connect(m_serialPort,SIGNAL(readyRead()),this,SLOT(readMycom()));
            //值改变
            connect(ui->receiveText,SIGNAL(textChanged()),this,SLOT(autoScroll()));

            ui->open_port->setEnabled(false); //打开串口后“打开串口”按钮不可用

            ui->close_port->setEnabled(true); //打开串口后“关闭串口”按钮可用

            ui->btn_send->setEnabled(true); //打开串口后“发送数据”按钮可用

             ui->btn_clc1->setEnabled(true);//清空按钮
              ui->btn_clc2->setEnabled(true);//清空按钮

            ui->comboBox_2->setEnabled(false); //设置combox不可用
            ui->comboBox_3->setEnabled(false);
            ui->comboBox_4->setEnabled(false);
            ui->comboBox_5->setEnabled(false);
            ui->comboBox->setEnabled(false);
}
界面刷新
//自动刷新界面显示信息,向下面滚动
void MainWindow::autoScroll()
{
    QTextCursor cursor  = ui->receiveText->textCursor();
    cursor.movePosition(QTextCursor::End);
    ui->receiveText->setTextCursor(cursor);
}
读取串口:这里的两种模式是网上比较通用的两种,于是在这里进行了判断,这段函数是后面进行完善的。
void MainWindow::readMycom(void) //读串口函数
{
 QBAtemp = m_serialPort->readAll();
 Qstrtemp.clear();
 qDebug() <<"read mycom";
 for(int j = 0 ; j < QBAtemp.length();j++)
      Qstrtemp += QBAtemp[j];

 if(recvmodel == ASCII)//ASCII码 其实是string类型
 {
      ui->receiveText->moveCursor(QTextCursor::End);
      ui->receiveText->insertPlainText(Qstrtemp);
      //ui->textBrowser->append(Qstrtemp);
      qDebug() << "ASCII :" << Qstrtemp;
 }
 else
 {
      ui->receiveText->append(StringtoHex(Qstrtemp));
      qDebug() << "HEX :" << StringtoHex(QString(Qstrtemp));
 }

 qDebug() << Qstrtemp << ":" << Qstrtemp.length();
}
到这一步其实已经可以接收单片机传递过来的信息了,默认的string类型可以直接显示
关闭串口
void MainWindow::on_close_port_clicked()
{
    m_serialPort->close();

    ui->open_port->setEnabled(true); //打开串口后“打开串口”按钮不可用

    ui->close_port->setEnabled(false); //打开串口后“关闭串口”按钮不可用

    ui->btn_send->setEnabled(false); //打开串口后“发送数据”按钮不可用

    ui->btn_clc1->setEnabled(false);

    ui->comboBox_2->setEnabled(true); //设置combox可用
    ui->comboBox_3->setEnabled(true);
    ui->comboBox_4->setEnabled(true);
    ui->comboBox_5->setEnabled(true);
    ui->comboBox->setEnabled(true);
}
ASCALL 转 HEX :勾选之后再进行处理即可
QString MainWindow::StringtoHex(QString buf)
{
  QString sret;
  QByteArray Qba = buf.toLatin1();
  QDataStream out(&Qba,QIODevice::ReadWrite);

  while(!out.atEnd())
  {
      qint8 outchar = 0;
      out >> outchar;

      QString str = QString("%1").arg(outchar & 0xFF,2,16,QLatin1Char('0')).toUpper() + QString(" ");

      sret += str;
  }

   return sret;
}
HEX 转 ASCALL 勾选之后再进行处理即可
QString MainWindow::HextoString(QString buf)
{
    QByteArray ret;
    QString    Qstr;
    bool ok;
    buf = buf.trimmed();
    buf = buf.simplified();

    QStringList sl = buf.split(" ");

    foreach(QString s,sl)
    {
        if(!s.isEmpty())
        {
            char c = s.toInt(&ok,16) & 0xFF;
            if(ok){
                ret.append(c);
            }
            else
            {
                qDebug() << "非法字符";
            }

        }

    }

    for(int i = 0 ; i < ret.length();i++)
         Qstr += ret[i];

    return Qstr;

}
发送功能:调用write函数即可,这里判断是否选择换行
void MainWindow::on_btn_send_clicked()
{
    if(sendmodel == ASCII)
    {
        if(ui->checkBox->checkState() == Qt::Checked)
        {
            Qstrtemp = ui->sendText->text() + "\r\n";
        }
        else
           Qstrtemp = ui->sendText->text();

       m_serialPort->write(Qstrtemp.toLatin1(),Qstrtemp.length());
    }
    else
    {
        if(ui->checkBox->checkState() == Qt::Checked)
        {
            Qstrtemp = ui->sendText->text() + "0D 0A";
        }
        else
            Qstrtemp = ui->sendText->text();

        qDebug() <<"666" +Qstrtemp;
       qDebug() <<"666" +HextoString(Qstrtemp);
       m_serialPort->write(HextoString(Qstrtemp).toLatin1(),HextoString(Qstrtemp).length());
    }
}
清除功能:简单,直接把界面清空即可
至此,串口助手设计结束

