单元测试实践
一、写在开始写单元测试前
1.1 背景
- 我们开发都知道单元测试的重要性,而且每个开发都有要写单元测试的意识
- 单元测试和代码编写结构息息相关,业界常用专业名词TDD(测试驱动开发),言外之意我们开始编写代码的时候就已经想好单元测试应该怎么写
- 单元测试并不只是为了验证你当前所写的代码是否存在问题,更为重要的是它可以很大程度的保障日后因业务变更、修复Bug或重构等引起的代码变更而导致(或新增)的风险
- 单元测试,并非大家不愿意写,一者因为我们的编码氛围没有单元测试的要求,再者我们的框架、我们的环境让我们不知道怎么快速高效地编写单元测试
- 单元测试可以提高我们对代码结构的设计能力,更加关注代码结构的高内聚、低耦合特性,对我们的产品代码维护、我们的技术提升皆有裨益
非常有意思的一段话:
1.2 TestNG VS Junit4
我们用得最多的基本单元测试框架是junit和testng,下面对这两个工具做个对比。
-
功能比较
-
注解支持
通过上面的对比可以看出,TestNG作为Java项目的单元测试框架是更有优势的,TestNG在参数化测试、依赖测试、套件测试、分组测试、并发测试等方面都比Junit4强,同时,TestNG涵盖了JUnit4的全部功能。
所以下面的案例说明都是基于TestNG来写的。
二、如何写第一个单元测试
2.1 示例
为方便对后面内容的理解,先写一个单元测试:
为方便理解,粘贴一份出来RSAUtilsTest:
package com.allawn.athletic.board.server.util;
import com.allawn.athletic.board.server.TestMain;
import com.allawn.athletic.board.server.config.PropertyManager;
import org.springframework.beans.factory.annotation.Autowired;
import org.springframework.boot.autoconfigure.EnableAutoConfiguration;
import org.testng.Assert;
import org.testng.annotations.Test;
/**
 * Create by 80119435 Lemon
 * on 2021/2/2 16:08
 **/
@EnableAutoConfiguration
public class RSAUtilsTest extends TestMain {
    /**
     * PropertyManager 有配置中心的注解 @HeraclesDynamicConfig
     * 所以,必须要启动spring容器,并启动配置中心:
     *
     *
     * com.oppo.basic.heracles
     * heracles-client
     *
     */
    @Autowired
    private PropertyManager propertyManager;
    /**
     * 测试rsa加解密
     */
    @Test
    public void testPublicEncrypt() throws Exception {
        String rsaPublicKey = propertyManager.getRsaPublicKey();
        String str = "test";
        String temp = RSAUtils.publicEncrypt(str, rsaPublicKey);
        String privateKey = propertyManager.getRsaPrivateKey();
        String result = RSAUtils.privateDecrypt(temp, privateKey);
        System.out.println("res:" + result);
        Assert.assertEquals(str, result);
    }
}
PropertyManager 源码:
package com.allawn.athletic.board.server.config;
import com.alibaba.fastjson.JSON;
import com.basic.heracles.client.core.spring.annotation.HeraclesConfigUpdateListener;
import com.basic.heracles.client.core.spring.annotation.HeraclesDynamicConfig;
import lombok.AccessLevel;
import lombok.Getter;
import org.apache.commons.lang3.StringUtils;
import org.springframework.stereotype.Component;
import javax.annotation.PostConstruct;
import java.util.Map;
/**
 * @author niujiaxing
 * @since 2019/3/13 20:39
 */
@Getter
@Component
public class PropertyManager {
    @HeraclesDynamicConfig(key = "rsa.private.key", fileName = "bodyEncrypt.properties")
    private String rsaPrivateKey;
    @HeraclesDynamicConfig(key = "rsa.public.key", fileName = "bodyEncrypt.properties")
    private String rsaPublicKey;
    @HeraclesDynamicConfig(key = "system.appkey", fileName = "appkey.properties")
    @Getter(AccessLevel.NONE)
    private String appKey;
    /**
     * appKey转换Map
     */
    public Map appKeyMap;
    @HeraclesConfigUpdateListener(fileName = "appkey.properties")
    public void change(String key, String newV, String old) {
        if (StringUtils.equals(key, "system.appkey")) {
            appKeyMap = JSON.parseObject(newV, Map.class);
        }
    }
    @PostConstruct
    public void init() {
        appKeyMap = JSON.parseObject(appKey, Map.class);
    }
}
这是一个验证rsa加解密功能的单元测试。
TestMain是抽象出来,用于启动spring容器以及支持testng用例自动注入bean,因为启动spring容器总是很耗时的,如果我们的测试用例用不到依赖的spring bean,最好不雅启动spring容器,TestMain源码:
package com.allawn.athletic.board.server;
import org.springframework.boot.SpringApplication;
import org.springframework.boot.test.context.SpringBootTest;
import org.springframework.context.annotation.ComponentScan;
import org.springframework.context.annotation.FilterType;
import org.springframework.test.context.testng.AbstractTestNGSpringContextTests;
/**
 * 测试启动类
 */
@SpringBootTest
@ComponentScan(excludeFilters = {
        @ComponentScan.Filter(type = FilterType.ASSIGNABLE_TYPE, value = {BoardServerApplication.class})})
public abstract class TestMain extends AbstractTestNGSpringContextTests {
    public static void main(String[] args) {
        SpringApplication.run(TestMain.class, args);
    }
}
说明:
① 根据SpringBoot项目Bean装配规则:
这就是TestMain最好放在和工程Application类所在包相同路径下的原因,比如我的示例中TestMain和BoardServerApplication都在相同包路径下:com.allawn.athletic.board.server。
② testng如果要注入实例的能力则需要继承AbstractTestNGSpringContextTests类。
③ @SpringBootTest注解启动spring容器,@ComponentScan过滤主工程的启动类。
2.2 本地开发环境
- 编辑器IntelliJ IDEA
- 测试插件 TestNG
- 覆盖率插件 Coverage
- 变异测试插件 PIT mutation testing
-
TestNG插件
检查TestNG插件是否存在
-
覆盖率插件
插件搜索“Coverage”
-
变异测试插件
在我们的pom文件下加如下plugin配置:
    org.pitest
    pitest-maven
    1.5.2


            /*你需要测试的类所在目录*/


            /*你需要测试的单元测试所在目录*/

        testng
注:
① targetClasses标签配置目录,比如com.oppo.cdo.*
② 如果单元测试框架使用了testNG,一定要加
idea插件自带,带搜索插件“PIT mutation testing”,但不建议用,很难调通!
2.3 Maven依赖
在这里搜索JAR包的新版本
-
TestNG
   org.testng
   testng
   7.0.0
   test
-
Mockito
    org.mockito
    mockito-core
    3.7.7
    test
-
Spring Test
   org.springframework.boot
   spring-boot-starter-test
   2.2.5.RELEASE
   test
2.4 创建单元测试
IDE自动创建单元测试的方法(也可手动完成):
1.在被测试类的类名按下Alt + Enter快捷键(或将鼠标指针停留其上,待出现黄色灯泡图标后,鼠标点击其下拉菜单。),在弹出的菜单上选择Create Test选项:
2.在弹出的窗口中选择“TestNG”并选择要创建的单元测试方法后点击“OK”按钮创建单元测试。(建议把所有方法都加单元测试)
3.创建后的单元测试在Maven工程的test目录下生成测试类:
注意:如果之前没有test目录,则需要手动创建一下:
然后再把目录设置为test目录。设置方法:file -> Project Structure -> Modules
2.5 运行单元测试
-
IntelliJ IDEA
1.在测试方法上鼠标右键或者单元测试方法左边行数栏:
方法一:
方法二:
运行通过的单元测试在控制台全绿色通过:
运行不通过则则会有提示:
-
Maven
要通过maven运行单元测试,要保证pom配置没有跳过单元测试,检查设置如下:
                org.apache.maven.plugins
                maven-surefire-plugin
                2.19.1

                    false
                    false
Maven执行的相关命令:
- 执行目录下所有单元测试,进入工程根目录后执行:mvn test
如果单元测试不通过,出现如下:
- 执行具体的单元测试类,多个测试类可用逗号分开:mvn test -Dtest=ClassTest1,ClassTest2
- 执行具体的单元测试类的方法:mvn test -Dtest=ClassTest1#testMethod
- 执行某个包下的单元测试:mvn test -Dtest=com/allawn/athletic/board/server/*/*
2.6 单元测试覆盖率
-
IntelliJ IDEA
两种方式皆可运行。
① 右键点击单元测试类“覆盖率运行”:
② 单元测试类内运行
运行完成后,我们就可以看单元测试的覆盖率了,覆盖率包括类覆盖率,方法覆盖率,代码行覆盖率。
IDEA可以直接生成覆盖率报告,导出来的覆盖率报告长这样:
点击index.html即可看报告内容:
2.7 变异测试
-
什么是变异测试?
变异测试,英文Mutation Testing,是使用变异器 (切换数学运算符,更改返回类型,删除调用等)将代码修改为不同的变异(基于变异器创建新代码),并检查单元测试是否失败。好的单元测试应该使所有突变都失败(杀死)。
所以,变异测试的有效性可以衡量杀死了多少个突变。
变异测试是覆盖率的一个很好的补充。相比覆盖率,它能够使单元测试更加健壮。
-
执行变异测试
在执行变异测试前需要先执行单元测试,不然变异测试有可能找不到单元测试类。
1. 找到对应模块下的pitest插件:
注:
如果是要执行指定某个包路径下所有类的单元测试变异测试,则通过targetClasses和targetTests的模糊匹配,比如这样:
        com.allawn.athletic.board.server.util.*


        com.allawn.athletic.board.server.util.*

    testng
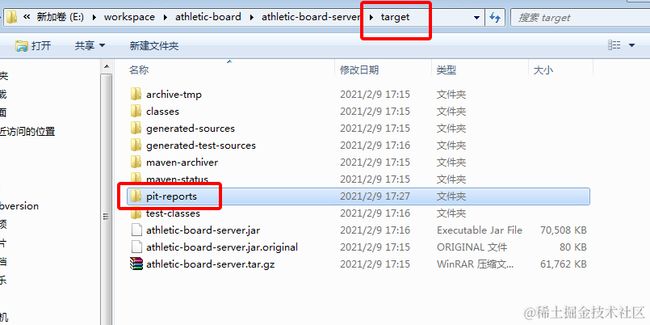
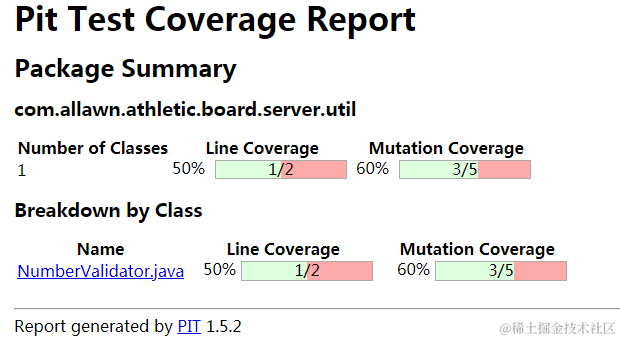
2. 找到插件双击 "pitest:mutationCoverage"即可运行变异测试。运行完成后,会自动生成变异测试报告,报告位置一般在对应模块的target/pit-reports目录下:
报告会详细列出每个包、每个类的覆盖率,变异通过率等。
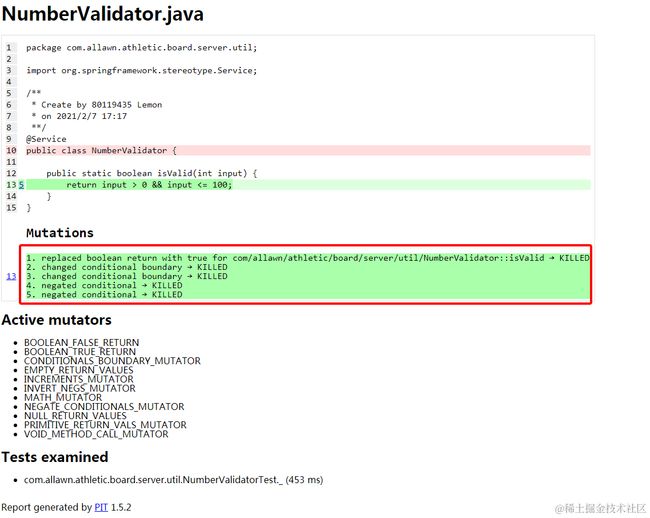
从上面很明显可以看到我的单元测试其实并没有写得完整,我们看看里面哪些变异详细报告:
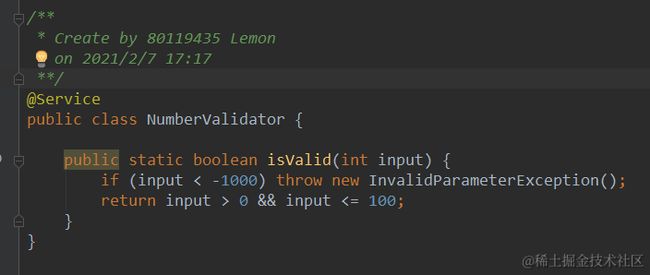
如果我的单元测试加上边界测试:
再次执行,变异测试全覆盖了!
三、一些主要的测试方法
主要列出testng的测试方法,junit的测试方法请另行百度。
3.1 异常测试
异常测试是指在单元测试中应该要抛出什么异常是合理的,可以检测我们方法中指定跑出的异常,类似这种:
@Test(expectedExceptions = InvalidParameterException.class)
public void throwException() {
    Assert.assertTrue(NumberValidator.isValid(-1100));
}
3.2 忽略测试
如果我们有时候不想测试某些方法的单元测试,那么我们可以指定这些具体的单元测试跳过不执行,testng和junit4都支持忽略测试,testng通过@Test(enabled=false)跳过。
3.3 超时测试
指定某个单元测试方法最长执行时间,如果超时了就算失败,testng中的timeout单位是毫秒。
3.4 套件测试
套件测试是指把多个单元测试组合成一个模块,然后一起运行,在套件定义中还可以通过定义组,针对相同组名的单元测试统一运行。
比如我们在单元测试类中加myGroups分组:
testng通过xml文件配置套件,只需在test目录下的resources文件夹下新增一个testng.xml文件(文件名可自定义),然后在xml文件内配置suite相关内容:
配置完成,在testng.xml文件上右键执行
套件和分组测试可以让单元测试非常灵活,我们可以指定运行某些单元测试方法。
3.5 参数化测试
为方便我们模拟单元测试的传参,testng提供了@DataProvider注解,我们可以在单元测试内设置多种参数值,单元测试会依次把入参都跑一遍。被@DataProvider修饰的方法,返回值是数组形式。
通过参数化,美化我们的单元测试,可以把期望有相同断言判断的不同参数测试写到一个单元测试方法内。
testng同时还支持XML文件配置参数,但不支持复杂数据类型,比如类,所以不是很建议使用,有兴趣可自行了解。
3.6 依赖测试
依赖测试是指测试的方法是有依赖的,在执行的测试之前需要执行的另一测试。如果依赖的测试出现错误,所有的子测试都被忽略,且不会被标记为失败。testng提供了方法依赖和组依赖,在@Test注解内可以看到相关的参数:
3.7 性能测试
TestNG支持通过多个线程并发调用一个测试接口来实现性能测试,invocationCount表示方法调用的次数,threadPoolSize表示并发线程数量,timeOut即是每次调用最大耗时时间。
3.8 并行测试
通过多线程并行调用多个测试方法,在我们套件/组测试的时候,如果使用并行测试,可以大大减少测试运行时间。
testng.xml中可以通过配置Suite、test标签的parallel、thread-count属性来实现并行测试。
testng.xml中标签属性及含义:
name:套件的名称。这是一个强制性的属性,可随意起
parallel:表示由testng 运行不同的线程来运行套件,可设置为methods,classes,tests。
thread-count:使用的线程数,如果启用并行模式(其他非并行方式则会忽略)
设置方法:
表示:最多起5个线程去同时执行不同的用例
以上3种设置的区别分别是:
methods
method 级别的多线程测试,每个方法都将采用独立的线程进行测试
classes
不同
tests
test级别的多线程测试,每个
比如我配置了方法级别的并行执行:
每个单元测试输出执行的线程号,最后运行得到的结果,每个方法执行都是不同的线程:
四、Mock工具 Mockito
4.1 Mockito介绍
Mock的使用场景:
- 1. 外部依赖的应用的调用,比如WebService等服务依赖。
- 2. DAO层(访问MySQL、MongoDB、Redis底层存储)的调用等。
- 3. 系统间异步交互通知消息。
- 4. methodA里面调用到的methodB。
- 5. 一些应用里面自己的Class(abstract,final,static)、Interface、Annotation、Enum和Native等。
目前市面上有很多mock工具,主要包括mockito、jmockit、easymock、PowerMock、Jmockit等,但用的较多的是mockito、jmockit。
JMockit包依赖在2020年之后就没有更新了,但Mockito目前仍在持续更新中,当前最新的版本是2021年1月更新的3.7.7版本。
Mockito有比较简洁的API,简单易学,可读性强。从Mockito2开始,Mockito支持了很多新特性以及新注解(所以依赖mockito2.x以上版本的需要java8及以上jdk方可),使用很便捷,spring-boot-starter-test包默认内置mockito,鉴于维护性和语言新特性的支持,个人建议使用Mockito作为单元测试的mock工具。
如果要用最新的Mockito,单独声明一下maven依赖:
    org.mockito
    mockito-core
    3.7.7
    test
Mockito源码:
https://github.com/mockito/mockito
Mockito2.x新特性介绍:
https://github.com/mockito/mockito/wiki/What%27s-new-in-Mockito-2
Mockito的javadoc地址:
mockito-core 5.10.0 javadoc (org.mockito)
4.2 Mockito的使用:
-
采用spy 或 @Spy 注解监控真实对象
在有需要的地方进行mock,否则走真实方法调用。
package com.allawn.athletic.board.server.util;
import com.allawn.athletic.board.server.TestMain;
import com.allawn.athletic.board.server.config.PropertyManager;
import org.mockito.Mockito;
import org.springframework.beans.factory.annotation.Autowired;
import org.springframework.boot.autoconfigure.EnableAutoConfiguration;
import org.testng.annotations.AfterClass;
import org.testng.annotations.BeforeClass;
import org.testng.annotations.Test;
import static org.mockito.Mockito.spy;
/**
 * Create by 80119435 Lemon
 * on 2021/2/2 16:08
 **/
@EnableAutoConfiguration
public class RSAUtilsWithSpyTest extends TestMain {
    /**
     * PropertyManager 有配置中心的注解 @HeraclesDynamicConfig
     * 所以,必须要启动spring容器,并启动配置中心:
     *
     *
     * com.oppo.basic.heracles
     * heracles-client
     *
     */
    @Autowired
    private PropertyManager propertyManager;

    /**
     * 采用静态方法{@link Mockito#spy(Object)}打桩
     */
    @Test
    public void testPublicEncrypt() throws Exception {
        PropertyManager spy = spy(propertyManager);
        //只对getRsaPublicKey()方法进行mock,其他方法不变
        Mockito.when(spy.getRsaPublicKey()).thenReturn("test2");
        String rsaPublicKey = propertyManager.getRsaPublicKey();
        //被mock的方法输出预期值 test2
        System.out.println("res:" + rsaPublicKey);
        String privateKey = propertyManager.getRsaPrivateKey();
        //输出配置中心配置值
        System.out.println("res:" + privateKey);
    }
}
除了采用静态方法spy以外,还可以通过采用注解的方式:
package com.allawn.athletic.board.server.util;
import com.allawn.athletic.board.server.TestMain;
import com.allawn.athletic.board.server.config.PropertyManager;
import org.mockito.Mockito;
import org.mockito.MockitoAnnotations;
import org.mockito.Spy;
import org.springframework.beans.factory.annotation.Autowired;
import org.springframework.boot.autoconfigure.EnableAutoConfiguration;
import org.testng.annotations.AfterClass;
import org.testng.annotations.BeforeClass;
import org.testng.annotations.Test;
import static org.mockito.Mockito.spy;
/**
 * Create by 80119435 Lemon
 * on 2021/2/2 16:08
 **/
@EnableAutoConfiguration
public class RSAUtilsWithSpyTest extends TestMain {

    @Autowired
    @Spy
    private PropertyManager propertyManager;

    private AutoCloseable autoCloseable;
    @BeforeClass
    public void initMock() {
        autoCloseable = MockitoAnnotations.openMocks(this);
    }
    @AfterClass
    public void close() throws Exception {
        autoCloseable.close();
    }
    /**
     * 采用@Spy注解打桩
     */
    @Test
    public void test1() {
        //调用getRsaPublicKey()方法则返回test2
        Mockito.when(propertyManager.getRsaPublicKey()).thenReturn("test2");
        String rsaPublicKey = propertyManager.getRsaPublicKey();
        //输出预期值 test2
        System.out.println("res:" + rsaPublicKey);
        String privateKey = propertyManager.getRsaPrivateKey();
        //输出配置中心配置值
        System.out.println("res:" + privateKey);
    }
}
结果示例:
注:使用@Spy注解需要设置(同时保留spring自动注入的注解@Autowired)
MockitoAnnotations.openMocks(this)
此关键在于初始化被Mockito注解修饰的变量,只有这样才能是注解生效。Mockito官网有关于MockitoAnnotations的说明:
一般普遍做法是在测试类中加:
private AutoCloseable autoCloseable;
    @BeforeClass
    public void initMock() {
        autoCloseable = MockitoAnnotations.openMocks(this);
    }
    @AfterClass
    public void close() throws Exception {
        autoCloseable.close();
    }
如果不设置则会抛出异常:
除了@Spy注解需要如此设置,@Mock、@Captor、@InjectMocks等注解都需要。
-
@Mock 注解 模拟对象
对整个class进行mock
package com.allawn.athletic.board.server.util;
import com.allawn.athletic.board.server.TestMain;
import com.allawn.athletic.board.server.config.PropertyManager;
import org.mockito.Mock;
import org.mockito.Mockito;
import org.mockito.MockitoAnnotations;
import org.springframework.boot.autoconfigure.EnableAutoConfiguration;
import org.testng.annotations.AfterClass;
import org.testng.annotations.BeforeClass;
import org.testng.annotations.Test;
/**
 * Create by 80119435 Lemon
 * on 2021/2/2 16:08
 **/
@EnableAutoConfiguration
public class RSAUtilsWithMockTest extends TestMain {

    @Mock
    private PropertyManager propertyManager;
    private AutoCloseable autoCloseable;
    @BeforeClass
    public void initMock() {
        autoCloseable = MockitoAnnotations.openMocks(this);
    }
    @AfterClass
    public void close() throws Exception {
        autoCloseable.close();
    }
    /**
     * 采用@Mock注解mock实例
     */
    @Test
    public void mock_test() {
        //调用getRsaPublicKey()方法则返回test2
        Mockito.when(propertyManager.getRsaPublicKey()).thenReturn("test2");
        String rsaPublicKey = propertyManager.getRsaPublicKey();
        //输出预期值 test2
        System.out.println("res:" + rsaPublicKey);
        String privateKey = propertyManager.getRsaPrivateKey();
        //输出null值
        System.out.println("res:" + privateKey);
    }


}
spy 和 mock不同,不同点是:
- spy 的参数是对象示例,mock 的参数是 class。
- 被 spy 的对象,调用其方法时默认会走真实方法。mock 对象不会。
-
使用方法预期回调接口生成期望值(Answer结构)
@Test
    public void answerTest(){
        when(mockList.get(anyInt())).thenAnswer(new CustomAnswer());
        assertEquals("hello world:0",mockList.get(0));
        assertEquals("hello world:999",mockList.get(999));
    }
    private class CustomAnswer implements Answer{
        @Override
        public String answer(InvocationOnMock invocation) throws Throwable {
            Object[] args = invocation.getArguments();
            return "hello world:"+args[0];
        }
    }
-
重置Mock
@Test
    public void reset_mock(){
        List list = mock(List.class);
        when(list.size()).thenReturn(10);
        list.add(1);
        assertEquals(10,list.size());
        //重置mock,清除所有的互动和预设
        reset(list);
        assertEquals(0,list.size());
    }
-
verify验证
@Test
public void mock_times() {
    //调用getRsaPublicKey()方法则返回test2
    Mockito.when(propertyManager.getRsaPublicKey()).thenReturn("test2");
    String rsaPublicKey = propertyManager.getRsaPublicKey();
    //输出预期值 test2
    System.out.println("res:" + rsaPublicKey);
    System.out.println("res:" +propertyManager.getRsaPublicKey());
    Mockito.verify(propertyManager, Mockito.times(2)).getRsaPublicKey();
}
验证方法的调用次数,不过一般我们单元测试很少用到。
-
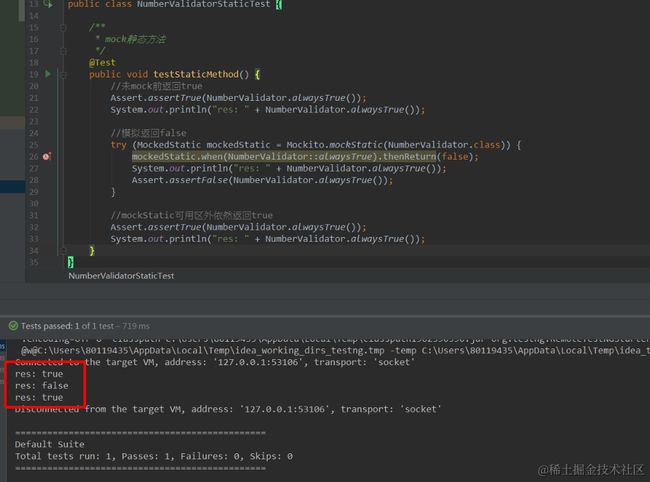
mock模拟静态方法
如果要用mockito模拟静态方法,一是要保证mockito包版本在3.4.0以上,二是需要额外加mockito-inline依赖,如下:
    org.mockito
    mockito-inline
    3.7.7
    test
加好依赖后,通过
Mockito.mockStatic
来模拟静态方法。
package com.allawn.athletic.board.server.util;
import org.mockito.MockedStatic;
import org.mockito.Mockito;
import org.testng.Assert;
import org.testng.annotations.Test;


/**
 * Create by 80119435 Lemon
 * on 2021/2/7 17:17
 **/
public class NumberValidatorStaticTest {
    /**
     * mock静态方法
     */
    @Test
    public void testStaticMethod() {
        //未mock前返回true
        Assert.assertTrue(NumberValidator.alwaysTrue());
        System.out.println("res: " + NumberValidator.alwaysTrue());
        //模拟返回false
        try (MockedStatic mockedStatic = Mockito.mockStatic(NumberValidator.class)) {
            mockedStatic.when(NumberValidator::alwaysTrue).thenReturn(false);
            System.out.println("res: " + NumberValidator.alwaysTrue());
            Assert.assertFalse(NumberValidator.alwaysTrue());
        }
        //mockStatic可用区外依然返回true
        Assert.assertTrue(NumberValidator.alwaysTrue());
        System.out.println("res: " + NumberValidator.alwaysTrue());
    }
}
结果:
五、Junit 5
5.1 Junit5介绍
因为我们spring-boot-starter-test包默认依赖junit单元测试,且Junit5的功能比Junit4更加完善,我们可以选择把Junit升级到Junit5,采用Junit5进行单元测试。
Junit5 主要新特性:
- 提供全新的断言和测试注解,支持测试类内嵌
- 更丰富的测试方式:支持动态测试,重复测试,参数化测试等
- 实现了模块化,让测试执行和测试发现等不同模块解耦,减少依赖
- 提供对 Java 8 的支持,如 Lambda 表达式,Sream API等。
注:运行Junit 5默认需要JDK8及以上。
Junit5使用手册:JUnit 5 User Guide
5.2 运行第一个Junit5单元测试
引入maven依赖:
    org.junit.jupiter
    junit-jupiter-engine
    5.7.1
    test
我们的单元测试通常使用到mock,在使用mockito的情况下,还需要引入以下依赖:
    org.mockito
    mockito-core
    3.7.7
    test


    org.mockito
    mockito-junit-jupiter
    3.7.7
    test
上一个单元测试案例:
源码如下:
package cdo.page.core.ods.cache;
import cdo.game.common.dto.GameStateResponseDto;
import cdo.page.core.rpc.RpcResourceService;
import org.junit.jupiter.api.Assertions;
import org.junit.jupiter.api.extension.ExtendWith;
import org.mockito.InjectMocks;
import org.mockito.Mock;
import org.mockito.Mockito;
import org.mockito.junit.jupiter.MockitoExtension;
import java.util.ArrayList;
import java.util.List;
/**
 * Create by 80119435 Lemon
 * on 2021/4/27 16:58
 **/
@ExtendWith(MockitoExtension.class)
class GameStateCacheServiceTest {
    @Mock
    private RpcResourceService rpcResourceService;
    @InjectMocks
    private GameStateCacheService gameStateCacheService;
    @org.junit.jupiter.api.Test
    void getGameState() {
        //batchQueryGameState查无资源返回0
        long appId = 112L;
        List res = new ArrayList<>();
        Mockito.when(rpcResourceService.batchQueryGameState(Mockito.anyList(), Mockito.any())).thenReturn(res);
        int gameState = gameStateCacheService.getGameState(appId);
        System.out.println("res:" + gameState);
        Assertions.assertEquals(0, gameState);
        //batchQueryGameState查无资源null返回0
        Mockito.when(rpcResourceService.batchQueryGameState(Mockito.anyList(), Mockito.any())).thenReturn(null);
        gameState = gameStateCacheService.getGameState(appId);
        System.out.println("res:" + gameState);
        Assertions.assertEquals(0, gameState);
        //batchQueryGameState 有资源且gameState=4
        GameStateResponseDto gameStateResponseDto = new GameStateResponseDto();
        gameStateResponseDto.setAppId(appId);
        gameStateResponseDto.setGameState(4);
        res.add(gameStateResponseDto);
        Mockito.when(rpcResourceService.batchQueryGameState(Mockito.anyList(), Mockito.any())).thenReturn(res);
        gameState = gameStateCacheService.getGameState(appId);
        System.out.println("res:" + gameState);
        Assertions.assertEquals(4, gameState);
    }
}
Junit5的Test注解和Junit4不一样,Junit5是一个完全的独立包开发的,Junit开发团队同时在维护Junit4和Junit5,所以在同一个工程同时存在Junit4和Junit5互不影响。
建议:新单元测试都使用Junit5,引入Junit5的依赖包即可,以前的Junit4单元测试保留原状不变。
在Junit5中要使用Mockito,需要单独引入mockito-junit-jupiter依赖包,通过在单元测试类上加
@ExtendWith(MockitoExtension.class)
实现构建一个mock运行容器。
附:
《测试驱动开发》
浅谈测试驱动开发
单元测试框架深入


