platfrom tree架构下实现3-Wire驱动(DS1302)
目录
概述
1 认识DS1302
1.1 DS1302 硬件电路
1.2 操作DS1302
1.3 注意要点
2 IO引脚位置
3 添加驱动节点
3.1 更新内核.dts
3.2 更新板卡.dtb
4 驱动程序实现
4.1 编写驱动程序
4.2 编写驱动程序的Makefile
4.3 安装驱动程序
5 验证驱动程序
5.1 编写测试程序
5.2 编写测试程序代码Makefile
5.3 运行测试App
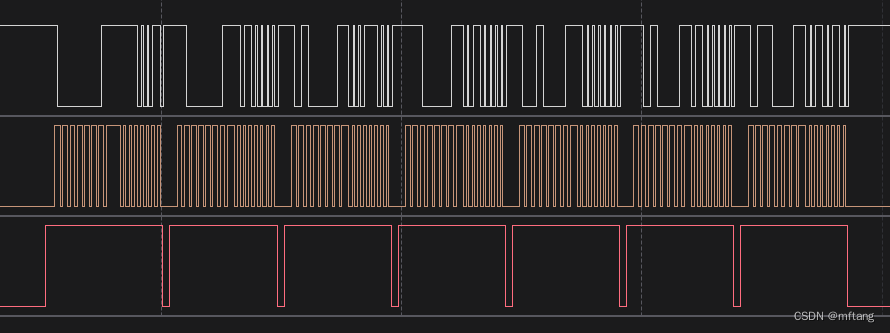
6 实时波形分析
概述
本文介绍在platform-tree框架下如何实现复杂总线驱动程序,以DS1302为例,详细介绍如何在linux内核中,添加driver tree节点,以及如何在驱动程序中,调用多线接口IO。
1 认识DS1302
DS1302 数据手册和产品信息 | 亚德诺(ADI)半导体 (analog.com)
DS1302是一款使用非常普遍的实时时钟芯片,可提供,年月日,时分秒,week实时数据。其和MCU直接的电路也非常简单,只需3个引脚(CE, IO , CLK)。
主要特性
- 完全管理所有计时功能
- 实时时钟可为秒、分、小时、日期、月、星期和年计数,闰年补偿有效期至2100年
- 31 x 8电池供电通用RAM
- 通过简单的串行端口与大多数微控制器进行接口
- 简单的3线接口
- TTL兼容(VCC = 5V)
- 用于读取或写入时钟或RAM数据的单字节或多字节(突发模式)数据传输
- 低功耗运行可延长备用电池运行时间
- 2.0V至5.5V全面运行
- 2.0V时电流消耗小于300nA
- 8引脚DIP和8引脚SO封装充分减少了所需空间
- 可选工业温度范围:-40°C至+85°C支持在多种应用中工作
1.1 DS1302 硬件电路
CE: 使能引脚
IO: 数据引脚(读/写数据)
SCLK: 时钟引脚
1.2 操作DS1302
读寄存器波形如下:
CE: 高电平有效
写地址时,CLK上升沿有效
读数据时,CLK下降沿有效
写寄存器波形:
CE: 高电平有效
写地址时,CLK上升沿有效
写数据时,CLK上升沿有效
1.3 注意要点
从DS1302中读取的时间数据位BCD码,所以,在实际运用时,需要将其转化为十进制,例如:
// 从寄存器中读出的值为: 0x14,使用时需要将其转化为14,方法如下:
static unsigned char bcd_2_dem(unsigned char x)
{
    return (x>>4)*10+(x&0x0f);                   //高4位乘以10,再加上低4位,即得到数值
}
初始化DS1302寄存器时,要进行上述数据转换的逆操作,方法如下:
// 如果要配置分钟数为25分钟,写到寄存器的值应该是: 0x25。转换方法如下:

unsigned char dem_2_bcd( unsigned char val )
{
  return (((val/10)& 0x0f)<<4)|((val%10)&0x0f);
}
2 IO引脚位置
DS1302芯片在测试底板上的IO引脚位置:
//GPIO4_24:  DS1302_CE
//GPIO4_26:  DS1302_IO
//GPIO4_28:  DS1302_CLK

CE_1302  = P2^4;   -----   D3   -- GPIO4_24
IO_1302  = P2^3;   -----   D5   -- GPIO4_26
CLK_1302 = P2^2;   -----   D7   -- GPIO4_28
硬件实物图:
在板卡ATK-DL6Y2C上DS1302的对应接口:
3 添加驱动节点
3.1 更新内核.dts
DS1302引脚和IMX.6ULL引脚对应关系:
GPIO4_24:  DS1302_CE
GPIO4_26:  DS1302_IO
GPIO4_28:  DS1302_CLK
.dts文件路径:
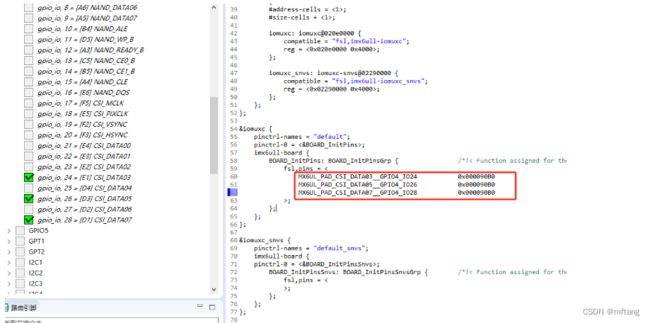
/home/mftang/linux_workspace/study_atk_dl6y2c/kernel/atk-dl6u2c/arch/arm/boot/dts/imx6ull-14x14-evk.dts1) 使用 i.MX Pins Tool v6 配置IO Pin
2) 添加IOMUXC数据至.dts文件
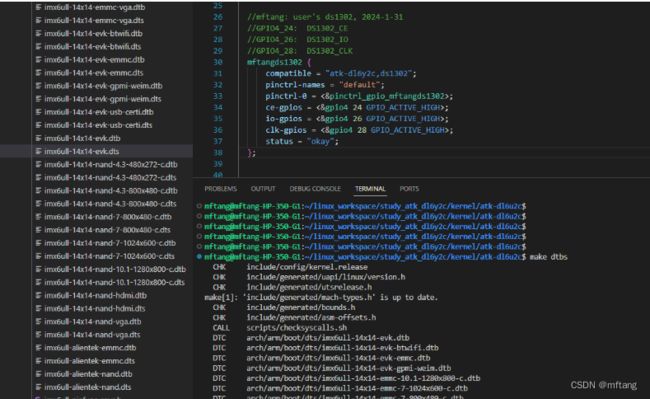
3)添加设备compatible至.dts文件
代码信息
	//mftang: user's ds1302, 2024-1-31
	//GPIO4_24:  DS1302_CE
	//GPIO4_26:  DS1302_IO
	//GPIO4_28:  DS1302_CLK
	mftangds1302 {
			compatible = "atk-dl6y2c,ds1302";
			pinctrl-names = "default";
			pinctrl-0 = <&pinctrl_gpio_mftangds1302>;
			ce-gpios = <&gpio4 24 GPIO_ACTIVE_HIGH>;
			io-gpios = <&gpio4 26 GPIO_ACTIVE_HIGH>;
			clk-gpios = <&gpio4 28 GPIO_ACTIVE_HIGH>;
			status = "okay";
	};
4) 编译.dts文件
在内核根目录下使用
make dtbs5) 复制 .dtb 文件至NFS共享目录
cp arch/arm/boot/dts/imx6ull-14x14-emmc-4.3-480x272-c.dtb /home/mftang/nfs/atk_dl6y2c/3.2 更新板卡.dtb
开发版中的.dtb文件存放位置:
cd /run/media/mmcblk1p1
在开发板上把 .dtb文件复制到应用目录中:
cp /mnt/atk_dl6y2c/imx6ull-14x14-emmc-4.3-480x272-c.dtb /run/media/mmcblk1p1
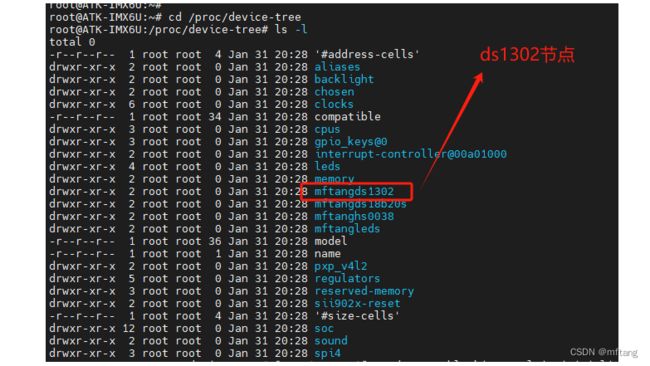
复制.dtb文件到相应的运行目录,然后重新板卡。在/proc/device-tree中可以看见device节点,然后可以在driver中使用该节点。
4 驱动程序实现
4.1 编写驱动程序
驱动程序源码:
/***************************************************************
Copyright  2024-2029. All rights reserved.
文件名     : drv_09_tree_hs0038.c
作者       : [email protected]
版本       : V1.0
描述       : ds1302 驱动程序
其他       : 无
日志       : 初版V1.0 2024/02/01

使用方法:
1) 在.dts文件中定义节点信息
    //mftang: user's ds1302, 2024-1-31
    //GPIO4_24:  DS1302_CE
    //GPIO4_26:  DS1302_IO
    //GPIO4_28:  DS1302_CLK
    mftangds1302 {
            compatible = "atk-dl6y2c,ds1302";
            pinctrl-names = "default";
            pinctrl-0 = <&pinctrl_gpio_mftangds1302>;
            gpios-ce = <&gpio4 24 GPIO_ACTIVE_HIGH>;
            gpios-io = <&gpio4 26 GPIO_ACTIVE_HIGH>;
            gpios-clk = <&gpio4 28 GPIO_ACTIVE_HIGH>;
            status = "okay";
    };

2) 在驱动匹配列表
static const struct of_device_id ds1302_of_match[] = {
    { .compatible = "atk-dl6y2c,ds1302" },
    { } // Sentinel
};

3) 驱动使用方法:
typedef struct{
    unsigned char second;
    unsigned char minute;
    unsigned char hour;

    unsigned char week;

    unsigned char day;
    unsigned char month;
    unsigned char year;
}stru_ds1302_rtc;

stru_ds1302_rtc rtc;

read(fd, &rtc, sizeof(stru_ds1302_rtc));


***************************************************************/
#include
#include

#include
#include
#include
#include
#include
#include
#include
#include
#include
#include
#include
#include
#include
#include
#include
#include
#include
#include
#include
#include
#include
#include
#include
#include
#include

#define DEVICE_NAME      "treeds1302"     // dev/treeds1302

/* ds1302dev设备结构体 */
struct ds1302stru_dev{
    dev_t   devid;                 /* 设备号          */
    struct  cdev cdev;             /* cdev            */
    struct  class *class;          /* 类              */
    struct  device *device;        /* 设备            */
    int     major;                 /* 主设备号        */
    struct  device_node *node;     /* ds1302设备节点  */
    int     userds1302;            /* ds1302 GPIO标号 */

    struct  gpio_desc *pin_ce;
    struct  gpio_desc *pin_io;
    struct  gpio_desc *pin_clk;
};

struct ds1302stru_dev ds1302dev;         /* ds1302设备 */
static wait_queue_head_t ds1302_wq;

static const unsigned char RTC_REG[7] = {0x80, 0x82, 0x84, 0x86, 0x88, 0x8a, 0x8c};

/*
  device 相关的驱动程序
*/
static unsigned char bcd_2_dem(unsigned char x)
{
    return (x>>4)*10+(x&0x0f);                   //高4位乘以10,再加上低4位,即得到数值
}

static void ds1302_wr_byte(unsigned char dat)    //DS1302:写入操作
{
   unsigned char i;

    for(i=0;i<8;i++)
    {
        if(dat&0x01){                            //从低字节开始传送
            gpiod_direction_output(ds1302dev.pin_io, 1); // ds1302 io = 1
        }
        else {
            gpiod_direction_output(ds1302dev.pin_io, 0); // ds1302 io = 0
        }

        // CLK_1302=0;
        gpiod_direction_output(ds1302dev.pin_clk, 0);

        // CLK_1302=1;
        gpiod_direction_output(ds1302dev.pin_clk, 1);
        dat = dat>>1;
    }
}

static unsigned char ds1302_rd_byte(void)  //DS1302:读取操作
{
   unsigned char i,temp = 0;

   // IO_1302 as input
   gpiod_direction_input( ds1302dev.pin_io );

   for(i=0;i<8;i++)
   {
        if( gpiod_get_value(ds1302dev.pin_io) )
            temp=temp|0x80;
        else
            temp=temp&0x7f;

        // CLK_1302 = 1
        gpiod_direction_output(ds1302dev.pin_clk, 1);
        // CLK_1302 = 0
        gpiod_direction_output(ds1302dev.pin_clk, 0);

        temp=temp>>1;
   }

   return(temp);
}


static void write_ds1302_reg(unsigned char addr,unsigned char dat)
{
   unsigned long flags;

   local_irq_save(flags);

   //CLK_1302=0;
   gpiod_direction_output(ds1302dev.pin_clk,0);
   //CE_1302=1;
   gpiod_direction_output(ds1302dev.pin_ce, 1);

   ds1302_wr_byte(addr);
   ds1302_wr_byte(dat);

   //CE_1302=0;
   gpiod_direction_output(ds1302dev.pin_ce, 0);
   //CLK_1302=0;
   gpiod_direction_output(ds1302dev.pin_clk,0);

   local_irq_restore(flags);
}

static unsigned char read_ds1302_reg(unsigned char addr)
{
   unsigned long flags;
   unsigned char temp;

   local_irq_save(flags);

   // CLK_1302=0
   gpiod_direction_output(ds1302dev.pin_clk, 0);
   // CE_1302=1
   gpiod_direction_output(ds1302dev.pin_ce, 1);

   ds1302_wr_byte(addr);      //写入地址
   temp = ds1302_rd_byte();

   // CE_1302=0
   gpiod_direction_output(ds1302dev.pin_ce, 0);
   // CLK_1302=0
   gpiod_direction_output(ds1302dev.pin_clk, 0);

   local_irq_restore(flags);


   return(temp);
}

static void ds1302_wr_wp(unsigned char wp)
{
  if (wp)
    write_ds1302_reg(0x8e,0x80);
  else
    write_ds1302_reg(0x8e,0x00);
}

static void ds1302_stop(unsigned char flag)
{
  unsigned char chold;

  chold = read_ds1302_reg(0x81);

  if (flag)
    write_ds1302_reg(0x80,chold|0x80);
  else
    write_ds1302_reg(0x80,chold&0x7f);
}

static unsigned char ds1302_read_rtc( unsigned char reg )
{
   unsigned char dat;

   dat = read_ds1302_reg(reg);

   return  bcd_2_dem(dat);
}

static void ds1302_get_rtc( unsigned char *buff)
{
    int LEN = sizeof(RTC_REG);
    int i = 0;

    for( i = 0; i < LEN; i++ ){
        buff[i] = ds1302_read_rtc( RTC_REG[i]|0x01);
    }
}

static void ds1302_drv_init( unsigned char *buff )
{
    unsigned long flags;
    unsigned char temp,val;
    int LEN = sizeof(RTC_REG);
    int i;

    ds1302_stop(1);    // stop clock
    ds1302_wr_wp(0);   // enable write

    local_irq_save(flags);

    for ( i=0; i < LEN; i++)
    {
        val = buff[i];
        temp = (((val/10)& 0x0f)<<4)|((val%10)&0x0f);
        write_ds1302_reg( RTC_REG[i], temp );
    }

   local_irq_restore(flags);

    ds1302_wr_wp(1);  // disable write
    ds1302_stop(0);   // enable clock
}

/*
    linux driver 驱动接口:
    实现对应的open/read/write等函数,填入file_operations结构体
*/
static ssize_t ds1302_drv_write(struct file *filp,
                                const char __user *buf, size_t cnt,
                                loff_t *offt)
{
    int LEN = sizeof(RTC_REG);
    unsigned char tempbuff[LEN];
    int length;

    length = copy_from_user(tempbuff, buf, LEN);
    if( cnt != LEN ){
        printk(" %s line %d write ds1302 register error! \r\n",  __FUNCTION__, __LINE__);
        return 0;
    }
    else{
        ds1302_drv_init( tempbuff );
    }

    return cnt;
}


static ssize_t ds1302_drv_read (struct file *file, char __user *buf,
                             size_t size, loff_t *offset)
{
    int LEN = sizeof(RTC_REG);
    unsigned char tempbuff[LEN];
    int length;

    ds1302_get_rtc( tempbuff );

    length = copy_to_user(buf, tempbuff, LEN);

    return length;
}

static unsigned int ds1302_drv_poll(struct file *fp, poll_table * wait)
{
    printk(" %s line %d \r\n",  __FUNCTION__, __LINE__);
    return 0;
}

static int ds1302_drv_close(struct inode *node, struct file *file)
{
    printk(" %s line %d \r\n",  __FUNCTION__, __LINE__);

    return 0;
}


/*
    定义driver的file_operations结构体
*/
static struct file_operations ds1302_fops = {
    .owner   = THIS_MODULE,
    .write   = ds1302_drv_write,
    .read    = ds1302_drv_read,
    .poll    = ds1302_drv_poll,
    .release = ds1302_drv_close,
};


/* 1. 从platform_device获得GPIO
    mftangds1302 {
            compatible = "atk-dl6y2c,ds1302";
            pinctrl-names = "default";
            pinctrl-0 = <&pinctrl_gpio_mftangds1302>;
            ce-gpios = <&gpio4 24 GPIO_ACTIVE_HIGH>;
            io-gpios = <&gpio4 26 GPIO_ACTIVE_HIGH>;
            clk-gpios = <&gpio4 28 GPIO_ACTIVE_HIGH>;
            status = "okay";
    };
 */
static int ds1302_probe(struct platform_device *pdev)
{
    printk("ds0302 driver and device was matched!\r\n");

    /* 1. 获得硬件信息 */
    ds1302dev.pin_ce = gpiod_get(&pdev->dev, "ce", 0);
    if (IS_ERR(ds1302dev.pin_ce))
    {
        printk("%s line %d get ce parameter error! \n", __FUNCTION__, __LINE__);
    }

    ds1302dev.pin_io = gpiod_get(&pdev->dev, "io", 0);
    if (IS_ERR(ds1302dev.pin_io))
    {
        printk("%s line %d get io parameter error! \n", __FUNCTION__, __LINE__);
    }

    ds1302dev.pin_clk = gpiod_get(&pdev->dev, "clk", 0);
    if (IS_ERR(ds1302dev.pin_clk))
    {
        printk("%s line %d get clk parameter error! \n", __FUNCTION__, __LINE__);
    }


    /* 2. device_create */
    device_create( ds1302dev.class, NULL,
                   MKDEV( ds1302dev.major, 0 ), NULL,
                   DEVICE_NAME);

    return 0;
}

static int ds1302_remove(struct platform_device *pdev)
{
    device_destroy( ds1302dev.class, MKDEV( ds1302dev.major, 0));

    gpiod_put(ds1302dev.pin_ce);
    gpiod_put(ds1302dev.pin_io);
    gpiod_put(ds1302dev.pin_clk);

    return 0;
}


static const struct of_device_id atk_dl6y2c_ds1302[] = {
    { .compatible = "atk-dl6y2c,ds1302" },
    { },
};

/* 1. 定义platform_driver */
static struct platform_driver ds1302_pltdrv = {
    .probe      = ds1302_probe,
    .remove     = ds1302_remove,
    .driver     = {
        .name   = "atk_ds1302",
        .of_match_table = atk_dl6y2c_ds1302,
    },
};

/* 2. 在入口函数注册platform_driver */
static int __init ds1302_init(void)
{
    printk("%s line %d\n",__FUNCTION__, __LINE__);

    /* register file_operations  */
    ds1302dev.major = register_chrdev( 0,
                                    DEVICE_NAME,     /* device name */
                                    &ds1302_fops);

    /* create the device class  */
    ds1302dev.class = class_create(THIS_MODULE, "ds1302_class");

    if (IS_ERR(ds1302dev.class)) {
        printk("%s line %d\n", __FUNCTION__, __LINE__);
        unregister_chrdev( ds1302dev.major, DEVICE_NAME);
        return PTR_ERR( ds1302dev.class );
    }

    init_waitqueue_head(&ds1302_wq);

    return platform_driver_register(&ds1302_pltdrv);
}

/* 3. 有入口函数就应该有出口函数:卸载驱动程序时,就会去调用这个出口函数
 *    卸载platform_driver
 */
static void __exit ds1302_exit(void)
{
    printk("%s line %d\n", __FUNCTION__, __LINE__);

    platform_driver_unregister(&ds1302_pltdrv);

    class_destroy(ds1302dev.class);
    unregister_chrdev(ds1302dev.major, DEVICE_NAME);
}


/* 7. 其他完善:提供设备信息,自动创建设备节*/

module_init(ds1302_init);
module_exit(ds1302_exit);

MODULE_LICENSE("GPL");
MODULE_AUTHOR("[email protected]");
4.2 编写驱动程序的Makefile
PWD := $(shell pwd)

KERNEL_DIR=/home/mftang/linux_workspace/study_atk_dl6y2c/kernel/atk-dl6u2c
ARCH=arm
CROSS_COMPILE=/home/ctools/gcc-linaro-4.9.4-arm-linux-gnueabihf/bin/arm-linux-gnueabihf-

export  ARCH  CROSS_COMPILE

obj-m:= drv_10_tree_ds1302.o

all:
	$(MAKE) -C $(KERNEL_DIR) M=$(PWD) modules


clean:
	rm -rf .*.cmd *.o *.mod.c *.ko .tmp_versions *.order *.symvers
4.3 安装驱动程序
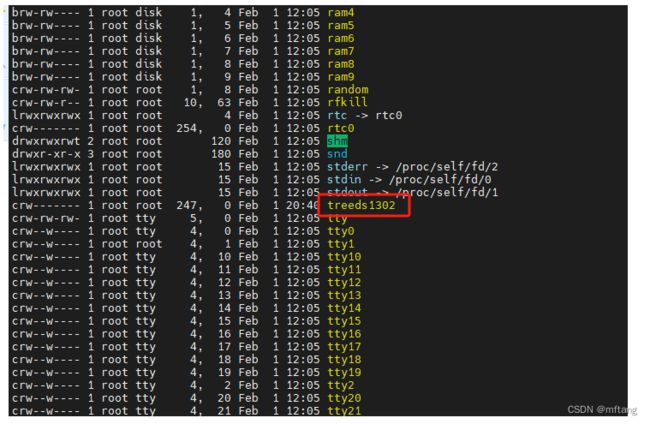
在dev/目录下查看驱动程序
5 验证驱动程序
5.1 编写测试程序
测试程序源码
/***************************************************************
Copyright  2024-2029. All rights reserved.
文件名  : test_10_tree_ds1302.c
作者    : [email protected]
版本    : V1.0
描述    : ds1302 测试程序,用于测试 drv_10_tree_ds1302
日志    : 初版V1.0 2024/1/29

***************************************************************/
#include
#include
#include
#include
#include
#include

#define DEV_NAME    "/dev/treeds1302"

typedef struct{
    unsigned char second;
    unsigned char minute;
    unsigned char hour;

    unsigned char week;

    unsigned char day;
    unsigned char month;
    unsigned char year;
}stru_ds1302_rtc;

stru_ds1302_rtc rtc;

int main(int argc, char **argv)
{
    int fd;

    fd = open(DEV_NAME, O_RDWR);
    if (fd < 0){
        printf("can not open file %s \r\n", DEV_NAME);
        return -1;
    }

    // init rtc
    rtc.year = 24;
    rtc.month = 2;
    rtc.day = 1;
    rtc.week = 4;

    rtc.hour = 18;
    rtc.minute = 2;
    rtc.second = 0;

    write(fd, &rtc, sizeof(stru_ds1302_rtc));
    while(1){
        read(fd, &rtc, sizeof(stru_ds1302_rtc));
        printf(" %02d-%02d-%02d week %d   %02d:%02d:%02d \r\n",  rtc.year, rtc.month, rtc.day, rtc.week,
                                                                 rtc.hour,rtc.minute, rtc.second);
        sleep(1);
    }
    close(fd);

    return 0;
}
5.2 编写测试程序代码Makefile
CFLAGS= -Wall -O2
CC=/home/ctools/gcc-linaro-4.9.4-arm-linux-gnueabihf/bin/arm-linux-gnueabihf-gcc
STRIP=/home/ctools/gcc-linaro-4.9.4-arm-linux-gnueabihf/bin/arm-linux-gnueabihf-strip


test_10_tree_ds1302: test_10_tree_ds1302.o
	$(CC) $(CFLAGS) -o test_10_tree_ds1302 test_10_tree_ds1302.o
	$(STRIP) -s test_10_tree_ds1302

clean:
	rm -f test_10_tree_ds1302 test_10_tree_ds1302.o
5.3 运行测试App
运行测试程序后,系统会初始化DS1302的时间,然后每隔1s从芯片中读取时间
6 实时波形分析
分析一个简单的波形,从寄存器:0x81中读取秒数据,秒数为57,具体波形图如下
读一个完整的年月日时分秒波形


