200行C++代码写一个网络调试助手(TCP服务端&TCP客户端)
前言
今天分享一个200行C++代码写成的QT网络调试助手。
可以先看看效果 。
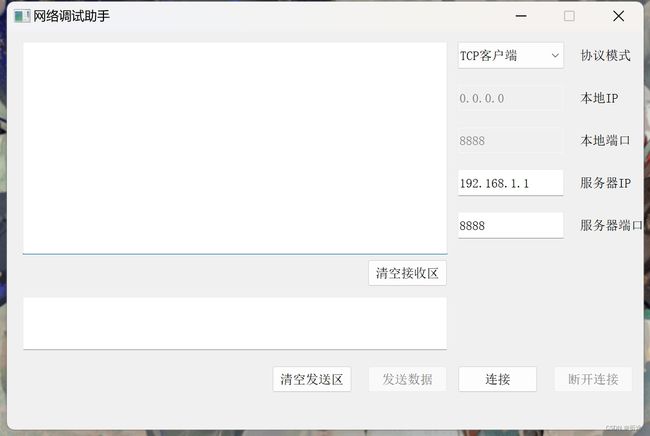
因为我不喜欢用QT Designer,因此我用的组件都是使用代码布局的,所以需要设计一下布局。

界面是参考的之前写的串口助手,就是把里面的逻辑改了改,因此外观上看起来差不多。
我用的VS2019,一样用VS的小伙伴需要自行去下载QT的插件才可以编写QT的代码。
并且我们写网络相关的代码需要设置一下模块。

需要把Network模块给勾选上。
使用QtCreator的小伙伴需要在配置文件的对应位置加上下面的一段配置。

这样我们的初始配置就算完成了。
TCP服务端核心
组件布局什么的就不说了,我们直接进入核心。
使用TCP服务端我们需要使用到两个类。

和

我们需要把对应的头文件给加上去。
因为我这个网络助手是服务端和客户端一体的,所以当开始网络调试的时候我们需要判断当前的模式是服务端还是客户端。
当我们判断为是服务端的时候,就需要让QTcpServer的对象去监听,我们需要获取在选型中设置的本地IP和本地端口,也就是我们监听的IP和端口。
接着我们绑定一个信号“newConnection”,也就是当有客户端来连接的时候。
在这个槽函数中我们再绑定一个信号“readyRead”,也就是当客户端发来信息的时候。我们用QTcpSocket的对象去调用readAll函数去获取所有接受到的数据,然后添加到我们的接收区里。
SocketServer->listen(QHostAddress(LocalIP->text()), LocalPort->text().toUInt());//设置服务端的IP和端口
connect(SocketServer, &QTcpServer::newConnection, [&]() {                       //槽函数(被连接之后)
    SocketSocket = SocketServer->nextPendingConnection();                       //获取Socket用于通信
    connect(SocketSocket, &QTcpSocket::readyRead, [&]() {                       //槽函数(收到数据之后)
        QString buffer = SocketSocket->readAll();                               //读取接收到的数据
        ReceiveArea->appendPlainText(buffer);                                   //放入接收区
    });
});
发送数据
从服务端发送数据到客户端以及从客户端发送数据到服务端的代码都是一样的。
SocketSocket->write(SendArea->toPlainText().toLocal8Bit().data());就是用QTcpSocket对象去调用write,里面的参数也就是发送的数据需要是char*类型的,因此我们需要把发送区里的数据转换一下格式。
TCP客户端核心
其实客户端和服务端里实现的功能差不多。
首先是先去主动去连接服务端,需要获取设置中的服务器IP和端口。
连接之后需要绑定信号“connect”,也就是连接上了服务器。
在槽函数中再绑定信号“readyRead”,跟上面服务端一样,把获取的数据放到接收区。
SocketSocket->connectToHost(ServerIP->text(),ServerPort->text().toUInt());      //设置连接的服务器IP和端口
connect(SocketSocket, &QTcpSocket::connected, [&]() {                           //槽函数(连接上之后)
        connect(SocketSocket, &QTcpSocket::readyRead, [&]() {                       //槽函数(收到数据之后)
            QString buffer = SocketSocket->readAll();                               //读取接收到的数据
            ReceiveArea->appendPlainText(buffer);                                   //放入接收区
        });
});
.cpp代码&.h代码
其实写一个网络助手比写一个串口助手简单多了。cpp加上h文件一共才200行代码,如果使用QtDesigner去布局的话代码会更少,我代码中大部分都用来布局组件了。
除了上面的核心代码之外。还有一些小细节就是选择不同模式去使用网络调试助手(服务端或客户端)的时候,我们需要的设置是不同的,使用客户端的时候需要的是服务器的IP和端口。而使用服务端的时候需要的是本地的IP和端口。我们可以在不同模式下禁用不需要的配置。
并且当我们还没有连接服务器或是开启服务器的时候,我们是无法发送数据的,因此我们需要禁用发送数据的按钮。诸如此类的小细节还是需要我们一边写一边调试然后一边体会和修改的。
具体可以参考下面的代码,基本上把这俩cpp和h文件复制进工程文件就能使用了。
#include "SocketTool.h"

SocketTool::SocketTool(QWidget *parent): QMainWindow(parent){
    this->setFixedSize(1200,750);
    this->setWindowTitle(QString::fromLocal8Bit("网络调试助手"));

    SocketServer = new QTcpServer(this);            //服务端需要用的
    SocketSocket = new QTcpSocket(this);            //服务端和客户端都需要用的

    InitAssembly();
}

SocketTool::~SocketTool(){

}

void SocketTool::InitAssembly(void){
    ReceiveArea = new QPlainTextEdit(this);     //接收区
    SendArea = new QPlainTextEdit(this);        //发送区

    ReceiveArea->setFixedSize(800,400);
    ReceiveArea->move(30,20);
    ReceiveArea->setReadOnly(true);             //接收区设置为只读

    SendArea->setFixedSize(800,100);
    SendArea->move(30, 500);

    //初始化按钮
    ClearReceiveArea = new QPushButton(QString::fromLocal8Bit("清空接收区"), this);
    ClearSendArea = new QPushButton(QString::fromLocal8Bit("清空发送区"), this);
    SendData = new QPushButton(QString::fromLocal8Bit("发送数据"), this);
    Connect = new QPushButton(QString::fromLocal8Bit("连接"), this);
    DisConnect = new QPushButton(QString::fromLocal8Bit("断开连接"), this);

    ClearReceiveArea->setFixedSize(150, 50);
    ClearSendArea->setFixedSize(150, 50);
    SendData->setFixedSize(150, 50);
    Connect->setFixedSize(150, 50);
    DisConnect->setFixedSize(150, 50);

    ClearReceiveArea->move(680, 430);
    ClearSendArea->move(500,630);
    SendData->move(680, 630);
    Connect->move(850,630);
    DisConnect->move(1030,630);

    Mode = new QComboBox(this);
    Mode->setFixedSize(200,50);
    Mode->move(850,20);
    Mode->addItem(QString::fromLocal8Bit("TCP客户端"));
    Mode->addItem(QString::fromLocal8Bit("TCP服务端"));

    LocalIP = new QLineEdit(this);
    LocalPort = new QLineEdit(this);
    ServerIP = new QLineEdit(this);
    ServerPort = new QLineEdit(this);

    //给选型设置上默认项
    LocalIP->setText("0.0.0.0");
    LocalPort->setText("8888");
    ServerIP->setText("192.168.1.1");
    ServerPort->setText("8888");

    QVectorEdits;
    Edits.push_back(LocalIP);
    Edits.push_back(LocalPort);
    Edits.push_back(ServerIP);
    Edits.push_back(ServerPort);

    for (int i = 0; i < Edits.size(); ++i) {
        Edits[i]->setFixedSize(200, 50);
        Edits[i]->move(850, 100 + 80 * i);
    }

    QVectorLabels;
    QLabel* ModeLabel = new QLabel(QString::fromLocal8Bit("协议模式"), this);
    QLabel* LocalIPLabel = new QLabel(QString::fromLocal8Bit("本地IP"), this);
    QLabel* LocalPortLabel = new QLabel(QString::fromLocal8Bit("本地端口"), this);
    QLabel* ServerIPLabel = new QLabel(QString::fromLocal8Bit("服务器IP"), this);
    QLabel* ServerPortLabel = new QLabel(QString::fromLocal8Bit("服务器端口"), this);

    Labels.push_back(ModeLabel);
    Labels.push_back(LocalIPLabel);
    Labels.push_back(LocalPortLabel);
    Labels.push_back(ServerIPLabel);
    Labels.push_back(ServerPortLabel);

    for (int i = 0; i < Labels.size(); ++i) {
        Labels[i]->setFixedSize(150,50);
        Labels[i]->move(1080, 20 + 80 * i);
    }

    connect(ClearReceiveArea, &QPushButton::clicked, [&]() {        //清空接收区
        ReceiveArea->clear();
        });

    connect(ClearSendArea, &QPushButton::clicked, [&]() {           //清空发送区
        SendArea->clear();
        });

    connect(Mode, &QComboBox::currentTextChanged, [&]() {           //切换协议模式
        if (Mode->currentIndex() == 0) {                            //切换到客户端模式
            LocalIP->setDisabled(true);                             //不允许设置服务端的选项
            LocalPort->setDisabled(true);                           //其实也不需要禁用,但是可以更直观的看出不同模式需要哪些配置
            ServerIP->setDisabled(false);
            ServerPort->setDisabled(false);
        }else {                                                     //切换到服务端模式
            LocalIP->setDisabled(false);
            LocalPort->setDisabled(false);
            ServerIP->setDisabled(true);
            ServerPort->setDisabled(true);
        }
    });

    connect(Connect, &QPushButton::clicked, [&]() {                 //连接
        SocketConnect();
        Connect->setDisabled(true);                                 //禁用连接按钮
        DisConnect->setDisabled(false);                             //允许断开连接
        SendData->setDisabled(false);                               //允许发送数据
        });

    connect(DisConnect, &QPushButton::clicked, [&]() {              //断开连接
        SocketServer->close();
        SocketSocket->close();
        DisConnect->setDisabled(true);
        Connect->setDisabled(false);
        SendData->setDisabled(true);
        });

    connect(SendData, &QPushButton::clicked, [&]() {                //发送数据
        SocketSocket->write(SendArea->toPlainText().toLocal8Bit().data());
        });

    //一开始默认禁用下面的按钮,因为模式选型默认是客户端
    LocalIP->setDisabled(true);
    LocalPort->setDisabled(true);
    SendData->setDisabled(true);
    DisConnect->setDisabled(true);
}

//连接(核心代码)
void SocketTool::SocketConnect(void){
    if (Mode->currentIndex() == 0) {        //TCP客户端模式
        SocketSocket->connectToHost(ServerIP->text(),ServerPort->text().toUInt());      //设置连接的服务器IP和端口
        connect(SocketSocket, &QTcpSocket::connected, [&]() {                           //槽函数(连接上之后)
            connect(SocketSocket, &QTcpSocket::readyRead, [&]() {                       //槽函数(收到数据之后)
                QString buffer = SocketSocket->readAll();                               //读取接收到的数据
                ReceiveArea->appendPlainText(buffer);                                   //放入接收区
                });
            });
    }else {                                 //TCP服务端模式
        SocketServer->listen(QHostAddress(LocalIP->text()), LocalPort->text().toUInt());//设置服务端的IP和端口
        connect(SocketServer, &QTcpServer::newConnection, [&]() {                       //槽函数(被连接之后)
            SocketSocket = SocketServer->nextPendingConnection();                       //获取Socket用于通信
            connect(SocketSocket, &QTcpSocket::readyRead, [&]() {                       //槽函数(收到数据之后)
                QString buffer = SocketSocket->readAll();                               //读取接收到的数据
                ReceiveArea->appendPlainText(buffer);                                   //放入接收区
                });
            });
    }
}
#pragma once

#include
#include
#include
#include
#include
#include
#include
#include
#include

#include

class SocketTool : public QMainWindow{
    Q_OBJECT

public:
    SocketTool(QWidget *parent = nullptr);
    ~SocketTool();

private:
    QTcpServer* SocketServer;
    QTcpSocket* SocketSocket;

    QPlainTextEdit* ReceiveArea;
    QPlainTextEdit* SendArea;
    QComboBox* Mode;
    QLineEdit* LocalIP;
    QLineEdit* LocalPort;
    QLineEdit* ServerIP;
    QLineEdit* ServerPort;
    QPushButton* ClearReceiveArea;
    QPushButton* ClearSendArea;
    QPushButton* SendData;
    QPushButton* Connect;
    QPushButton* DisConnect;


    void InitAssembly(void);
    void SocketConnect(void);

};
工程文件获取(其实没必要,因为主要的代码都在上面了)
可以关注我的公众号“折途想要敲代码”,回复关键词“qt网络助手”即可获取VS的工程文件以及一个别人写好的网络调试助手。