Spring Cache
目录标题
- Spring Cache
-
- 1 介绍
- 2 常用注解
- 3 入门
Spring Cache
1 介绍
Spring Cache 是一个框架,实现了基于注解的缓存功能,只需要简单地加一个注解,就能实现缓存功能。
Spring Cache 提供了一层抽象,底层可以切换不同的缓存实现,例如:
- EHCache
- Caffeine
- Redis(常用)
起步依赖:
<dependency>
	<groupId>org.springframework.bootgroupId>
	<artifactId>spring-boot-starter-cacheartifactId>  		            		       	 <version>2.7.3version>
dependency>
2 常用注解
在SpringCache中提供了很多缓存操作的注解,常见的是以下的几个:
| 注解 | 说明 |
|---|---|
| @EnableCaching | 开启缓存注解功能,通常加在启动类上 |
| @Cacheable | 在方法执行前先查询缓存中是否有数据,如果有数据,则直接返回缓存数据;如果没有缓存数据,调用方法并将方法返回值放到缓存中 |
| @CachePut | 将方法的返回值放到缓存中 |
| @CacheEvict | 将一条或多条数据从缓存中删除 |
在spring boot项目中,使用缓存技术只需在项目中导入相关缓存技术的依赖包,并在启动类上使用@EnableCaching开启缓存支持即可。
例如,使用Redis作为缓存技术,只需要导入Spring-data-Redis的maven坐标即可。
3 入门
1). 环境准备
准备基础工程:底层已使用Redis缓存实现
配置文件信息:
server:
  port: 8888
spring:
  datasource:
    druid:
      driver-class-name: com.mysql.cj.jdbc.Driver
      url: jdbc:mysql://localhost:3306/spring_cache_demo?serverTimezone=Asia/Shanghai&useUnicode=true&characterEncoding=utf-8&zeroDateTimeBehavior=convertToNull&useSSL=false&allowPublicKeyRetrieval=true
      username: root
      password: 123456
  redis:
    host: 192.168.193.141
    port: 6379
    password: 123456
    database: 1
logging:
  level:
    com:
      example:
        mapper: debug
        service: info
        controller: info
pom.xml 依赖:
<project xmlns="http://maven.apache.org/POM/4.0.0"
         xmlns:xsi="http://www.w3.org/2001/XMLSchema-instance"
         xsi:schemaLocation="http://maven.apache.org/POM/4.0.0 http://maven.apache.org/xsd/maven-4.0.0.xsd">
    <modelVersion>4.0.0modelVersion>
    <parent>
        <groupId>org.springframework.bootgroupId>
        <artifactId>spring-boot-starter-parentartifactId>
        <version>2.7.3version>
        <relativePath/>
    parent>
    <groupId>com.itheimagroupId>
    <artifactId>springcache-demoartifactId>
    <version>1.0-SNAPSHOTversion>

    <properties>
        <maven.compiler.source>11maven.compiler.source>
        <maven.compiler.target>11maven.compiler.target>
    properties>

    <dependencies>
        <dependency>
            <groupId>org.springframework.bootgroupId>
            <artifactId>spring-boot-starter-webartifactId>
            <scope>compilescope>
        dependency>
        <dependency>
            <groupId>org.projectlombokgroupId>
            <artifactId>lombokartifactId>
            <version>1.18.20version>
        dependency>

        <dependency>
            <groupId>com.alibabagroupId>
            <artifactId>fastjsonartifactId>
            <version>1.2.76version>
        dependency>

        <dependency>
            <groupId>commons-langgroupId>
            <artifactId>commons-langartifactId>
            <version>2.6version>
        dependency>
        <dependency>
            <groupId>org.springframework.bootgroupId>
            <artifactId>spring-boot-starter-cacheartifactId>
        dependency>

        <dependency>
            <groupId>org.springframework.bootgroupId>
            <artifactId>spring-boot-starter-data-redisartifactId>
        dependency>

        <dependency>
            <groupId>mysqlgroupId>
            <artifactId>mysql-connector-javaartifactId>
            <scope>runtimescope>
        dependency>

        <dependency>
            <groupId>org.mybatis.spring.bootgroupId>
            <artifactId>mybatis-spring-boot-starterartifactId>
            <version>2.2.0version>
        dependency>

        <dependency>
            <groupId>com.alibabagroupId>
            <artifactId>druid-spring-boot-starterartifactId>
            <version>1.2.1version>
        dependency>

        <dependency>
            <groupId>com.github.xiaoymingroupId>
            <artifactId>knife4j-spring-boot-starterartifactId>
            <version>3.0.2version>
        dependency>

        <dependency>
            <groupId>org.springframework.bootgroupId>
            <artifactId>spring-boot-starter-testartifactId>
        dependency>
    dependencies>
    <build>
        <plugins>
            <plugin>
                <groupId>org.springframework.bootgroupId>
                <artifactId>spring-boot-maven-pluginartifactId>
                <version>2.7.3version>
            plugin>
        plugins>
    build>
project>
基础环境的代码 WebMvcConfiguration :
package com.example.config;

import lombok.extern.slf4j.Slf4j;
import org.springframework.context.annotation.Bean;
import org.springframework.context.annotation.Configuration;
import org.springframework.web.servlet.config.annotation.ResourceHandlerRegistry;
import org.springframework.web.servlet.config.annotation.WebMvcConfigurationSupport;
import springfox.documentation.builders.ApiInfoBuilder;
import springfox.documentation.builders.PathSelectors;
import springfox.documentation.builders.RequestHandlerSelectors;
import springfox.documentation.service.ApiInfo;
import springfox.documentation.spi.DocumentationType;
import springfox.documentation.spring.web.plugins.Docket;

@Configuration
@Slf4j
public class WebMvcConfiguration extends WebMvcConfigurationSupport {

    /**
     * 生成接口文档配置
     * @return
     */
    @Bean
    public Docket docket(){
        log.info("准备生成接口文档...");

        ApiInfo apiInfo = new ApiInfoBuilder()
                .title("接口文档")
                .version("2.0")
                .description("接口文档")
                .build();

        Docket docket = new Docket(DocumentationType.SWAGGER_2)
                .apiInfo(apiInfo)
                .select()
                //指定生成接口需要扫描的包
                .apis(RequestHandlerSelectors.basePackage("com.example.controller"))
                .paths(PathSelectors.any())
                .build();

        return docket;
    }

    /**
     * 设置静态资源映射
     * @param registry
     */
    protected void addResourceHandlers(ResourceHandlerRegistry registry) {
        log.info("开始设置静态资源映射...");
        registry.addResourceHandler("/doc.html").addResourceLocations("classpath:/META-INF/resources/");
        registry.addResourceHandler("/webjars/**").addResourceLocations("classpath:/META-INF/resources/webjars/");
    }
}
基础环境的代码UserController:
package com.example.controller;

import com.example.entity.User;
import com.example.mapper.UserMapper;
import lombok.extern.slf4j.Slf4j;
import org.springframework.beans.factory.annotation.Autowired;
import org.springframework.web.bind.annotation.*;

@RestController
@RequestMapping("/user")
@Slf4j
public class UserController {

    @Autowired
    private UserMapper userMapper;

    @PostMapping
    public User save(@RequestBody User user){
        userMapper.insert(user);
        return user;
    }

    @DeleteMapping
    public void deleteById(Long id){
        userMapper.deleteById(id);
    }

	@DeleteMapping("/delAll")
    public void deleteAll(){
        userMapper.deleteAll();
    }

    @GetMapping
    public User getById(Long id){
        User user = userMapper.getById(id);
        return user;
    }

}
基础环境的代码 User 实体类:
package com.example.entity;

import lombok.Data;
import java.io.Serializable;

@Data
public class User implements Serializable {

    private static final long serialVersionUID = 1L;

    private Long id;

    private String name;

    private int age;

}
基础环境的代码 UserMapper:
package com.example.mapper;

import com.example.entity.User;
import org.apache.ibatis.annotations.*;

@Mapper
public interface UserMapper{

    @Insert("insert into user(name,age) values (#{name},#{age})")
    @Options(useGeneratedKeys = true,keyProperty = "id")
    void insert(User user);

    @Delete("delete from user where id = #{id}")
    void deleteById(Long id);

    @Delete("delete from user")
    void deleteAll();

    @Select("select * from user where id = #{id}")
    User getById(Long id);
}
启动类:
package com.example;

import lombok.extern.slf4j.Slf4j;
import org.springframework.boot.SpringApplication;
import org.springframework.boot.autoconfigure.SpringBootApplication;

@Slf4j
@SpringBootApplication
public class CacheDemoApplication {
    public static void main(String[] args) {
        SpringApplication.run(CacheDemoApplication.class,args);
        log.info("项目启动成功...");
    }
}
工程结构如下:

数据库准备:
创建名为spring_cache_demo数据库,将下面的sql脚本直接导入数据库中。
create database spring_cache_demo;
use spring_cache_demo;
DROP TABLE IF EXISTS `user`;
CREATE TABLE `user` (
                        `id` bigint NOT NULL AUTO_INCREMENT,
                        `name` varchar(45) DEFAULT NULL,
                        `age` int DEFAULT NULL,
                        PRIMARY KEY (`id`)
);

引导类上加@EnableCaching:
package com.example;

import lombok.extern.slf4j.Slf4j;
import org.springframework.boot.SpringApplication;
import org.springframework.boot.autoconfigure.SpringBootApplication;
import org.springframework.cache.annotation.EnableCaching;

@Slf4j
@SpringBootApplication
@EnableCaching//开启缓存注解功能
public class CacheDemoApplication {
    public static void main(String[] args) {
        SpringApplication.run(CacheDemoApplication.class,args);
        log.info("项目启动成功...");
    }
}
2). @CachePut注解
@CachePut 说明:
作用: 将方法返回值,放入缓存
value: 缓存的名称, 每个缓存名称下面可以有很多key
key: 缓存的key ----------> 支持Spring的表达式语言SPEL语法
在save方法上加注解@CachePut
当前UserController的save方法是用来保存用户信息的,我们希望在该用户信息保存到数据库的同时,也往缓存中缓存一份数据,我们可以在save方法上加上注解 @CachePut,用法如下:
	/**
	* CachePut:将方法返回值放入缓存
	* value:缓存的名称,每个缓存名称下面可以有多个key
	* key:缓存的key
	*/
	@PostMapping
    @CachePut(value = "userCache", key = "#user.id")//key的生成:userCache::1
    public User save(@RequestBody User user){
        userMapper.insert(user);
        return user;
    }
查看@CachePut源代码的key属性:
/**
* Spring Expression Language (SpEL) expression for computing the key dynamically.
* Default is {@code ""}, meaning all method parameters are considered as a key,
* unless a custom {@link #keyGenerator} has been set.
*
The SpEL expression evaluates against a dedicated context that provides the
* following meta-data:
*
* - {@code #result} for a reference to the result of the method invocation. For
* supported wrappers such as {@code Optional}, {@code #result} refers to the actual
* object, not the wrapper
* - {@code #root.method}, {@code #root.target}, and {@code #root.caches} for
* references to the {@link java.lang.reflect.Method method}, target object, and
* affected cache(s) respectively.
* - Shortcuts for the method name ({@code #root.methodName}) and target class
* ({@code #root.targetClass}) are also available.
*
- Method arguments can be accessed by index. For instance the second argument
* can be accessed via {@code #root.args[1]}, {@code #p1} or {@code #a1}. Arguments
* can also be accessed by name if that information is available.
*
*/
String key() default "";
说明:上述方法的注释说明 key属性 的写法如下(使用spEl语法生成不固定的key)
#user.id : #user指的是方法形参的名称, id指的是user的id属性 , 也就是使用user的id属性作为key ;
#result.id : #result代表方法返回值,该表达式 代表以返回对象的id属性作为key ;
#p0.id:#p0指的是方法中的第一个参数,id指的是第一个参数的id属性,也就是使用第一个参数的id属性作为key ;
#a0.id:#a0指的是方法中的第一个参数,id指的是第一个参数的id属性,也就是使用第一个参数的id属性作为key ;
#root.args[0].id: #root.args[0]指的是方法中的第一个参数,id指的是第一个参数的id属性,也就是使用第一个参数的id属性作为key ;
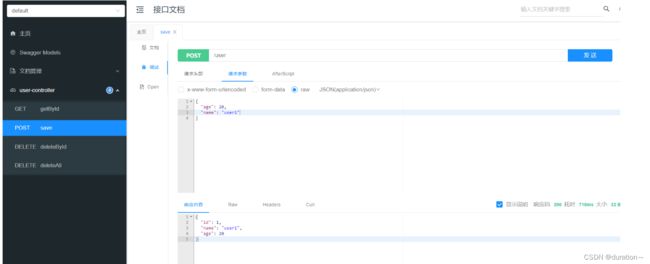
启动服务,通过swagger接口文档测试,访问UserController的save()方法
因为id是自增,所以不需要设置id属性
查看user表中的数据

查看Redis中的数据

3). @Cacheable注解
@Cacheable 说明:
作用: 在方法执行前,spring先查看缓存中是否有数据,如果有数据,则直接返回缓存数据;若没有数据,调用方法并将方法返回值放到缓存中
value: 缓存的名称,每个缓存名称下面可以有多个key
key: 缓存的key ----------> 支持Spring的表达式语言SPEL语法
在getById上加注解@Cacheable
	/**
	* Cacheable:在方法执行前spring先查看缓存中是否有数据,如果有数据,则直接返回缓存数据;若没有数据,
	* 调用方法并将方法返回值放到缓存中,原理spring boot对当前的controller使用了 代理技术
	* value:缓存的名称,每个缓存名称下面可以有多个key
	* key:缓存的key
	*/
	@GetMapping
    @Cacheable(cacheNames = "userCache",key="#id")
    public User getById(Long id){
        User user = userMapper.getById(id);
        return user;
    }
重启服务,通过swagger接口文档测试,访问UserController的getById()方法
第一次访问,会请求我们controller的方法,查询数据库。后面再查询相同的id,就直接从Redis中查询数据,不用再查询数据库了,就说明缓存生效了。
提前在redis中手动删除掉id=1的用户数据

查看控制台sql语句:说明从数据库查询的用户数据

查看Redis中的缓存数据:说明已成功缓存

再次查询相同id的数据时,直接从redis中直接获取,不再查询数据库。
4). @CacheEvict注解
@CacheEvict 说明:
作用: 清理指定缓存
value: 缓存的名称,每个缓存名称下面可以有多个key
key: 缓存的key ----------> 支持Spring的表达式语言SPEL语法
在 delete 方法上加注解@CacheEvict
	@DeleteMapping
    @CacheEvict(cacheNames = "userCache",key = "#id")//删除某个key对应的缓存数据
    public void deleteById(Long id){
        userMapper.deleteById(id);
    }

	@DeleteMapping("/delAll")
    @CacheEvict(cacheNames = "userCache",allEntries = true)//删除userCache下所有的缓存数据
    public void deleteAll(){
        userMapper.deleteAll();
    }
重启服务,通过swagger接口文档测试,访问UserController的deleteAll()方法

查看user表:数据清空

查询Redis缓存数据
