SSM框架课上实操
SSM框架课上实操
9月13日
//实体类
package com.example.practive.dao;

public class bookDao {
    public void save() {
        System.out.println("bookDao save...");
    }
}
// test文件
package com.example.practive;

import com.example.practive.dao.bookDao;
import org.junit.jupiter.api.Test;
import org.springframework.boot.test.context.SpringBootTest;

@SpringBootTest
class PractiveApplicationTests {

    @Test
    void contextLoads() {
        bookDao bookDao = new bookDao();
        bookDao.save();
    }

}
# 执行结果
bookDao save...
为什么之后不写 new bookDao() 了呢?
=》降低耦合;另一方面,每次创建对象都会导致内存的浪费!
那么去掉之后又该如何?
=》将new工作交给工厂。而spring正是一个超级工厂!
//实体类如上
// applicationContext.xml配置文件

<beans xmlns="http://www.springframework.org/schema/beans"
       xmlns:xsi="http://www.w3.org/2001/XMLSchema-instance"
       xsi:schemaLocation="http://www.springframework.org/schema/beans http://www.springframework.org/schema/beans/spring-beans.xsd">

    <bean id="bookDao" class="com.example.practive.dao.bookDao">bean>

beans>
// test文件
package com.example.practive;

import com.example.practive.dao.bookDao;
import org.junit.jupiter.api.Test;
import org.springframework.boot.test.context.SpringBootTest;
import org.springframework.context.ApplicationContext;
import org.springframework.context.support.ClassPathXmlApplicationContext;

@SpringBootTest
class PractiveApplicationTests {

    @Test
    void contextLoads() {
        ApplicationContext ac = new ClassPathXmlApplicationContext("applicationContext.xml");
        bookDao bean = (bookDao)ac.getBean("bookDao");
        bean.save();
    }

}
# 执行结果
bookDao save...
除此之外,在配置文件中,name可以用于起别名,scope可以用作范围,比如单例还是多例(具体如下)。
// applicationContext做出如下修改
<bean id="bookDao" scope="singleton" class="com.example.practive.dao.bookDao"></bean>
// test文件做出如下修改
@Test
void contextLoads() {
    ApplicationContext ac = new ClassPathXmlApplicationContext("applicationContext.xml");
    bookDao bean = (bookDao)ac.getBean("bookDao");
    bookDao bean1 = (bookDao)ac.getBean("bookDao");
    System.out.println(bean==bean1);
}
# 执行结果
true
// applicationContext做出如下修改
<bean id="bookDao" scope="prototype" class="com.example.practive.dao.bookDao"></bean>
# 执行结果
false
maven下载的jar包下载到了哪里? 在下载的maven里的setting文件中可以修改!!!
D:\Maven\apache-maven-3.6.3\repository
9月20日
属性注入
①构造器注入(必须存在有参构造方法)
值得一提的是,必须将所有的参数填写完毕才可以创建。
// applicationContext.xml配置文件

<beans xmlns="http://www.springframework.org/schema/beans"
       xmlns:xsi="http://www.w3.org/2001/XMLSchema-instance"
       xsi:schemaLocation="http://www.springframework.org/schema/beans http://www.springframework.org/schema/beans/spring-beans.xsd">
    <bean id="bookDao" class="com.example.practive.dao.bookDao">
        <constructor-arg name="age" value="18">constructor-arg>
        <constructor-arg name="name" value="jty">constructor-arg>
    bean>
beans>
// 实体类
package com.example.practive.dao;

public class bookDao {

    private int age;
    private String name;

    public bookDao(int age, String name) {
        this.age = age;
        this.name = name;
    }

    public void save() {
        System.out.println("bookDao save..." + name + age);
    }
}
// test文件
package com.example.practive;

import com.example.practive.dao.bookDao;
import org.junit.jupiter.api.Test;
import org.springframework.boot.test.context.SpringBootTest;
import org.springframework.context.ApplicationContext;
import org.springframework.context.support.ClassPathXmlApplicationContext;

@SpringBootTest
class PractiveApplicationTests {

    @Test
    void contextLoads() {
        ApplicationContext ac = new ClassPathXmlApplicationContext("applicationContext.xml");
        bookDao bean = (bookDao)ac.getBean("bookDao");
        bean.save();
    }

}
# 执行结果
bookDao save...jty18
②setter注入(属性注入)+ 复杂注入
值得一提的是,这种注入方式是通过调用对象中的set()方法来实现注入的。
// 实体类
package com.example.practive.dao;

import java.util.Arrays;
import java.util.List;

public class bookDao {

    private int age;
    private String name;
    private List<String> list;
    private String[] arr;

    public void setAge(int age) {
        this.age = age;
    }

    public void setName(String name) {
        this.name = name;
    }

    public void setList(List<String> list) {
        this.list = list;
    }

    public void setArr(String[] arr) {
        this.arr = arr;
    }

    public void save() {
        System.out.println("bookDao save..." + "{name:" + name + ",age:" + age + ",list:" + list + ",arr:" + Arrays.toString(arr) + "}");
    }
}
// applicationContext.xml配置文件

<beans xmlns="http://www.springframework.org/schema/beans"
       xmlns:xsi="http://www.w3.org/2001/XMLSchema-instance"
       xsi:schemaLocation="http://www.springframework.org/schema/beans http://www.springframework.org/schema/beans/spring-beans.xsd">
    <bean id="bookDao" class="com.example.practive.dao.bookDao">
        <property name="age" value="18">property>
        <property name="name" value="jty">property>
        <property name="arr">
            <array>
                <value>arr1value>
                <value>arr2value>
                <value>arr3value>
            array>
        property>
        <property name="list">
            <list>
                <value>list1value>
                <value>list2value>
                <value>list3value>
            list>
        property>
    bean>
beans>
# 执行结果
bookDao save...{name:jty,age:18,list:[list1, list2, list3],arr:[arr1, arr2, arr3]}
创建service并引入dao对象
// 实体类
package com.example.practive.service;

import com.example.practive.dao.bookDao;

public class bookService {

    private bookDao bookDao;

    public void setBookDao(com.example.practive.dao.bookDao bookDao) {
        this.bookDao = bookDao;
    }

    public void save() {
        System.out.println("bookService...");
    }

}
// applicationContext.xml配置文件

<beans xmlns="http://www.springframework.org/schema/beans"
       xmlns:xsi="http://www.w3.org/2001/XMLSchema-instance"
       xsi:schemaLocation="http://www.springframework.org/schema/beans 				http://www.springframework.org/schema/beans/spring-beans.xsd">
    <bean id="bookDao" class="com.example.practive.dao.bookDao">
        <property name="age" value="18">property>
        <property name="name" value="jty">property>
    bean>

    <bean id="bookService" class="com.example.practive.service.bookService">
        <property name="bookDao" ref="bookDao">property>
    bean>
beans>
// Test文件
package com.example.practive;

import com.example.practive.dao.bookDao;
import com.example.practive.service.bookService;
import org.junit.jupiter.api.Test;
import org.springframework.boot.test.context.SpringBootTest;
import org.springframework.context.ApplicationContext;
import org.springframework.context.support.ClassPathXmlApplicationContext;

@SpringBootTest
class PractiveApplicationTests {

    @Test
    void contextLoads() {
        ApplicationContext ac = new ClassPathXmlApplicationContext("applicationContext.xml");
//        bookDao bean = (bookDao)ac.getBean("bookDao");
//        bean.save();
        bookService bookService = (bookService)ac.getBean("bookService");
        bookService.save();
    }

}
# 执行结果
bookService...

构造器注入只需要类中有配置文件中对应参数的构造方法。配置文件进行属性注入时,传入的参数不需要对应构造方法、
但是对象中必须存在空参数构造方法,Spring 通过空参构造方法构造后才能使用set()方法注入。
③注解
因为配置文件太麻烦了=》面向注解开发(删除配置文件喽)
// bookDao类
package com.example.practive.dao;

import org.springframework.stereotype.Repository;

@Repository
public class bookDao {
    public void save() {
        System.out.println("bookDao save...");
    }
}
// bookService类
package com.example.practive.service;

import com.example.practive.dao.bookDao;
import org.springframework.beans.factory.annotation.Autowired;
import org.springframework.stereotype.Service;

@Service
public class bookService {

    @Autowired
    private bookDao bookDao;

    public void save() {
        System.out.println("bookService...");
        bookDao.save();
    }

}
// test文件
package com.example.practive;

import com.example.practive.dao.bookDao;
import com.example.practive.service.bookService;
import org.junit.jupiter.api.Test;
import org.springframework.beans.factory.annotation.Autowired;
import org.springframework.boot.test.context.SpringBootTest;
import org.springframework.context.ApplicationContext;
import org.springframework.context.support.ClassPathXmlApplicationContext;

@SpringBootTest
class PractiveApplicationTests {
    @Autowired
    private bookService bookService;

    @Test
    void contextLoads() {
//        ApplicationContext ac = new ClassPathXmlApplicationContext("applicationContext.xml");
//        bookDao bean = (bookDao)ac.getBean("bookDao");
//        bean.save();
//        bookService bookService = (bookService)ac.getBean("bookService");
        bookService.save();
    }

}
# 执行结果
bookService...
bookDao save...
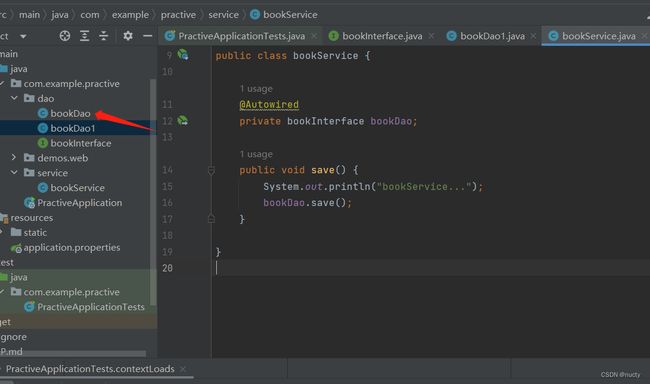
同时在创建一个bookDao1类,将dao层的两个类同时继承一个接口,如下图

将出现如下报错:

需要指明:Autowired
Autowired 首先按照类型进行查找,如果查找结果出现多个,则出现报错。当然了,也不一定会出现报错,这个时候,会出现按名查找,如果spring容器中有这个实体对象,则不会报错!
// bookService类
package com.example.practive.service;

import com.example.practive.dao.bookDao;
import com.example.practive.dao.bookInterface;
import org.springframework.beans.factory.annotation.Autowired;
import org.springframework.stereotype.Service;

@Service
public class bookService {

    @Autowired
    private bookInterface bookDao;

    public void save() {
        System.out.println("bookService...");
        bookDao.save();
    }

}
# 执行结果
bookService...
bookDao save...
// bookService类
package com.example.practive.service;

import com.example.practive.dao.bookDao;
import com.example.practive.dao.bookInterface;
import org.springframework.beans.factory.annotation.Autowired;
import org.springframework.stereotype.Service;

@Service
public class bookService {

    @Autowired
    private bookInterface bookDao1;

    public void save() {
        System.out.println("bookService...");
        bookDao1.save();
    }

}
# 执行结果
bookService...
bookDao1 save ...
@Qualifier这个注解可以帮助直接指明是spring容器中的哪一个!
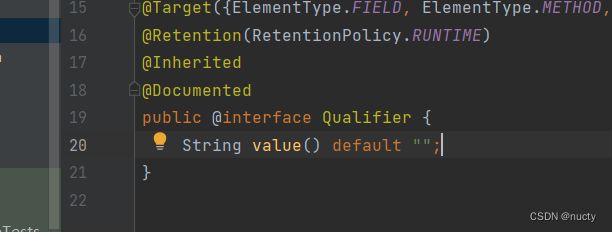
语法: @Qualifier(value = "bookDao")
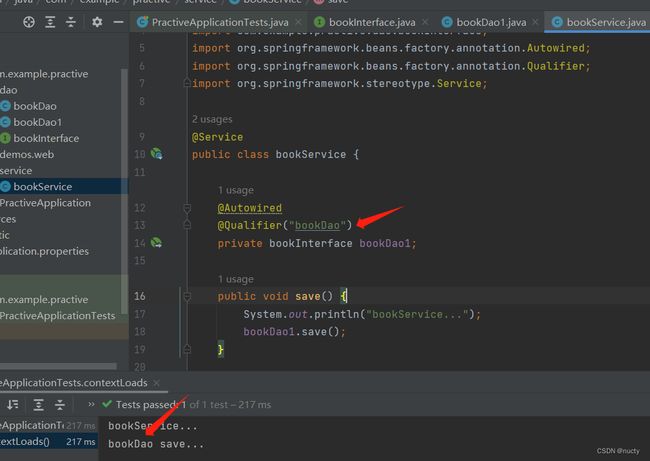
@Autowired + @Qualifier(value=“xxx”) = @Resource(name=“xxx”)
// bookService类
package com.example.practive.service;

import com.example.practive.dao.bookDao;
import com.example.practive.dao.bookInterface;
import org.springframework.beans.factory.annotation.Autowired;
import org.springframework.beans.factory.annotation.Qualifier;
import org.springframework.stereotype.Service;

import javax.annotation.Resource;

@Service
public class bookService {

    @Resource(name = "bookDao")
    private bookInterface bookDao1;

    public void save() {
        System.out.println("bookService...");
        bookDao1.save();
    }

}
# 执行结果
bookService...
bookDao save...
将dao层移动位置,将出现如下情况:
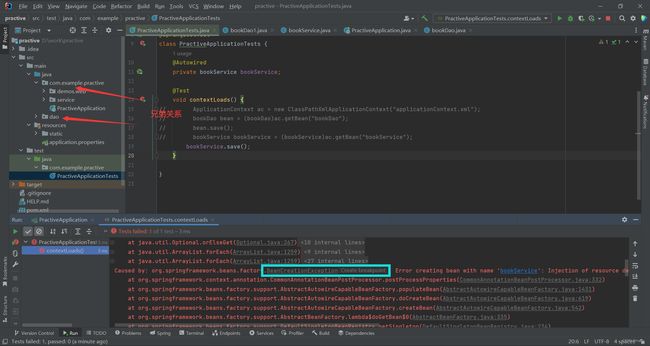
入口程序将扫描和入口程序所在的包及其子包。故出现如上报错!
也可以如下方式解决:@ComponentScan(basePackages = “dao”)
// 在bookService类中做出如下调整
package com.example.practive.service;

import dao.bookInterface;
import org.springframework.context.annotation.ComponentScan;
import org.springframework.stereotype.Service;

import javax.annotation.Resource;

@Service
@ComponentScan(basePackages = "dao")
public class bookService {

    @Resource(name = "bookDao")
    private bookInterface bookDao1;

    public void save() {
        System.out.println("bookService...");
        bookDao1.save();
    }

}
9月27日
Spring中的AOP
//切面类
package com.example.practive.config;

import org.aspectj.lang.ProceedingJoinPoint;
import org.aspectj.lang.annotation.*;
import org.springframework.core.annotation.Order;
import org.springframework.stereotype.Component;

@Component
@Aspect
public class myAspect {

    @Before("execution(* com.example.practive.dao.bookDao.save(..))")
    public void Before() {
        System.out.println("before...");
    }

    @After("execution(* com..save(..))")
    public void After() {
        System.out.println("after...");
    }

    @Around("execution(* com.example.practive.dao.bookDao.save(..))")
    public void Around(ProceedingJoinPoint pjb) throws Throwable {
        System.out.println("around before...");
        pjb.proceed();
        System.out.println("around after...");
    }

    @AfterReturning("execution(* com.example.practive.dao.bookDao.save(..))")
    public void AfterReturning() {
        System.out.println("after returning...");
    }

    @AfterThrowing("execution(* com.example.practive.dao.bookDao.save(..))")

    public void AfterThrowing() {
        System.out.println("after throwing...");
    }
}
//测试类
package com.example.practive;

import com.example.practive.dao.bookDao;
import com.example.practive.service.bookService;
import org.junit.jupiter.api.Test;
import org.springframework.beans.factory.annotation.Autowired;
import org.springframework.beans.factory.annotation.Qualifier;
import org.springframework.boot.test.context.SpringBootTest;

@SpringBootTest
class PractiveApplicationTests {
    @Autowired
    private bookService bookService;
    @Autowired
    @Qualifier("bookDao")
    private bookDao bookDao;

    @Test
    void contextLoads() {
//        ApplicationContext ac = new ClassPathXmlApplicationContext("applicationContext.xml");
//        bookDao bean = (bookDao)ac.getBean("bookDao");
//        bean.save();
//        bookService bookService = (bookService)ac.getBean("bookService");
        bookService.save();
    }

    @Test
    void textBookDaoSave() {
        bookDao.save();
    }
}
# 运行结果
around before...
before...
bookDao save...
after returning...
after...
around after...
记录遇到的问题
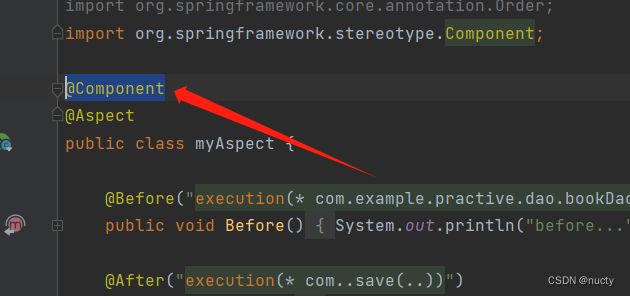
切面类中的方法没有发挥作用(上课老师也遇到了这样的问题),原因如下:
在切面类中没有加@Component标签
解释如下:
# @Component 是 Spring 框架中的一个注解,用于标记一个类作为 Spring 容器中的一个组件。如果没有将切面类标记为 @Component 或者其他类似的注解,Spring 容器就无法扫描到该类,也就无法将其实例化并添加到容器中。

# 在你的示例中,假如没有添加 @Component 注解,即便类上标注了 @Aspect,Spring 也无法识别出来这是一个切面类,并且无法正常工作。因此,需要使用 @Component 注解来标记该类,让 Spring 容器能够正确地扫描和管理它。
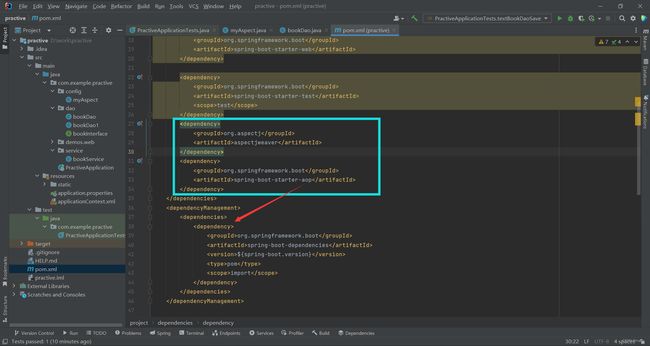
@Aspect标签一直爆红,原因如下:
依赖注入的位置出现错误(将依赖写在了红箭头所指向的位置,正确方式如图所示)。
解释如下:
# 在 Maven 的 pom.xml 文件中, 和  是两个不同的部分。

#  用于管理项目的依赖版本号,它可以集中管理整个项目中所使用的依赖库的版本,避免重复定义和冲突。通常情况下, 部分会包含一个  子节点,用来指定所引入的依赖库的版本号。这样,在其他地方引入相同 groupId 和 artifactId 的依赖时,就不需要再指定版本号,而是直接使用  中定义的版本号。

#  则用于声明项目所依赖的具体库。在  部分,你可以添加项目所需的各种依赖库,并指定相应的 groupId 和 artifactId。

# 简单来说, 是用来管理依赖版本号的,而  是用来声明项目实际所依赖的库。
输出顺序暂时与书上不一致(暂未解决)。
10月11日
对课上所学的SpringMVC做一个总结
首先来说俩个注解
# @RequestMapping 用于将任意HTTP请求映射到控制器方法上。
# @ResponseBody 将java对象转为json格式的数据
# @RestController注解相当于@ResponseBody + @Controller合在一起的作用。
1) 如果只是使用@RestController注解Controller,则Controller中的方法无法返回jsp页面,或者html,配置的视图解析器 InternalResourceViewResolver不起作用,返回的内容就是Return 里的内容。
2) 如果需要返回到指定页面,则需要用 @Controller配合视图解析器InternalResourceViewResolver才行。
   如果需要返回JSON,XML或自定义mediaType内容到页面,则需要在对应的方法上加上@ResponseBody注解。
package com.example.springmvc.controller;

import org.springframework.stereotype.Controller;
import org.springframework.web.bind.annotation.RequestMapping;
import org.springframework.web.bind.annotation.ResponseBody;

@Controller
public class indexController {

    @RequestMapping("/index")
    @ResponseBody
    public String index() {
        return "index";
    }

    @RequestMapping("/test")
    public String test() {
        return "test.html";
    }

}
DOCTYPE html>
<html lang="en">
<head>
    <meta charset="UTF-8">
    <title>Titletitle>
head>
<body>
<h1>这里是中北市场h1>
body>
html>