饭后Android 第三餐-XUI框架(XUI介绍,使用方法,控件使用(九个Button,导航栏,可伸缩布局,顶部弹出框))
饭后Android 第三餐-XUI框架(XUI介绍,使用方法,控件使用(九个Button,导航栏,可伸缩布局,顶部弹出框))
-
- 1.XUI介绍
- 2.使用方法
-
- 1 添加依赖
- 2 初始化XUI设置
- 3.控件使用
-
- 1.Button
-
- 1.Buttonview
- 2.RippleView-带波纹效果
- 3.ShineButton-带动画
- 4.SmoothCheckBox-动画切换
- 5.SwitchIconView-动画切换
- 6.FloatingActionButton-悬浮按钮
- 7.ShadowButton-点击时背景阴影
- 8.RoundButton
- 9.CountDownButton-带倒计时
- 2.导航栏
-
- 1.TitleBar
- 3.可伸缩布局
-
- 1.ExpandableHorizontalFragment(水平伸缩)
- 2.ExpandableSimpleFragment(垂直伸缩)
- 4.顶部弹出框
XUI–GitHub开源网址
1.XUI介绍
作者语录:一个简洁而又优雅的Android原生UI框架,解放你的双手!
XUI涵盖了大部分的UI组件,TextView、Button、EditText、ImageView、Spinner、Picker、Dialog、PopupWindow、ProgressBar、LoadingView、StateLayout、FlowLayout、Switch、Actionbar、TabBar、Banner、GuideView、BadgeView、MarqueeView、WebView、SearchView等一系列的组件和丰富多彩的样式主题。
工具图片展示

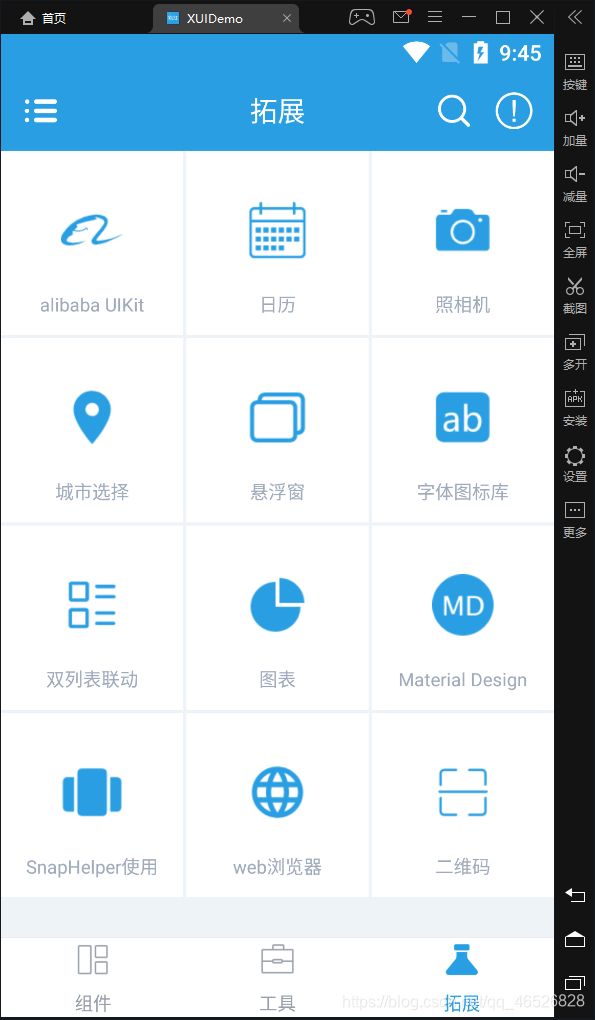
拓展图片展示

这些控件在官方文档中并没有一一提到,官方文档只对常用的一些控件进行了讲解,但是这个XUI框架是开源的,所以这些控件在源码中都可以找到使用方法,其实自己挖掘出的知识会更觉得有成就感,所以如果你对哪个控件感兴趣,但是官方文档又没有的话,那就尽情的去探索吧!
2.使用方法
1 添加依赖
1.在项目的 build.gradle 的 repositories 下添加:
maven { url "https://jitpack.io" }
然后接着在dependencies下添加
(推荐使用)
  //androidx项目
  implementation 'com.github.xuexiangjys:XUI:1.1.5'

  implementation 'androidx.appcompat:appcompat:1.1.0'
  implementation 'androidx.recyclerview:recyclerview:1.1.0'
  implementation 'com.google.android.material:material:1.1.0'
  implementation 'com.github.bumptech.glide:glide:4.11.0'
【注意】如果你的项目目前还未使用androidx,请使用如下配置:
(官方文档给的建议,但是我个人不推荐用这个,一是因为依赖版本低不仅要重构依赖,而且因为这个依赖库缺少一个配置文件会导致运行不了)
//support项目
  implementation 'com.github.xuexiangjys:XUI:1.0.9-support'

  implementation 'com.android.support:appcompat-v7:28.0.0'
  implementation 'com.android.support:recyclerview-v7:28.0.0'
  implementation 'com.android.support:design:28.0.0'
  implementation 'com.github.bumptech.glide:glide:4.8.0'
2 初始化XUI设置
第一步,新建一个 类
然后继承 Application (application会在activity之前运行)
记得!!!在mainfests里注册(不然不会生效)
android:name=".Myapplication"
XUI.init(this); //初始化UI框架
XUI.debug(true);  //开启UI框架调试日志
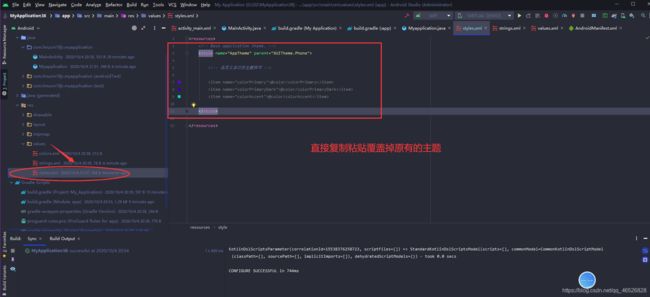
必须设置应用的基础主题,否则组件将无法正常使用!必须保证所有用到XUI组件的窗口的主题都为XUITheme的子类,这非常重要!!
也就是说要给成XUI设定的主题,不然会因为不适配,控件显示不出来或者运行报错
基础主题类型:
- 大平板(10英寸, 240dpi, 1920*1200):XUITheme.Tablet.Big
- 小平板(7英寸, 320dpi, 1920*1200):XUITheme.Tablet.Small
- 手机(4.5英寸, 320dpi, 720*1280):XUITheme.Phone
<style name="AppTheme" parent="XUITheme.Phone">

    <!-- 自定义自己的主题样式 -->

    <item name="colorPrimary">@color/colorPrimary</item>
    <item name="colorPrimaryDark">@color/colorPrimaryDark</item>
    <item name="colorAccent">@color/colorAccent</item>

</style>
当然也可以在Activity刚开始时调用如下代码动态设置主题(我比较喜欢用上面那种,直接改了)
@Override
protected void onCreate(Bundle savedInstanceState) {
    XUI.initTheme(this);
    super.onCreate(savedInstanceState);
    ...
}
3.调整字体库(对字体无要求的可省略)–这里我没有用到就不加了
(1)设置你需要修改的字体库路径(assets下)
//设置默认字体为华文行楷,这里写你的字体库
XUI.getInstance().initFontStyle("fonts/hwxk.ttf");
(2)在项目的基础Activity中加入如下代码注入字体.
注意:1.1.4版本之后使用如下设置注入
@Override
protected void attachBaseContext(Context newBase) {
    //注入字体
    super.attachBaseContext(ViewPumpContextWrapper.wrap(newBase));
}
注意:1.1.3版本及之前的版本使用如下设置注入
@Override
protected void attachBaseContext(Context newBase) {
    //注入字体
    super.attachBaseContext(CalligraphyContextWrapper.wrap(newBase));
}
解决方法:把minSdkVersion改为 23,问题就会解决
(别问为啥是23,因为这是我一个一个试验出来的,乔丹号码)
运行成功,现在添加一个基础控件,在布局文件添加
 <com.xuexiang.xui.widget.button.ButtonView
        android:id="@+id/buttonView"
        style="@style/ButtonView.Green"
        android:layout_width="50dp"
        android:layout_height="50dp"
        android:layout_marginTop="237dp"
        android:layout_marginBottom="69dp"
        app:layout_constraintBottom_toTopOf="@+id/textView"
        app:layout_constraintEnd_toEndOf="parent"
        app:layout_constraintStart_toStartOf="parent"
        app:layout_constraintTop_toTopOf="parent" />

OK,到这一步其实你就已经打开了XUI的这个城堡的大门 ,你可以去看各种堡垒的美景。
3.控件使用
官方组件使用文档传送门
官方文档已经很详细的讲了常用控件的布局文件属性,我在这列举按钮篇和几个其他控件。
1.Button
其实大多button的逻辑代码都一样,几个特殊的按钮我在上一讲有讲到,感兴趣的小伙伴可以;了解
饭后Android 第二餐-复选框CheckBox+开关按钮Switch+单选按钮RadioButton

演示
1.Buttonview
布局文件
    <com.xuexiang.xui.widget.button.ButtonView
        android:id="@+id/buttonView"
        style="@style/ButtonView.Green"
        android:layout_width="50dp"
        android:layout_height="50dp"
        android:layout_marginTop="20dp"
        app:layout_constraintEnd_toEndOf="parent"
        app:layout_constraintStart_toStartOf="parent"
        app:layout_constraintTop_toTopOf="parent" />
逻辑代码
     mButtonView=findViewById(R.id.buttonView);
        mButtonView.setOnClickListener(new View.OnClickListener() {
            @Override
            public void onClick(View v) {
                Log.i("Mainactivity","ButtonView按钮点击了一次");            }
        });
2.RippleView-带波纹效果
布局文件
 <com.xuexiang.xui.widget.button.RippleView
        android:id="@+id/rippleView"
        android:layout_width="200dp"
        android:layout_height="wrap_content"
        android:layout_marginTop="?attr/xui_config_content_spacing_horizontal"
        android:layout_marginBottom="561dp"
        app:layout_constraintLeft_toLeftOf="@id/buttonView"
        app:layout_constraintRight_toRightOf="@id/buttonView"
        app:layout_constraintTop_toBottomOf="@id/buttonView"
        app:layout_goneMarginTop="20dp"

        app:rv_type="simpleRipple">

        <TextView
            android:layout_width="match_parent"
            android:layout_height="100dp"
            android:layout_gravity="center"
            android:layout_marginStart="?attr/xui_config_content_spacing_horizontal"
            android:layout_marginEnd="?attr/xui_config_content_spacing_horizontal"
            android:background="@color/xui_btn_green_normal_color"
            android:gravity="center"
            android:text="单波纹"
            android:textColor="@color/xui_config_color_white"
            android:textSize="20sp" />

    </com.xuexiang.xui.widget.button.RippleView>
逻辑代码
 mRippleView=findViewById(R.id.rippleView);
        mRippleView.setOnClickListener(new View.OnClickListener() {
            @Override
            public void onClick(View v) {
                Log.i("Mainactivity","RippleView按钮点击了一次");
            }
        });
3.ShineButton-带动画
布局文件
  <com.xuexiang.xui.widget.button.shinebutton.ShineButton
        android:id="@+id/shine_button_1"
        android:layout_width="30dp"
        android:layout_height="30dp"
        android:layout_gravity="center"
        android:layout_marginTop="20dp"
        android:src="@android:color/darker_gray"
        app:layout_constraintLeft_toLeftOf="@id/buttonView"
        app:layout_constraintRight_toRightOf="@id/buttonView"
        app:layout_constraintTop_toBottomOf="@id/rippleView"
        app:sb_allow_random_color="false"
        app:sb_big_shine_color="#FF6666"
        app:sb_checked_color="#FF6666"
        app:sb_click_animation_duration="200"
        app:sb_enable_flashing="false"
        app:sb_icon_image="@mipmap/good1"
        app:sb_normal_color="@android:color/darker_gray"
        app:sb_shine_animation_duration="1500"
        app:sb_shine_count="15"
        app:sb_shine_distance_multiple="1.5"
        app:sb_shine_turn_angle="10"
        app:sb_small_shine_color="#CC9999"
        app:sb_small_shine_offset_angle="20" />
图标资源下载
4.SmoothCheckBox-动画切换
布局文件
  <com.xuexiang.xui.widget.button.SmoothCheckBox
        android:id="@+id/scb"
        android:layout_width="40dp"
        android:layout_height="40dp"
        android:layout_margin="5dp"
        android:layout_marginTop="20dp"
        android:paddingTop="10dp"
        app:layout_constraintLeft_toLeftOf="@id/buttonView"
        app:layout_constraintTop_toBottomOf="@id/shine_button_1"
        app:scb_color_checked="@color/xui_btn_green_normal_color" />
5.SwitchIconView-动画切换
布局文件
    <com.xuexiang.xui.widget.button.SwitchIconView
        android:id="@+id/switchIconView"
        android:layout_width="50dp"
        android:layout_height="50dp"
        android:layout_gravity="center"
        android:layout_marginTop="20dp"
        android:padding="8dp"
        app:layout_constraintLeft_toLeftOf="@id/buttonView"
        app:layout_constraintRight_toRightOf="@id/buttonView"
        app:layout_constraintTop_toBottomOf="@id/scb"
        app:siv_disabled_alpha=".5"
        app:siv_disabled_color="#dadada"
        app:siv_enabled="false"
        app:siv_tint_color="#11E6ED"
        app:srcCompat="@mipmap/nz"

        />
图标资源下载
逻辑代码
//变量声明
 SwitchIconView mSwitchIconView;
    int i=1;
 mSwitchIconView=findViewById(R.id.switchIconView);
        mSwitchIconView.setOnClickListener(new View.OnClickListener() {
            @Override
            public void onClick(View v) {
                if (i>0) {
                    mSwitchIconView.setIconEnabled(true);
                    i*=-1;
                }else{
                    mSwitchIconView.setIconEnabled(false);
                    i*=-1;
                }

            }
        });
6.FloatingActionButton-悬浮按钮
布局文件
 <com.google.android.material.floatingactionbutton.FloatingActionButton
        android:id="@+id/floatingActionButton"
        android:layout_width="50dp"
        android:layout_height="50dp"
        app:layout_constraintLeft_toLeftOf="@id/buttonView"
        app:layout_constraintRight_toRightOf="@id/buttonView"

        app:layout_constraintTop_toBottomOf="@id/switchIconView" />
7.ShadowButton-点击时背景阴影
布局文件
  <com.xuexiang.xui.widget.button.shadowbutton.ShadowButton
        android:id="@+id/shadowButton"
        android:layout_width="50dp"
        android:layout_height="50dp"
        android:layout_margin="16dp"
        app:layout_constraintTop_toBottomOf="@id/floatingActionButton"
        app:layout_constraintLeft_toLeftOf="@id/buttonView"
        android:layout_marginTop="20dp"
        app:layout_constraintRight_toRightOf="@id/buttonView"
        app:sb_color_unpressed="@color/xui_btn_green_normal_color"
        app:sb_color_pressed="@color/xui_config_color_red"
        app:sb_ripple_color="@color/xui_btn_blue_select_color"
        app:sb_radius="6dp" />
8.RoundButton
布局文件
 <com.xuexiang.xui.widget.button.roundbutton.RoundButton
        android:id="@+id/roundButton"
        style="@style/RoundButton.Auto"
        android:layout_width="50dp"
        android:layout_height="50dp"
        android:layout_marginBottom="20dp"
        android:text="圆角"
        android:textColor="@color/xui_default_round_btn_white_text"
        app:layout_constraintBottom_toTopOf="@+id/countDownButton"
        app:layout_constraintEnd_toEndOf="@+id/buttonView"

        app:layout_constraintStart_toStartOf="@+id/buttonView"
        app:rb_backgroundColor="@color/xui_btn_green_normal_color"
        app:rb_borderColor="@color/xui_btn_gray_normal_color"
        app:rb_radius="100dp" />
逻辑代码
      mRoundButton=findViewById(R.id.roundButton);
        mRoundButton.setOnClickListener(new View.OnClickListener() {
            @Override
            public void onClick(View v) {
                Log.i("Mainactivity","RoundButton按钮点击了一次");
            }
        });
9.CountDownButton-带倒计时
布局文件
这个有点意思,可以不在java文件里写代码就可以实现点击倒计时
  <com.xuexiang.xui.widget.button.CountDownButton
        android:id="@+id/countDownButton"
        style="@style/Button.Blue"
        android:layout_width="50dp"
        android:layout_height="50dp"
        android:layout_marginBottom="20dp"
        android:text="10s"
        app:cdbt_countDown="10000"
        app:cdbt_countDownInterval="100"
        app:layout_constraintBottom_toBottomOf="parent"
        app:layout_constraintEnd_toEndOf="@+id/buttonView"
        app:layout_constraintStart_toStartOf="@+id/buttonView" />
2.导航栏
官方文档给出了几种, 这里讲一种我常用的吧
1.TitleBar
布局文件
 <com.xuexiang.xui.widget.actionbar.TitleBar
        android:id="@+id/titleBar"
        android:layout_width="0dp"
        android:layout_height="50dp"
        android:background="@color/xui_btn_green_normal_color"
        app:layout_constraintEnd_toEndOf="parent"
        app:layout_constraintStart_toStartOf="parent"
        app:layout_constraintTop_toTopOf="parent"
        app:tb_actionPadding="10dp"
        app:tb_barHeight="65dp"
        app:tb_leftImageResource="@mipmap/back"
        app:tb_leftText="返回"
        app:tb_sideTextPadding="10dp"
        app:tb_titleText="导航栏"
        app:tb_useThemeColor="false" />
 mTitleBar=findViewById(R.id.titleBar);
        mTitleBar.setLeftClickListener(new View.OnClickListener() {
            @Override
            public void onClick(View v) {

                Log.i("Mainactvity","点击返回");
            }
        });
演示
3.可伸缩布局
这里我讲到两个伸缩布局,一个是水平伸缩,一个是垂直伸缩
演示
Mainactivity布局文件,很简单就是两个fragment布局
<?xml version="1.0" encoding="utf-8"?>
<androidx.constraintlayout.widget.ConstraintLayout xmlns:android="http://schemas.android.com/apk/res/android"
    xmlns:app="http://schemas.android.com/apk/res-auto"
    xmlns:tools="http://schemas.android.com/tools"
    android:layout_width="match_parent"
    android:layout_height="match_parent"
    tools:context=".MainActivity">

    <FrameLayout
        android:id="@+id/frameLayout"
        android:layout_width="0dp"
        android:layout_height="100dp"
        android:layout_marginTop="20dp"
        app:layout_constraintEnd_toEndOf="parent"
        app:layout_constraintStart_toStartOf="parent"
        app:layout_constraintTop_toTopOf="parent" />
    <FrameLayout
        android:id="@+id/frameLayout2"
        android:layout_width="0dp"
        android:layout_height="0dp"
        android:layout_marginTop="20dp"
        app:layout_constraintEnd_toEndOf="parent"
        app:layout_constraintStart_toStartOf="parent"
        app:layout_constraintTop_toBottomOf="@id/frameLayout"
        app:layout_constraintBottom_toBottomOf="parent"/>
</androidx.constraintlayout.widget.ConstraintLayout>
public class MainActivity extends AppCompatActivity {


    BlankFragment mBlankFragment=new BlankFragment();
    BlankFragment2 mBlankFragment2=new BlankFragment2();
    @Override
    protected void onCreate(Bundle savedInstanceState) {
        super.onCreate(savedInstanceState);
        setContentView(R.layout.activity_main);

        getSupportFragmentManager().beginTransaction().replace(R.id.frameLayout,mBlankFragment).commit();
        getSupportFragmentManager().beginTransaction().replace(R.id.frameLayout2,mBlankFragment2).commit();

    }
}
1.ExpandableHorizontalFragment(水平伸缩)
布局文件
<?xml version="1.0" encoding="utf-8"?>
<LinearLayout xmlns:android="http://schemas.android.com/apk/res/android"
    xmlns:app="http://schemas.android.com/apk/res-auto"
    android:layout_width="match_parent"
    android:layout_height="match_parent"
    android:gravity="right"
    android:orientation="horizontal">

    <LinearLayout
        android:layout_width="match_parent"
        android:layout_height="58dp"
        android:layout_marginTop="16dp"
        android:gravity="right"
        android:orientation="horizontal">


        <com.xuexiang.xui.widget.layout.ExpandableLayout
            android:id="@+id/expandable_layout"
            android:layout_width="0dp"
            android:layout_height="match_parent"
            android:layout_weight="1"
            android:orientation="horizontal"
            app:el_duration="1000"
            app:el_expanded="false">

            <TextView
                style="@style/TextStyle.Content"
                android:layout_width="match_parent"
                android:layout_height="match_parent"
                android:background="#FD09ECBD"
                android:gravity="center_vertical"
                android:paddingStart="16dp"
                android:paddingEnd="16dp"
                android:text="hello world~"
                android:textColor="@color/xui_config_color_white" />

        </com.xuexiang.xui.widget.layout.ExpandableLayout>
        <androidx.appcompat.widget.AppCompatImageView
            android:id="@+id/expand_button"
            android:layout_width="40dp"
            android:layout_height="40dp"
            android:background="?selectableItemBackgroundBorderless"
            android:layout_gravity="center"
            android:layout_marginRight="10dp"
            android:src="@mipmap/back"
            android:tint="?attr/colorAccent" />
    </LinearLayout>

</LinearLayout>
逻辑代码
public class BlankFragment extends Fragment {

    ExpandableLayout expandableLayout;
    AppCompatImageView expandButton;
    int i=1;


    @Override
    public View onCreateView(LayoutInflater inflater, ViewGroup container,
                             Bundle savedInstanceState) {

        return inflater.inflate(R.layout.fragment_blank, container, false);
    }
    @Override
    public void onActivityCreated(@Nullable Bundle savedInstanceState) {
        super.onActivityCreated(savedInstanceState);

        expandableLayout=getActivity().findViewById(R.id.expandable_layout);
        expandButton=getActivity().findViewById(R.id.expand_button);
        expandableLayout.setOnExpansionChangedListener((expansion, state) -> {
            if (expandButton != null) {
                expandButton.setRotation(expansion * 180);

            }
        });
        expandButton.setOnClickListener(new View.OnClickListener() {
            @Override
            public void onClick(View v) {

                if (i>0) {

                    expandableLayout.toggle();
                    expandButton.setSelected(true);
                    i*=-1;
                }else {
                    expandableLayout.toggle();
                    expandButton.setSelected(false);
                    i*=-1;
                }
                Log.i("expandButton","--------"+i);
            }
        });
    }
}
这里有个报错

解决方法
如图所示,等待同步一会就解决了
运行

2.ExpandableSimpleFragment(垂直伸缩)
布局代码
<?xml version="1.0" encoding="utf-8"?>
<LinearLayout xmlns:android="http://schemas.android.com/apk/res/android"
    xmlns:app="http://schemas.android.com/apk/res-auto"
    android:layout_width="match_parent"
    android:layout_height="match_parent"
    android:orientation="vertical">

    <com.xuexiang.xui.widget.alpha.XUIAlphaTextView
        android:id="@+id/expand_button2"
        style="@style/TextAppearance.AppCompat.Medium"
        android:layout_width="match_parent"
        android:layout_height="wrap_content"
        android:background="#07D5CE"
        android:gravity="center"
        android:padding="16dp"
        android:text="点击切换伸缩状态" />

    <com.xuexiang.xui.widget.layout.ExpandableLayout
        android:id="@+id/expandable_layout_1"
        android:layout_width="match_parent"
        android:layout_height="wrap_content"
        app:el_duration="1000"
        app:el_expanded="false">

        <TextView
            android:layout_width="match_parent"
            android:layout_height="80dp"
            android:background="#7AF66C"
            android:clipToPadding="false"
            android:gravity="center"
            android:text="固定高度"
            android:textColor="@color/xui_config_color_white" />

    </com.xuexiang.xui.widget.layout.ExpandableLayout>

    <com.xuexiang.xui.widget.layout.ExpandableLayout
        android:id="@+id/expandable_layout_2"
        android:layout_width="match_parent"
        android:layout_height="0dp"
        android:layout_weight="1"
        app:el_duration="1000"
        app:el_expanded="false"
        app:el_parallax="0.5">

        <TextView
            android:layout_width="match_parent"
            android:layout_height="match_parent"
            android:background="#1892B1"
            android:gravity="center"
            android:text="全填充"
            android:textColor="@color/xui_config_color_white" />

    </com.xuexiang.xui.widget.layout.ExpandableLayout>


</LinearLayout>
逻辑代码
public class BlankFragment2 extends Fragment {
    XUIAlphaTextView mXUIAlphaTextView;

    ExpandableLayout expandableLayout1;

    ExpandableLayout expandableLayout2;

    @Override
    public View onCreateView(LayoutInflater inflater, ViewGroup container,
                             Bundle savedInstanceState) {
        // Inflate the layout for this fragment
        return inflater.inflate(R.layout.fragment_blank2, container, false);
    }

    @Override
    public void onActivityCreated(@Nullable Bundle savedInstanceState) {
        super.onActivityCreated(savedInstanceState);
        mXUIAlphaTextView=getActivity().findViewById(R.id.expand_button2);
        expandableLayout2=getActivity().findViewById(R.id.expandable_layout_2);
        expandableLayout1=getActivity().findViewById(R.id.expandable_layout_1);


        mXUIAlphaTextView.setOnClickListener(new View.OnClickListener() {
            @Override
            public void onClick(View v) {

                if (expandableLayout1.isExpanded()) {
                    expandableLayout1.collapse();
                } else if (expandableLayout2.isExpanded()) {
                    expandableLayout2.collapse();
                } else {
                    expandableLayout1.expand();
                    expandableLayout2.expand();
                }

            }
        });

    }

}
运行
4.顶部弹出框
调用会从顶部弹出一个弹窗
java代码
public class MainActivity extends AppCompatActivity {
    @Override
    protected void onCreate(Bundle savedInstanceState) {
        super.onCreate(savedInstanceState);
        setContentView(R.layout.activity_main);


        CookieBar.builder(this)
                .setTitle("来自护眼精灵的温馨提示")
                .setMessage("来自Rose-J的提示")
                .setDuration(4000)
                .setBackgroundColor(R.color.xui_btn_green_normal_color)
                .setActionColor(android.R.color.white)
                .setTitleColor(android.R.color.white)
                .setAction(R.string.app_name,View::stopNestedScroll)
                .show();
    }
}
运行
关于XUI就讲到这里啦,还有很多好看的控件,这里就不一一介绍了,感兴趣的小伙伴可以深入了解,也欢迎和博主分享你的新发现哦,感谢您的阅读。
博主为了可以学到更多的Android知识,创建了一个安卓知识交流群,欢迎大佬入群,当然也欢迎和我一样的安卓小白,我们可以一起交流,最重要的是快乐水群,记得定个小目标,冲击bat


